Order fulfillment through Kibo’s Curbside Delivery provides a safer shopping experience for both the customer and store associate, allowing retailers to continue serving their customers while limiting traffic within the store and contact between individuals.
Curbside Delivery is a new order management and fulfillment process with a flexible system of communication between the customer and retailer to enhance the pickup experience. These communications consist of email notifications that direct customers to landing pages to inform the retailer that they are on their way, that they have arrived, and details to identify their car or indicate where they prefer their order to be placed. This keeps both parties in sync and streamlines the pickup process to ensure accuracy. Curbside Delivery operates as its own separate system and so can be utilized as a standalone product or implemented alongside other Kibo solutions.
This guide describes the Curbside Delivery flow in more detail, shows how to manage and fulfill these orders through the Kibo user interface, and explains the notification process.
Curbside-Only vs. Curbside+OMS
This guide differentiates between Curbside-Only and Curbside+OMS versions of Curbside Delivery. The former is the standalone version of Curbside, while Curbside+OMS extends the following Order Management capabilities.
- Inventory Management: Update location inventory levels based on Curbside fulfillment.
- Stock Validation: Curbside-Only implementations only perform front-end validation based on the store associate's UI input, while Curbside+OMS includes more advanced inventory confirmation.
- Transfer Shipments: If order items are not available at the pickup location, a transfer shipment can be created so that those items are shipped to the location from another fulfiller and then provided to the customer. In Curbside-Only implementations, any unavailable items are cancelled. Transfer notifications are sent to the customer in the same manner as they are for BOPIS transfer shipments.
- Additionally, Curbside+OMS implementations can utilize a customer survey option to gather feedback.
The email notifications are the same between implementations. In the Fulfiller Interface, Curbside-Only users will see only tables of Curbside shipment data while Curbside+OMS users will see a new column for Curbside alongside all of their usual data for other shipment types.
Curbside Delivery Flows
Curbside Delivery follows a simple flow – the retailer accepts the order, validates stock, provides any available inventory to the customer, and then the order is complete. If there is no inventory, then the order is rejected and the customer is informed that it has been cancelled due to lack of inventory.
When Curbside is enabled alongside an implementation of Order Management KCCP, it follows the same fulfillment flow as a BOPIS (Buy Online Pickup In Store) shipment including pick lists, stock validation, and transfer shipments in the case of partial inventory.
In both implementations, a series of notifications are received by the customer and retailer during the fulfillment process. These notifications are sent as emails as described later.
Configure Curbside
The Main > Orders and Main > Fulfiller sections of the the Kibo Composable Commerce Platform home navigation are the most relevant to Curbside implementations, as this is where locations and their orders are managed and fulfilled.
The Site settings, which will be used to enable Curbside as well as manage notifications, can be found under System > Settings.
Create Locations
Before Curbside is enabled for either implementation, the retailer locations that will be supporting order fulfillment should be created and configured in the system. Once these locations exist, Curbside can then be activated as described in the Enable Curbside section of this guide.
- Go to the Main > Orders > Locations page.
- Any existing locations are listed, but click Create New Location in the top right to add a new location to the list.
- The following location configurations should be set:
- The location must be set to either Active or Disabled.
- An address and primary contact should be defined.
- The fulfillment types option is where Curbside will be enabled at the location level, as it determines what types of orders can be fulfilled there.
- The hours of operation can be set further down this page.
You may see a link to Location Groups in the homepage, but this does not have any functionality relevant for Curbside-Only users. Curbside+OMS implementations will use location groups for bulk location management and configuration as they do for other shipment types.
Enable Curbside
To use Curbside Delivery, you should activate the email used during the Curbside process and enable the fulfillment method at the location level. You can also implement a customer widget on your storefront if you want to use it.
Enable Curbside Notifications
Curbside Delivery supports notifications for both the store and the shopper to keep them both up-to-date on the delivery process. All of these notifications are enabled by default but can be disabled.
- Go to System > Settings > General > Emails
- Toggle the Curbside notifications you want to use.
For more information about these options, see the General Settings documentation.
Enable Curbside for Locations
Existing fulfillment locations must have Curbside Delivery enabled as a fulfillment type in their location settings in order for that store to support the process.
To enable Curbside at the individual location level:
- Go to Main > Orders > Locations and click a location entry in the table, or select the Edit button from the dropdown menu on the right of the table row.
- Click the Fulfillment Types field and select "Curbside Delivery" from the dropdown that appear.
- Click Save.
Implement the Curbside Widget
Kibo provides a widget that can be added to any storefront via a JavaScript tag to make Curbside Delivery accessible for the shopper. During checkout, the customer is able to select Curbside Delivery as their chosen fulfillment method. The widget also includes editable text fields for the retailer to collect information such as primary and optional alternate pickup contacts.
The widget does not automatically send any data to Kibo – the order information must be sent through a Create Order API call. This widget is also not required; a custom process can be used instead if desired.
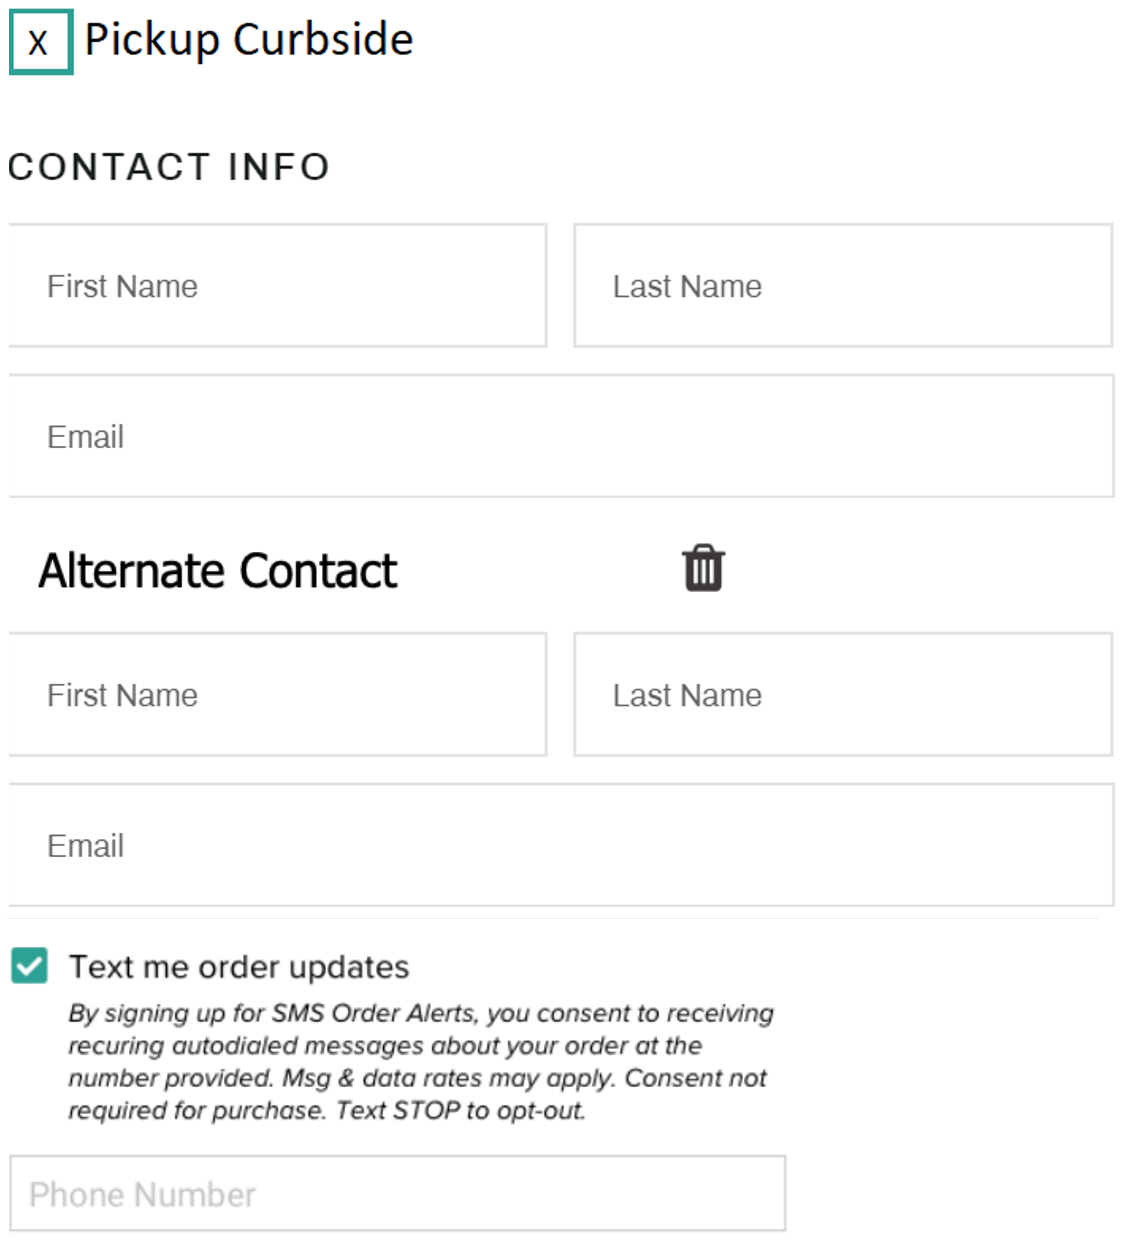
Order Placement
In order to support a standalone Curbside-Only implementation, Kibo accepts the minimal amount of order information from the third-party storefront. For Curbside+OMS, the usual order data can be provided as is for STH and BOPIS shipments, as long as the below details are included.
The existing order model must be adapted to provide the following pieces of information to Kibo:
- Customer Name, Email, Phone Number
- Product Image, Details, Description, UPC #
- Quantity Per Line Item
- Fulfillment Location Details, Store Name/Number, Store Address
- Order Type = Curbside
- Alternate Contact with First/Last Name, Email Address, and Phone Number (if the customer opted into specifying an additional pickup person)
Order Admin
Administrators and customer service representatives can view the Order Admin application to manage Curbside Delivery orders.
- Go to Main > Orders > Orders to view a list of all orders that have been made for every fulfillment location.
- Use the search bar or advanced search filter menu to find specific orders by searching for order numbers, fulfillment location, customer name, phone number, and other variables.
- Click an order to view basic information about the customer and their order once it has been accepted by Kibo. Customer records are created or matched to existing accounts based on their email address.
- You can edit the primary and alternate pickup contact (or add an alternate contact, if one doesn't exist already) in the Order Details.
For standalone Curbside-Only implementations, "shipments" are effectively the same thing as an order but by another name.
- Click the Shipments tab to view more details about the shipments associated with that order, but note that the items cannot be edited or reassigned to another location.
- While it's possible to cancel the shipment or mark it as fulfilled here, the actual fulfillment should be done via the Fulfiller UI instead.
Fulfiller UI
Store associates view and process the orders assigned to their specific location through the Fulfiller User Interface (FFUI). This UI can be found at Main > Fulfiller.
But before a store associate can access the UI and begin fulfilling orders, they should have an account configured.
- Click Settings to view a list of any existing fulfiller users across all stores.
- Each user account lists account information, contact details, and store associations (the locations that they belong to and whose orders they can access). They will be set to a role of either Store Employee or Store Manager.
- To edit the account details, click the green pencil icon on the right.
- After making changes, click the green checkmark to save. Or, use the red trash can to delete the account instead.
- If no store associate accounts have yet been configured or a new one needs to be added, click Create New User in the top right above the user listings to open the new user options shown here.
- Creating a new user will have the same editable fields as editing an existing one.
- The required fields are Username, Password, First Name, and Last Name.
- The optional fields are Phone and Email.
- Click Save when all details have been provided to finish creating the user account and manage their store associations.
Fulfilling Orders
The homepage presents a summary of all orders and a table of Assigned Orders that lists how many are in each step of the fulfillment process. This example is a Curbside-Only implementation; a Curbside+OMS implementation would have additional columns for the other usual shipment types (STH, BOPIS, and Transfer).
- Click a shipment entry or use the search bar to find a specific order based on number, customer name, or other details.
- When viewing the details of an order, whether it was found via the search bar or selected from a table, the basic information is listed that includes the expected pickup date, current status, and item details. The UPC and SKUs are listed along with the expected quantity, which will be confirmed by the store associate.
- Click Continue to Process Order to begin or resume fulfilling an order.
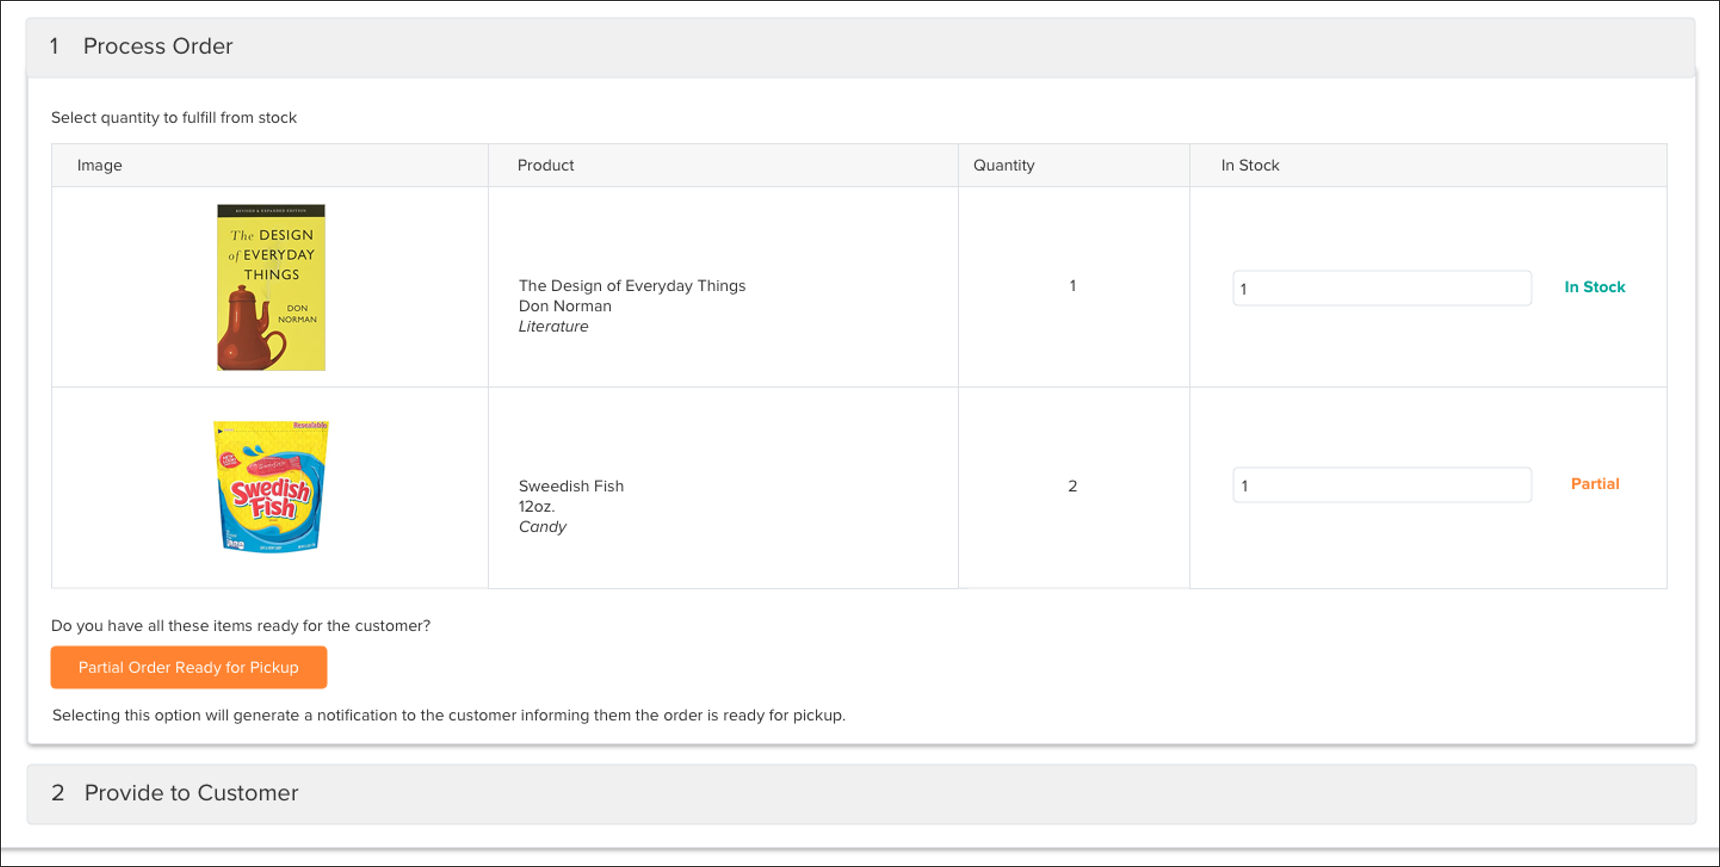
- The first step is Process Order, where stock validation occurs. The expected quantity is shown in the table alongside blank In Stock fields. Retrieve the items and enter how many out of the expected quantity they were able to collect as In Stock.
- If only some items are in stock, then partial pickup will be indicated as shown below and the unavailable items will be cancelled. If there is no inventory in stock for any item in the order, the user will not be able to continue to Provide to Customer and will instead cancel the entire order.
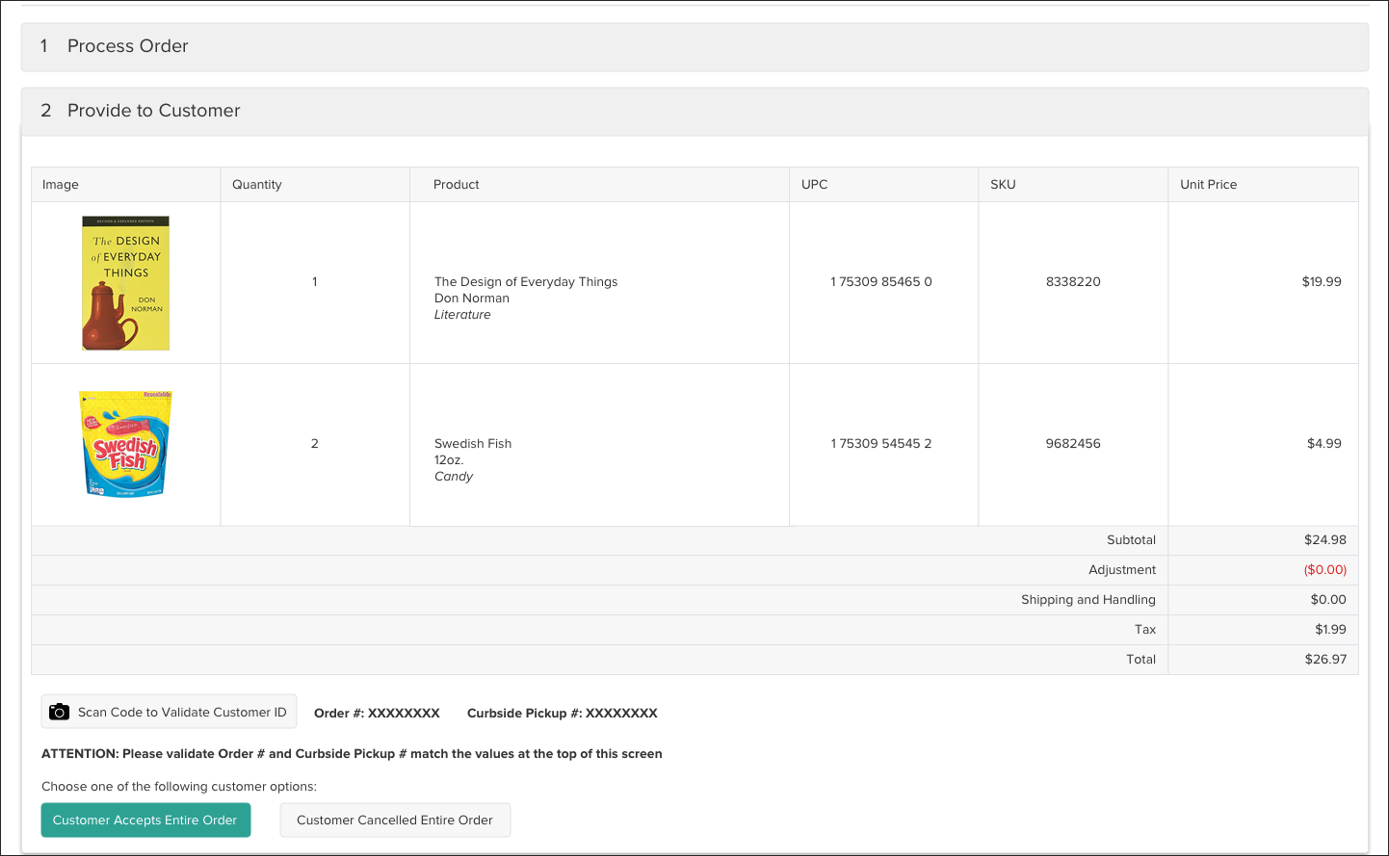
- In the Provide to Customer step, the user confirms whether the customer (either the primary pickup contact or the alternate contact, if one was specified) successfully picked up the order. The customer may provide a QR code that can be scanned to verify their identity by validating their code against the order and pickup number.
- Click either Customer Accepts Entire Order or Customer Cancelled Entire Order to complete fulfillment.
- If the customer accepts the order, it is marked complete. If they do not accept the order, it is cancelled with an automatic reason code of "PURCHASE NOT PICKED UP."
Notifications
Emails allow the customer to generate status updates so that the retailer’s store associates know when to bring the order to the curb. These updates are submitted through links in the notifications. The customer will always receive these email notifications by default.
Kibo provides the default template for notifications so all the administrator needs to do is ensure that the notifications they want are enabled in the site or location settings. However, the templates can be customized if desired through the SiteBuilder UI and pushing Hypr template files to the site theme. When customizing templates, the content must fit within a character limit of 160 characters.
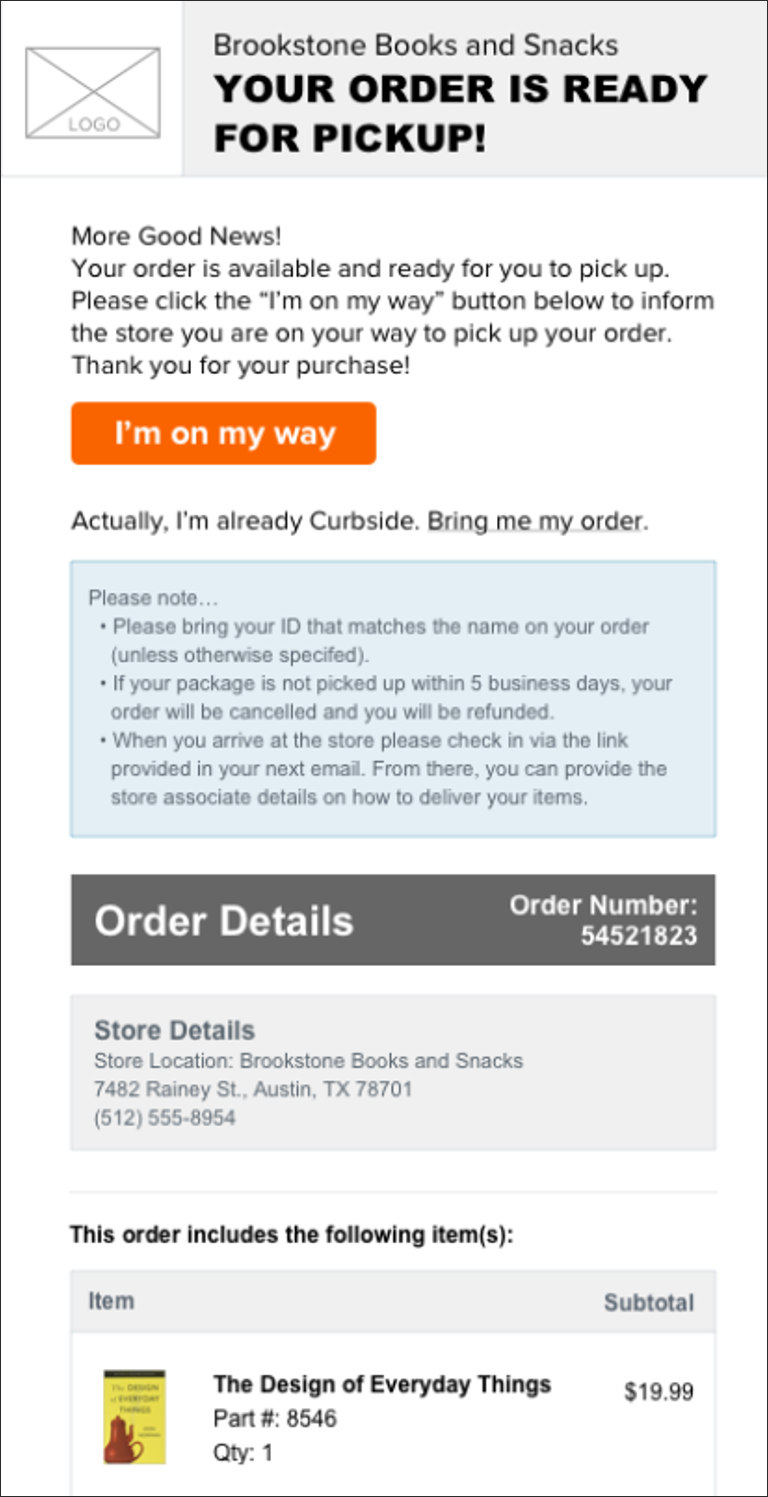
Customer Notifications
The email notification topics that are sent to customers are listed below. If an alternate pickup contact was specified for the order, then these notifications will be sent to the alternate contact in addition to the primary customer.
- Order Confirmation: Triggered when an order is placed and provides pickup instructions including the store location and order items.
- Order Pickup Ready: Tells the customer that their full or partial order is ready for pickup. Triggered when the fulfiller has processed the order and placed it into the Provide to Customer state. This includes a link for the customer to indicate that they are on their way, but also includes an option to say they already arrived in case they did not say that they were in transit earlier (see example on previous page).
- In Transit Confirmation: Triggered when the customer indicates that they are on their way. This includes a link for them to indicate that they have arrived, which leads to a landing page with the retailer's preferred customer identification details and delivery options, such as the car make/model, parking spot number or license plate, and preference for which door or window to place the order in. When the customer arrives at the location and submits this information, the page displays a QR code that the store associate can scan when they bring the order to further validate the customer.
- Order Complete: Triggered whenever the order has been marked as fulfilled.
- Order Cancellation: Triggered whenever the order is cancelled, whether lack of inventory or not picked up.
Retailer Notifications
Retailers receive two notifications that are unique to Curbside during the fulfillment process - Customer In Transit and Customer Arrived. Both are triggered by the customer giving an update to indicate their arrival status, allowing the retailer to know when to take the order to the curb.
- Shipment Assigned / Fulfillment Location Assigned: Triggered when an order is placed and assigned to their fulfillment location, and is thus ready to be processed.
- Customer In Transit: Triggered when the customer indicates they are on their way after their order is ready for pickup. This notification tells the retailer that the customer is en route and should be expected soon.
- Customer Arrived: Triggered when the customer indicates that they have arrived and submitted any identification information about their car or delivery preferences. Upon receiving this notification and customer information, a store associate should take the order to the curb and provide it to the customer.
- Item Cancelled: A cancellation confirmation that is triggered whenever an item is cancelled, such as if the store associate indicates that there was not enough inventory in stock.
If a customer fails to indicate that they are on their way, they are still able to indicate they are curbside from the landing page. In this case, the Customer In Transit notification for the retailer would be skipped and the retailer would immediately receive the Customer Arrived notification.
Customer Surveys
When implemented with Order Management, a survey link can be added within any of the customer email notifications. This link leads to a landing page with a form that lists four prompts about their Curbside Delivery experience, allowing them to rank their satisfaction on a scale from 1 (Strongly Disagree) to 5 (Strongly Agree). These prompts request the customer's opinion about their experience with their store associate, overall experience with their order, whether they intend to use the curbside option again, and whether they were satisfied with the communication and notification process. There is also an optional field for additional feedback, which allows the customer to write a freeform response. Upon clicking Submit, the customer is thanked for providing their feedback.
These surveys are not supported for Curbside-Only implementations.