

Watch: Managing Locations
Learn how to create and configure locations in Kibo
The Locations Page
A list of all locations is displayed on the initial Locations view at Main > Orders > Locations. Click Create New Location in the top right to add a new location to the list, or expand the drop-down actions menu to the right of an existing location to edit, duplicate, or disable it.
Configure a Location
To configure a location:- Go to Main > Orders > Locations.
- Either click Create New Location or select an existing one from the table.
-
Select the Location Type. Locations should only be set to one location type on most implementations.
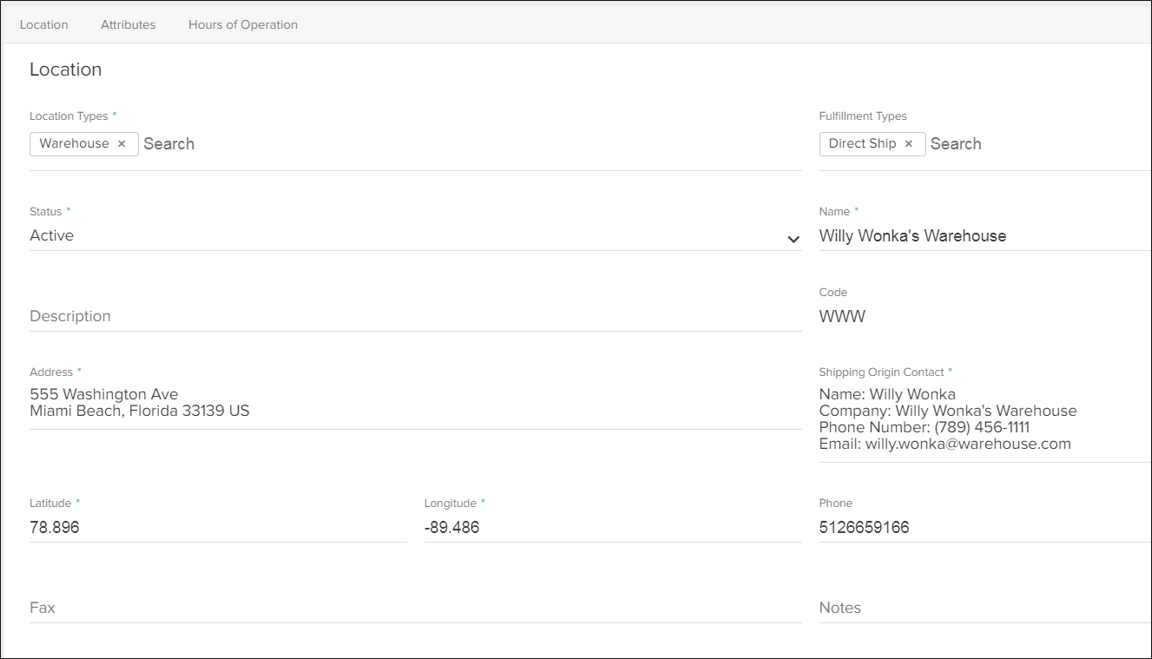
- From the Fulfillment Types drop-down menu, select one or more fulfillment types the location supports.
- Select a Status for the location.
- Enter a Name.
- Enter a Code.
- Enter a physical Address.
- Enter a Shipping Origin Contact and contact Phone.
- Enter the Latitude and Longitude of the location.
- Enter an optional Fax number.
- Enter any internal Notes about this location as needed.
-
Fill out any other optional details that are appropriate for your location:
- Enable inventory tracking, express orders, and transfer shipments and/or consolidation as desired.
- Toggle whether you want to include this location in aggregate inventory levels and location exports.
- Indicate whether the location is integrated with a warehouse or requires a shipping manifest.
- If you are using Estimated Delivery Dates, enter the Time Zone and Processing Time settings for each fulfillment type used by location.
-
If you enter a number of shipments and unit of time (hours, days, weeks, or months) for Fulfillment Capacity, then Order Routing will use this as a constraint when assigning shipments. Once the limit is reached, Order Routing will exclude the location from assignment when evaluating orders for the time period. This does not apply to returns.

- In the Attributes section of the configurations, enter values for any location attributes that you have created.
-
In the Hours of Operation section, define the time zone that this location operates in and set its opening and closing hours. Your site’s theme controls whether this information is exposed on the site storefront.

- If you are using Estimated Delivery Dates, enter the Fulfillment Cutoff Time settings for each fulfillment type used by location. See the linked guide for the full details of these settings.
-
In the Carrier Accounts section, identify which account credentials should be used when that location is fulfilling a shipment with that carrier. Type the account name for each listed carrier and select it from the results that appear.
- This is useful when there are multiple accounts for one carrier that are dependent on location. However, note that more extensive carrier settings such as a default carrier and supported shipping methods are configured at the location group level.
- When shipping labels are being generated, carrier account credentials are automatically inherited from a higher level if not specified in the priority of location, then location group, and then site. The “No Carrier Credentials Selected” option here means that this location will fall back to the location group credentials, and then the default site credentials if no location group credentials are specified.

-
If Fulfillment SLAs are enabled for your implementation, then the SLAs section will be displayed at the bottom of the page. Use the checkboxes to assign one or more SLAs to this location, and use the up and down arrows to adjust the target percentage for each assigned SLA.

- Click Save.
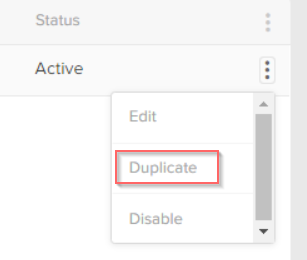
Duplicate a Location
You can duplicate a location to quickly create new locations that are based off of existing locations. To duplicate a location:- Go Main > Orders > Locations.
-
Expand the actions menu next to the location you want to duplicate, and select Duplicate:
- In the new location, complete all required fields according to the Create a Location steps.
Disable a Location
You can disable locations from the same More Actions menu shown above. At this time, there is no way to disable locations in bulk or via an automatic process—you should manually disable each location individually. If you want to disable a location that happens to be set as the default Shipping From location in your site settings, then an error message will be displayed. You should first go to your Shipping Carrier settings and change the Shipping From option to a different location, after which you will be able to successfully disable the original location.Best Practices
- You can select more than one location type if more than one type applies.
- You can select more than one fulfillment type if your location supports both direct ship and in-store pick up.
- Create a unique code for each location.
- Enter latitude and longitude coordinates in numerical format.
For example, latitude = 38.8897 and longitude = 77.0089. - Select the Location supports inventory checkbox if the location maintains merchandise.
Optionally, if you want to be able to fulfill items from the location without sufficient on hand stock select Allow fulfillment without stock on hand. Refer to Inventory Management for more information.