

Standard Return Flow
The default return process allows you to simply accept the customer’s items and select inventory locations to restock any quantity at.Receive Package
To receive a package:- Go to Main > Orders > Returns.
- Click on the return you are receiving the product for.
- In the Items tab, click Receive Package.

- Check the boxes of the return items you are receiving.
- Enter a Qty Received Now to indicate the quantity of the item you received. This must be less than or equal to Qty Returning - Qty Already Received. If all quantity for an item has already been marked received, then this field will not be editable.
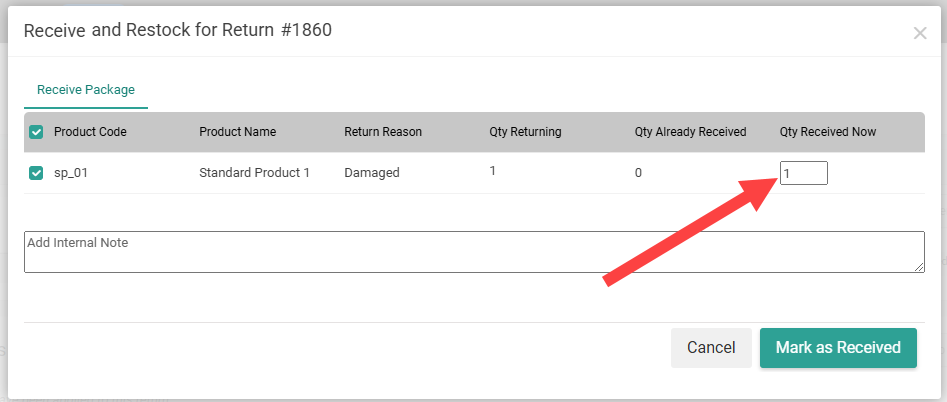
- Enter an optional internal note if needed.
- Click Mark as Received.
Restock Items
The Restock tab displays all items that have been marked as received and allows you to update a location’s inventory with the returned quantity.- Enter a Qty to Restock.
-
Select a Restock Location from the drop-down menu to indicate where that quantity should be restocked at, which may or may not be the return location. Begin typing a location name to filter the results to matching locations.

- Click Submit
With Reverse Logistics
Reverse Logistics enables Order Routing to suggest the best disposition location based on an item’s condition after you receive the package.Receive Package
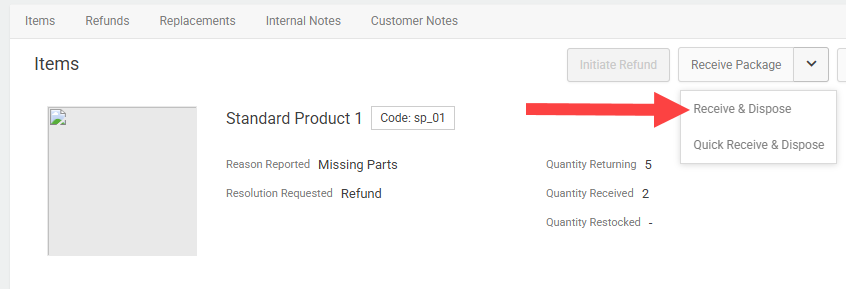
To receive a package with Reverse Logistics:- Go to Main > Orders > Returns.
- Click on the return you are receiving the product for.
- In the Items tab, select Receive & Dispose from the Receive Package drop-down menu.
- Check the boxes of the return items you are receiving.
- Enter a value in Qty Received Now to indicate the quantity of the item you received. This must be less than or equal to the Qty Returning - Qty Already Received. If all quantity for an item has already been marked received, then this field will not be editable.
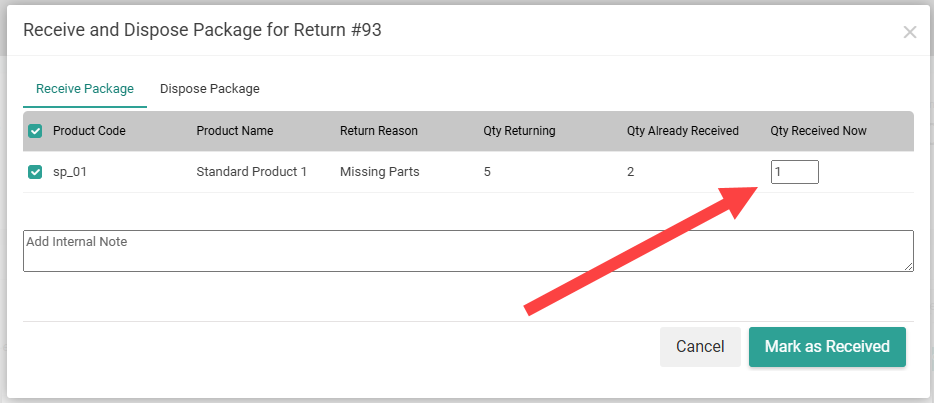
- Enter an optional internal note if needed.
- Click Mark As Received.
Dispose Package
This Dispose Package tab displays all quantities that have been marked as received and allows you to indicate the condition of an item before assigning it to a disposition location.- Check the boxes of the received items you want to manage.
- Enter a Qty to Dispose. This defaults to the quantity that has been received and not yet disposed of.
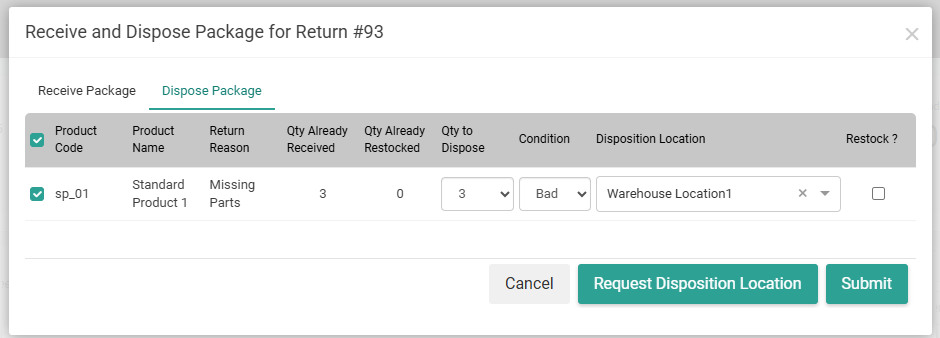
- If you entered a Qty to Dispose that is less than the Qty Already Received, the item will split into an additional row. This allows you to select a different location and/or condition for the remaining quantity if needed.
- Select a Condition from the drop-down menu that best describes each item quantity.
- Select a Disposition Location to indicate where that quantity should be disposed.
- If you want Order Routing to suggest the location, click Request Disposition Location at the bottom. Order Routing will automatically select the best option for every item.
- If you would prefer to manually select a location or override Order Routing’s suggestion, select a location from the drop-down menu instead. Begin typing a location name to filter the results to matching locations.
- Check Restock if you want to add that quantity back to the location. Whether available inventory will be incremented or not depends on the Update On Hand Inventory on Return Restock return setting.
- Click Submit.
Quick Receive & Dispose
Alternatively, Reverse Logistics enables a Quick Receive & Dispose option to more efficiently manage the return if all remaining items and their quantity are being received.- Go to Main > Orders > Returns.
- Click on the return you are receiving the product for.
- In the Items tab, select Quick Receive & Dispose from the Receive Package drop-down menu.
- Select a Condition from the drop-down menu that best describes all items in the package.
- Check Restock if you want to add that quantity back to inventory. Whether available inventory will be incremented or not depends on the Update On Hand Inventory on Return Restock return setting.
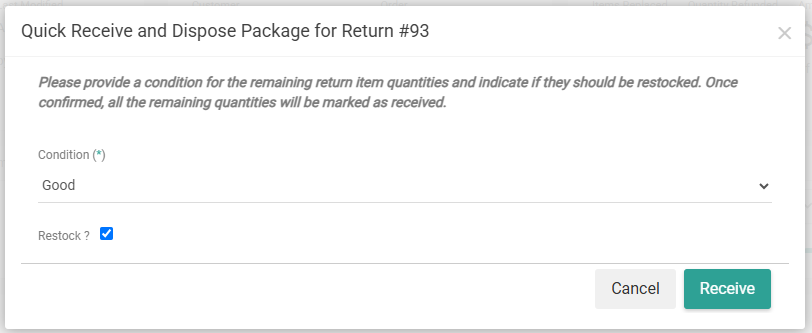
- Click Receive.
- This will open the Dispose Package tab as shown in the previous section, though you will not be able to edit any quantities or item conditions. Review Order Routing’s prepopulated location suggestions and use the drop-down menu to manually select a different location if desired.
- Update the Restock checkboxes for any items as needed.
- Click Submit.