

Scenarios are groups of locations that an order can be routed within, filters that exclude certain locations from different routing cases, and after-actions that control which steps Order Routing takes when determining whether that scenario is a match for shipment items. Fulfillment paths within routing strategies are usually made up of multiple scenarios, ranked by priority. The Order Routing UI has been overhauled in August 2025 with an updated look and feel, as well as some functional changes. This new UI is now available to be enabled in your sandboxes. Contact Kibo Support to opt in and begin using it. All sandbox tenants will receive the new UI on September 3, unless you have specified to opt out by notifying Kibo Support. The UI will also be available for production tenants on September 3. Coordinate with Kibo to migrate your production tenants at any point between September and end of January 2026. Expand the below sections to view the scenario details for the appropriate UI version.Documentation Index
Fetch the complete documentation index at: https://docs.kibocommerce.com/llms.txt
Use this file to discover all available pages before exploring further.
Classic Order Routing UI
If you have not yet upgraded to the new Order Routing UI, then you are using the Classic UI. Here, a single scenario can be used across multiple routes (e.g. Direct Ship, Transfer, and Return).View All Scenarios
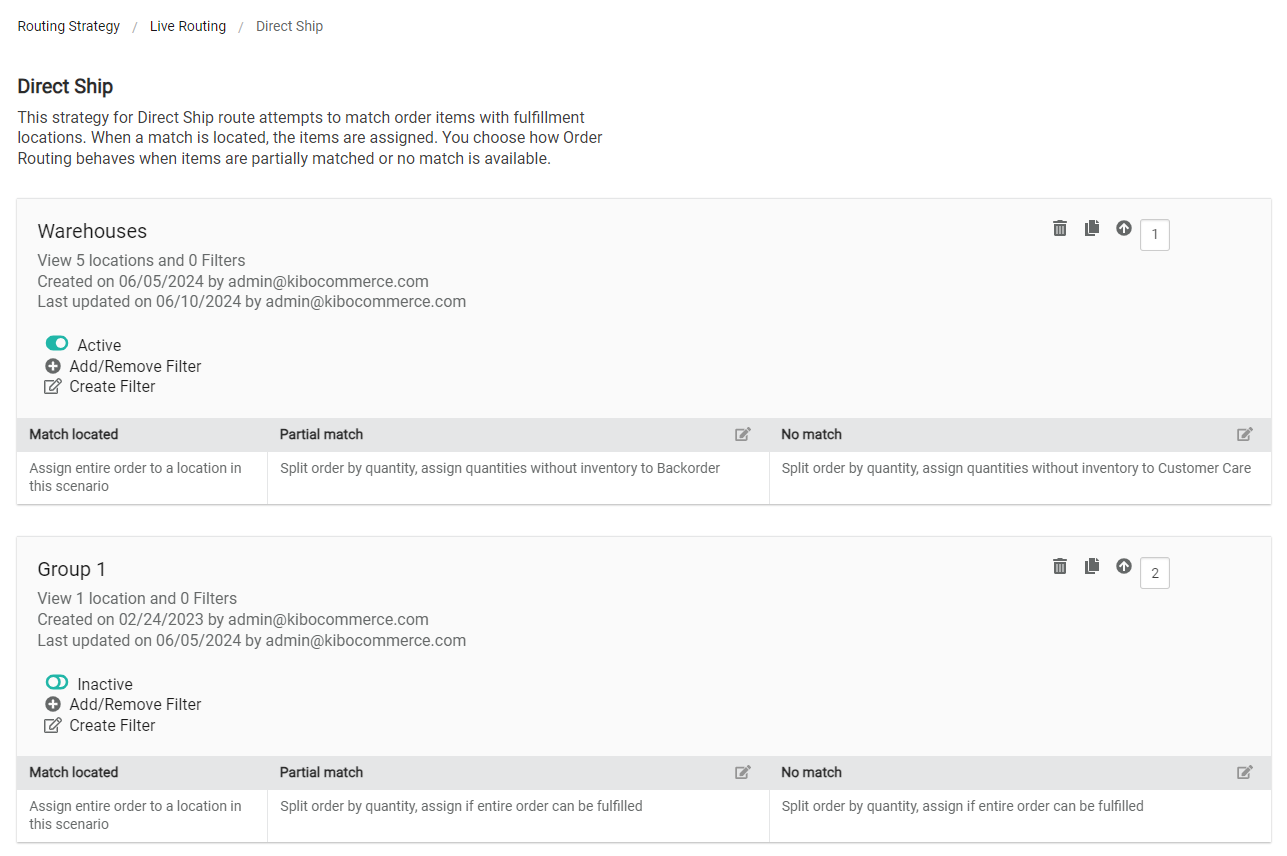
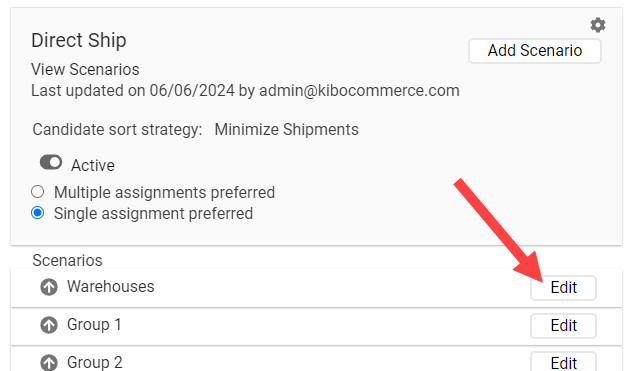
Scenarios are displayed as part of each fulfillment path summary in the routing strategy details. To view more detailed information, click View Scenarios on that page. This will display a list of all scenarios assigned to that path the following information and actions.- Scenario Details: Click the scenario name to view more details and a list of the locations within the scenario.
- Status: Click the status toggle to activate or deactivate this scenario as needed. If disabled, it will be skipped during assignment.
- Filters: Each of the filters applied to the scenario are listed, with the ability to create a new filter or add/remove existing ones.
- After-Actions: Click the icon in the corner of a table column to change the after-actions that should be taken when the scenario is determined to be a match for the order (can fulfill entire order), a partial match (can fulfill some of the order items), or no match (cannot fulfill any items in the order). See the After-Action Logic section for an explanation of these options.
- Use the icons in the top right corner to delete, duplicate, or change the current rank of a scenario.
Create a New Scenario
Begin creating a new scenario from the routing strategy details page by clicking Add Scenario in the top right of the desired fulfillment path.
- Enter the scenario’s Name and Description.
- Configure the primary and secondary sorting options to determine how to prioritize locations within a scenario. In the event of a tie using the primary sort, the secondary sort will determine which location is preferred.
- Rank: Allows manually prioritized locations by numeric rank.
- Distance: Prioritizes locations closest to the shipping address.
- Velocity: Based on maximum LTD (Life to Date) inventory values of the order items at each location candidate. Prioritizes locations with lower values to improve product turn and reduce markdowns by assigning orders to locations with the slowest moving inventory.
- Carrier Cost: Queries FedEx to get the actual shipping cost and prioritize locations with the lowest costs. Note that this does not calculate based on the rates of any other carriers.
- Load Balanced: Distributes order assignments evenly among locations.
- Highest Available Inventory: Aggregates available inventory across all requested items and prioritizes the location with the highest inventory count.
- Lowest Available Inventory: Aggregates available inventory across all requested items and prioritizes the location with the lowest inventory count. This is best used with Reverse Logistics routes, as it allows you to restock items at the locations that need it the most.
- Indicate whether this should be the default scenario that new locations are automatically added to or not.
- Select which route the scenario should be applied to. Selecting multiple routes will copy the scenario to each.
- Click Continue.
- Select one or multiple locations by selecting the checkbox.
- Click Continue.
- Select existing filter(s) if applicable, or click New Filter.
- If creating a new filter:
- Enter new Filter Name.
- Select Type: Set up a custom value or choose an existing data point.
- Select Filter Attribute: The parameter to base the filter on.
- Select Logic.
- Select Comparison Property or Custom Value.
- Click Continue.
- Select the preferred behavior that Order Routing should take in the event of only finding partial inventory for an order available in this scenario.
- Select the behavior that Order Routing should take if there is no available inventory for an order in this scenario.
- Click Save Scenario.
Edit an Existing Scenario
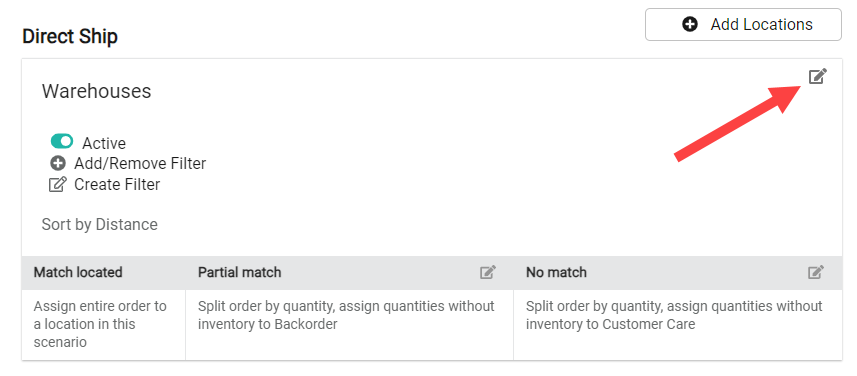
To edit a scenario’s basic information from the routing strategy details:- Either click Edit on a scenario (shown below) or click View Scenarios and then a scenario’s name.
- This will display the scenario details. Click the Edit icon in the top right.
- Enter the scenario’s Name and Description.
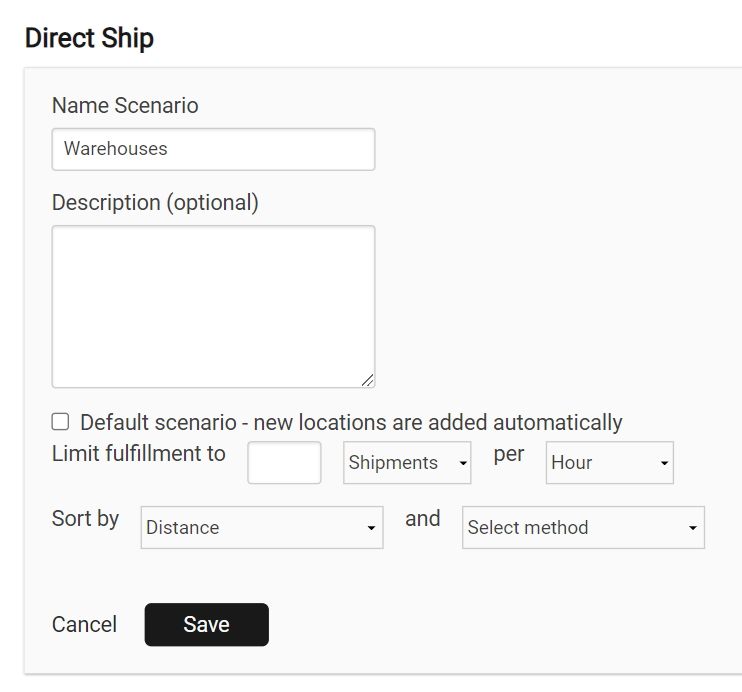
- Indicate whether the scenario is the Default scenario for new locations to be added to.
- Select a Sort for this scenario, such as rank or distance.
- Click Save.
Manage Scenario Filters
While viewing scenario details, click either Create Filter (which will take you to the filter configuration flow) or follow the below steps to update the filters currently assigned to the scenario:- Click Add/Remove Filter.
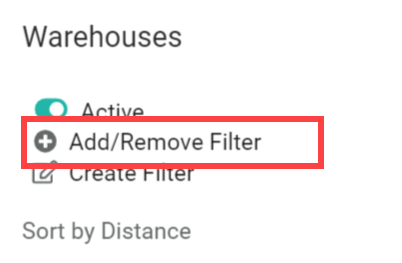
- This will open a pop-up with all existing filters in your routing strategy. Click the checkboxes as needed to select filters you want to add and unselect filters you want to remove.
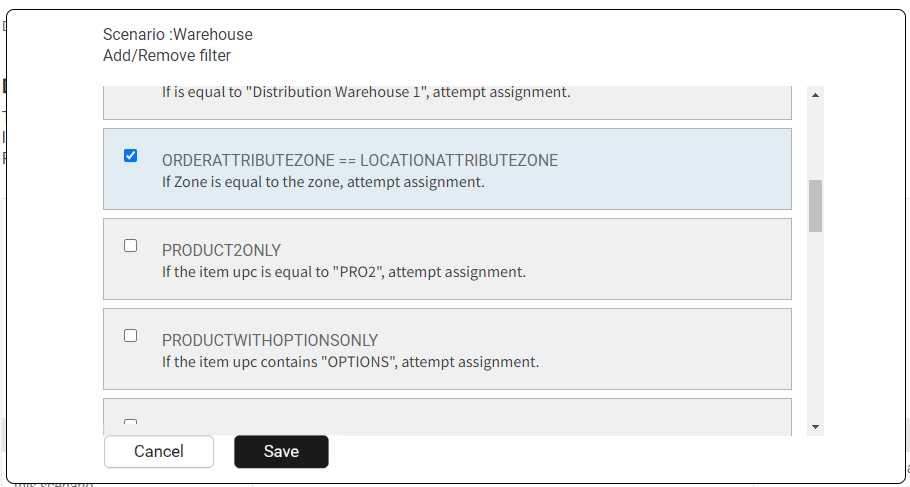
- Click Save.
Manage Scenario Locations
You can both add new locations and edit existing locations while viewing a scenario’s details.Add New Locations
To add new locations to a scenario from the routing strategy details::- Either click Edit on a scenario (shown below) or click View Scenarios and then a scenario’s name.
- Click Add Locations in the top right.
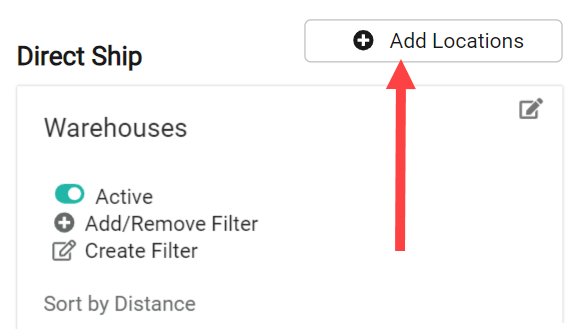
- Select locations from the list by clicking their checkboxes.
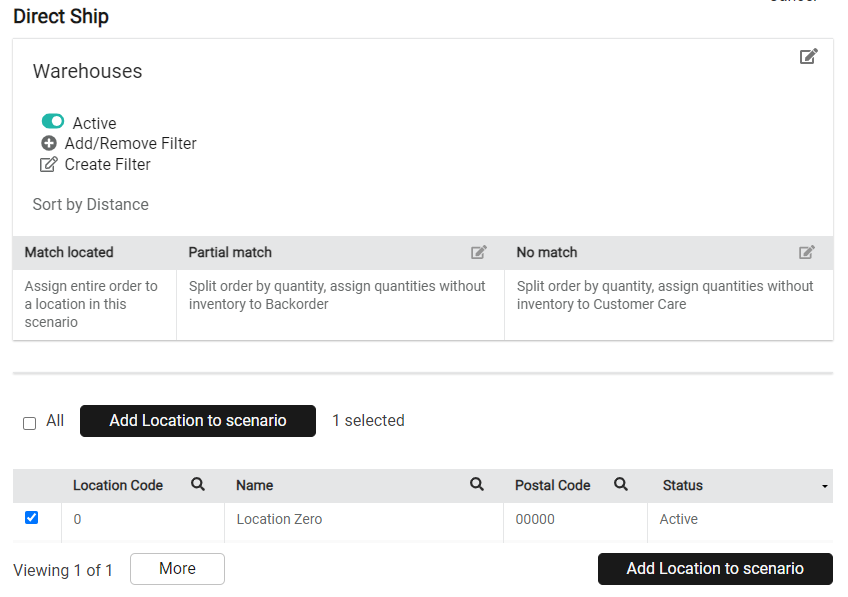
- Click Add Location to Scenario.
Edit Existing Locations
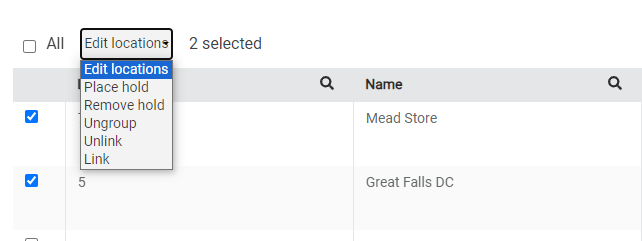
To edit or perform other actions on scenario locations from the routing strategy details:- Either click Edit on a scenario (shown below) or click View Scenarios and then a scenario’s name.
- Select at least one location using the checkbox in the table.
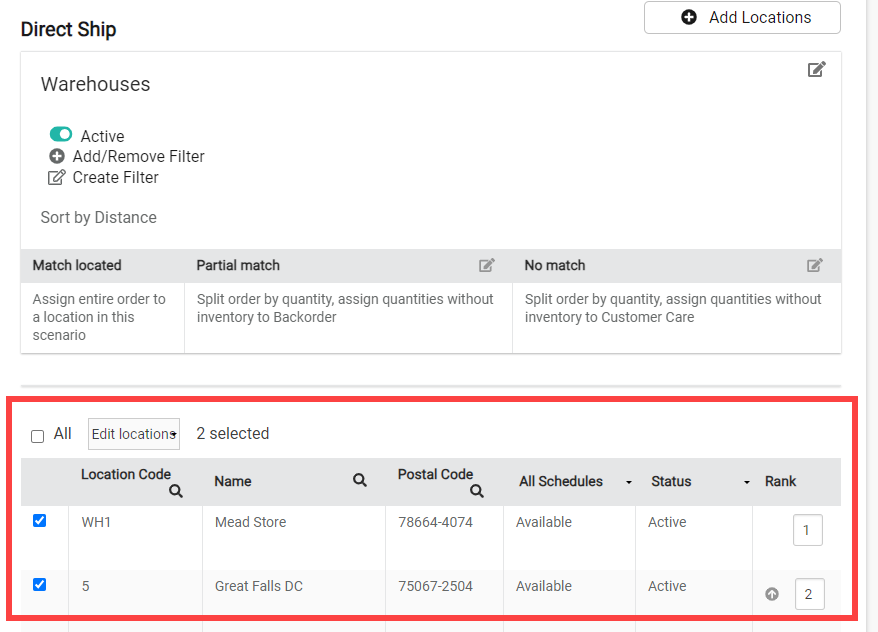
- Expand the Edit locations dropdown and select the action you want to perform on the selected location(s). A common use of this is to place a location on hold (and then remove it from the hold). This will temporarily prevent any shipments from being assigned to that location, without fully deactivating the location.
New Order Routing UI
In the new UI, scenarios are independently associated with each strategy and added directly to that strategy.Configure a Scenario
To begin configuring a new scenario:- Go to the List Strategies page.
- Click the Edit icon on a strategy in the table.
- Scroll down to the Scenarios section and click Add Scenario.
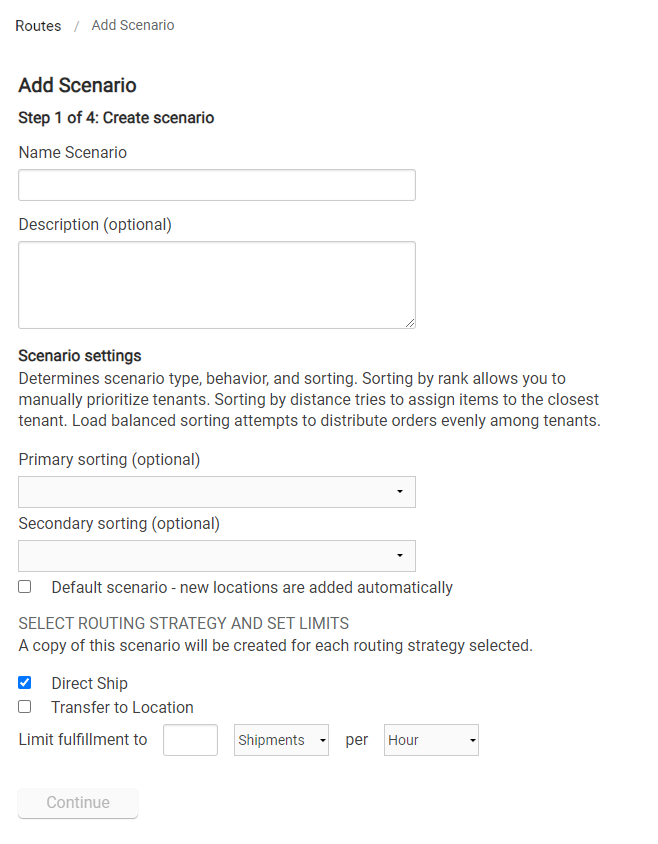
Add Scenario
In Step 1, set the scenario’s basic configurations.- Enter the scenario’s Name.
- Enter an optional Description.
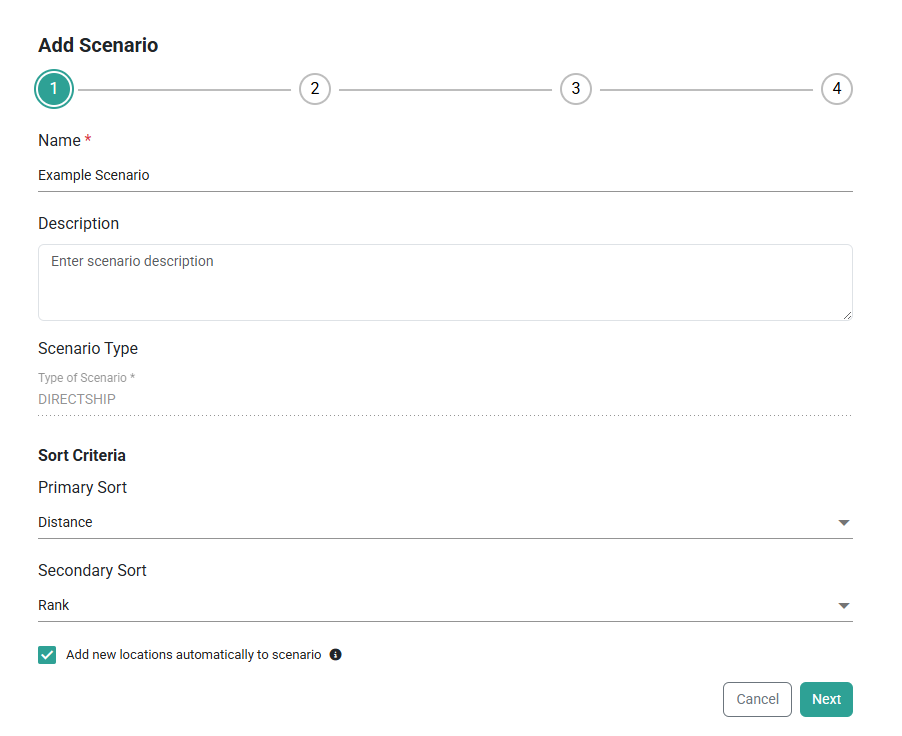
- Configure the primary and secondary sorting options to determine how to prioritize locations within a scenario. In the event of a tie using the primary sort, the secondary sort will determine which location is preferred.
- Rank: Allows manually prioritized locations by numeric rank.
- Distance: Prioritizes locations closest to the shipping address.
- Velocity: Based on maximum LTD (Life to Date) inventory values of the order items at each location candidate. Prioritizes locations with lower values to improve product turn and reduce markdowns by assigning orders to locations with the slowest moving inventory.
- Carrier Cost: Queries FedEx to get the actual shipping cost and prioritize locations with the lowest costs. Note that this does not calculate based on the rates of any other carriers.
- Load Balanced: Distributes order assignments evenly among locations.
- Highest Available Inventory: Aggregates available inventory across all requested items and prioritizes the location with the highest inventory count.
- Lowest Available Inventory: Aggregates available inventory across all requested items and prioritizes the location with the lowest inventory count. This is best used with Reverse Logistics routes, as it allows you to restock items at the locations that need it the most.
- Excess Count: Aggregates Excess inventory across all requested items and prioritizes the location with the highest Excess Inventory count.
- Excess Percentage: Aggregates Excess inventory percentages across all requested items and prioritizes the location with the highest Excess Inventory percentage.
- Indicate whether you want to Automatically add all active locations to Scenario or not using the checkbox. If enabled, all locations that are active in the Admin UI will be applied to this scenario (including any new locations created going forward) and you will not be able to manually add or remove specific locations.
- Click Next.
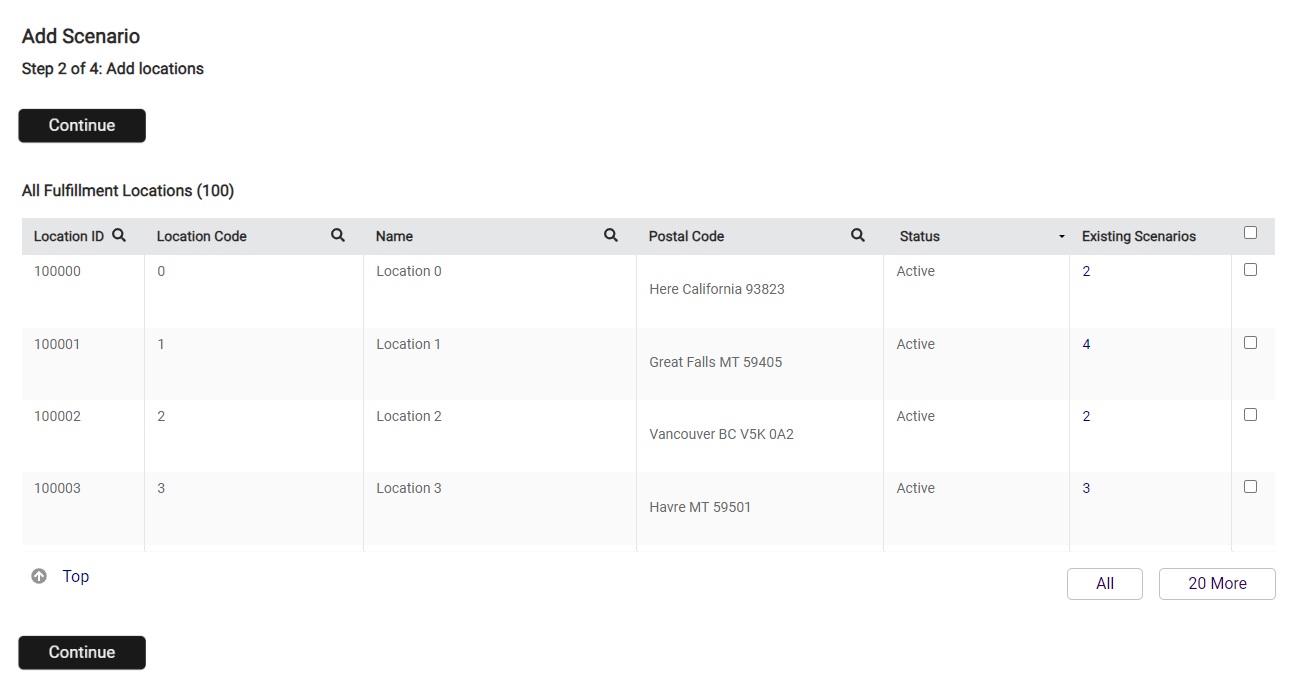
Select Locations
In Step 2, add active fulfillment locations to the scenario to indicate where shipments in this scenario can be assigned. If you enabled Automatically add all active locations to Scenario in the previous step, you will not be able to add any further locations here and can immediately progress to Step 3 instead. For more details about managing routing locations, see the Locations guide.- Select locations from the list by clicking their checkboxes. Use the search bar in the top right to quickly find specific locations if needed.
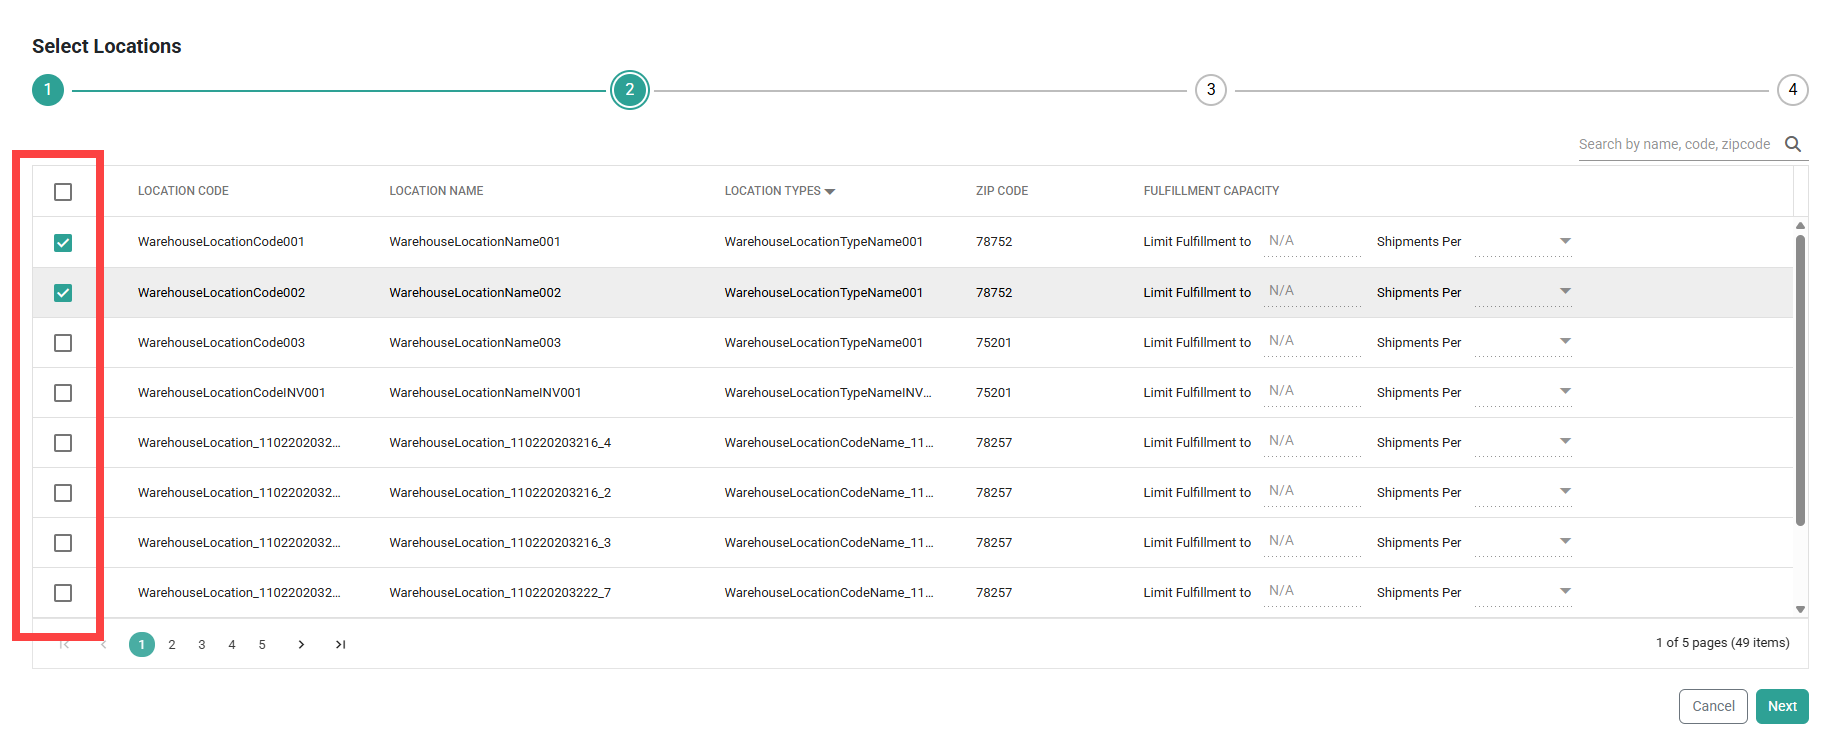
- Click Next.
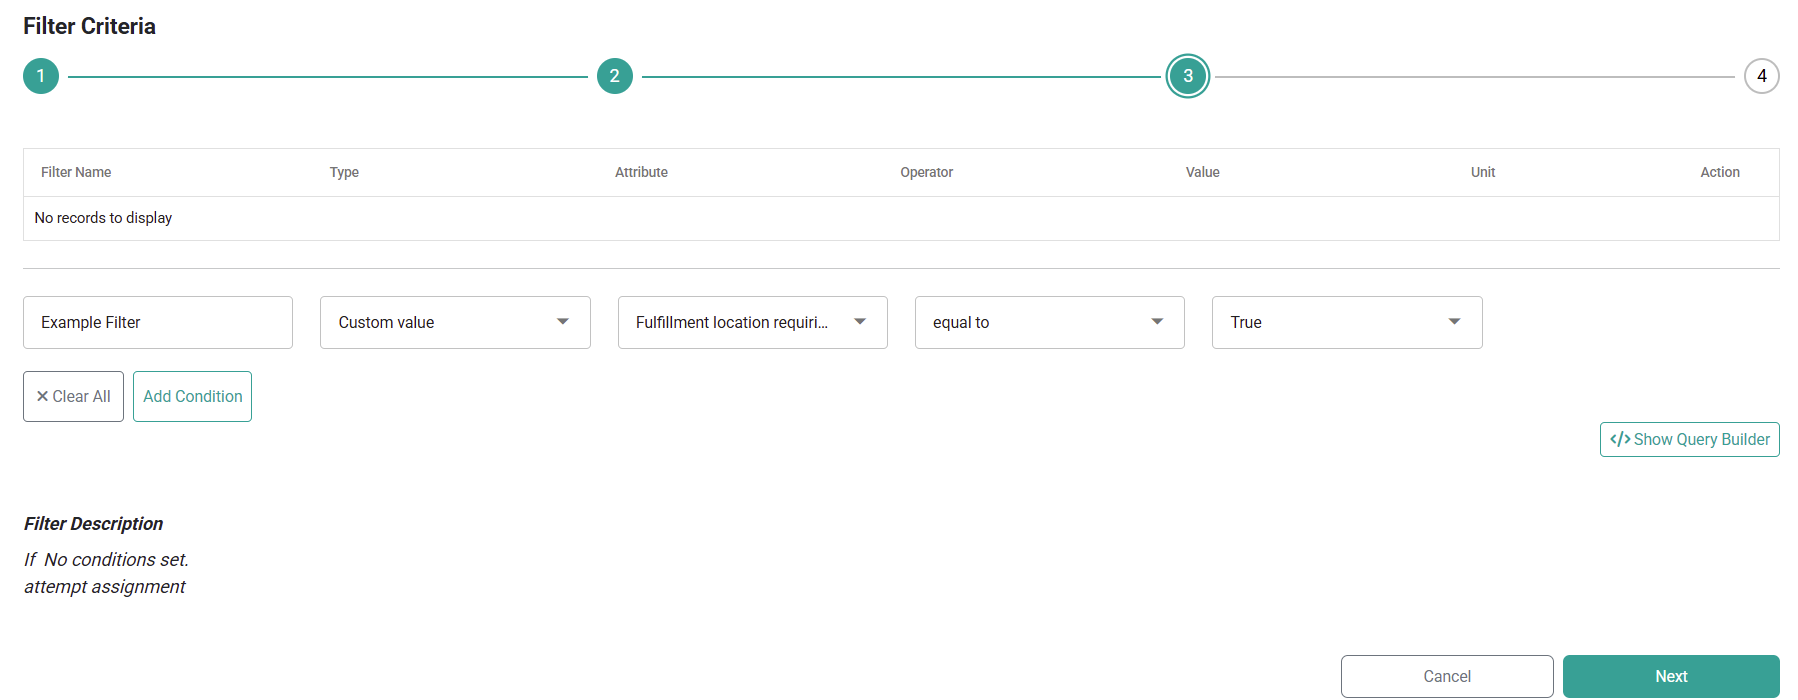
Filter Criteria
In Step 3, fine-tune routing by filtering available locations according to logical conditions. If no filters are desired, just click Continue. For more details about filter logic, see the Filters guide.- Enter a Filter Name.
- Select the Filter Type. This is the type of data that the filter will be based off of, such as a custom value or existing data point.
- Select the Attribute. This is the property that will determine whether the order should be assigned to a scenario with this filter.
- Select the logical operator that should be applied when comparing the attribute. The possible conditions will change depending on the data type of the attribute you selected.
- A field for a Custom Value, Data List, or Second Attribute will be displayed depending on the filter type you selected. Select or enter the appropriate value that the first attribute will be compared against.
- Click Add Condition. This will display the filter in a new table, allowing you to create additional filters as needed.
- Apply one or more Condition (including complex multi-condition filters) to narrow which locations within the scenario should be considered for order assignment.
- Click Next.
Split Shipment Behavior
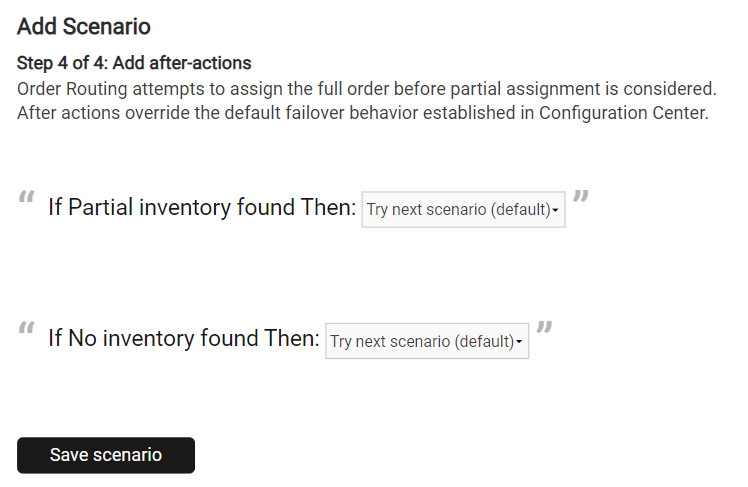
In Step 4, configure the scenario’s after-actions. For more information about after-action behavior and what these options mean, see the After-Action Logic section of this guide.- Select the preferred behavior that Order Routing should take in the event of only finding partial inventory for an order available in this scenario.
- Select the behavior that Order Routing should take if there is no available inventory for an order in this scenario.
- Click Save.
Manage Existing Scenarios
Once a scenario has been created, you can edit its configurations again at any point by clicking the Edit icon from the strategy details page. You can also remove existing scenarios using the Delete icon.Reordering Scenarios
Scenarios within a strategy can be reordered using either of the following methods. Reordering changes are staged and not saved automatically — they are only committed when you click Update Strategy. Clicking Cancel discards all staged changes and reverts to the last saved order.- Drag-and-drop: Each scenario row displays a drag handle icon (⠿) on its left side. Click and hold the handle to drag the scenario to a new position in the list. The list reflows in real time as you drag, and all rank numbers update immediately once the scenario is dropped in its new position.
- Manual rank input: Click the rank badge on any scenario row to make it an editable input field. Type the desired rank number and confirm by pressing Enter or clicking away. The scenario moves to the specified position and all other scenarios resequence accordingly. If an invalid value is entered (out of range, non-numeric, or empty), the field reverts to the current rank.
Scenarios Per Page
The Scenarios list displays an Items per page selector at the bottom of the list, to the left of the page count indicator. Use this to control how many scenarios are shown at once. Available options are 10, 15, 20, 25, and 30; the default is 10. Changing the value refreshes the list and returns you to page 1. Your selected value is retained for the remainder of the session.
After-Action Logic
When a scenario is being considered for assignment, order routing considers the locations within the scenario, the available inventory in each of those locations, and any filters set in the scenario. Then it will determine whether the scenario is a match (can fulfill entire shipment), a partial match (can fulfill some of the items), or no match (cannot fulfill any items). If a full match is found, the shipment will be fully assigned within that scenario. This cannot be reconfigured. In the event of a partial match, in which some inventory is available within the scenario but not the entire shipment, the most common behavior is splitting the shipment. If you don’t want to split shipments, you can choose to try the next scenario, cancel the entire order, assign the entire order to Customer Care, or assign the entire order to Backorder instead.Split Shipment Behavior
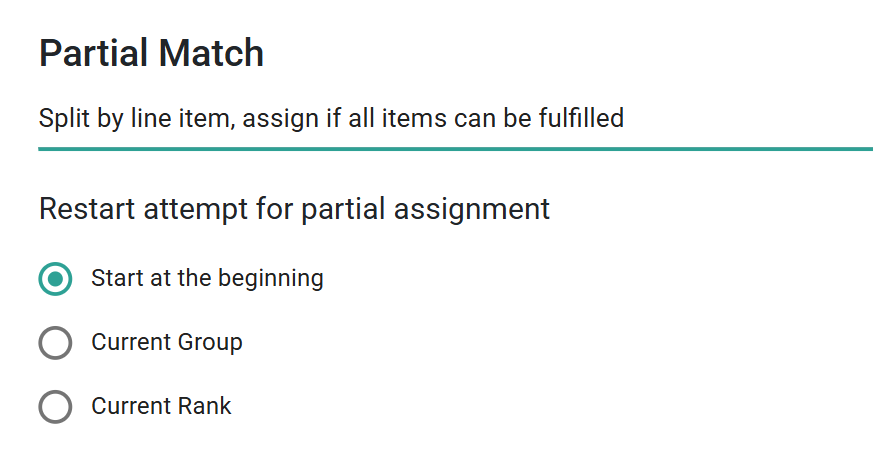
Shipments can be split based on line item or quantity by assigning available items to a location, and the remaining quantity either assigned to another location, cancelled, sent to Customer Care, or sent to Backorder. If split by line item, the entire quantity of a line item will always be assigned to another location. Splitting by quantity would allow some inventory of one line item to be assigned to one location. The following screenshot is from the new UI, but is very similar to the Classic version.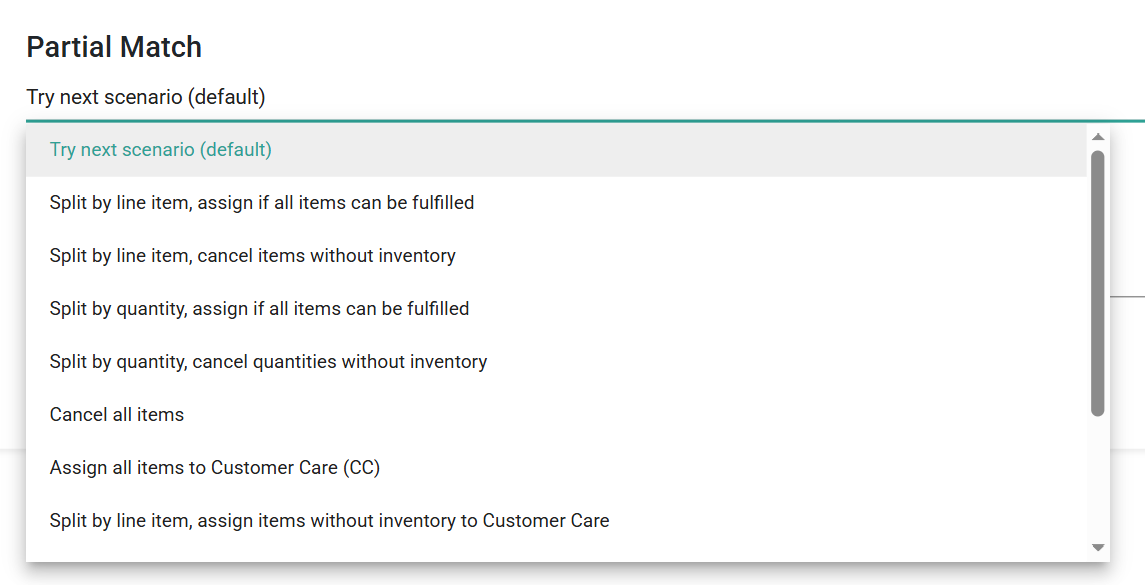
- Start Over at Beginning: Go back to the highest priority scenario and try to assign the remaining items to a location in that scenario.
- Current Scenario: Try to assign the remaining items to any location within the current scenario that the split occurred in. If no location can fulfill the items, then move on to the next scenario.
- Scenario Rank: Try to assign the items to locations in the next scenario of the ranking order.
Ship-to-Home and Delivery Consolidation
If you have locations enabled for STH or Delivery Consolidation, then specific logic determines how to consolidate shipments:- If a full match is not available, Order Routing will check whether any of the suggested routing locations are enabled for consolidation as a partial match. If so, then it will assign the parent shipment to the first consolidation location it finds instead of performing the usual after-action (such as splitting). It will then create transfers to fulfill all of the missing items from transfer-enabled locations. Thus, one single shipment will be sent to the customer from the consolidated location.
- If no locations have consolidation enabled, or there are not locations enabled to provide transfers, then it will proceed with the standard process of splitting the shipment.
- If an item is unavailable or on backorder, then a separate shipment will be created and reassigned for future delivery so that it does not block the available items from being consolidated and shipped. Likewise, any items that can’t be successfully routed or is rejected from the parent location will follow the configured after-action logic such as being canceled or sent to Customer Care as a separate shipment.