

Payment Rankings
Payment rankings determine the sequence in which payments get captured as shipments are fulfilled. These ranks are used by automatic payment capture to determine which payment methods to use first.- For example, suppose you have a $100 order paid using $75 on a Visa credit card and a $25 store credit. A shipment worth $40 is fulfilled.
- If the payment ranking is “VISA, StoreCredit,” then KCCP will capture $40 from the credit card and reauth $35.
- If the payment ranking is “StoreCredit, VISA,” then KCCP will capture $25 from the store credit, then $15 from the credit card and reauth $60.

Refund Rankings
Refund rankings work similarly to payment rankings, except for refunding and crediting payments instead of capturing them. When creating a refund, the system will set default payment amounts based on the rankings starting from the one given highest rank. This is supported for both the one-click Initiate Refund and the manual Issue Refund options in the Order Admin. Auto crediting will refer to refund ranking when it determines which payment methods to credit. If no refund ranking is set, then refunds and credit will be processed in the reverse order of payment ranking. If a payment type that exists for the order is not specified, then it will be processed last. Ranking settings are configured at System > Settings > General > Site.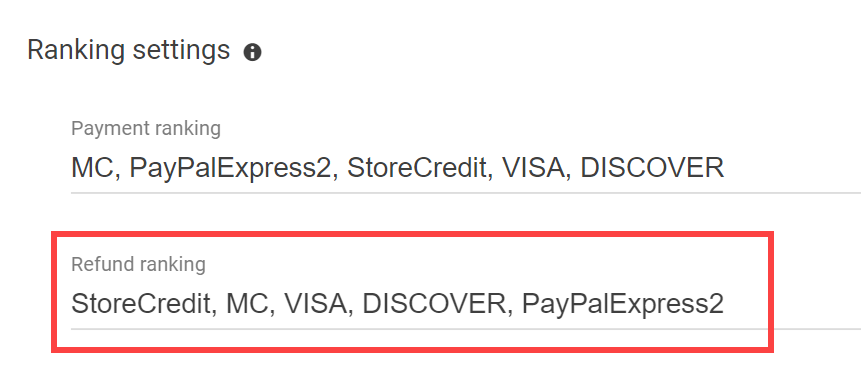
Auto Capture
The Kibo Composable Commerce Platform can capture payments automatically, which is particularly helpful for clients integrated with Order Management. The auto capture amount is calculated by subtracting the already captured amount (if any) from the capturable shipment total.- Go to System > Settings > General > Site.
- Toggle Auto capture on.
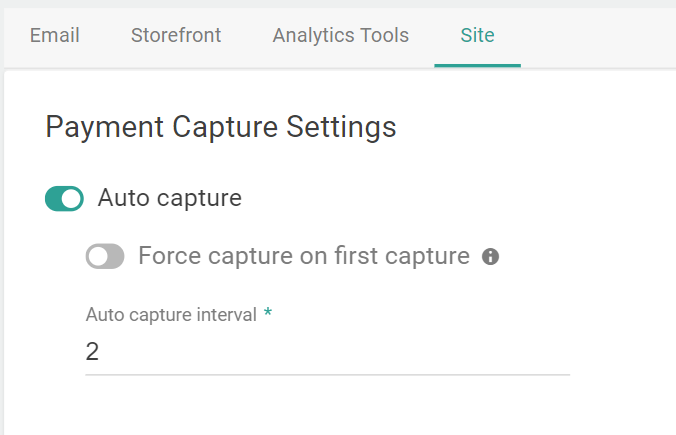
- Set an Auto capture interval to determine how frequently KCCP checks for shipments that are fulfilled and thus ready for their payment to be captured.
- When Auto capture is enabled, then you can also toggle Force capture on first capture on. This will capture the entire order amount (except for any Backorder, Hold or Future shipments) if at least one shipment in the order is ready for capture. In other words, capturing the first shipment of an order will trigger capturing the entire order amount.
Flexible Auto Capture
With flexible auto capture, a shipment status or BPM step can be chosen as the point at which a shipment’s payment becomes eligible for capture, instead of the default fulfillment step. This is useful if you only need a simple change to your payment process, as it does not require creating a custom Business Process Manager (BPM) for more complex payment cases. For example, payment could be set to capture at the Validate Stock step so that an order is not charged until a fulfiller has confirmed that they can fulfill it. This can be configured for Ship to Home and Pickup fulfillment flows (which includes Delivery shipments). This allows you to capture on Future, Backorder and Hold shipment statuses, which are otherwise not included in forced auto capture. Payment for any items in transfer shipments would be captured as part of the parent pickup shipment.- Go to System > Settings > General > Site and locate Flexible Auto Capture Settings. Note that the above toggle for the general auto capture functionality must be enabled in order for flexible capture to be available.

- Select either Shipment State or Shipment Workflow for each fulfillment flow. The dropdown options for shipment state selection now includes Hold as an available option alongside the existing statuses.
- Begin typing in the Ship to Home capture on and Pickup (BOPIS) capture on fields to display a dropdown of shipment status options, and select one or more to enable auto capture on those statuses.
Force Auto Capture
The Force auto capture setting is an alternate version of auto capture that will capture the entire order irrespective of the fulfillment status (except for Backorder, Hold or Future shipments).- Go to System > Settings > General > Site.
- Toggle Force auto capture on. This can be enabled separately from the standard auto capture.
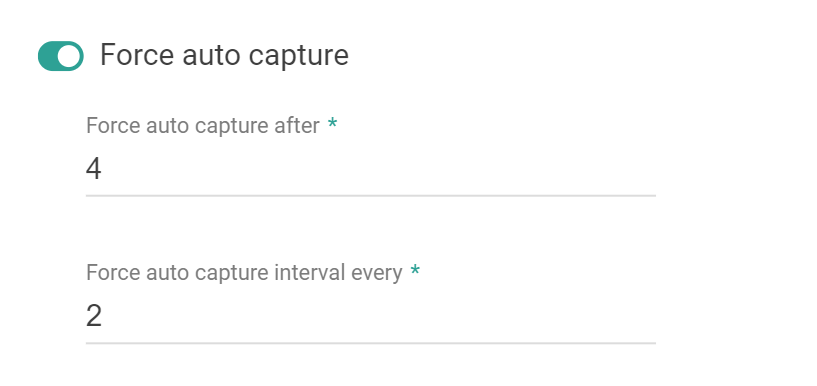
- Enter a number into Force auto capture after to determine when a capture is attempted based on how many days ago the order was submitted.
- Enter a number into Force auto capture interval every to determine how frequently KCCP checks for shipments that are fulfilled and thus ready for their payment to be captured.
Auto Capture with Third-Party Payments
Only one auto capture is made for third-party payments. The full third-party payment amount is captured on the first capture, which occurs when the first shipment of the order is fulfilled. This includes any Backorder, Hold, Future, and Customer Care shipments. For instance, if an order has a $50 Fulfilled shipment and a $50 Ready shipment with a $100 PayPal payment, the full $100 requested on the payment will be auto captured. Some special cases for credits and cancellations:- If an item is on backorder, hold an Admin user will have to manually issue a credit on the PayPal payment if needed.
- If an item is cancelled after capture, an Admin user will have to manually issue a credit on the PayPal payment.
- If an item is cancelled before capture happens, the cancelled shipment amount will be taken out of the capture amount.