

Estimated Delivery Date Calculations
The system calculates both a Fulfillment Date and the total Estimated Delivery Date, which can then be displayed on your storefront’s product details, cart, and checkout pages. These dates are independently calculated for each item in the cart, allowing you to give the shopper the option to ship them separately or not. The rest of this guide will explain how to configure processing times, transfer times, and location cut off times. If you want to quickly refer to parameter definitions and calculations, you can expand the collapsible table below.Parameters and Calculations
| Field | Description |
|---|---|
| Shopper Location | The shopper’s address or zip code, required for any Direct Ship (Ship-to-Home) or Delivery Estimated Delivery Date calculation. |
| Processing Time | Time taken to fulfill shipments at a location, measured in hours. Set separately on locations for Direct Ship, BOPIS, Transfer, and Delivery. |
| Cut Off Time | The start and end times of a given day during which a location is fulfilling Direct Ship, BOPIS, Transfer, and/or Delivery shipments. If the current time or processing time is past the cut off time for the location, the item’s processing time will start the next day that the location is open. This is optional and if not set, it is considered unconstrained. |
| Order Cut Off Date | The latest time at which the order can be placed and still meet the Estimated Delivery Date, calculated as Closing Cut Off Time - Processing Time. |
| Transfer Time | The time taken to transfer a Direct Ship, BOPIS, or Delivery shipment from a Transfer Location to a Receiving Location, measured in hours. Default transfer times between location types can be set up, as well as overrides for transfers between specific locations. |
| Carrier Shipping Time | The time it takes for the carrier to get a Direct Ship order to the shopper, based on their address or zip code. This is determined by the carrier and shipping method, such as FedEx 2 Day shipping. |
| Delivery Time | The time it takes for the delivery provider to get a Delivery order to the shopper. This is determined by the provider. |
| Remorse Period | A period of time, measured in minutes, in which orders can be cancelled before shipments are created. This is configured with the Configurable Shipments feature. |
| Fulfillment Date (Current Inventory) | Current Date + Processing Time |
| Fulfillment Date (Future Inventory) | Last Future Date + Processing Time |
| Fulfillment Date (Current Inventory) with Remorse Period | Current Date + Remorse Period + Processing Time |
| Fulfillment Date (Future Inventory) with Remorse Period | Future Date + Remorse Period + Processing Time |
| Transfer Fulfillment Date | Current Date + Transfer Processing Time |
| Fulfillment Date (with Consolidation) | Current Date + Last (Transfer Fulfillment Date + Transfer Time) across transfer locations + Processing Time |
| Estimated Delivery Date (BOPIS) | Current Date + Processing Time |
| Estimated Delivery Date (Direct Ship / STH) | Fulfillment Date + Carrier Shipping Time |
| Estimated Delivery Date (Delivery) | Fulfillment Date + Delivery Time |
Fulfillment Date
The Fulfillment Date is calculated for each item and fulfillment type. For BOPIS, this is the date that the item is ready to be picked up. For Direct Ship, also known as Ship-to-Home, this is the date that the item is ready to be shipped (i.e. picked up by carrier). For Delivery, this is the date that the item is ready to be Delivered (i.e. picked up by Delivery Provider).- Fulfillment Date for Current Inventory = Current Date + Processing Time
- Fulfillment Date for Future Inventory = Future Date + Processing Time
Estimated Delivery Date
The Estimated Delivery Date for BOPIS shipments will be the same as the Fulfillment Date calculated above, because pickup does not require additional carrier or delivery time.- BOPIS Estimated Delivery Date = Current Date + Processing Time
- STH Estimated Delivery Date = Fulfillment Date + Carrier Shipping Time
- Delivery Estimated Delivery Date = Fulfillment Date + Delivery Time
Special Case: Shipment Consolidation
Transfer times are considered when using shipment consolidation for STH, Delivery, or BOPIS. An additional Transfer Fulfillment Date field indicates when an item is fulfilled at a transfer location and ready to be transferred to the receiving location. This field is not displayed externally, only used in calculations.- Transfer Fulfillment Date = Current Date + Transfer Processing Time
- Fulfillment Date = Current Date + Last (Transfer Fulfillment Date + Transfer Time) across transfer locations + Processing Time
- Note that the last incoming transfer is used for the item displayed on the product details page, while the last incoming transfer across all items is used on the cart and checkout pages.
Configure Delivery Date Parameters
This section describes how to configure a location’s processing and cut off times, as well as the transfer times between specific locations and/or location types.Set Processing Times
The Processing Time is the time taken at a location to fulfill shipments, measured in hours. This can be set at the location level for Direct Ship, BOPIS, Transfer, and Delivery fulfillment types. How Processing Time Works Across Multiple Days Processing time is measured in hours and may span multiple days depending on when the location is open. The system automatically accounts for a location’s operating schedule when calculating how long processing will take.- Processing continues across open days. If a location cannot complete processing within the same day, the remaining hours carry over to the next day the location is open.
- Closed days are skipped. If a location is closed on weekends or holidays, those days are not counted toward processing time.
- Orders placed after cut off start processing the next open day. If an order comes in after the location’s cut off time, processing begins the following business day.
- Remorse period adds to processing start. If a remorse period is configured, processing won’t begin until that period ends.
| Day | Hours Available | Hours Used | Hours Remaining |
|---|---|---|---|
| Thursday | 5 | 5 | 15 |
| Friday | 5 | 5 | 10 |
| Saturday | Closed | 0 | 10 |
| Sunday | Closed | 0 | 10 |
| Monday | 5 | 5 | 5 |
| Tuesday | 5 | 5 | 0 — Processing Complete |
Note: To have a behavior where processing time will always decremented in 24-hour blocks regardless of location cutt off hours can be renabled via the tenant attribute
EDD_24_HOUR_PROCESSING_HOURS_LOGIC_ENABLED=true. Contact Kibo Support if you need this enabled for your tenant.- Go to Main > Orders > Locations.
- Either select an existing location or create a new location.
- Enter the processing time in hours for Direct Ship, In Store Pickup, Delivery, and/or Transfers as applicable depending on what your implementation is enabled for. The Transfers time entered here is the processing time only at the transfer location. \
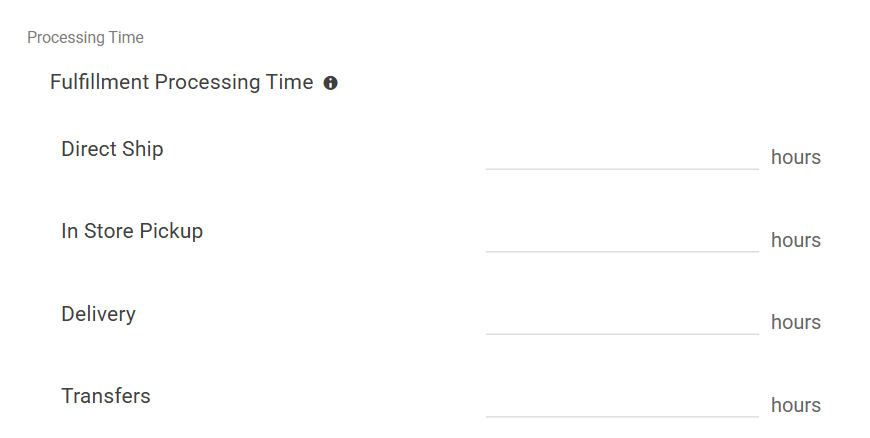
- Click Save.
Set Transfer Times
The Transfer Time is the time taken to transfer a shipment from a Transfer Location to the Receiving Location. For example, if the Transfer Time between Location A and Location B is three hours, then that means it takes three hours to transfer a shipment from Transfer Location A to Receiving Location B. The system will consider transfer times set up between location types as defaults. Overrides can be set up between specific locations, in which case the system will apply the override instead of the default. For instance, you could set a default time for transfers between two location types (a Warehouse and a Store) and override if needed between two specific locations (Location A and Location B). This will apply to all fulfillment types.- Go to System > Settings > Transfer Times.
- Click the Default Transfer Times by Location Type tab. This tab displays a list of any existing location type-based transfer times, indicating the “from” and “to” location types and their associated time period.
-
Click Add Transfer Time.
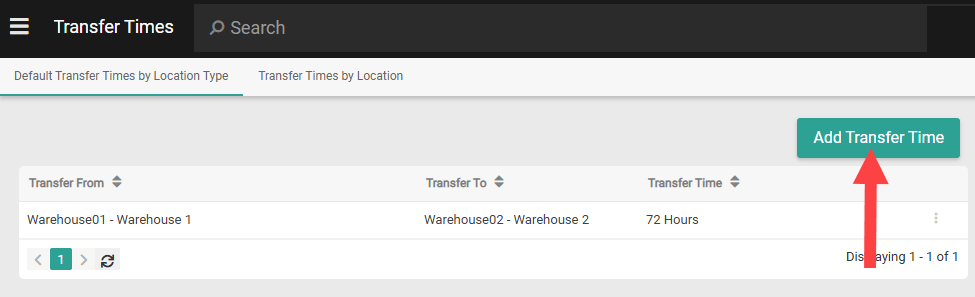
- Select the From Location Type and the To Location Type. While you can’t duplicate a setting for the same permutation (such as “from: Warehouse, to: Store”), the inverse scenario will still be valid if a setting for it doesn’t already exist (“from: Store, to: Warehouse”).
-
Enter the Transfer time (a whole number that is at least 0) and Transfer time unit (hours or days). If you enter the time in days, it will be converted into hours upon saving.

- Click Save.
- Repeat Steps 3-6 for any other location type defaults you want to add.
- If you need to set up overrides, click the Transfer Times by Location tab. This tab displays a list of any existing location-based transfer times, indicating the “from” and “to” locations and their associated time period.
-
Click Add Transfer Time.
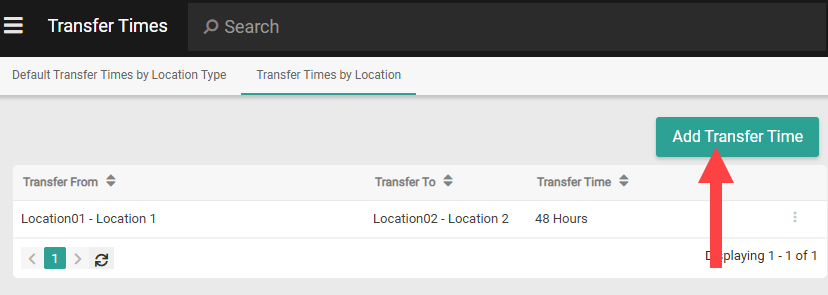
- Select the From Location and the To Location. While you can’t duplicate a setting for the same permutation (such as “from: Austin, to: Boston”), the inverse scenario will still be valid if a setting for it doesn’t already exist (“from: Boston, to: Austin”). While locations can only be set to one location type by default, certain implementations may be enabled to set multiple location types. If this is the case, the Estimated Delivery Date calculation will only consider the first set location type while determining the location’s transfer time.
-
Enter the Transfer time (a whole number that is at least 0) and Transfer time unit (hours or days). If you enter the time in days, it will be converted into hours upon saving.

- Click Save.
- Repeat Steps 9-12 for any other location overrides you want to add.
Set Cut Off Times
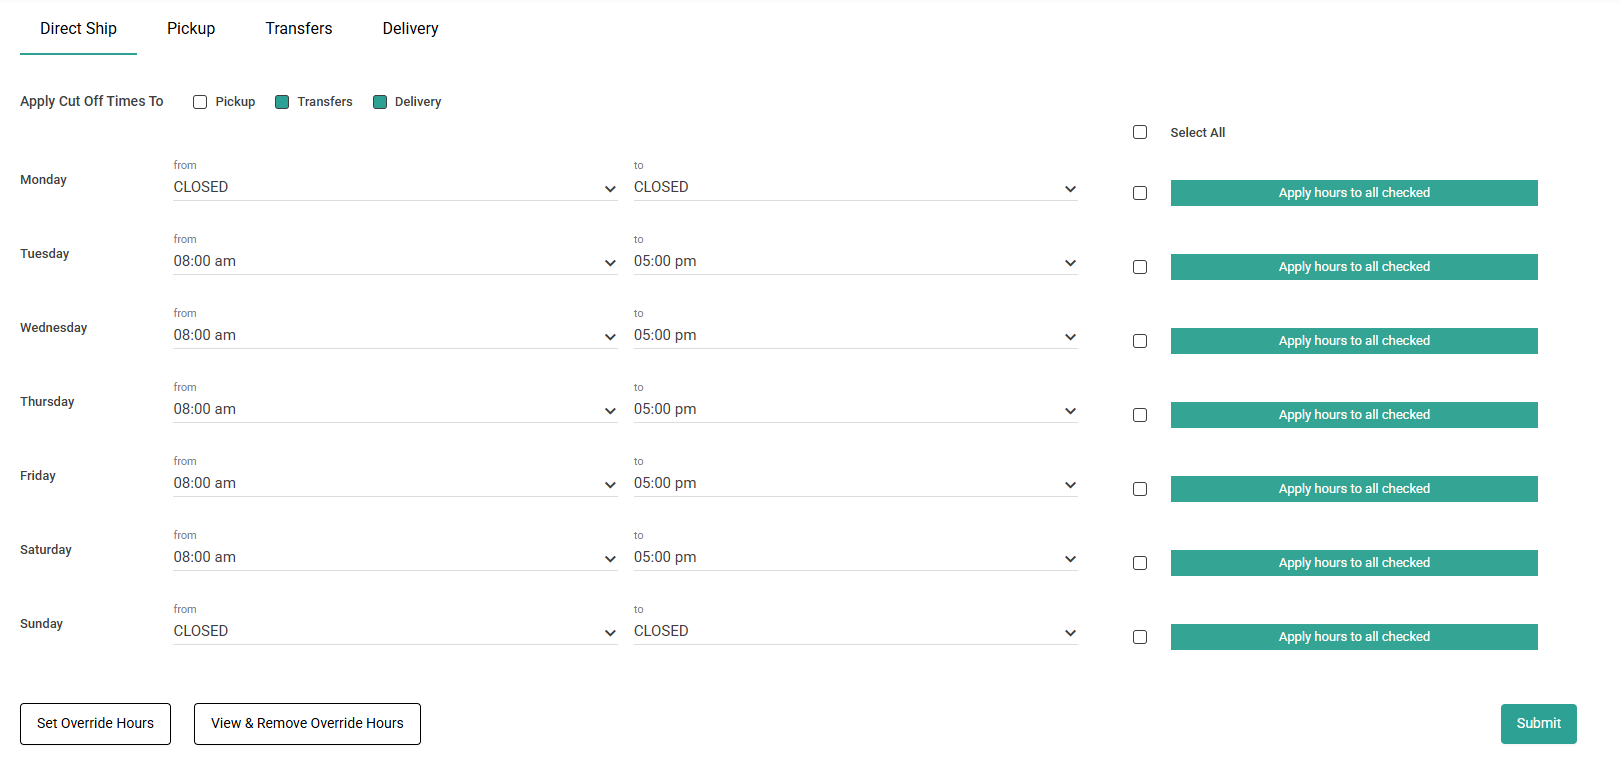
Fulfillment Cut Off Times define when a location is able to fulfill on each given day of the week, and may or may not be the same as the location’s Hours of Operations (which are a different section of the location configurations). You can set daily Direct Ship, BOPIS, Transfer, and Delivery cut off times in the location configurations with calendar-based overrides. Fulfillment Date and Estimated Delivery Date calculations factor in these cut off times. If the current time or processing time is past the cut off time for the location, the item’s processing time will start the next day that the location is open. Additionally, the system will use this information to calculate an Order Cut Off Date (Closing Cut Off Time - Processing Time). This indicates the latest time at which the order can be placed and still meet the Estimated Delivery Date, allowing you to display messaging such as “Receive by February 28th if order placed by 3:00 PM today” on your storefront.- Go to Main > Orders > Locations.
- Click a location or create a new one.
- In the Fulfillment Cut Off Time section, set the Time Zone.

- Click the tab of the fulfillment type you want to configure hours for.
- If you want your settings here to apply to any other fulfillment types as well, such as if the location operates with the same time block for Direct Ship and Pickup, then check the appropriate options in Apply Cut Off Times to setting. This will copy your selections to the checked fulfillment type.
- For at least one day of the week, set the from and to times (which may also be Closed instead of a specific time of day) to indicate when the location is actively fulfilling orders. If any days are left blank, that means that there is no cut off for that day.
- If you want to set the same times across multiple days, then you can set the times for one day and check the others you want to copy to using the boxes on the right. Then click Apply hours to all checked.
- If you want to set the same times across multiple days, then you can set the times for one day and check the others you want to copy to using the boxes on the right. Then click Apply hours to all checked.
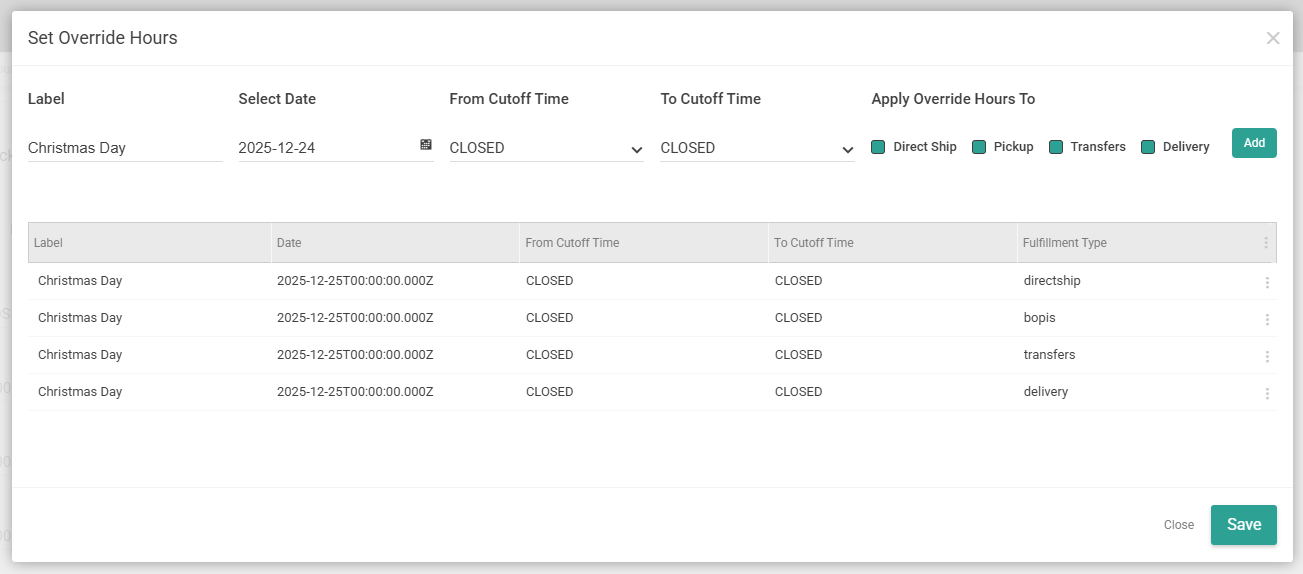
- If you want to set different cut off times on specific calendar dates, such as holidays, click Set Override Hours.
- Enter the From and To times, and check which fulfillment types you want these times to. Click Add.
- Repeat these steps to add more override dates as needed. You can remove any by clicking the X on the far right.
- Click Save.
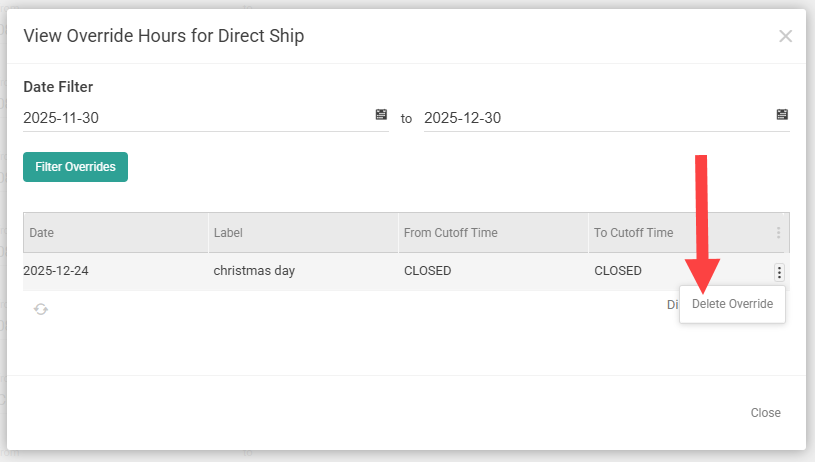
- Click View & Remove Override Hours to see a list of all existing overrides and filter the list by date. To remove one, expand the drop-down menu on the far right of the table row and click Delete Override.
- When you are done, click Submit in the bottom right of the Fulfillment Cut Off Time section.
- If you are done configuring all location configurations, click Save in the top right of the page.
Shipping Extensibility Applications
In order for Kibo to retrieve estimated transit times and delivery windows from your shipping carriers or delivery providers, you must install the appropriate STH or Delivery application. The Delivery application requires you to have a Delivery Solutions account configured with locations and their time windows.Install or Develop Applications
If you want to use either of Kibo’s default applications, ask Kibo Support to install it for you and skip to the Configure Carriers section. Alternatively, you can develop your own application(s) based on our open source code. This is an Estimated Delivery Date-specific variant of a Shipping Extensibility application. To do so:- Log in to Dev Center.
- Go to Develop > Applications.
- Click Create Application.
- Enter an appropriate name and ID, such as the following examples.
- Name: “STH EDD Extensibility” or “Delivery EDD Extensibility”
- Application ID: “STHEddExtensibility” or “DeliveryEddExtensibility”
- Click Save.
- While viewing the new application, click Packages > Capabilities > Add Capability.
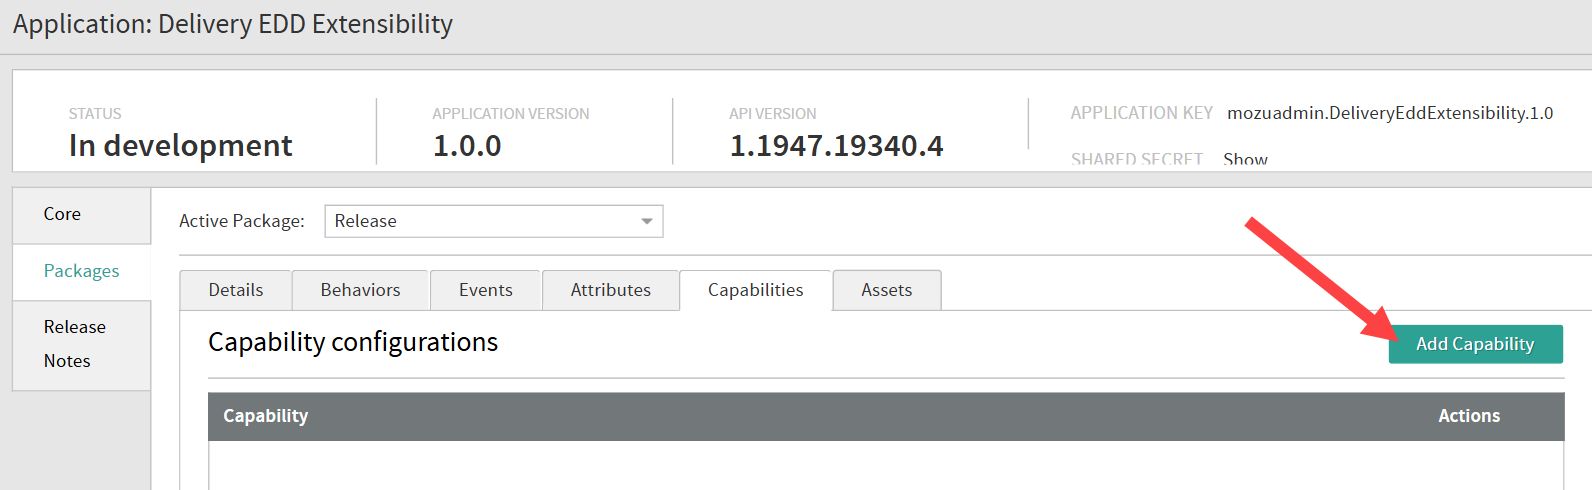
- Select Shipping Adapter.
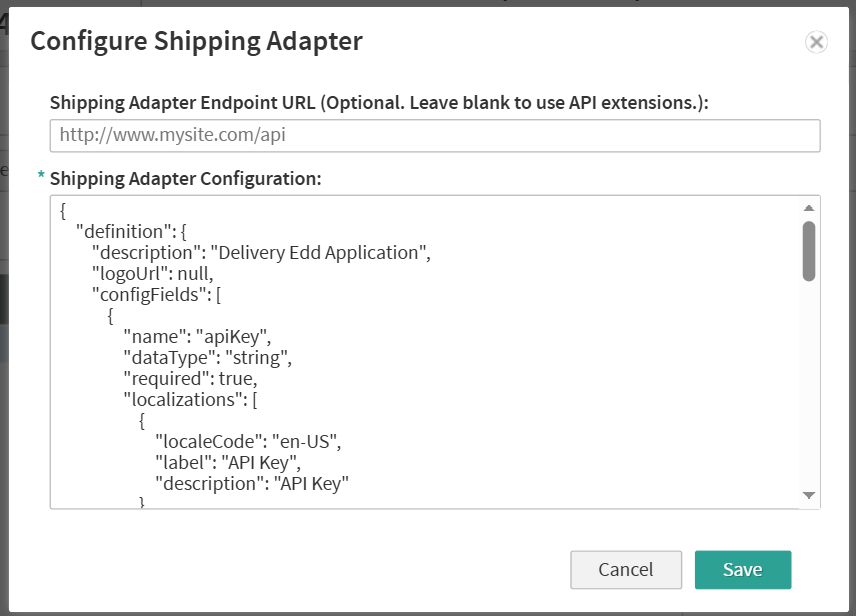
- Click Ok. This displays the Shipping Adapter screen.
- Leave the Endpoint URL blank and edit the default Shipping Adapter Configuration code to include the necessary features and configurations.
-
STH Configuration Example:
-
Delivery Configuration Example:
-
STH Configuration Example:
- Click Save.
- Clone the STH or Delivery repository.
- Add the appropriate mozu.config.json file to the directory.
- Run
gruntto upload.
- Make a POST call to
.../api/platform/applications/authticketswith the payload{“appId”:”<appId>”,”sharedSecret”:”<sharedSecret>”} - Make a POST call to
.../api/platform/secureappdata/<appKeyId>/easypostConfigwith the payload{"apiKey": "123456"}
Configure Carriers
After an application is installed, create a carrier account with its credentials and connect it to your shipping methods:- Go to System > Settings > Shipping > Carrier Accounts.
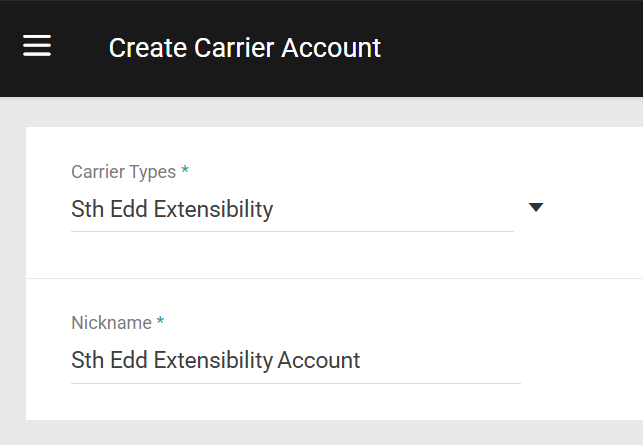
- Click Create New Carrier Account.

- Select the Delivery or STH application in the Carrier Types drop-down menu.
- Enter an appropriate Nickname for the carrier.
- If using Delivery, enter the API Key. This can be found in your Delivery Solutions admin portal under Settings > Integrations > API Keys.

- If using STH, note that you do not have to enter an API Key as Kibo’s account key will be used automatically.
- If using STH, note that you do not have to enter an API Key as Kibo’s account key will be used automatically.
- If using Delivery, also enter your Delivery Solutions Tenant Id from the admin portal.
- Click Save.
- Go to System > Settings > Shipping > Carriers > Shipping Methods and Rates.
- Select the appropriate carrier from the drop-down menu.
- Select the matching carrier account to link it.
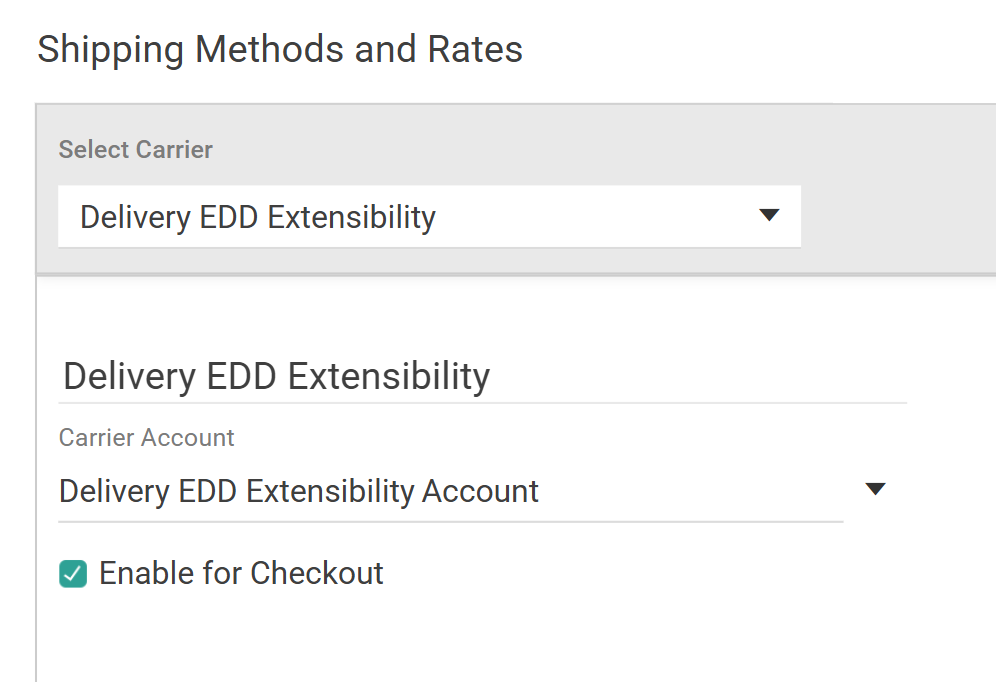
- Check Enable for Checkout.
- Click Save.
Add API Extension
The API Extension used by both applications should have been automatically added to your tenant upon install:- Go to System > Customization > API Extensions.
- Verify that embedded.commerce.catalog.storefront.shipping.shippingExtensibility.main appears in the list and contains the custom function below. If not present, add it manually.
View on Fulfiller UI
Once everything is set up, the Estimated Delivery Dates for current and future Direct Ship (Ship-to-Home), BOPIS, and Delivery shipments are displayed while viewing shipment lists in the Fulfiller UI. Click this column header to sort shipments in ascending or descending order, with those that don’t have an Estimated Delivery Date sorted to the end of the list.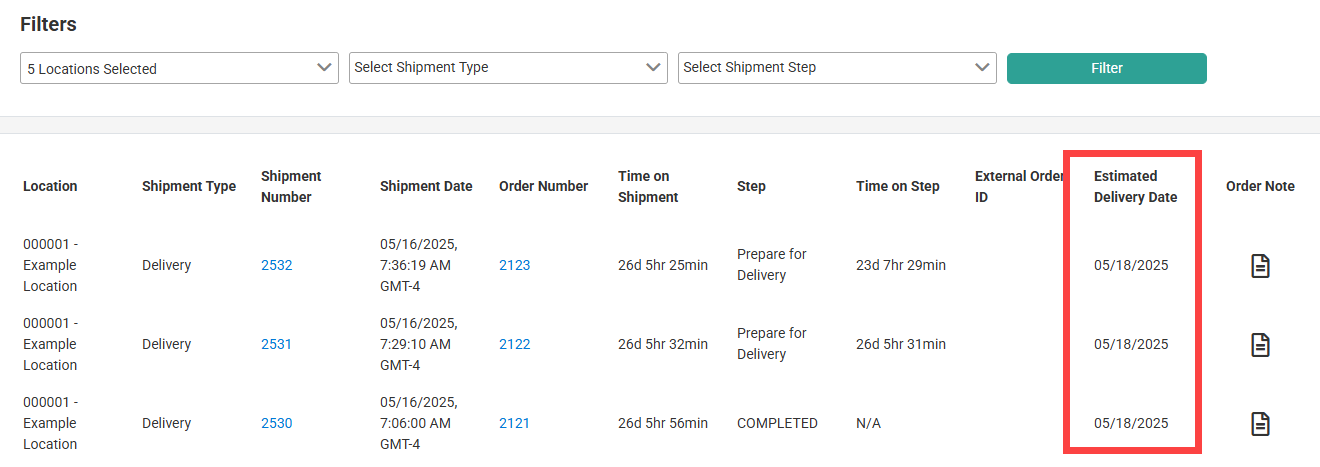
View on Admin UI
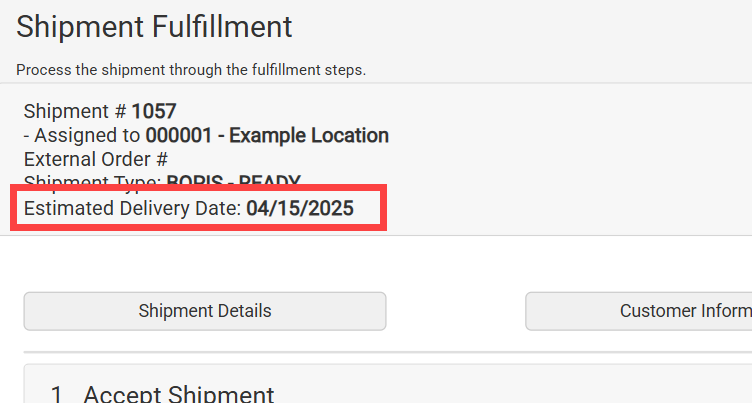
You can now view and update the Estimated Delivery Date for current and future shipments on the Admin UI. An event is emitted when the Estimated Delivery Date is updated.API Integration
The Kibo APIs include a dedicated endpoint to retrieve Estimated Delivery Dates, as well as the ability to offer different shipping methods on different items in an order which may be useful to display to your shoppers alongside the estimated dates.Estimated Delivery Date API
The Estimated Delivery Date Suggestion API retrieves the Estimated Delivery Date (EDD) calculation for order items to display to customers on your storefront. In the case of STH and Delivery items, this request will suggest the optimal fulfillment location to assign it to based on your configured order routing rules and calculate its associated EDD. In the case of BOPIS items in which the customer has chosen a pickup location, the system will not go through routing logic to suggest an assignment location and will instead return the EDD for the chosen location. The POST endpoint/commerce/orders/orderRouting/api/v1/routing/edd/suggestion accepts the order item information and customer shipping address, as shown in the example request below.
estimatedDeliveryDate object for each order item and location, as shown in the below example. Use the http.commerce.routing.eddsuggestion API Extensions to customize these responses if needed, such as to display the optimal estimated fulfillment date or time on your storefront.
The estimatedDeliveryDates object includes the following fields:
- estimatedDeliveryDate (EDD): The expected date by which the order is anticipated to reach the customer.
- orderCutoffDate: Indicates the latest time at which the order can be placed and still meet the expected EDD. This allows you to display messaging such as “Receive by February 28th if order placed by 3:00 PM today” on your storefront.
- fulfillmentDate: Represents the date and time by which the shipment is expected to be ready for fulfillment (pickup or carrier handoff)
deliveryWindow will be returned as well.