

Returns Concepts
Understand return processing and reverse logistics
Watch: Returns for Replacements or Exchanges
Learn how to process returns for replacements or exchanges
Watch: Returns for Refund
See the end-to-end process of handling a customer return and issuing a refund
View Returns in Order Details
To view the returnable items in an order and any of its existing returns:- Go to Main > Orders > Orders.
- Click the order you want to view returnable items or returns for.
- Click the Returns tab. This will display information about item quantities in the order, including how many items are returnable and any existing returns. To change the columns that are displayed in the table, expand the dropdown menu in the far right of the header and toggle columns on and off.
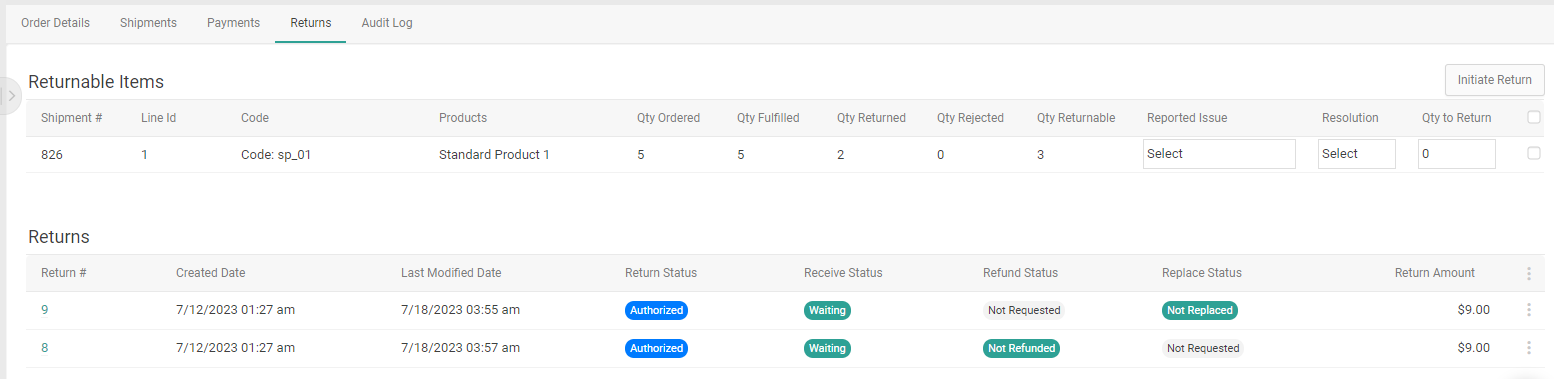
- Clicking a return will take you to the return details page, where more information about the return will be displayed and you can perform actions on it.
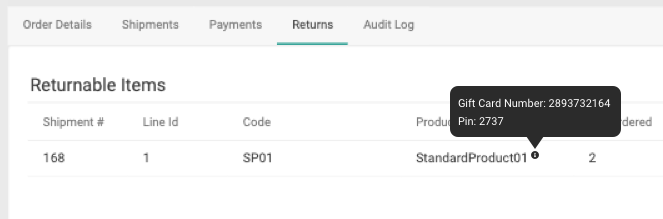
Return Item Identifiers
If an item identifier has been set for any returnable items, that information will be provided in a tooltip on the product. These identifiers are defined in thefulfillmentFields object of the Create Order API and can set by fulfillers during the fulfillment process, where they’re displayed as input fields during the Validate Stock step. The item identifier can be a serial number, manufacturer number, number for a gift card item to load a value to, or other identifying data point.
Returns Dashboard
The Returns dashboard at Main > Orders > Returns displays the existing returns across all of your orders and provides more details about them. Use the search box at the top to find specific returns, or use the advanced filter to narrow down results by fields such as Return Status, Return Number, or External ID.- Return Status: Whether the overall return is completed or not.
- Action Required: Whether any action needs to be taken yet to process the return.
- Received Status: Whether the returned item has been received from the customer or not.
- Refund Status: Whether a return is fully, partially, or not refunded. This is determined by comparing the refund amount to the sum of the total price and tax amount.
- Fully Refunded means that the total refund is greater than or equal to the sum of the total price and tax.
- Partially Refunded means that the total refund is less than the sum of the total price and tax.
- Replacement Status: Whether a replacement has been requested, issued, or not requested.
- Return Amount: The total cost of the return.

Return Details Page
Click on a return to view its details and perform any actions that may be associated with the return request such as confirming receipt of the return, creating a return shipment label, or closing the return. If the return has an External ID set, then that field will be displayed here as well (otherwise it will not be displayed).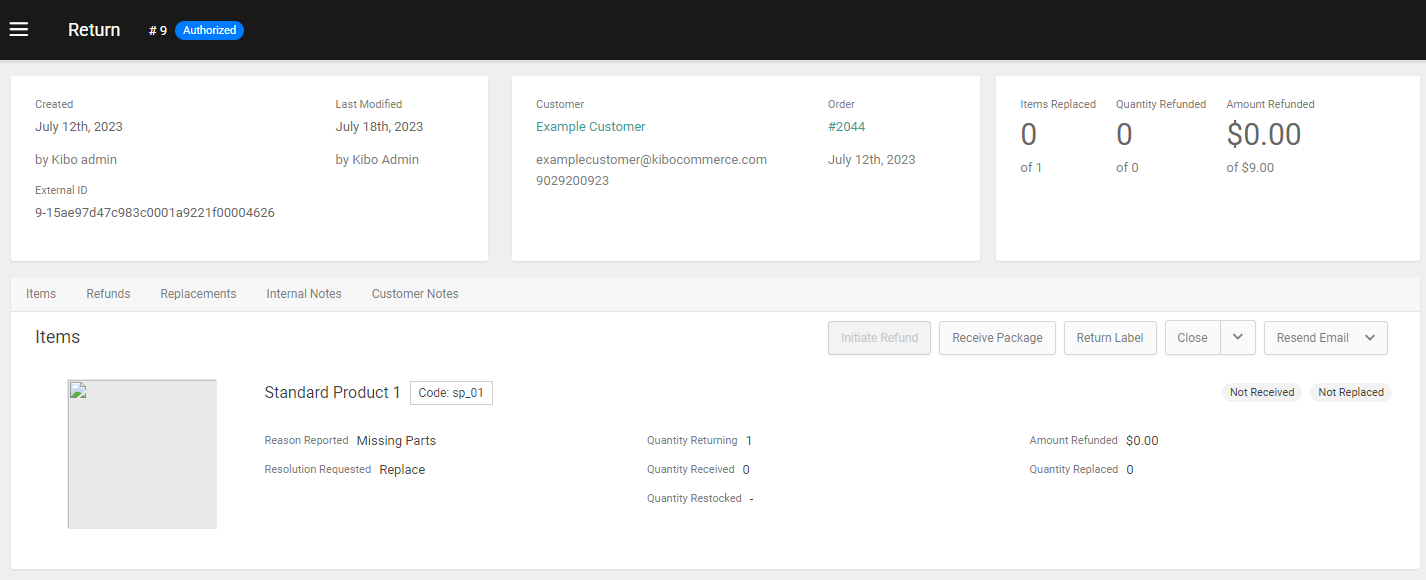
Add Internal Notes
To add notes (that are not visible to shoppers) to a return:- Go to Main > Orders > Returns.
- Click the return you want to add a note for.
- In the Internal Notes tab, click Add Internal Notes.
- In the modal that opens, create your note.
- Click Create Note to save your note.
View Customer Notes
To view return notes created by shoppers:- Go to Main > Orders > Returns.
- Click the return you want to add a note for.
- In the Customer Notes tab, view any existing customer notes to determine if the shopper has any specific requests or additional information for processing the return.
Resend Return Emails
To resend return emails (which send automatically but may have been missed by the shopper) for non-cancelled returns:- Go to Main > Orders > Returns.
- Click the return you want to add a resend an email for.
- In the Items tab, click the Resend Email drop-down menu.
- Choose to resend the Return Created or the Return Authorized email.