

restrictEdit flag is set to true on the order via API, then a user without the Override Order Update Restriction behavior will not be able to edit the order.
This includes changing the address, email, contact, attributes, or other details as well as performing any actions such as creating a new shipment, reassigning or updating existing shipments, editing shipment items or notes or custom data, canceling shipment line items, and adding a payment. However, the user will still be able to initiate and process returns.
Shipment Item Edits
Once shipments exist on an order, you can only edit order items at the shipment level.- While viewing an order, click the Shipments tab.

- Expand the drop-down menu to the right of a line item to access item actions.
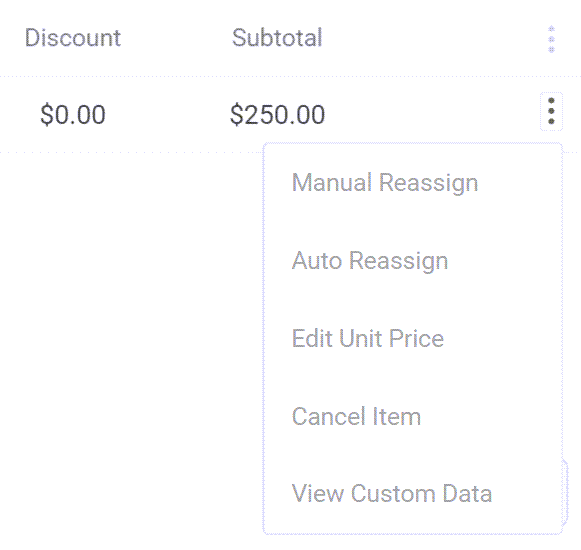
Reassign Item
Manual Reassign will allow you to select a new fulfillment location for this line item, similar to manual reassignment at the shipment level. Auto Reassign will use Order Routing logic to assign the line item to a new fulfillment location.Transfer Item
If applicable for the shipment type and fulfillment configurations, Request Transfer will be available and will allow a new transfer shipment to be created to supply missing inventory for the assigned fulfillment location instead.Edit Unit Price
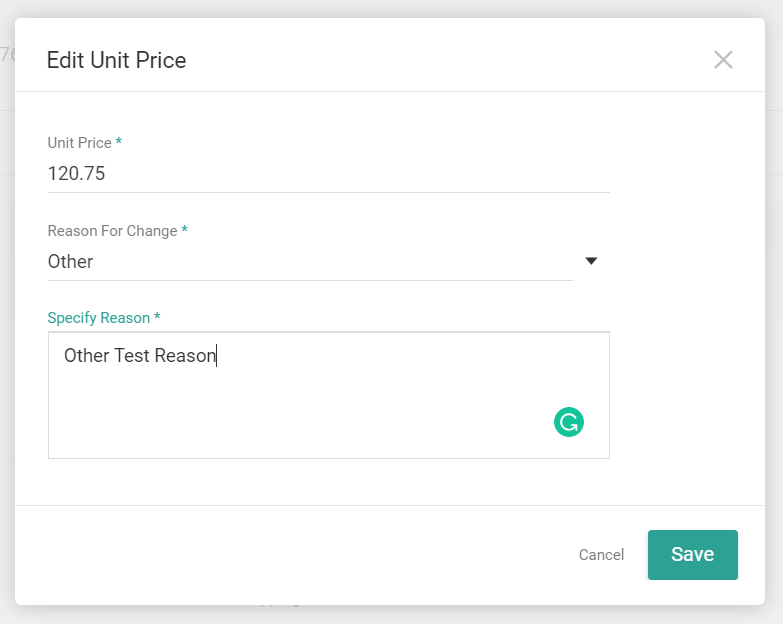
After editing an item’s unit price, the tax will be automatically recalculated.- Click Edit Unit Price from the item actions menu.
- Enter the new Unit Price.
- Select the Reason For Change from the drop-down menu. If you select Other, then you will be prompted to specify the reason.
- Click Save.
Cancel Item
You can cancel all or partial quantity of an item. Crediting a payment is not necessary if editing or canceling a single item from a shipment.- You can cancel either partial quantity or the full quantity of an item.
- Click Cancel Item from the item actions menu.
- Enter the quantity of the item that you want to cancel. For example, if an item has a starting quantity of 7 then cancelling 3 will change the shipment quantity to 4. Cancelling all 7 will remove the line item from the shipment entirely.
- Select a Cancel Reason from the drop-down.
- Click Cancel Items to confirm.

View Custom Data
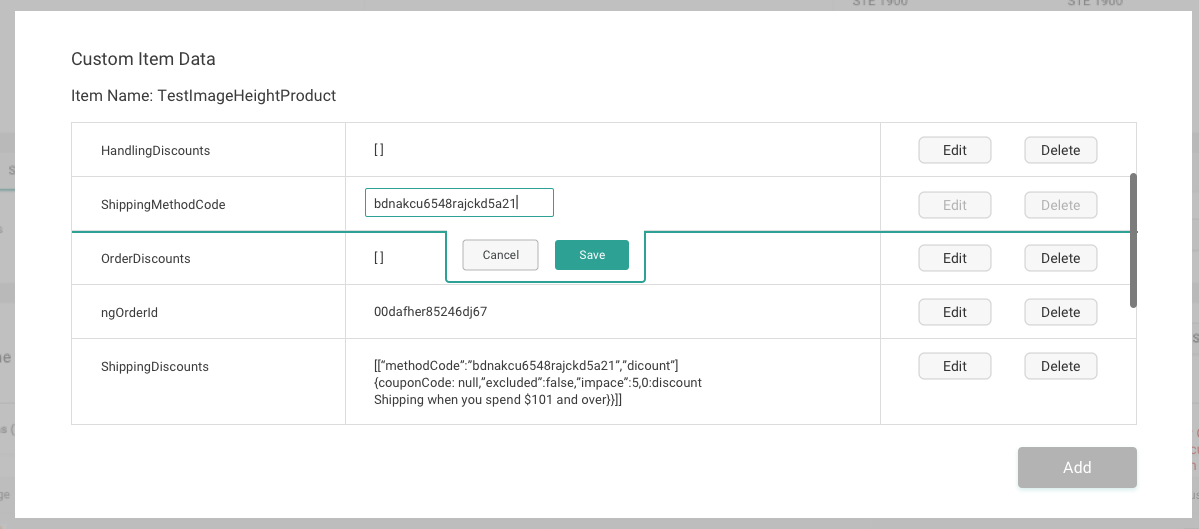
Custom order data is passed to the shipments upon initial order creation, but any edits to the item-level custom data made after creation must be done on a per-shipment basis. This means that you should update any custom item data on every shipment within the order where needed because a change at the order level will not be applied across the board.- Click View Custom Data from the item actions menu. This opens a modal displaying the item-level custom data that was applied to the shipment during order creation.
- Click Edit to change a custom data key. Note that these values are always treated as strings. Click Save after entering the new value.
- Click Delete to remove a data key from this item.
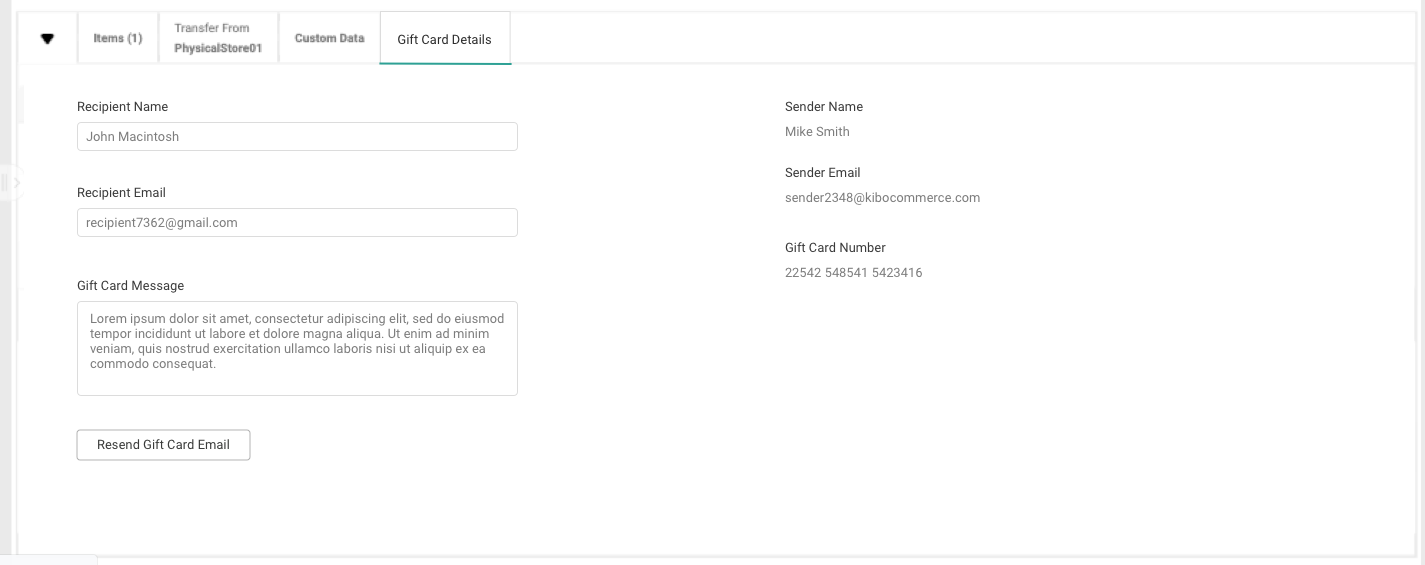
Gift Card Items
If an item is a digital product, such as a gift card, then it will be displayed as a “Digital” shipment type. The shipment information in the Order Admin will have an additional tab for Gift Card Details where the gift card number, PIN, recipient and sender names and emails, and gift message are displayed. You can edit the recipient’s name or email as well as the gift message and resend the gift card email to the recipient:- Click into a text box to make changes. As with customer accounts, the maximum allowed length for an email address is 254 characters.
- Click Resend Gift Card Email to save changes and send the customer a new email with their gift card information.
Order Item Edits
If an order is in the Pending Shipment status (which must be enabled by configuring how long after order submission the shipments are created), then you can edit individual items and make adjustments before the shipment is created.Repricing Behavior
Whether or not an edit reprices the order (updates its tax, discounts, shipping, and/or handling) depends on the type of edit being done. While implementations with eCommerce follow the same repricing behavior as when creating offline orders, Order Management implementations vary depending on whether or not you have a product catalog.- Order Management-Only: All totals will be proportionally redistributed across the remaining item quantities when a quantity is decreased or an item is canceled. When editing an item’s unit price or making adjustments to the order, shipping, and handling totals, then only the tax amount is refreshed (which requires tax to be configured in your tenant). This means that any discounts that were present when the order was placed will remain after editing a unit price or making adjustments.
- Order Management with Catalog: When the Refresh Pricing on Order site setting is enabled, repricing will follow the same behavior as when creating offline orders. This requires you to have payment gateways, tax, shipping carriers, and discounts configured. When this setting is disabled (which is the default), it will follow the same behavior as Order Management-Only.
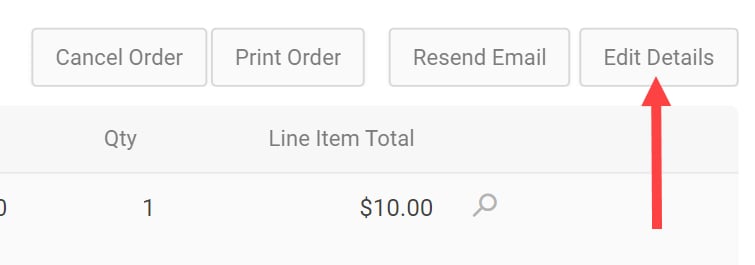
Perform Edits
Which actions are available may depend on your implementation type and configurations. For instance, Order Management with Catalog implementations must have the Refresh Pricing on Order site setting enabled in order to change shipping methods or fulfillment types.-
Click Edit Details while viewing the order details.
- This will open a modal similar to that of creating an offline order. Here you can make edits to existing items such as changing their unit price, decreasing their quantity, or removing them from the order.
-
When editing an order, you can manage shipping methods at either the item or order level, but not both simultaneously. If individual items have their own methods, a Shipping Method column appears, allowing you to update each item directly. In this case, the order-level shipping option is not visible. Alternatively, if a single shipping method applies to the entire order, the Shipping Method column is not displayed, and you will manage shipping using the order-level menu. With delivery, a specific location selection is not available, as the system will derive it. The system enforces consistency by preventing conflicts: for example, you cannot add a Ship-to-Home (STH) item to an order that has a single order level method for delivery items, or vice versa.

-
Add a new item using the Product Search bar and enter its fulfillment method, unit price, and quantity. You can also choose whether to subscribe to the item (and if so, change its frequency) if subscriptions are enabled.

-
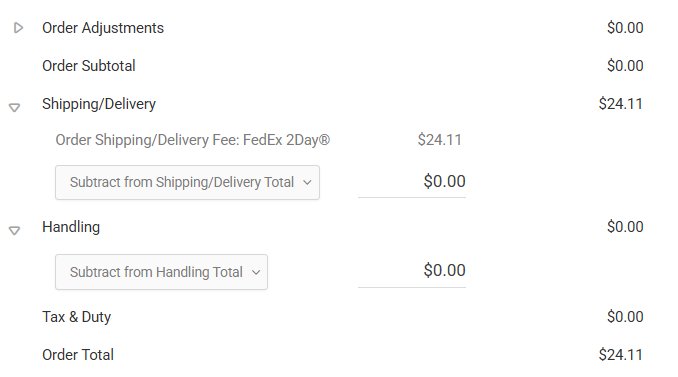
Expand the Order Adjustments, Shipping, Handling, and/or Tax & Duty sections of the order details to make adjustments by adding or subtracting from the subtotal.\
-
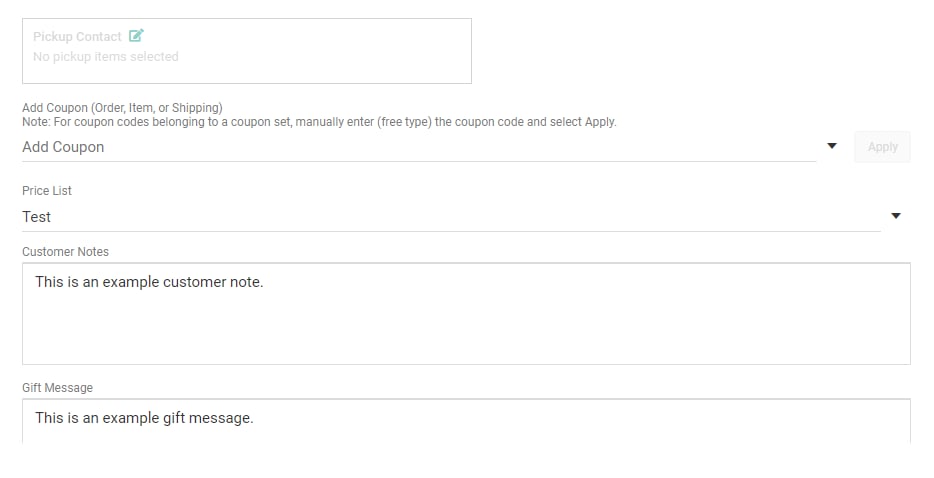
Make other miscellaneous edits such as changing the pickup contact, changing the price list, and adding customer notes or a gift message as needed.
- Click Save in the bottom right once all edits have been completed.