

Inventory Overview
Developer Reference
See the Inventory API documentation for programmatic access
Developer Reference
See the Reservation API documentation for programmatic access
Watch: Inventory Overview
Get an introduction to inventory management in Kibo
1. Strategic Overview
Concept Definition: Inventory is the functional core that tracks the quantity, location, and availability status of every product unit within the unified commerce platform to fulfill customer demand across all channels. Business Context: The Inventory Management System within the Kibo Commerce platform is positioned as the single, authoritative Source of Truth for all product stock. Its purpose is to synchronize inventory across the enterprise—from warehouses and distribution centers to physical store locations and third-party vendor sites—to power accurate order promising and omnichannel fulfillment strategies. Value Drivers:- Optimized Order Fulfillment: Provides a holistic view of stock across the entire network, enabling intelligent order routing to the most cost-effective and fastest fulfillment location, which shortens delivery times and reduces shipping costs.
- Maximized Sell-Through & Revenue: Ensures that every available unit is visible and sellable on the storefront, minimizing lost sales from stock-outs or inaccurate inventory display and maximizing the revenue potential of existing stock.
- Enhanced Customer Trust and Experience: Guarantees that product availability is accurately promised at the time of purchase (Available to Promise), drastically reducing the rate of order cancellations due to inventory errors, thereby building long-term customer confidence.
2. Core Concepts Explained
What is Inventory?
Inventory within the Kibo Commerce platform is a dynamic record, primarily maintained at the UPC (Universal Product Code) and Location level. It is the real-time record of all product units, categorizing them into various quantity types to support a range of business processes, including sales, allocation, and fulfillment. Its role in the platform ecosystem is to act as the central point of truth, constantly communicating product availability to the storefront (via the Real-Time Inventory Service) and to the Order Management System (OMS) for fulfillment decisions.Why does Inventory matter?
Inventory is foundational because it directly links sales and fulfillment, dictating what a business can promise and deliver to its customer.- Operational Benefits: It enables complex omnichannel fulfillment methods like Buy Online, Pick Up In-Store (BOPIS) or Ship-from-Store, by knowing the precise quantity and location of every item. This operational flexibility allows a retailer to utilize all of its assets (store stock) for e-commerce fulfillment, improving inventory turnover.
- Financial Benefits: Proper inventory management prevents both overselling (leading to expensive cancellations, customer churn) and underselling (missing revenue opportunities by holding back available stock). It ensures capital is not unnecessarily tied up in inventory that is not being actively sold.
- Customer Experience Benefits: Providing accurate, real-time availability on the storefront prevents customer frustration that arises from ordering a product only to be informed later that it is out of stock. This transparency creates a seamless and trustworthy shopping experience.
Core Definitions and Calculations
The Kibo Commerce platform tracks inventory using a set of key, interdependent quantity types:| Quantity Type | Definition | Calculation/Logic | Importance |
|---|---|---|---|
| On Hand | The total physical count of product units physically present at a specific location, regardless of their current sales status (allocated or unallocated). | Source of truth based on physical counts/updates. | The base unit quantity; used to track physical stock levels. |
| Allocated | The quantity of product units that have been allocated for a confirmed order | Quantity allocated to confirmed shipments/orders. | Represents committed stock that is no longer available for new orders. |
| Available | The quantity of product units that are immediately available and sellable to a new customer (Available to Sell). | Available = On Hand - Allocated | The key metric for storefront visibility and immediate order promising. |
| Safety Stock | A buffer quantity of units that is deliberately withheld from the Available quantity to mitigate the risk of stock-outs caused by unexpected demand spikes or fulfillment delays. | Safety Stock is a configurable setting applied against the Available quantity. | Protects against overselling by creating an intentional cushion. |
| Pending Items | The quantity that was overallocated and is waiting for inventory. This occurs anytime there is an allocation greater than the Available amount of inventory. Pending items will be “released” and automatically converted to Allocated when stock is available. | Any quantity that is Pending for an item is applied against Available quantity. | Used to handle overallocation. Pending items get created only on an exception basis. |
| Available to Promise (ATP) | The total sellable inventory, including currently available stock and any confirmed incoming inventory (Future Inventory) within a defined time frame. | ATP = Available (Current )+ Future Inventory | The most comprehensive metric for promising an item with an immediate or future delivery date. |
3. Functional Components & Configuration Deep Dive
Component Architecture
The Inventory functionality is built upon an interconnected set of core records and services:- Inventory Record (UPC-Location Level): The base unit of inventory tracking.
- Core Components: For a UPC, Location Code: On Hand, Allocated, Available, Safety Stock, Future Inventory.
- Sub-Components (Optional)
- Granular Inventory Fields: SKU, Lot Code, Date, Serial Number, Condition
- Location: Defines the physical entity where inventory is held (Warehouse, DC, Store).
- Configuration: Location Supports Inventory (Boolean), Location Type. 3. Future Inventory: Incoming Inventory
- Site: Future Inventory Enabled (Boolean) with Future Date Limit for allocation.
- Product: Future Inventory Enabled (Boolean) 4. Inventory Segmentation: Custom, user-defined labels (tags) applied to Inventory Records.
- Configuration: Segment Type, Allocation Percentage/Quantity Rules. 5. Real-Time Inventory Service (RIS): A dedicated, highly performant service that processes and delivers availability data to the storefront.
Configuration-Level Deep Dive
Inventory configuration controls how stock is tracked, protected, and offered to the customer.| Configuration Name | Business Purpose | Impact and Trade-offs | Concrete Example |
|---|---|---|---|
| Location-Level Inventory Enabled Flag | Toggles the active tracking of inventory for all products at a specific physical location (e.g., a specific store or warehouse). | Enabling inventory allows the location to be selected for order fulfillment and stock-level updates. Disabling it means the location’s stock is excluded from the total sellable pool. | A Direct-to-Consumer (DTC) Brand marks a temporary pop-up fulfillment center as Enabled only for the 4th quarter holiday rush. |
| Future Inventory Enabled (Site) | Controls whether the platform considers incoming stock that has a confirmed delivery date as part of the total Available to Promise (ATP) quantity. | Enabling allows allocation against incoming stock, maximizing pre-sales potential. | An Enterprise Electronics Retailer enables this to take pre-orders on a highly anticipated new gadget 4 weeks before it arrives at the DC. |
| Future Date Limit (Site) | Sets the maximum look-ahead period (set as Days/Weeks/Months) for which incoming Future Inventory is considered sellable and calculated into the ATP | A longer look-ahead maximizes long-term sales but increases the risk of delivery delays causing customer experience issues. A shorter window is safer but limits pre-sale capability. | A Fashion & Apparel Retailer sets a 6-week limit to only allocate against new seasonal collections arriving in the near term. |
| Safety Stock Value (Per UPC-Location) | Defines the quantity buffer that is not included in Available quantity. | A higher value significantly reduces the risk of overselling but artificially decreases the sellable inventory, potentially leading to missed sales opportunities. | A B2B Industrial Distributor sets a Safety Stock of 10 units for an essential maintenance part to ensure immediate fulfillment of emergency client orders. |
4. Key Capabilities and Business Applications
The platform’s Inventory management capabilities support granular control and real-time visibility across complex retail networks.Capability: Real-Time Availability for Storefront Experience (RIS)
Functional Explanation: The Real-Time Inventory Service (RIS) is a high-performance, dedicated service that provides immediate, accurate inventory visibility to the storefront. RIS is engineered to support the heavy traffic and low latency requirements of Product Listing Pages (PLP) and Product Detail Pages (PDP) by maintaining a single, unified source of inventory availability across the entire fulfillment network. It enables the storefront to display:- Real-time in-stock/out-of-stock status on PLPs (Product Listing Pages) and PDPs (Product Detail Pages).
- Accurate and near real-time quantities, and potential urgency messaging (e.g., “Only 3 Left!”), on the PDP (Product Detail Page).
- Store-specific availability for BOPIS/Ship-from-Store options.
Inventory levels can be requested as the total aggregate quantity across all locations or filtered to a specific location (or group of locations).
- Industry: Fashion & Apparel Retailer
- Scenario: A customer is browsing the New Arrivals category page (PLP) on their mobile device. Without RIS, the page would rely on less-frequent inventory updates, risking showing an item as “In Stock” when it has already sold out. By leveraging RIS, the retailer ensures that only items with confirmed Available quantity are displayed as purchasable. When the customer clicks through to a specific jacket’s PDP, they immediately see the accurate stock count (e.g., “Only 5 left in Size Medium”). This transparency drives an informed purchase decision, resulting in fewer customer support calls about canceled orders and a higher rate of completed purchases due to guaranteed stock.
Capability: Future Inventory Allocation
Functional Explanation: This capability allows the platform to accept orders and allocate stock against product units that are not yet physically On Hand but have a confirmed inbound delivery date. This stock is designated as Future Inventory. When a customer’s order utilizes Future Inventory, the system will prioritize Current Available inventory first. Once current stock is exhausted, the system begins allocating against the earliest dated future inventory records. This mechanism enables pre-selling and maximizes the Available to Promise (ATP) quantity. Business Application Example:- Industry: Enterprise Electronics Retailer
- Scenario: A major new gaming console is being released, and the retailer knows they have 5,000 units arriving at their main distribution center in 6 weeks. By enabling Future Inventory and importing the inbound stock record with the future date, they can immediately begin taking pre-orders online. When a customer checks out, the system allocates from the ATP (which includes the 5,000 future units) and assigns a future shipment date, creating a highly anticipated and guaranteed order for the customer. This business practice allows the retailer to capture 5,000 sales and realize the revenue weeks before the product physically arrives, resulting in a maximized product launch sales volume and better cash flow management.
Capability: Inventory Segmentation
Functional Explanation: Inventory Segmentation allows for the logical partitioning of physical stock (Inventory Records) at a location using custom tags. This partitioning enables a business to ring-fence or prioritize specific portions of their Available inventory for particular channels, customer groups, or fulfillment types. Allocation rules can be defined by a Percentage of the total Available quantity or a Discrete Unit Quantity to be reserved for a segment. Inventory is allocated from the requisite segment.. If that segment’s quantity is depleted, the remaining quantity will be handled by after actions (cancelled/backorder/customer care) Business Application Example:- Industry: Marketplace Operator
- Scenario: A marketplace offers products from third-party vendors (Shipped-by-Vendor) as well as its own inventory (Shipped-by-Marketplace). To ensure a fast-moving special promotion for VIP customers is not jeopardized by high demand from general sales, the operator creates an Inventory Segment called “VIP-Allocation” and reserves 20% of the inventory for a select high-demand product. This rule ensures that even if general sales deplete the primary inventory pool, VIP customers will still be able to successfully purchase the product, resulting in improved loyalty and retention for their most profitable customer segment.
Capability: Granular Inventory Tracking and Allocation
Functional Explanation: While inventory is fundamentally tracked by UPC and Location, Granular Inventory allows for deeper differentiation of individual units within that grouping. The configurable Granular Fields include: SKU, Lot Code, Date, Serial Number, and Condition.- SKU: This field differentiates inventory for each individual SKU. A UPC may be associated with multiple SKUs. Aggregate amounts across SKUs roll up to the UPC.
- Lot Code: A batch number used to identify a group of items produced together.
- Date: Used as Expiry Date. The date after which an item should not be sold).
- Serial Number: A unique identifier for a single product unit (e.g., for high-value electronics).
- Condition: The quality status of the item (e.g., New, Refurbished, Damaged).
- Industry: B2B Industrial Distributor
- Scenario: A distributor of chemical components tracks stock with short shelf lives. To minimize loss from expired inventory, they configure their allocation rules to prioritize the earliest Expiry Date first.. A large client places an order for 50 units. The system checks the inventory records and automatically allocates the 50 units from Lot Code A because its expiration date is 30 days sooner than Lot Code B, ensuring the oldest, highest-risk stock is sold first. This business practice dramatically reduces losses from inventory write-downs due to expiration.
Capability: Inventory Quantity Retrieval
The platform’s Inventory APIs and services support two primary methods for retrieving inventory quantity, which provides flexibility for various storefront and business applications.Retrieval by UPC at a Location
This method provides the most granular view of current inventory: the On Hand, Allocated, Available, and other quantities for a single UPC at a specific Location. Business Application Example:- Industry: Fashion & Apparel Retailer
- Scenario: A customer on the PDP clicks the “Check In-Store Availability” option. The storefront makes a request for the quantity of Product SKU 1234, Size Medium specifically at Store Location ‘NYC-Flagship’. The system returns the inventory record for that exact UPC-Location combination, showing 3 Available units. This enables the customer to confidently choose BOPIS (Buy Online, Pick Up In-Store) at that single location.
Retrieval as Aggregate: UPC Across All Locations
This method provides a consolidated view, summing the Available(or ATP quantity for a single UPC across all eligible Locations in the retail network. Business Application Example:- Industry: DTC Brand
- Scenario: A customer is viewing the Product Detail Page (PDP) for a new item. The retailer wants to display the total availability to encourage the sale, regardless of which location will fulfill it. The storefront makes an aggregate request for Product SKU 5678 across all active distribution centers. The system returns a single value of 2,500 Available units. This total aggregate quantity is displayed as the primary stock indicator, maximizing confidence in the product’s general availability.
5. Working with Inventory in the Admin UI
You can manage product inventory in Admin, which allows you to associate products with inventory and track quantities for your products. The products’ storefront behavior can then be selected based on whether inventory exists for each individual product while the available quantities at different locations are considered when routing orders for fulfillment. Inventory can be used with either Kibo eCommerce, Order Management-only, or a full solution implementation of the Kibo Composable Commerce Platform.Inventory UI
This section provides a general overview of the Inventory UI. See the Configure Inventory guide for more details about creating and updating inventory levels, as well as the inventory segmentation, granular inventory fields, or future inventory guides for information about additional inventory tracking features.- Go to Main > Orders > Inventory.
- You must select a location or enter a product name/code before inventory is displayed. Either enter a value or select a location in the appropriate field in the table.
- You must have a catalog enabled in order to use Product Name, then select the appropriate master and child catalogs from the drop-down menus on the left. Matching results will appear once you begin typing. You can either click a product from these results or click Enter.

- You must have a catalog enabled in order to use Product Name, then select the appropriate master and child catalogs from the drop-down menus on the left. Matching results will appear once you begin typing. You can either click a product from these results or click Enter.
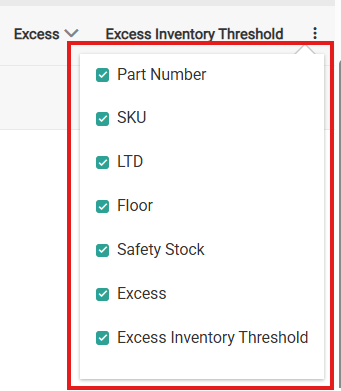
- Expand the menu in the top right corner of the table to hide and unhide columns as desired depending on what type of inventory levels you want to see.
- The Product Code (which maps to the
upcin the Inventory API), Part Number, SKU, Location Code, and Location Name columns can all be searched on. If only a single product is selected without a specific location, then the aggregate inventory levels will be displayed.- Entering a base product code that has variations will trigger a popup that allows you to select which variants you want displayed in the results. You can view these as either a list of their variant codes or as drop-down options. Upon confirming your selections, those results will populate the inventory table.
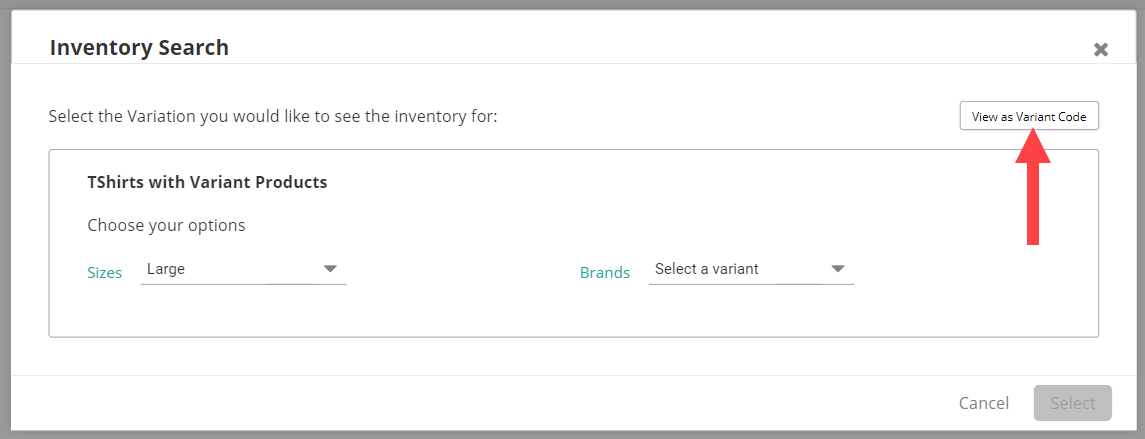
- Entering a base product code that has variations will trigger a popup that allows you to select which variants you want displayed in the results. You can view these as either a list of their variant codes or as drop-down options. Upon confirming your selections, those results will populate the inventory table.
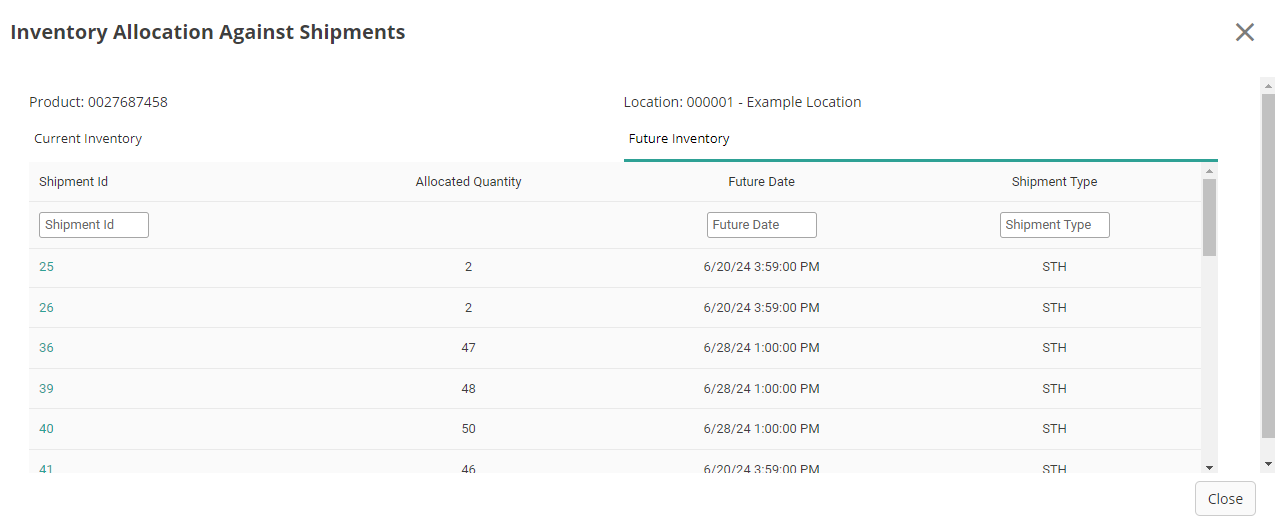
View Allocated Shipments
Click any Allocated value in the inventory table to view a list of Ready shipments that have allocated quantity for that item at the selected location. You can filter this list by Shipment Type or Shipment ID. Click a Shipment ID to open its details in the Orders UI.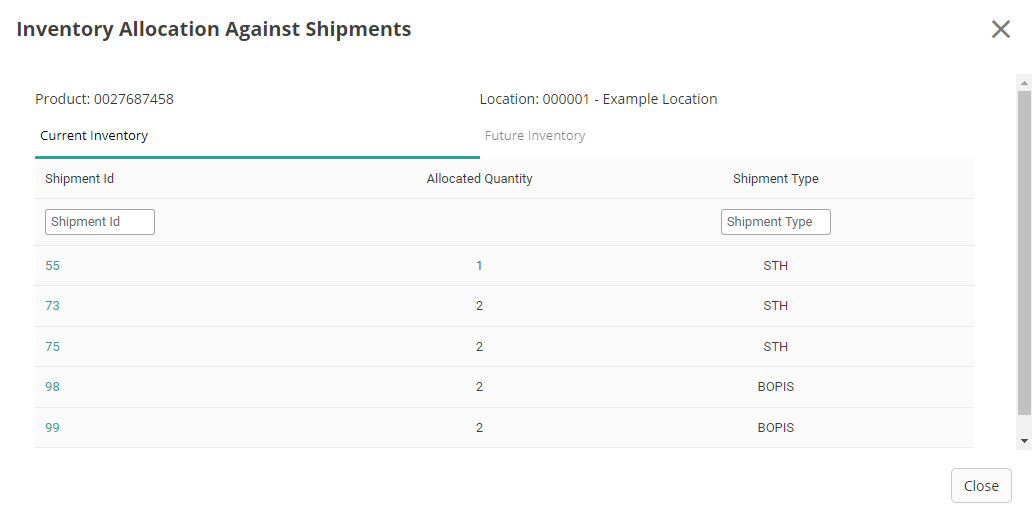
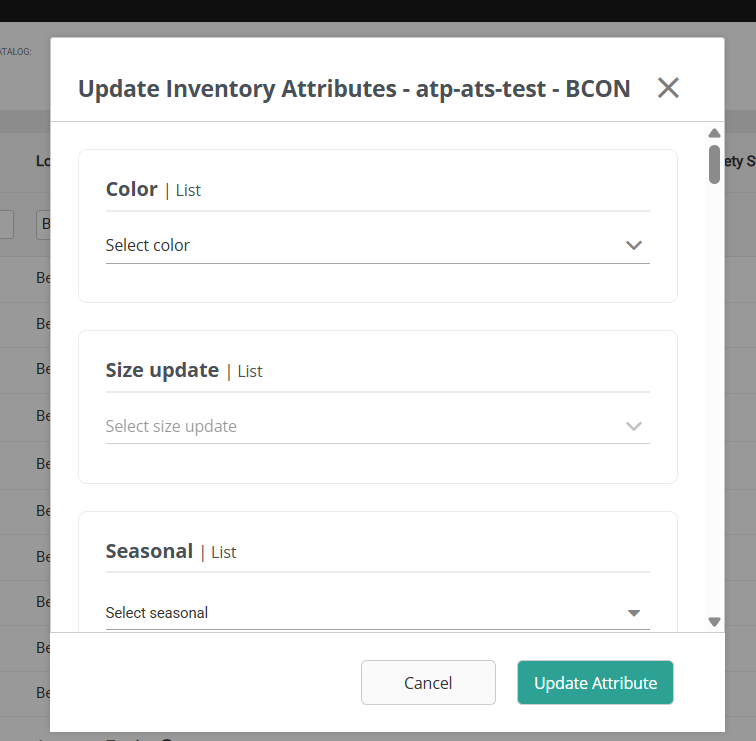
Managing Inventory Attributes
Viewing Attributes on Inventory Records
Inventory extensible attributes are visible on the inventory UI for each inventory record at the product-location level. The system displays extensible attributes for a product-location record only if at least one attribute has a value. If all attributes are null, the UI will not display any extensible attribute section.
Updating Attribute Values
- Navigate to the specific inventory record in the inventory UI
- Locate the extensible attributes section
- Click on View/Edit link and Update one or more attribute values as needed
- Save your change
Returns and Inventory Interaction
During return processing, when you receive the return you can specify whether the product should be restocked at a return location as documented in the Returns guide. If you choose to restock the product, then the on-hand quantity is automatically increased appropriately.Assume Infinite Inventory
The Assume Infinite Inventory feature allows allocation beyond available inventory levels for specific inventory records. You can set this flag via the Refresh and Adjust APIs or inventory import process. It can also be applied at a inventory segmentation Level, granular inventory level or on future inventory. When enabled, this Boolean field overrides standard allocation rules, permitting allocation even when inventory is not available. This is an optional field and does not require any tenant or site-level setting to be enabled. If the flag is set totrue, the system will apply the Assume Infinite Inventory logic for allocation. If the flag is not set or is false, standard allocation rules will continue to apply.
To identify which inventory records have this flag enabled, use the Get Inventory API with the parameter includeItemsWithInfiniteInventoryFlag. Records with infinite inventory will return hasInfiniteInventory: true in the response.
6. Platform Integration Map
Upstream Dependencies
- Locations: Physical locations (warehouses, stores) must be configured and set to Inventory Enabled before stock can be tracked or allocated at that location.
- Order Management System (OMS): Order creation and shipment processes trigger the key Allocation and Deallocation events that update the inventory quantities.
Downstream Impacts
- Storefront / E-commerce Site: Inventory data, driven by the Real-Time Inventory Service (RIS), powers product availability messaging, in-stock filtering, and fulfillment options (BOPIS).
- Order Routing / Fulfillment: The Available and Future Inventory quantities are the core inputs for the platform’s order routing logic, determining the optimal location to fulfill a shipment.
- Financial Reporting: Inventory consumption affects Cost of Goods Sold (COGS) and is essential for accurate balance sheet valuation.
Synergistic Features
- Order Routing Engine: Inventory provides the what and where (product quantity and location), while the Order Routing Engine provides the how and why (business rules for selecting the best fulfillment source), resulting in minimized fulfillment costs and maximized delivery speed.
- Location Management: Defining the properties of a location (like its proximity or fulfillment capabilities) combined with its inventory levels allows for highly accurate and flexible omnichannel experiences, such as offering Ship-from-Store only from locations within a certain radius of the customer.
7. Related Conceptual Guides
For foundational knowledge, refer to:- Catalog: This guide is a prerequisite because inventory records are tied directly to the product definitions (UPCs) and their attributes defined in the Catalog.
- Order Routing: This guide explains how the Available and Future Inventory quantities are used as the foundational data points to select the final, most cost-effective fulfillment location for a customer’s order.
- Location Admin: This guide details how to configure the physical entities (stores, warehouses) that hold the inventory, explaining how location-specific settings (like fulfillment capabilities) combine with stock to achieve a greater omnichannel strategy.