

Create a Dev Center Payment Gateway Application
An application must be created first to access the environments.- Log into Dev Center.
- Click Develop > Applications.
- Click Create Application.
- Enter in a name.
- Click Save.
Configure Metadata for your Gateway
You must select the gateway adapter capability for your new application and configure its metadata.- On the left hand side, select Packages > Capabilities.
- Select Add Capability.
- Select Payment Gateway Adapter from the dropdown menu.
- Click Ok. This displays the Configure Payment Gateway Adapter screen.
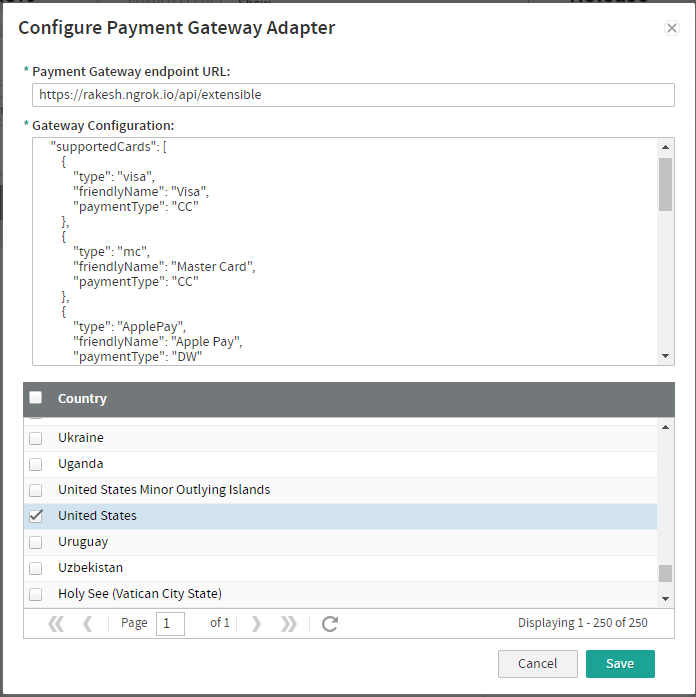
- In the Gateway Configuration field, a template is displayed for you to enter configurations for your payment gateway in JSON format. If you are creating a payment gateway that processes gift cards, you must add the
supportsGiftcardandschemaVersionfields to your gateway configuration after the administrationUi section as in the following example:ThesupportsGiftcardfield must be set to true, and theschemaVersionfield must be set to 1.0. - Depending on what kind of payments your connector can process, you need to set the following configurations.
- Set
paymentTypefield (supportedCards.paymentType) to one of the below values based on payment type.- CreditCards: “CC”
- DigitalWallets: “DW”
- ThirdPartyPayments:“3P”
- Populate the features collection with at least one of these values, such as in the example below.
- “CreditCards”
- “DigitalWallets”
- “ThirdPartyPayments”
- When setting administration UI fields for the connector, use the
xtypefield to configure the type of field you want to display in the admin.- “textfield”
- “password”
- “dropdown”
- “radio”
- “email”
- “date”
- “checkbox”
- “number”
- Set
- Select the countries whose payments you want this payment gateway to process.
Fork/Clone the Payment Gateway Template
Kibo provides a template repository to help you configure your new gateway.- Create a repository by either forking or cloning the Payment Gateway Template.
- Implement the adapter.
- Update the included tests.
Implement Custom Endpoints
Your custom application needs to include an endpoint that allows your storefront theme to call the adapter directly. This will start a session with the gateway outside of the flow of an out-of-the-box credit card payment. For example, the below endpoint will start a session with Apple Pay. ThemethodName field is important, because if the payment gateway adapter handles responses at /session then the Kibo Composable Commerce Platform will pass the request to this endpoint and run your custom code.
Gateway Adapter Hosting
While in development, Kibo allows adapter code to be hosted either remotely or inside of Kibo infrastructure. Hosting the adapter yourself may be advantageous if you require access to logs. For certification or “production” deployment, Kibo must host the code to fulfill a set of standards and complete the audits mentioned below.Self Hosting an Endpoint
Follow the below steps if you plan on hosting the adapter yourself.- In Dev Center, open the application details page for your payment gateway application.
- Click Packages, and then click the Details tab.
- Under Configuration URL, add the URL endpoint of the payment gateway application’s configuration page.
- Save the application.
Kibo Managed Endpoint
Follow the below steps when you want Kibo to host the adapter for use on a production tenant.- Create a ‘dev’ branch in your repo (this will be the branch that will be deployed).
- Provide git repo access to your Kibo enablement team.
- The representative will provide an ETA.
- You will then be contacted when a hosted development version of the adapter is available for a sandbox.
- Test the sandbox and sign off on the adapter.
Prepare the Gateway for Production Certification
After you have adequately integration tested your gateway, submit it for certification so that it can be used by a production tenant. Before doing so, validate the following:- Your gateway is built using the latest version of the template and references the latest “kibo-paymentgateway-hosting” package.
- All tests pass.
- No linter errors are present.
- Code coverage is greater than 80%.
- Any endpoints that the your code uses are either hard coded or managed by static Production/Sandbox settings.
- Note that endpoints cannot be passed in through admin user configuration.
- No PCI data is logged.
- Logging is limited to discrete items, not complex objects.
Submit the Gateway for Certification
To certify the application:- Provide your Kibo enablement team with the Application ID and Development account of the gateway application. They may also want you to include the following additional information:
- Git version tag
- GIT-SHA
- List of external endpoints that the code calls.
- Kibo will perform a code review and PCI audit. This usually takes about four weeks.
- If approved, you will be notified that the certified gateway adapter can be installed on a production tenant.