Configure Inventory

You must enable inventory at the location level before you can begin to associate products with inventory. 

For more information about configuring your inventory with category tags to differentiate between the quantities available for different channels, fulfillment methods, or other groups, see Inventory Segmentation.

Note that changes to these settings may not immediately take effect when processing orders. It may take up to 15 minutes for updates to be reflected in the system while the cache refreshes.

Enable Inventory

Before you associate your products with inventory, you must first enable inventory support for one or more of your locations. Once you enable inventory support for a location, you can then associate your products with inventory records at that specific location. Refer to Associate Products with Inventory for more information about associating products with inventory.

You must create your locations in the Locations module before enabling inventory support for locations. Refer to Location Settings for more information about setting up locations.

To enable inventory support for a location:

  1. Go to Main > Orders > Locations.
  2. Select an applicable location.
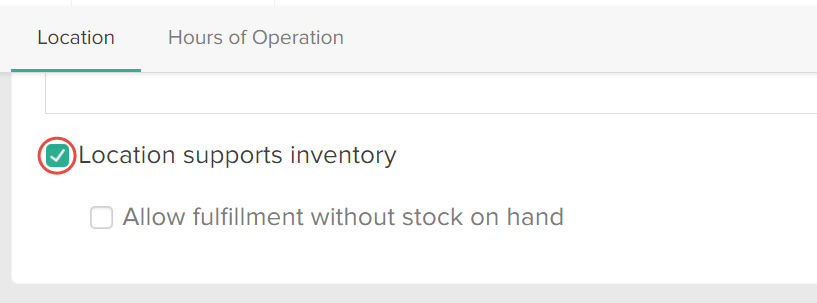
  3. Under the Location section, enable Location supports inventory:

    Callout of the

  4. (Optional) Decide whether you want to Allow fulfillment without stock on hand.
    This setting allows you to fulfill orders without sufficient on-hand quantities. This is useful if you want to mark items as fulfilled before entering newly arriving stock quantities in Kibo eCommerce. Refer to Fulfill Items Without Sufficient Stock for more information.

Refer to Location Settings for more information about the various location settings you can configure.

Associate Products with Inventory

After you create products in a catalog, you can associate them with inventory at a specific location.

  1. For the applicable product, go to its Product Editor > Inventory configurations and enable Track stock level.Callout of the
  2.  Click Manage Inventory. The product inventory page will automatically be searched for the applicable product. If the product is a configurable product with options, then the base product's code will be used.

    Callout of the Manage Inventory button in the product editor

  3. Select the product in the left panel:

    Callout of the product selection panel on the Inventory page

  4. Click Create New Inventory:

    Callout of the Create New Inventory button in the top right of the Inventory page

  5. Select the Location Name from the drop-down menu, and enter the On Hand quantity:

    Callout of the location name and on hand quantity of inventory location settings

  6. Click Save.

Granular Inventory Fields

While the default way to differentiate inventory levels is by UPC-Location (meaning the UPCs that are present at a specific location), you can use the following fields for more detailed tracking instead. They can also be used in combination with External IDs on future inventory.

  • SKU: As a UPC may be associated with multiple SKUs, this field differentiates inventory for each individual SKU and allows an aggregate amount to be displayed at the UPC level. 
  • Lot Code: Tracking which lot a product is manufactured in may be helpful with product recalls, or tracking SKU inventory in different lots.
  • Date: A manufacturing or expiration date can improve your stock management by ensuring older products are used first. By default, inventory will be allocated from items with the earliest date after a location has been assigned.
  • Condition: You may offer different conditions for the same UPCs, such as New or Refurbished for a couch. If a condition is specified for an item, then it will only be allocated from the inventory record that matches that condition. Items with conditions cannot be substituted.
  • Serial Number: This is the lowest granular identifier for a physical piece of inventory, such as a laptop. A record with a serial number can only have an inventory quantity of 1. Items with serial numbers cannot be substituted.

Enable Granular Fields

These additional identifiers must be enabled on your tenant by Kibo before you can use them. Please submit a request to Kibo Support to have this feature turned on for you.

Restricted Content

The tenant attribute to enable this behavior is granularInventoryTrackingEnabled

Set Fields on Inventory Records

Use Refresh and Adjust Inventory API calls to set up granular quantities on inventory records. Provide the appropriate fields at the item level, as shown in the below Refresh example that includes a SKU, serial number, and condition. Those values will then be included in any Get Inventory responses. The linked API documentation will be updated soon to include these fields.

{
    "locationCode": "Example",
    "items": [
        {
            "partNumber": null,
            "upc": "PRODUCT_123",
            "sku": null,
            "ltd": 0,
            "floor": 0,
            "quantity": 4,
            "safetyStock": 0,
            "retailPrice": 1.99,
            "currencyID": 1,
            "serialNumber": "PRODUCT_123", 
            "lotCode": "PRODUCT_123",  
            "date": "2025-07-30T09:15:30-05:00",  
            "condition": "PRODUCT_123_CONDITION_1" 
        }
    ]
}

Granular Fields in the UI 

When any of these fields are present, current and future inventory records will be unique based on those values and additional columns will be displayed in the Inventory UI. The below example shows several inventory records for the same product differentiated by lot code, date, serial number, and condition. Note that values are not required for all fields.

Granular inventory with example values

Identifiers will also be displayed in Fulfiller UI shipment details. Line items will be separated by condition and serial number, meaning that if the customer purchases both a New and Used version of the same product then they will be displayed as two line items (shown below). 

Shipment items in the Fulfiller UI with different conditions

Use Inventory with Granular Fields

When performing the below inventory-related API actions, use the below fields to specify which granular records should be used. The linked API documentation will be updated soon to include these fields.

  • Allocate Inventory and Create Order: You can specifycondition and serialNumber fields at the item level.
  • Deallocate Inventory: If you want to deallocate from a specific granular inventory record, include an inventoryID for each item on the item level. The inventoryIDs can be found in the shipment data.
  • Fulfill Inventory: If you want to fulfill inventory from a specific granular record, include an inventoryID for each item on the item level. The inventoryIDs can be found in the shipment data.

Adjust On-Hand Quantities

If you've already associated a product with inventory, you can adjust its on-hand quantity at any time. You can also update its LTD, floor, or safety stock using the same steps as detailed below.

  1. Go to Main > Orders > Inventory.
  2. Either select the Location Name from the drop-down menu or enter a Product Code to view inventory levels.
  3. Click a row to make its inventory fields editable.
  4. Enter the new quantity.

    Callout of the user input field for on-hand quantity

  5. Click Save.