Google Pay Configuration

Google Pay is a digital wallet that can be integrated for eCommerce and eCommerce+OMS implementations through Payment Extensibility. Though you will follow the application and payment gateway creation process in the Payment Extensibility guide, this page provides additional details and configuration examples specifically for Google Pay.

The basic steps of this process are:

  1. Build a payment gateway adapter that supports a card type of "GooglePay."
  2. Customize your theme to display Google's front-end components. 
  3. Develop a custom endpoint in the extensible gateway adapter in order to generate a session and token with Google.
  4. When an order is placed with Kibo, give it the payment type "Token" and card type "GooglePay" with the tokenized transaction as provided by Google.
  5. The payment gateway passes the Google Pay token to the gateway provider, such as CyberSource or another credit card service.

Build the Gateway Adapter

First, you must create and install an application in the Dev Center based on the instructions provided in the Payment Extensibility Starter Kit. When you add the Payment Gateway Adapter capabilities, you will need to add the "GooglePay" digital wallet (a "DW" payment type, as shown in the example below) as a supported card type.

In order to support sending the Google Pay token to a gateway provider, you need to provide the name and login information for your gateway provider account in the administationUi block. This example links Google Pay with CyberSource:

{
    "supportedCards": [
        {
            "type": "GooglePay",
            "friendlyName": "Google Pay",
            "paymentType": "DW"
        }
    ],
    "features": [
        "DigitalWallets"
    ],
  "configuration": {
       "googlePayPaymentSolution" : "012"
    },
    "administationUi": [
      {
            "xtype": "textfield",
            "name": "MerchantId",
            "fieldLabel": "Cybersource Merchant Id",
            "allowBlank": false,
            "isPublic": false
        },
        {
            "xtype": "password",
            "name": "MerchantKey",
            "fieldLabel": "Cybersource  Password",
            "allowBlank": false,
            "isPublic": false
        }
    ],
    "schemaVersion": "1.0"
}

Front End Theme

Your storefront theme must support a token, using a tokenModel of the type "Google Pay." This will allow the custom function to run on the token, retrieve the data needed from Google Pay, and pass it to the storefront. 

const googlePayToken = new TokenModels.Token({ type: 'GooglePay' });
        googlePayToken.set('tokenData', customTokenData);
        await googlePayToken.apiCreate()
        const payload = {
          amount: self.getTotal(),
          currencyCode: apiContext.headers['x-vol-currency'],
          newBillingInfo: {
            paymentType: 'token',
            billingContact: {
              email: billingEmail,
              firstName: billingContact.givenName,
              lastNameOrSurname: billingContact.familyName,
              phoneNumbers: {
                home: appleShippingContact.phoneNumber
              },
              address: {
                address1: billingContact.addressLines[0],
                address2: billingContact.addressLines[1] || null,
                address3: billingContact.addressLines[2] || null,
                address4: billingContact.addressLines[3] || null,
                cityOrTown: billingContact.locality,
                stateOrProvince: billingContact.administrativeArea,
                postalOrZipCode: billingContact.postalCode,
                countryCode: billingContact.countryCode.toUpperCase()
              }
            },
            token: {
              paymentServiceTokenId: responseId,
              type: 'GooglePay'
            }
          }
        }
        const response = await self.orderModel.apiCreatePayment(payload)

The theme also needs to support displaying the Google Pay option and any other elements in checkout. You must reference the Google Pay documentation or work with your integration team to determine what these storefront elements are.

Custom Endpoint

A custom function that can be called by your theme is required to start the conversation with Google Pay. It should return whatever Google Pay needs to start a session in the browser - token, device data, etc. You must reference the Google Pay documentation or work with your integration team to determine what these requirements are. 

Google Pay will respond with a tokenized card number, which the system will then pass to the provider configured in the payment gateway adapter capabilities (such as CyberSource in the earlier example). Google's token may be formatted differently from a standard credit card, so your application must be able to make changes to the format to avoid errors with the gateway provider.

Two additional endpoints must also be implemented: /authorizeWithToken and /authorizeAndCaptureWithToken. The respective requests with tokens will go these endpoints for authorizing and capturing Google Pay payments.

Create Payment Gateway and Payment Type

Create a new payment gateway for Google Pay in System > Settings > Payment Gateways as documented in the Payment Extensibility guide, using the username and password that you configured in the administationUi data of the payment gateway adapter capabilities.

Then, go to System > Settings > Payment Types where the Google Pay card type will be available. You can now enable the Google Pay type in your system and link it to the processing gateway you just configured. You can now place orders with Google Pay.
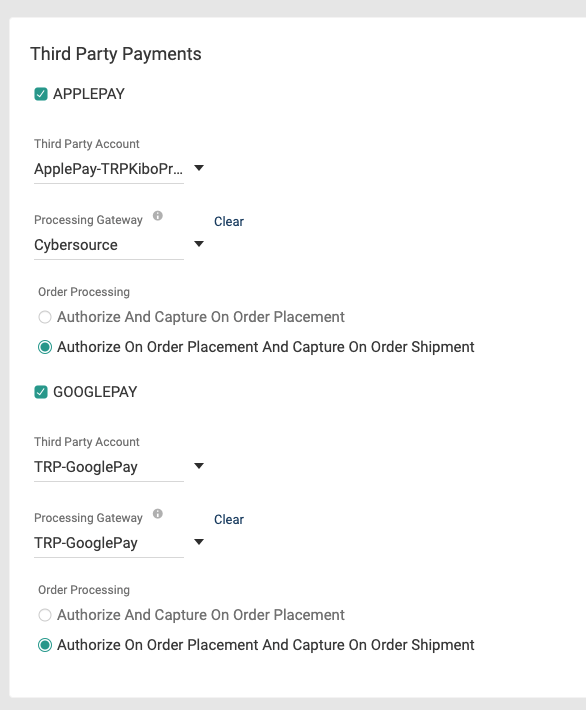
The Payment Types configuration page with APPLEPAY and GOOGLEPAY set up