

 |
| Platforms: Legacy eCommerce, KCCP eCommerce and eCommerce+OMS |
Application Features
- Address validation
- Tax calculation based on rules you set in Avalara
Install the App
For assistance installing the application, please reach out to your SI partner or Kibo’s professional services and enablement team.Configuration Requirements
To configure Avalara to work seamlessly with eCommerce, you need specific items installed and settings provided. This guide details each step from requirements to final configuration for calculating taxes on orders. You must meet the following criteria to configure the Avalara application:- You must have the Avalara application installed on your tenant.
- You must have an active AvaTax account with Avalara.
- You must create and configure your company information in the AvaTax system.
Configure the App
- In Admin, go to System > Customization > Applications.
- Click Avalara Tax Calculator and Address Validator.
- Set the Shipping Country to US.
- Click Configuration.
Configure Account Settings
- Click the Account tab.
- Enter your Avalara Account Number and License Key. You receive this information from Avalara.
- Select the environment to use. Use Development if you are testing your account in the Avalara sandbox. Use Production for live tax calculations.
- Click Test Account to ensure you can successfully connect to your Avalara account from eCommerce and that there are no errors in your credentials.
- Click Save to commit your changes.

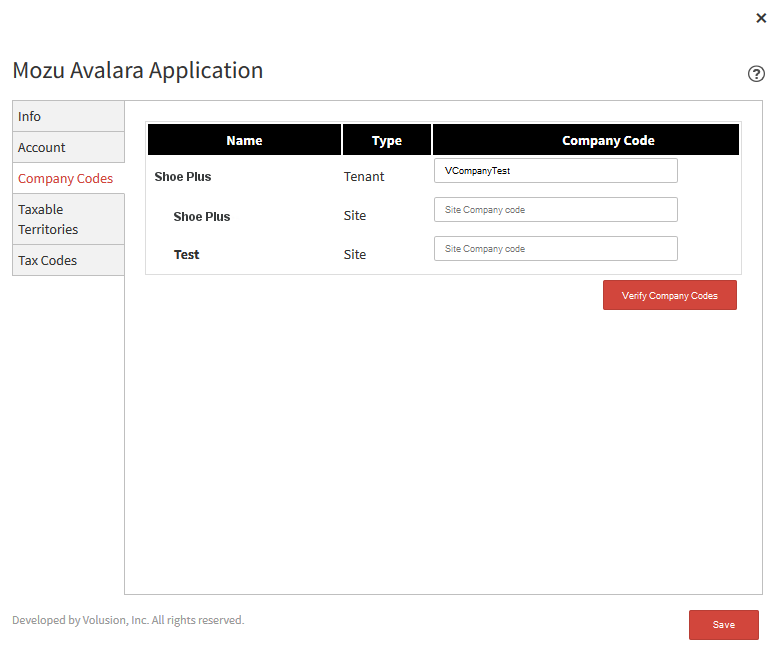
Configure Company Codes
The Company Codes tab allows you to map your tenant and sites to corresponding company codes defined in your Avalara account. The app automatically populates the tab with the sites available in your tenant. You can select different company codes for each level so that different sites log tax transactions to different company names in Avalara. You must have at least one company code that maps to a tenant or a site.- Go to the Company Codes tab. The Name column displays each tenant with the associated sites in eCommerce, as marked in the Type column.
- Enter an Avalara code in the Company Code column per tenant/site as needed. If the names do not exactly match, the application returns an error.
- When you are done mapping, click Verify Company Codes to ensure the information you entered into the eCommerce application matches the information you have stored in Avalara.
- Click Save.
Configure Taxable Territories
You can select countries/nations for taxable purchases through the Taxable Territories tab. Each territory may include states and provinces, displayed in the table. These territories can be set as taxable per eCommerce site, associated through the company code associations made between eCommerce and Avalara.- Go to the Taxable Territories tab.
- Select a eCommerce site from the drop-down menu.
- Enable the checkboxes for each territory you want to set as taxable for purchases.
- (Optional) Click Configure for a particular territory if you want to mark a subset of the states or provinces of that region as taxable. For example, you can mark the United States as a taxable country, but configure Texas as the only taxable state.
- Enable Product Tax Included if the product cost listed in eCommerce already includes tax. This prevents double taxation in the Avalara system.
- Enable Shipping Tax Included if the shipping cost listed in eCommerce already includes tax. This prevents double taxation in the Avalara system.
- Click Verify Company Codes to have Avalara validate the associations and configurations in Avalara to support the selections made.
- Click Save.
Configure Tax Codes
Tax Code is a required field for products, so you must select a code for every new product you configure. Tax codes are available in a pull-down menu in your Product configuration page. One company code can have multiple tax codes. You can enter tax codes individually, but Kibo recommends importing your tax code information from Avalara.Import Tax Codes
- In Avalara, export your tax codes. You must format the exported file with each Tax Code and Description separated by a Tab stop character.
- Click the Tax Codes tab.
- Click Import in the Tax Codes dialog.
- Click Save to commit your changes.
Caution: Deleting entries from the Tax Code grid is only available before saving your settings. Once you save, you cannot edit or delete existing Tax code entries.
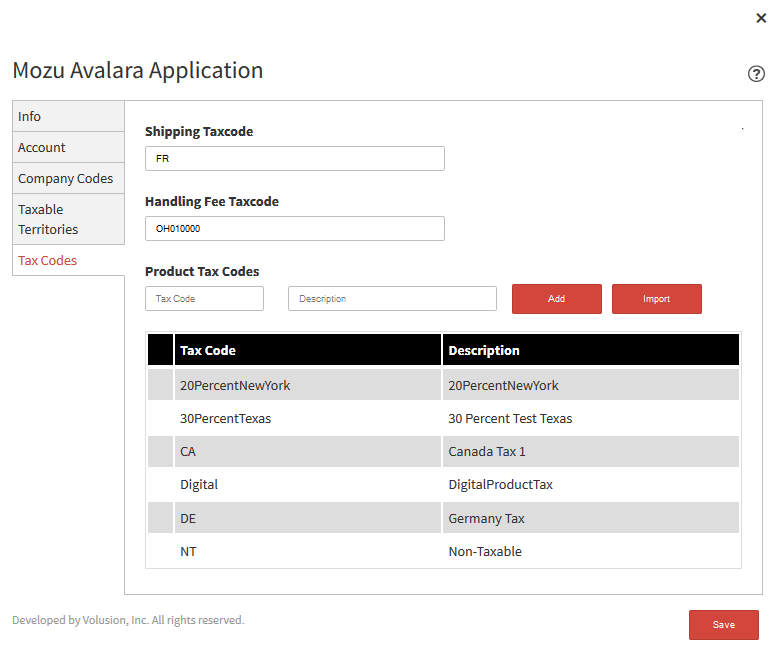
Manually Add Tax Codes
- Click the Tax Codes tab.
- Enter a Shipping Taxcode.
- Enter a Handling Free Taxcode.
- For Product Tax Codes, enter a Tax Code and Description. Click Add. Repeat for every tax code you need to add.
- Click Save to commit your changes.
Caution: Deleting entries from the Tax Code grid is only available before saving your settings. Once you save, you cannot edit or delete existing Tax code entries.
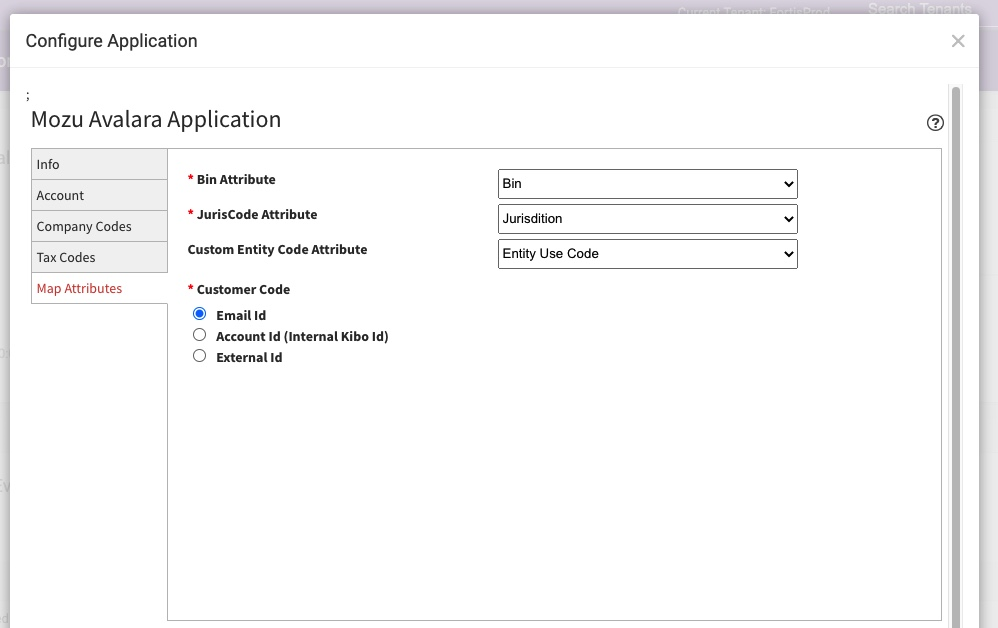
Configure Map Attributes
The Map Attributes tab allows you to map order attributes for Avalara to use to read BIN and JurisCode data.- Select the Map Attributes tab.
- Select a bin attribute from the Bin Attribute drop-down menu.
- Select a JurisCode from the JurisCode Attribute drop-down menu.
- If applicable, select a custom entity code attribute.
- Select which field you want your customer code to be mapped to: the customer’s email ID, their account ID in Kibo, or an external ID.
- Select Save.
Enable the App
- In Admin, go to System > Customization > Applications.
- Double-click Avalara.
- Click Enable App on the Avalara page.