

How It Works
This is different from Ship to Home consolidation, which uses transfers to move all of a single shipment’s items to a single location for shipping. Package consolidation instead lets fulfillers combine packages from multiple shipments for the same recipient that are assigned to their location, even if they belong to different orders. When you begin fulfillment on a shipment, the Fulfiller UI suggests any other qualifying shipments. You then confirm which ones you want to consolidate and pick those items. A tracking number and return tracking number will be generated for each package, and shipments with items in the same package will share the common tracking number information.Shipment Requirements
In order to qualify for consolidation with the selected shipment, other shipments must:- Be in the Ready state.
- Be assigned to the same fulfillment location.
- Be going to the same B2C customer or B2B account.
- Be using the same fulfillment type.
- Be going to the same shipping address using the same shipping method.
Examples
Shipments may be consolidated in one or more packages, such as:- Shipment A consists of two tops and a skirt, while Shipment B consists of three socks. They are consolidated into one package that contains all items.
- Shipment A consists of two tops and a skirt, Shipment B consists of three socks and a vase, and Shipment C consists of one lamp. The apparel items are consolidated into one package while the vase and lamp are consolidated into another package.
Package Consolidation Pre-requites
Before using package consolidation, auto-generate packing list must be disabled for the relevant location groups:- Go to Main > Orders > Location Groups.
- Click a group to open its location details.
- Click Config Settings in the header.
- In the Other Settings section, ensure that Auto generate packing list is disabled. When auto generation is disabled, this location group will use split packing slips instead.
- Click Save in the top right.
Fulfillment Process
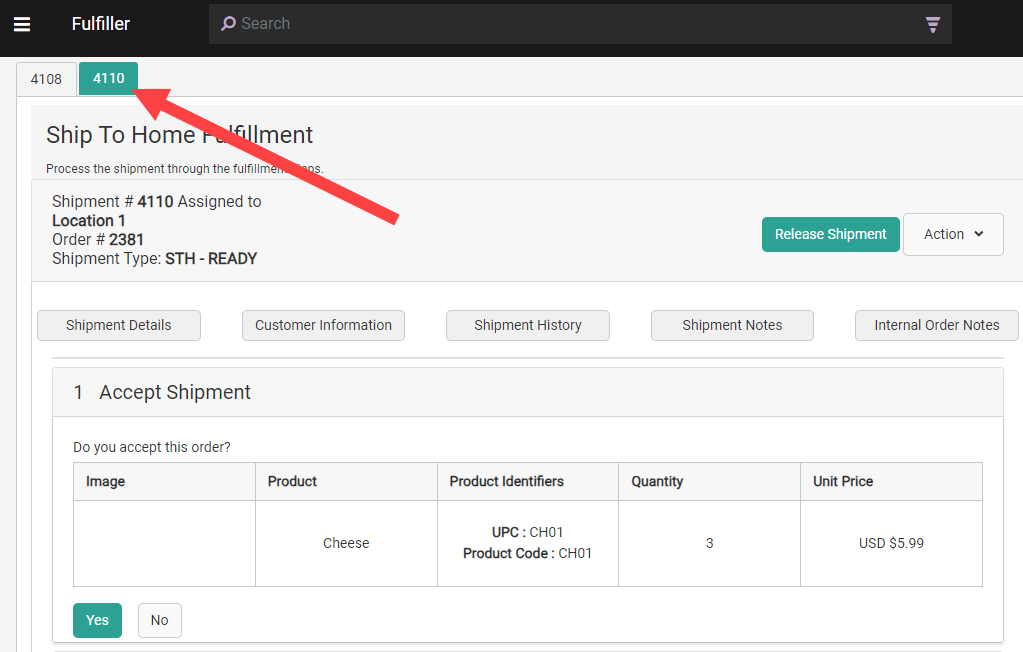
This Ship to Home example demonstrates how the consolidation process works in the Fulfiller UI.- Go to Main > Fulfiller.
- View a Ready shipment you want to fulfill and click Finish Fulfilling Shipment.
- Before accepting the shipment, click Package Consolidations Available. If no other shipments qualify for consolidation, this link will not be displayed.

- Select up to 10 qualifying shipments and click Consolidate. You will not be able to add more shipments to the consolidation after this point.

- This will redirect you to a new page with a tab for each shipment.
- You can independently proceed through acceptance, picking, and stock validation for each shipment. In the Print Packing Slip step, print the amount of packing slips corresponding to the number of boxes you want to ship for that shipment. Once a packing slip has been generated, shipments can no longer be removed from the group.
If cartonization is enabled for your tenant, you can click Get Packing Recommendations to have the system automatically determine optimal box assignments across all items in all consolidated shipments. The button is enabled only once all shipments in the consolidation group have reached the Print Packing Slip step. The recommendations display a cross-shipment view showing which items from each shipment are assigned to each box. Once you click Save, each shipment’s packing slips are updated to reflect only its own assigned items — the cross-shipment view is replaced by a per-shipment view. You can click Reject Recommendations at any time before proceeding to revert all shipments to their original state and proceed with manual packing instead.
Note: The Reject Recommendations button is disabled once any shipment in the consolidation group proceeds to the Prepare for Shipment step. It is re-enabled only when all shipments return to the Print Packing Slip step.
- During Prepare for Shipment (or Prepare for Delivery), toggle Consolidate Packages across Shipments and associate other shipments from the consolidation group with the appropriate packing slips using the drop-down menus that appear. In this example, Shipment 4110 and 4108 have been consolidated into one package.
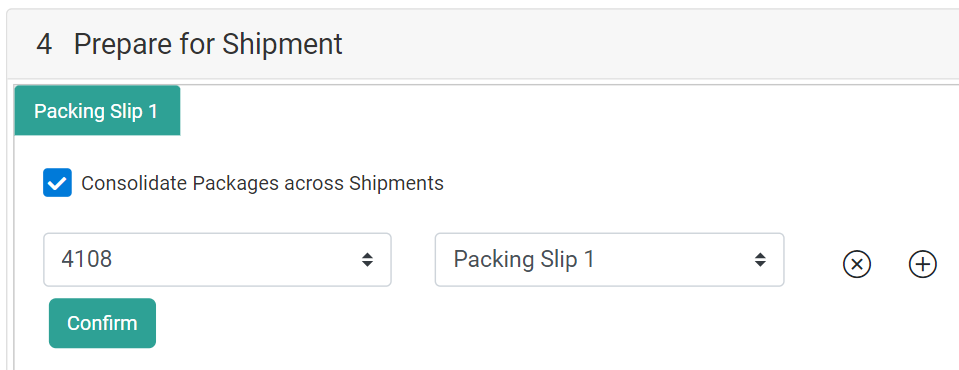
- Click Confirm.
- Enter the box dimensions and carriers for each package as usual, then generate the shipping label(s). A tracking number and return tracking number will be generated for each package. These numbers are the same across all shipments included in the package.
- In the case of Delivery, a single delivery label will be generated and shared across consolidated shipments. If a shipment contains any package(s) that are not consolidated, they will receive a separate delivery label.
- Click Yes, Complete Shipment. This will complete all grouped shipments and release them from the group.
Remove Shipments from Consolidation
Once you have added a shipment to a consolidation group, it cannot be added to a different consolidation group or fulfilled by itself unless released from the group. To release a shipment before a packing slip has been generated:- In the tabbed layout shown in Step #6 above, click the tab of the shipment you want to release. Viewing any shipment that belongs to a consolidation group (such as from the search results) will direct you to this page if needed.
- Click Release Shipment in the top right.

- Click Confirm.
Note: If cartonization recommendations have been saved for the consolidation group, the Release Shipment button is disabled on all shipments in the group. To re-enable it, click Reject Recommendations on the Print Packing Slip step to remove the recommendations and restore all shipments to their original state.