

Watch: Vendor Order Fulfillment
Walk through the two-step vendor fulfillment workflow: order acknowledgement and shipment preparation
Note: The vendor-facing PO and Order Number on each order corresponds to the operator’s Kibo Admin shipment number, so the same record can be tracked from both sides throughout fulfillment
Order Listing
Click Orders in the left navigation. The Orders page surfaces four summary cards mapped to workflow stages: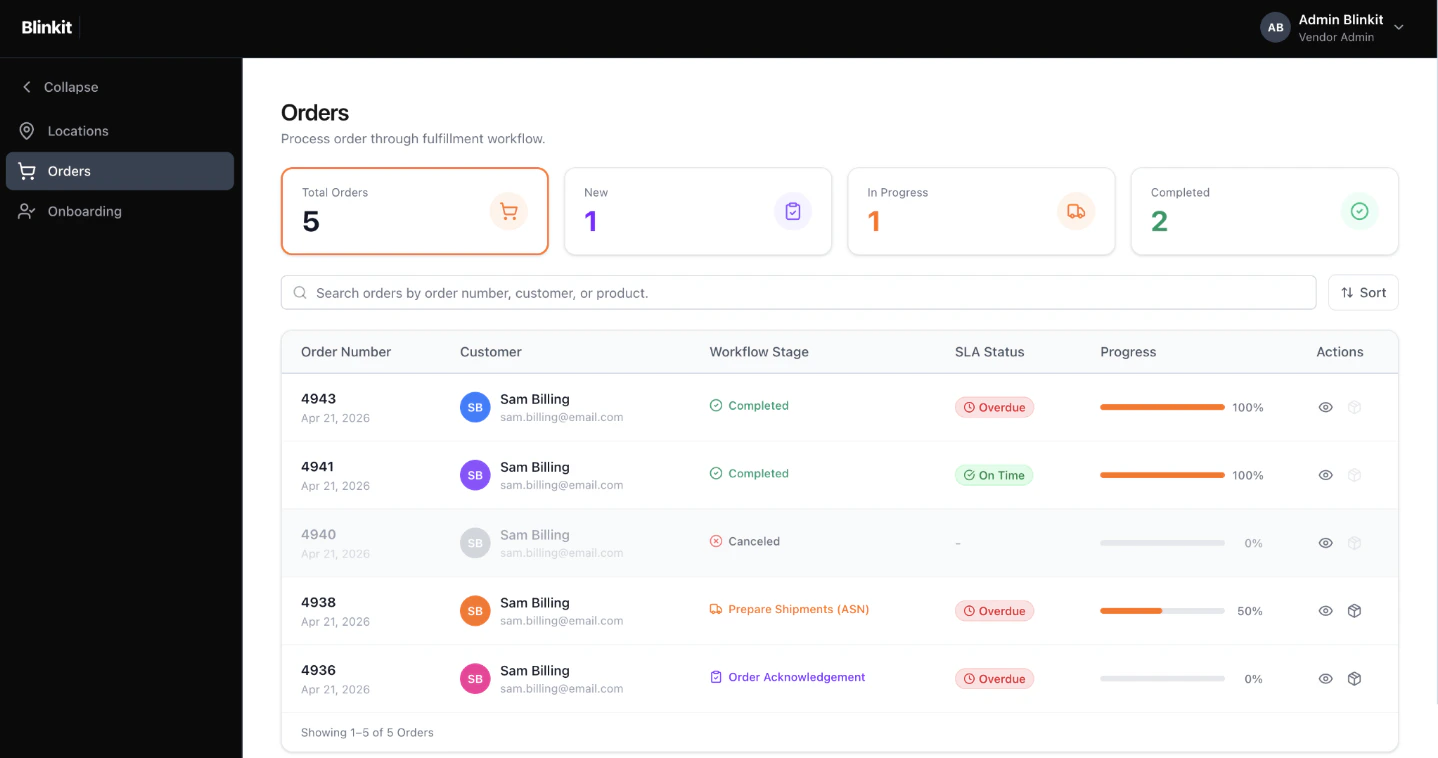
- Total Orders — cumulative count of all orders.
- New — orders awaiting Order Acknowledgement (Step 1).
- In Progress — orders at Prepare Shipment / ASN (Step 2).
- Completed — orders that have moved past the invoice screen after you click Done.
- Order ID with placement date below.
- Customer — name, email, and avatar initials.
- Workflow Stage — labeled badge: Order Acknowledgement, Prepare Shipments (ASN), Completed, or Canceled.
- SLA Status — On Time (green), At Risk (amber), or Overdue (red). Thresholds are configured by the Kibo Admin.
- Progress — horizontal bar with a percentage.
- Actions — a View icon (always enabled) and a Start Fulfillment icon (enabled for orders not yet at Fulfilled or Canceled).
Order Details
- Click the View icon on any order row to open the Order Details page.
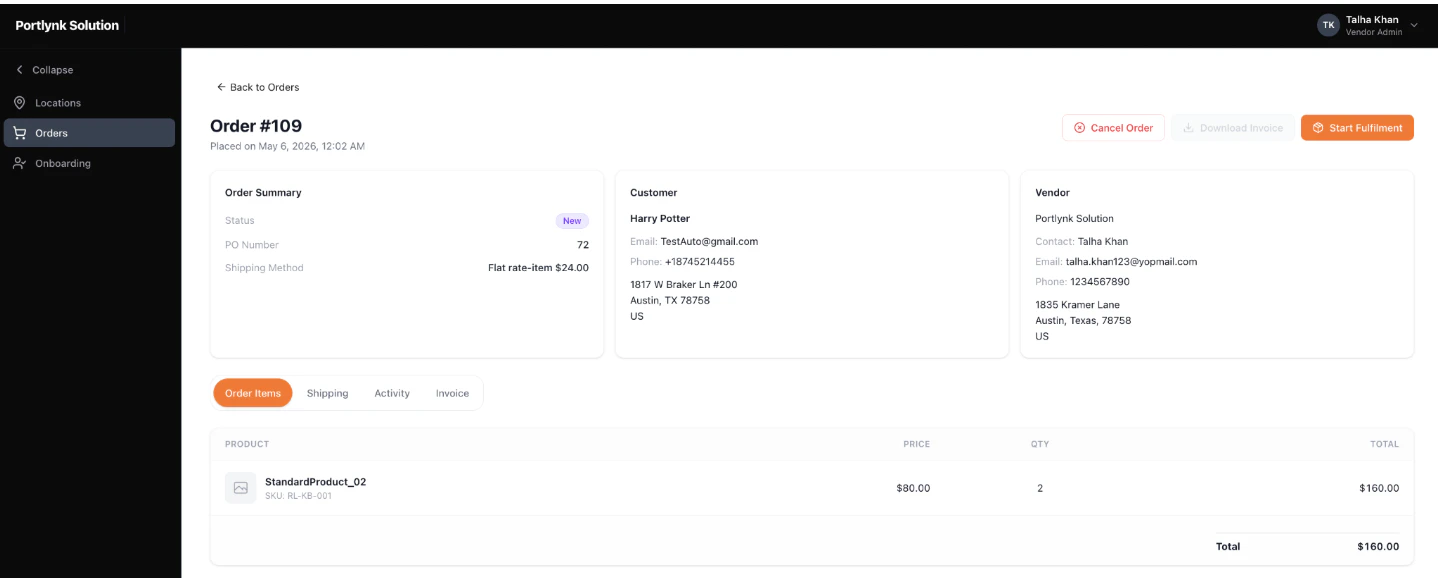
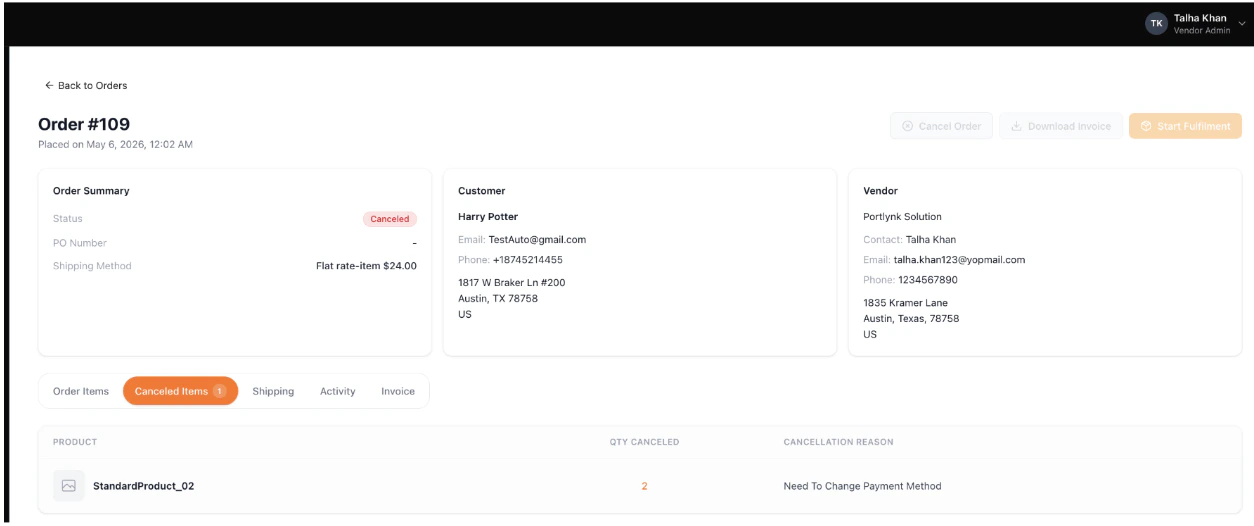
- Page header — Order ID and placement timestamp, with top-right action buttons for Cancel Order, Download Invoice (disabled until the invoice is generated), and Start Fulfillment.
- Order Summary — Status badge, PO Number (the Kibo Admin shipment number), Shipping Method, and Shipping Cost.
- Customer — contact name, email, phone, and full mailing address.
- Vendor — your contact name, email, phone, and full mailing address.
- Tab bar — Order Items, Canceled Items (only present when at least one item was canceled), Shipping, Activity, and Invoice.
Cancel an Order
An order can be canceled at any time before it is marked Fulfilled, from the Order Details page. Cancellation cancels the entire order — for partial fulfillment of a single line, see Step 1: Acknowledge with Partial Fulfillment later in this section.- On the Order Details page, click Cancel Order in the top-right.
- In the Cancel Order — Reason Required popup, choose a Reason for cancellation from the dropdown. The button to confirm cancellation remains disabled until a reason is selected.
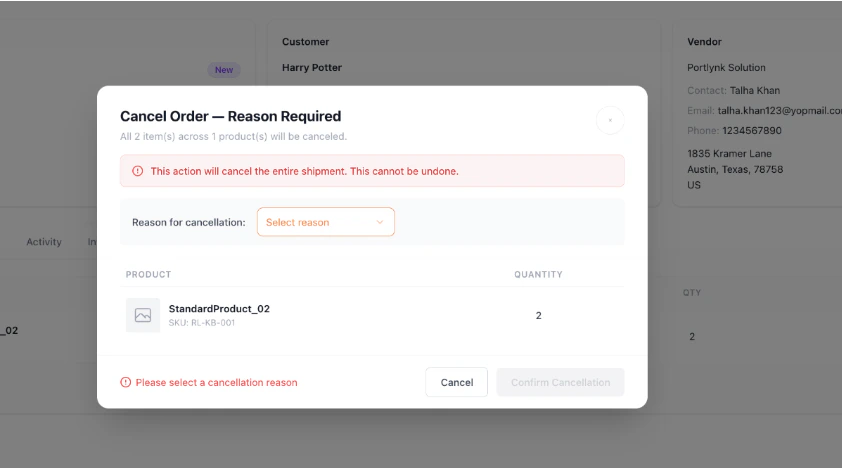
- Click Confirm Cancellation.
- After cancellation, the order’s status changes to Canceled and a new Canceled Items tab appears on the Order Details page listing the canceled products with the cancellation reason. The Order Items tab itself displays an empty state — “All items in this order have been canceled” — pointing you to the Canceled Items tab for details.
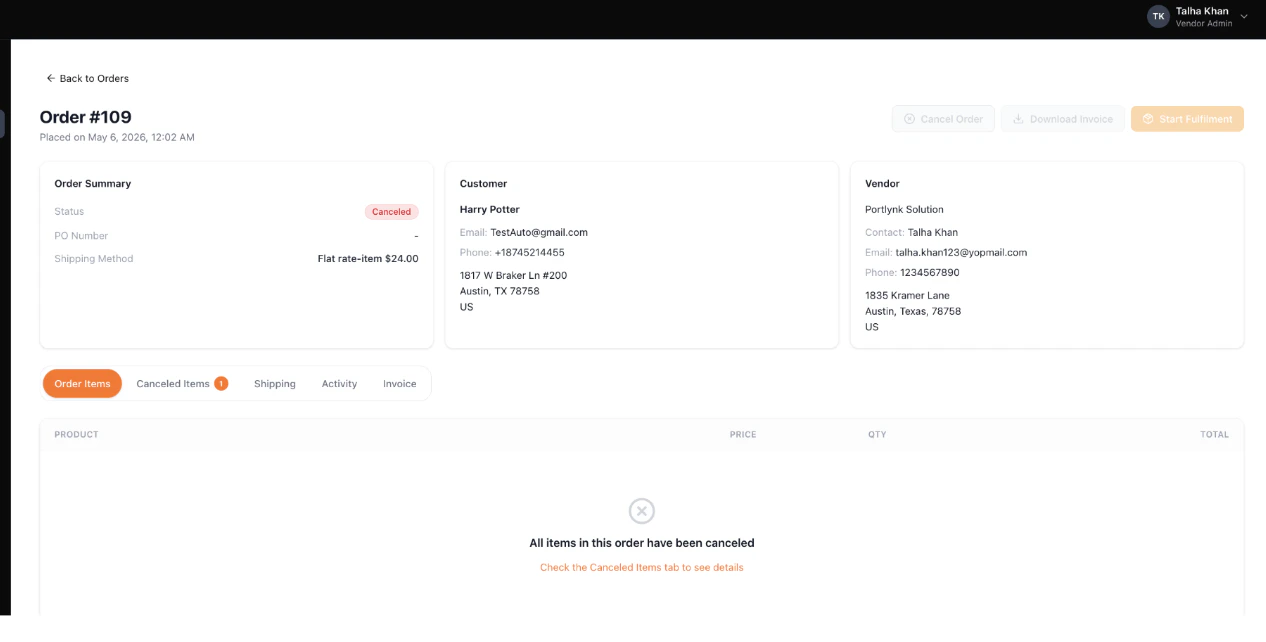
- In the Order Listing, the canceled order is greyed out at 0% progress, the SLA Status is set to Canceled, and the Start Fulfillment icon is disabled.

Step 1: Acknowledge an Order
Step 1 confirms order receipt and validates that the items are available to ship. To begin fulfillment, click the Start Fulfillment icon in the Actions column on the Orders list, or open the order and click Start Fulfillment in the Order Details header.Full Quantity Available
On the Step 1 screen you’ll see the Validate Items in Stock table, listing each product with its image, name, price, identifiers, the quantity ordered, and a Validate Stock input pre-populated with the ordered quantity.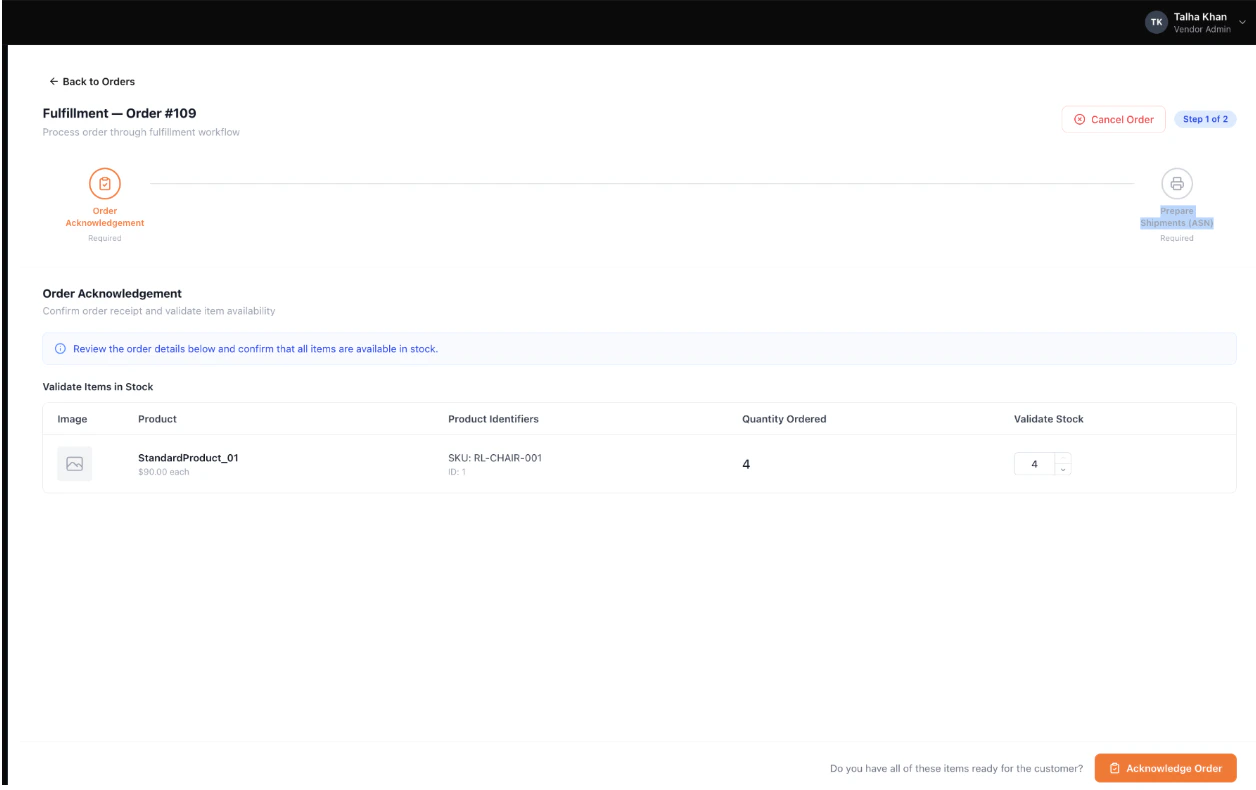
- Confirm that all items are available by leaving the Validate Stock values equal to the Quantity Ordered values.
- Click Acknowledge Order in the bottom-right. Because all rows are at full quantity, the workflow advances directly to Step 2.
Partial Fulfillment with Reason Capture
If any item is not fully available, reduce the Validate Stock value on its row. As soon as you do: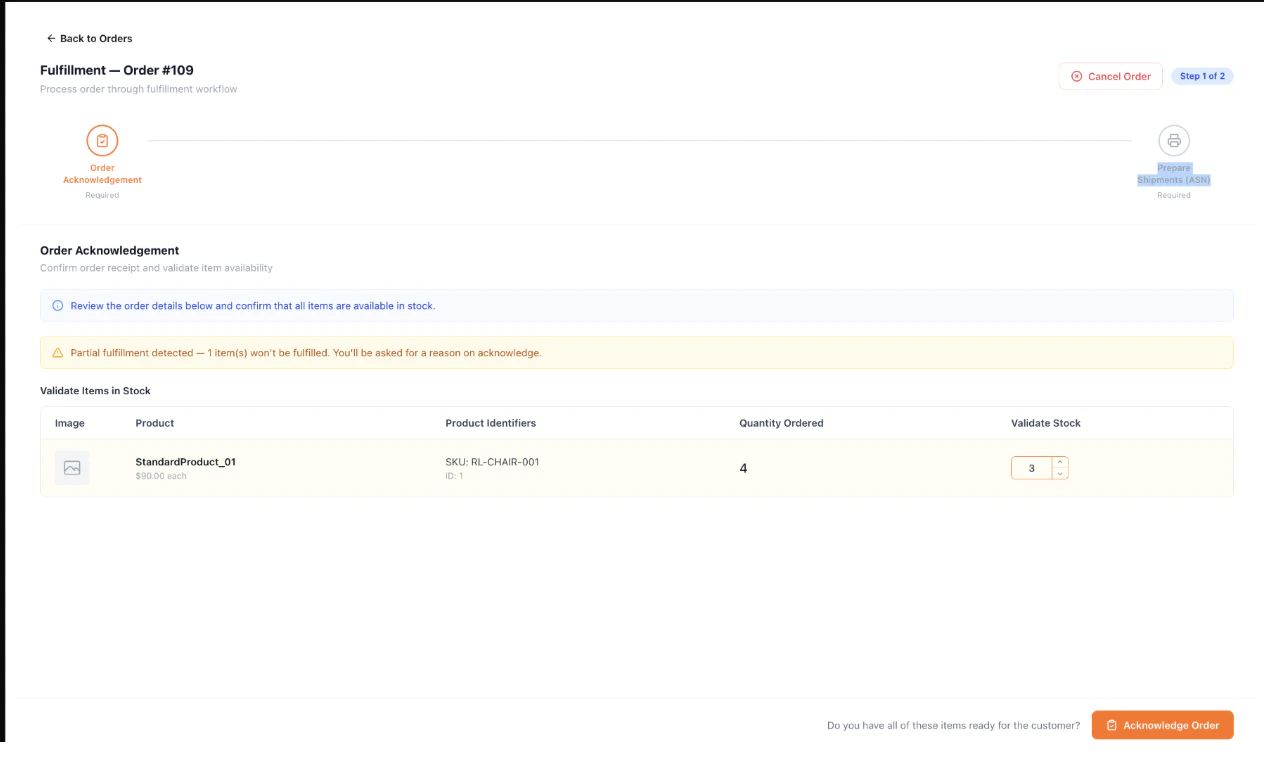
- The row is highlighted in yellow to flag the partial fulfillment.
- A warning banner appears above the table: “Partial fulfillment detected — [X] item(s) won’t be fulfilled. You’ll be asked for a reason on acknowledge.”
- Click Acknowledge Order. The Unfulfilled Items — Reason Required popup opens.
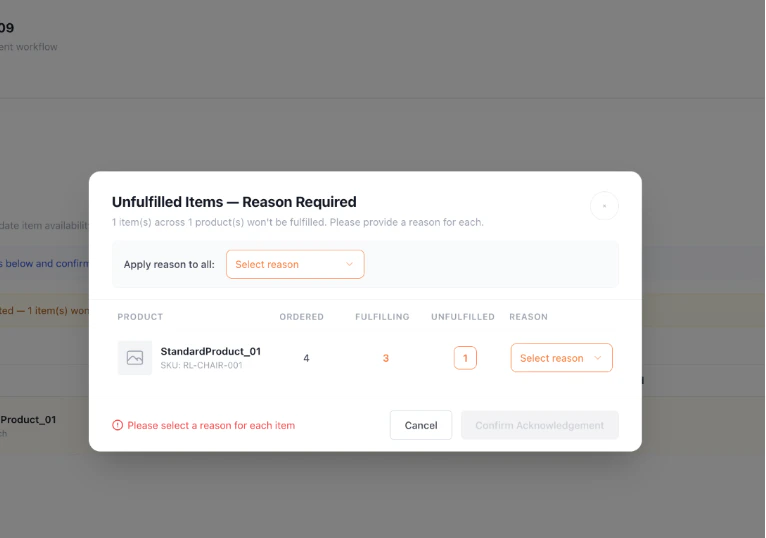
- Provide a reason for each unfulfilled item using either of two methods:
- Apply reason to all — select a reason from this dropdown to populate every per-product reason at once. (If you then change a single product’s reason, the Apply-to-all dropdown resets to its default empty state since the reasons are no longer uniform.)
- Per-product reason — use the dropdown in each product row to set a reason for that product specifically.
- When every unfulfilled item has a reason, the popup displays a green All reasons provided indicator and the Confirm Acknowledgement button becomes enabled.
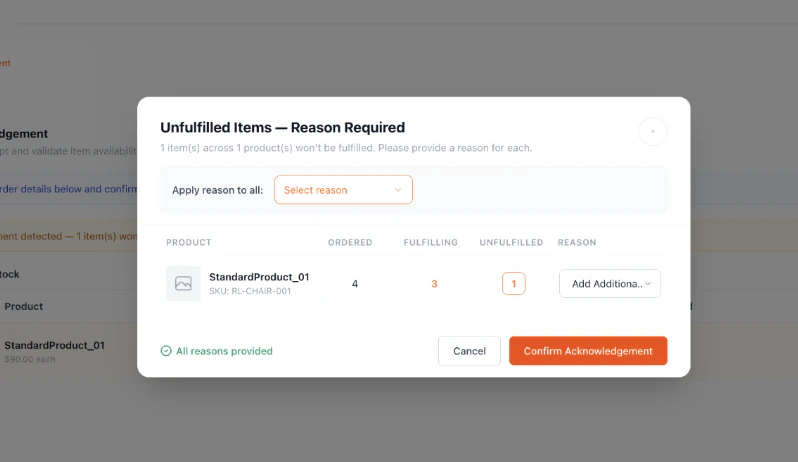
- Click Confirm Acknowledgement.
Step 2: Prepare Shipments (ASN)
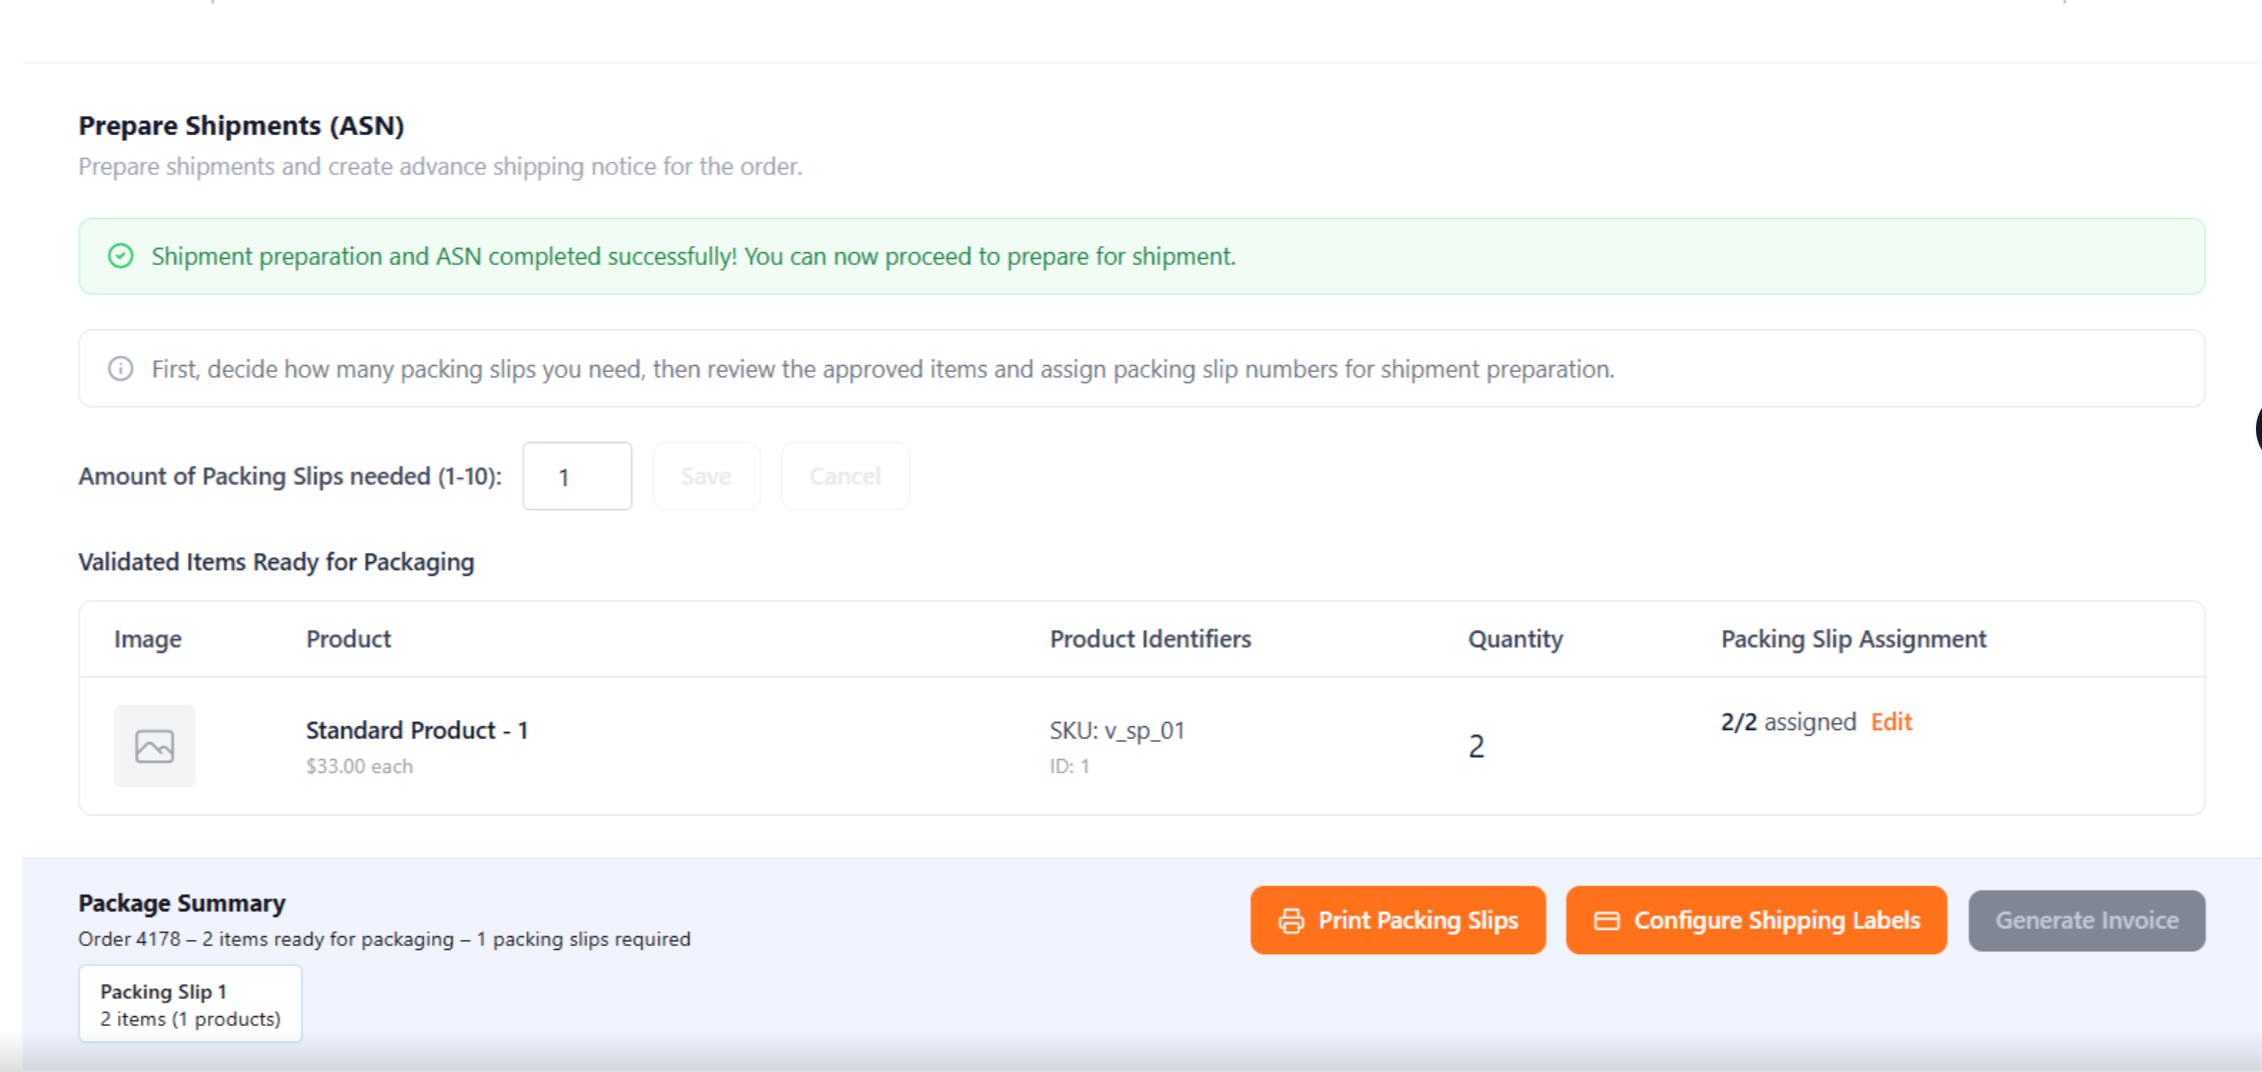
Step 2 prepares the shipment for dispatch and creates the Advance Shipping Notice. The screen shows the Validated Items Ready for Packaging table — the items the order is moving forward with — plus controls for the number of packing slips, per-product slip assignment, and downstream actions.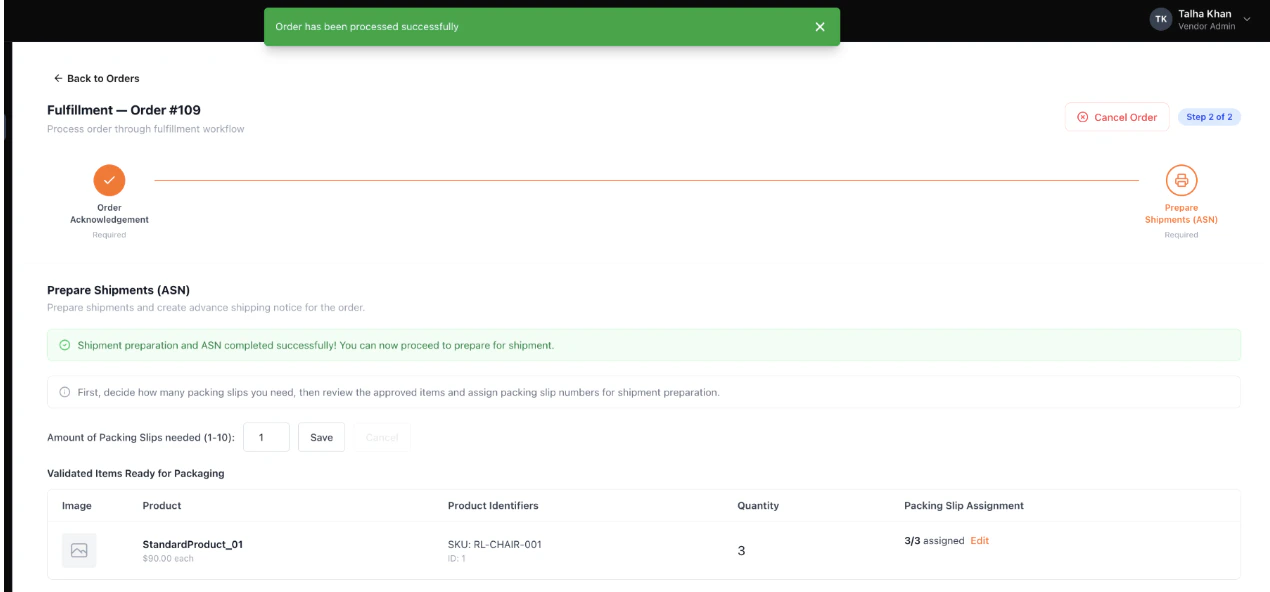
Set the Number of Packing Slips
The slip count and per-product assignments are configured together — Save is gated by both completing all assignments and no slip being empty.- In the Amount of Packing Slips needed (1-10) input at the top of the table, enter the number of packing slips you’ll be using to ship the order.
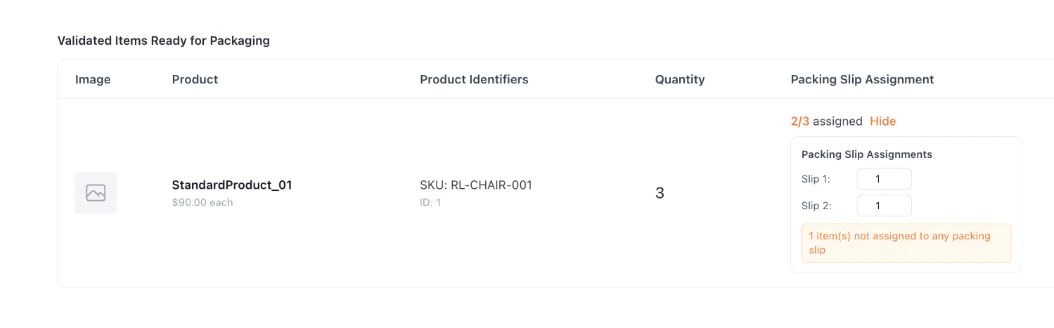
- For each product row, click Edit in the Packing Slip Assignment column. Enter the quantity to assign to each slip — the sum across slips must equal the acknowledged quantity for the product. The row’s X / Y assigned counter updates as you go.
- Repeat for each product that needs to be split across slips. Every packing slip must end up with at least one item.
- Click Save on the Amount of Packing Slips needed input.
Tip: You can re-save the count later to change it — for example, to add an additional box mid-packing.
Every packing slip you create must contain at least one item. If a slip is left empty, an inline error appears in the assignment, the empty slip card displays a red border in the Package Summary below the table, and the Print Packing Slips button stays disabled until every slip has at least one item.
Print Packing Slips
Once all quantities are assigned and no slip is empty, click Print Packing Slips in the Package Summary footer. The system generates the packing slips for printing.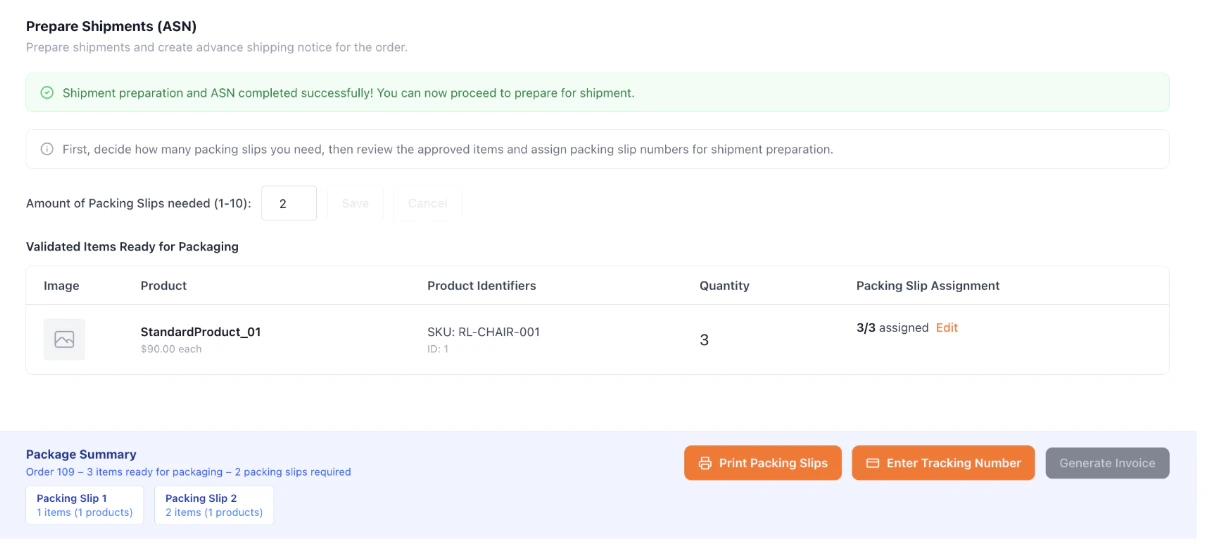
Record Shipping: Tracking Number or Shipping Label
How you record shipping in Step 2 depends on the vendor shipping mode your operator has configured (see Vendor Settings → Shipping Configuration):- Vendor-managed shipping (default) — you enter your own tracking number per packing slip.
- Operator-managed shipping — you can generate a shipping label on the operator’s carrier accounts, with manual tracking entry available as a fallback.
Enter a Tracking Number (vendor-managed, or as a fallback)
- Click Enter Tracking Number in the Package Summary footer.
- For each slip, type the carrier’s tracking number into the input field and click Save on that row. Each row’s Save operates independently.
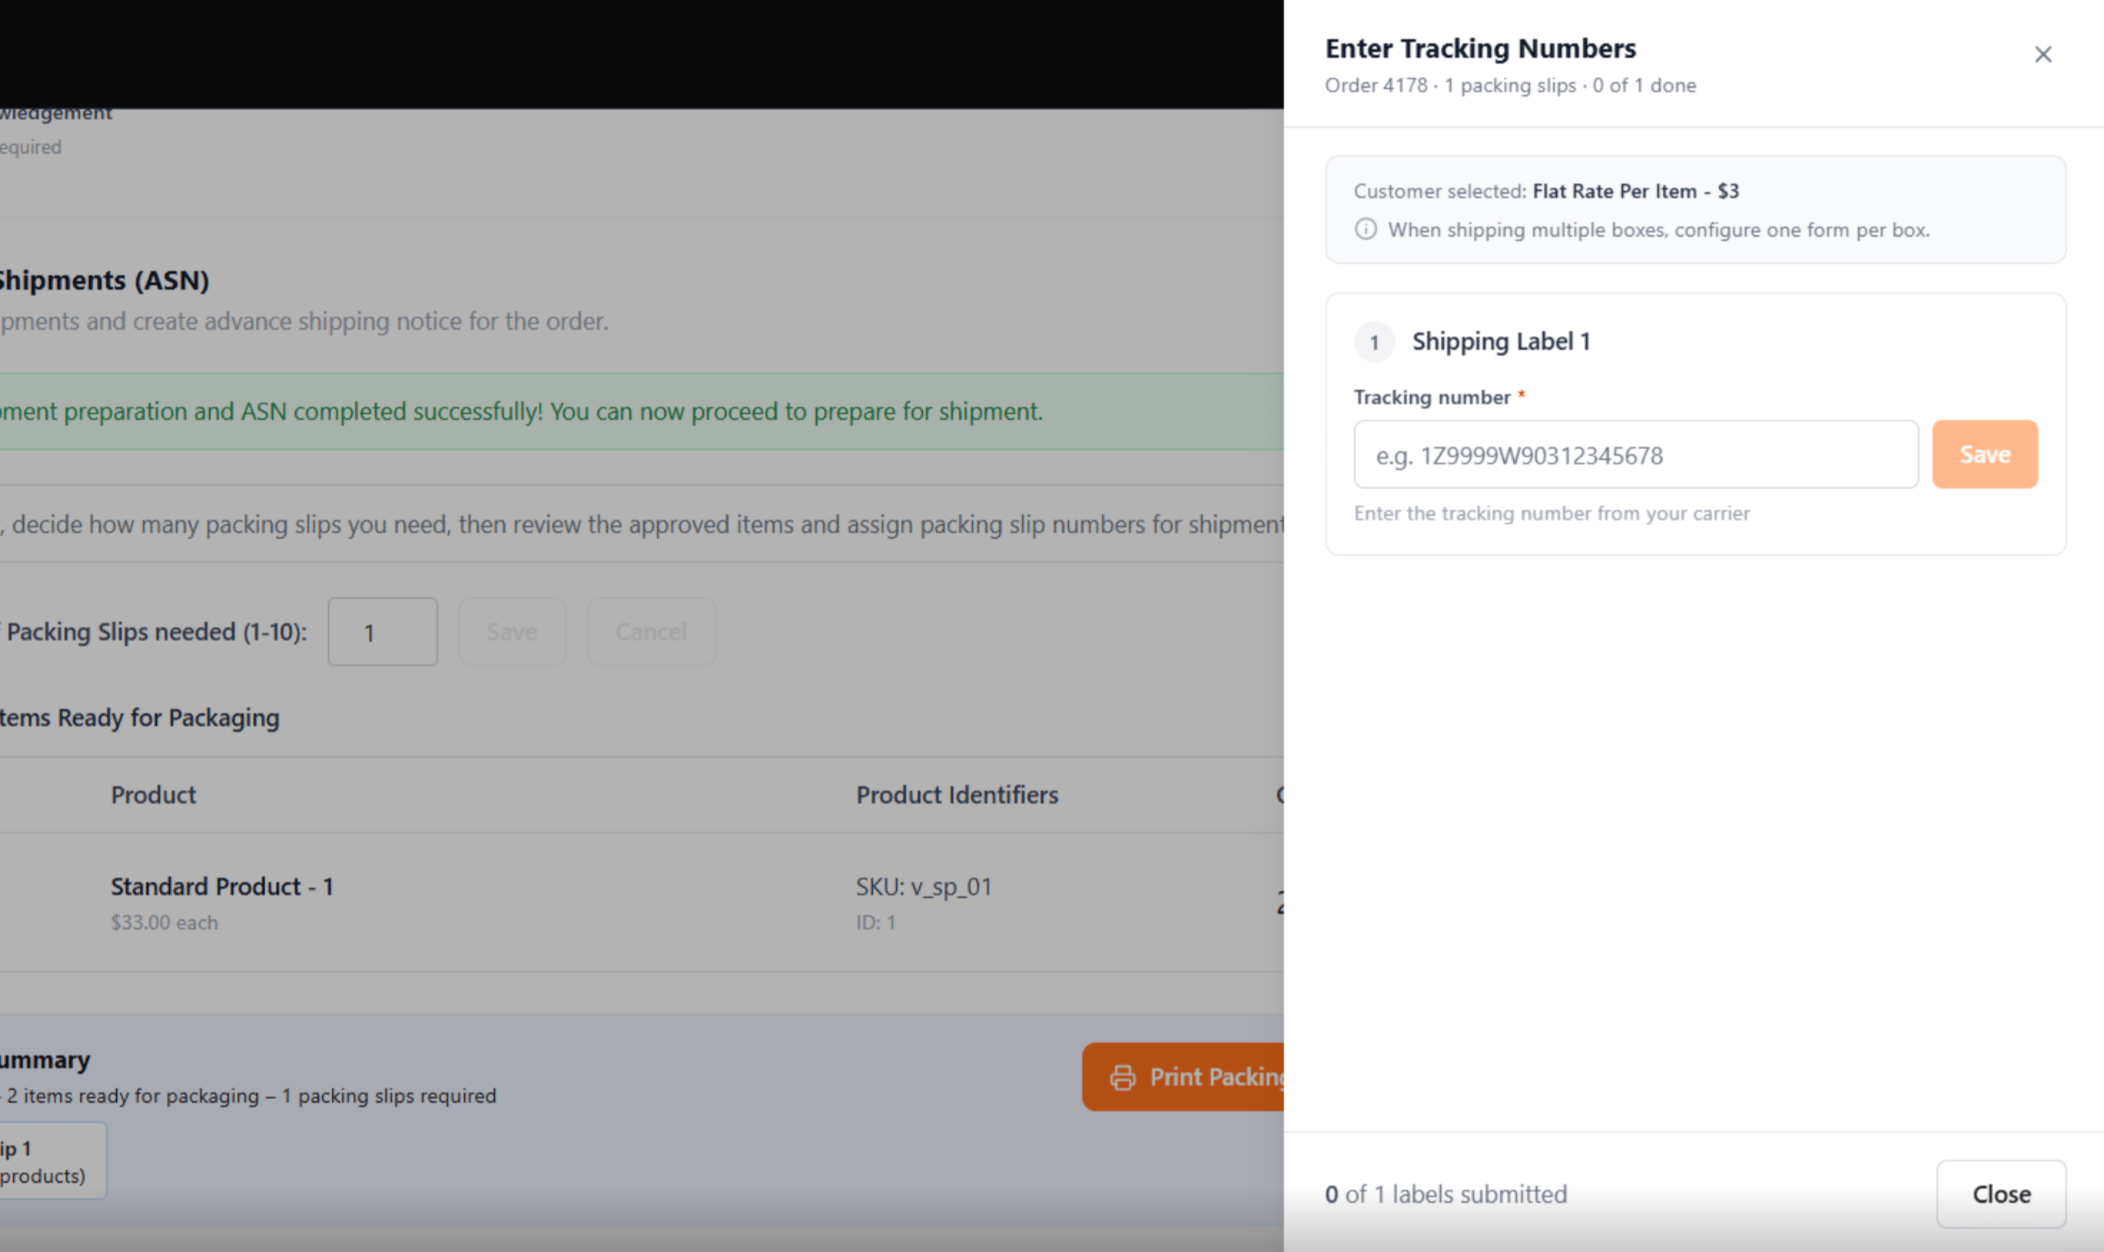
- After Save, the input becomes read-only and the Save button becomes Edit. Click Edit if you need to correct a mistyped number.
- Once saved, the tracking number is also reflected on the corresponding packing slip card in the Package Summary
Print a Shipping Label (operator-managed)
When operator-managed shipping is enabled, each packing slip has its own Shipping Label tab (“Shipping Label 1”, “Shipping Label 2”, …), configured independently.- Click Configure Shipping Label.
- Click Configure Shipping Label.
- Confirm carrier and service. The carrier and service type are pre-selected from the customer’s chosen shipping method. You can override either within the carriers your operator has configured for the fulfillment location; service types are filtered to the selected carrier.
- Select a package. If your operator has configured predefined packages on the location group, choose one from the dropdown — the L × W × H dimensions prefill and lock to that package. If no predefined packages exist, enter L × W × H manually.
- Enter weight. Weight is always entered manually. Dimension and weight units (in/lbs or cm/kg) follow the location group’s unit type and cannot be changed.
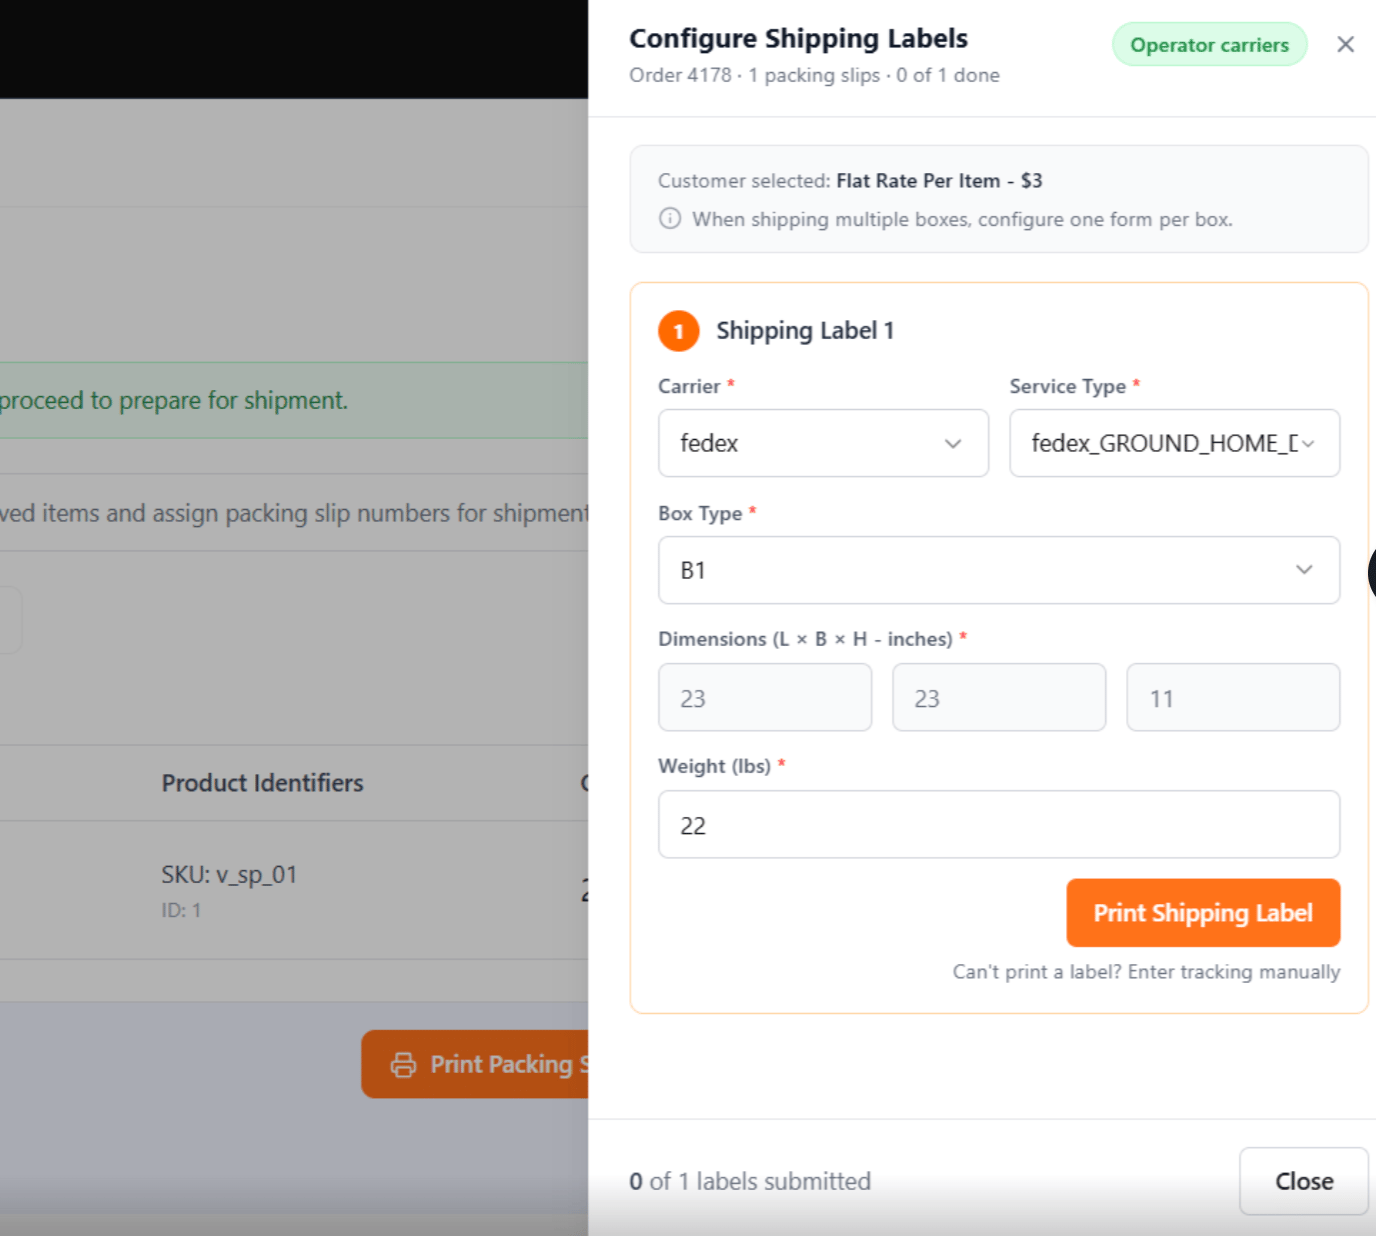
- Click Print Shipping Label. The system generates a PDF label on the operator’s carrier account and captures the tracking number automatically — no manual entry. The tracking number appears on the packing slip card and on the Shipping tab.
- Reprint or edit. Reprint returns the existing label. Edit generates a new label with a new tracking number and updates the order to the latest number.
Manual tracking entry remains available in operator-managed mode as a fallback for any slip. Also update the Shipping Tab subsection (under “View a Completed Order”), note that tracking is auto-captured from the generated label in operator-managed mode, or the manually entered number in vendor-managed mode.
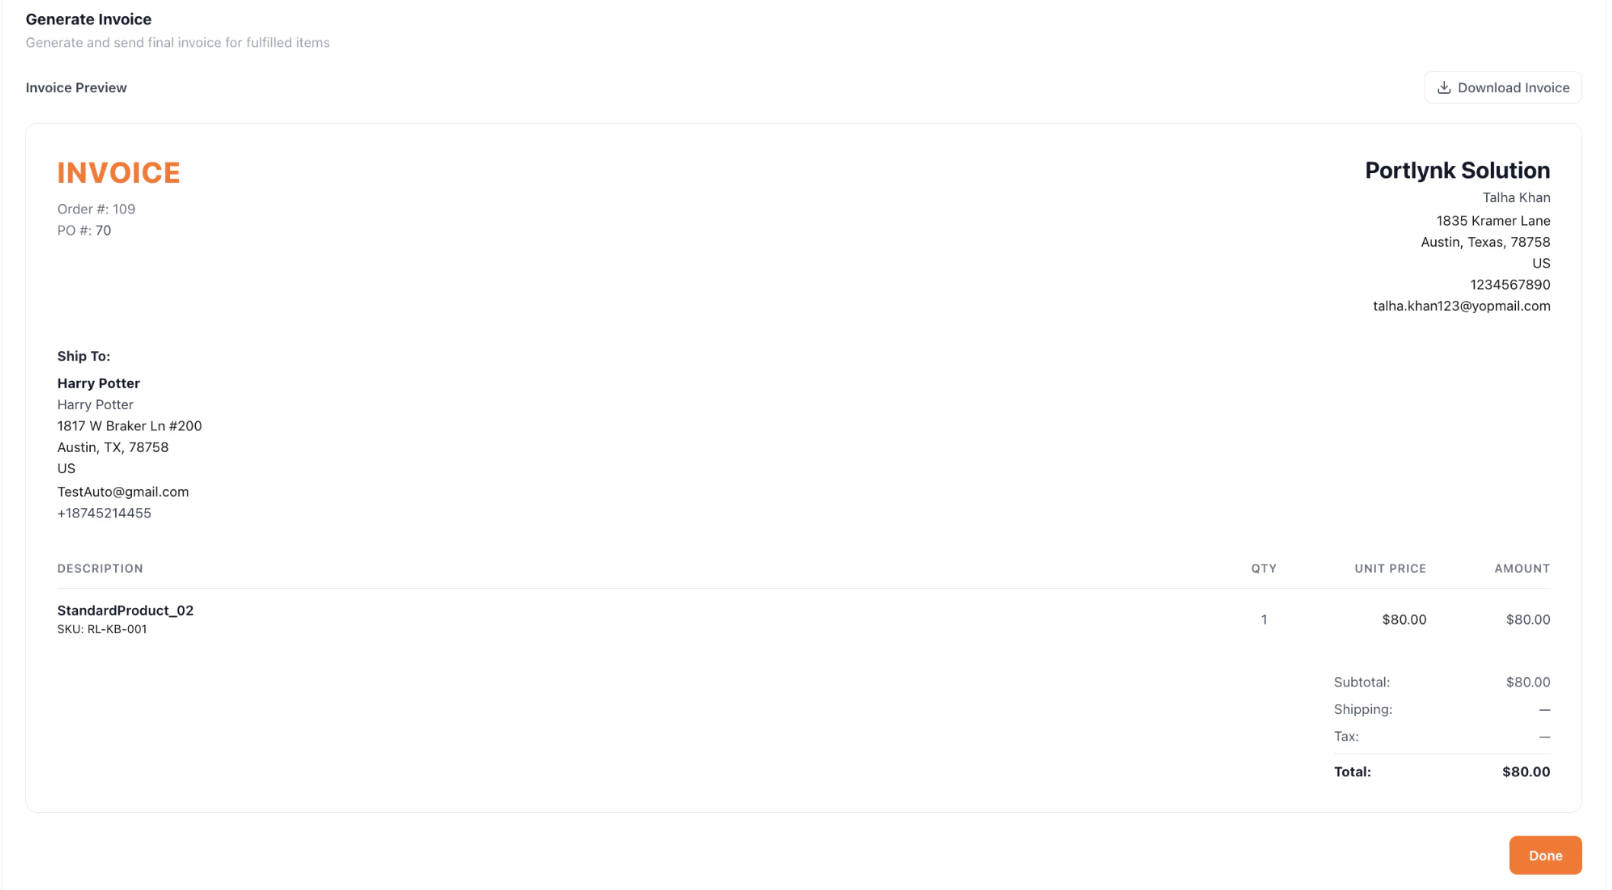
Generate the Invoice
- When every packing slip has a saved tracking number, the Generate Invoice button in the Package Summary footer becomes enabled. Click it to open the Send Invoice page.
- On the Invoice page you’ll see an Invoice Preview with a Download Invoice button. The invoice document includes the INVOICE header with Kibo company details, invoice metadata (Invoice #, Order #, Date, PO #), Ship To, line items, and total.
- Click Done below the invoice preview to finalize. The order’s status flips to Completed, its progress bar moves to 100%, and the Cancel Order and Start Fulfillment buttons on the Order Details page become disabled.
View a Completed Order
A completed order’s Order Details page exposes five tabs, each filled in with the data captured during fulfillment.Order Items Tab
Lists each fulfilled product with image, name, SKU, unit price, quantity, discount, item adjustment, and total. The price shown is the contract price, not the storefront selling price the customer paid.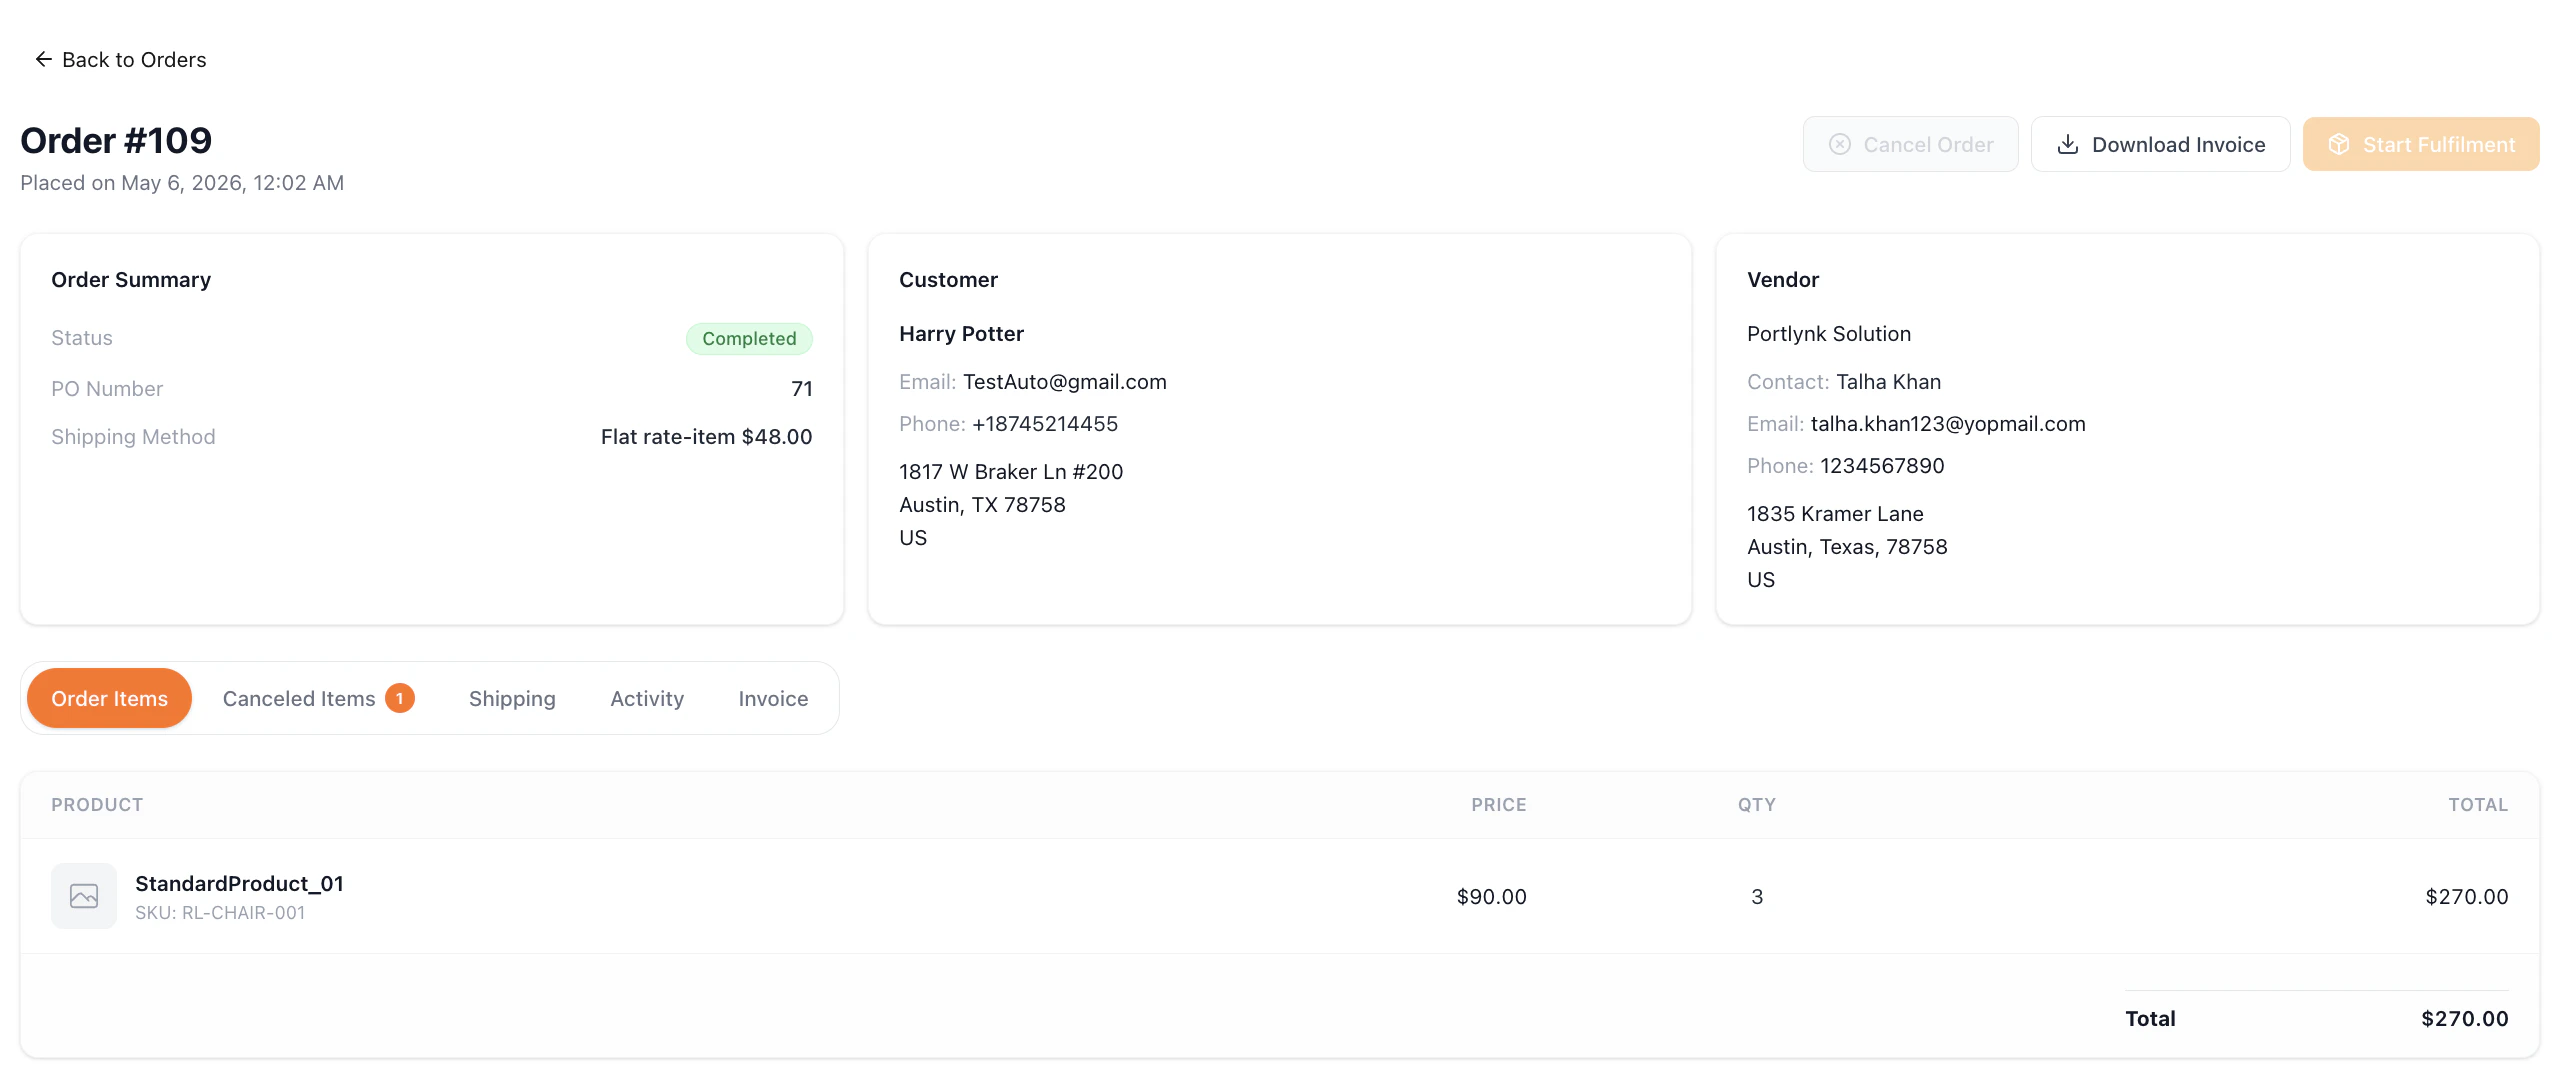
Canceled Items Tab
Appears only when at least one item was canceled during the order’s lifecycle (from a partial-fulfillment branch in Step 1 or a full cancellation). The tab badge shows the count of canceled items. Columns are Product, Qty Canceled (in red), and Cancellation Reason. For products where the reason was “Other”, a secondary line below the primary line displays the custom reason text the vendor entered.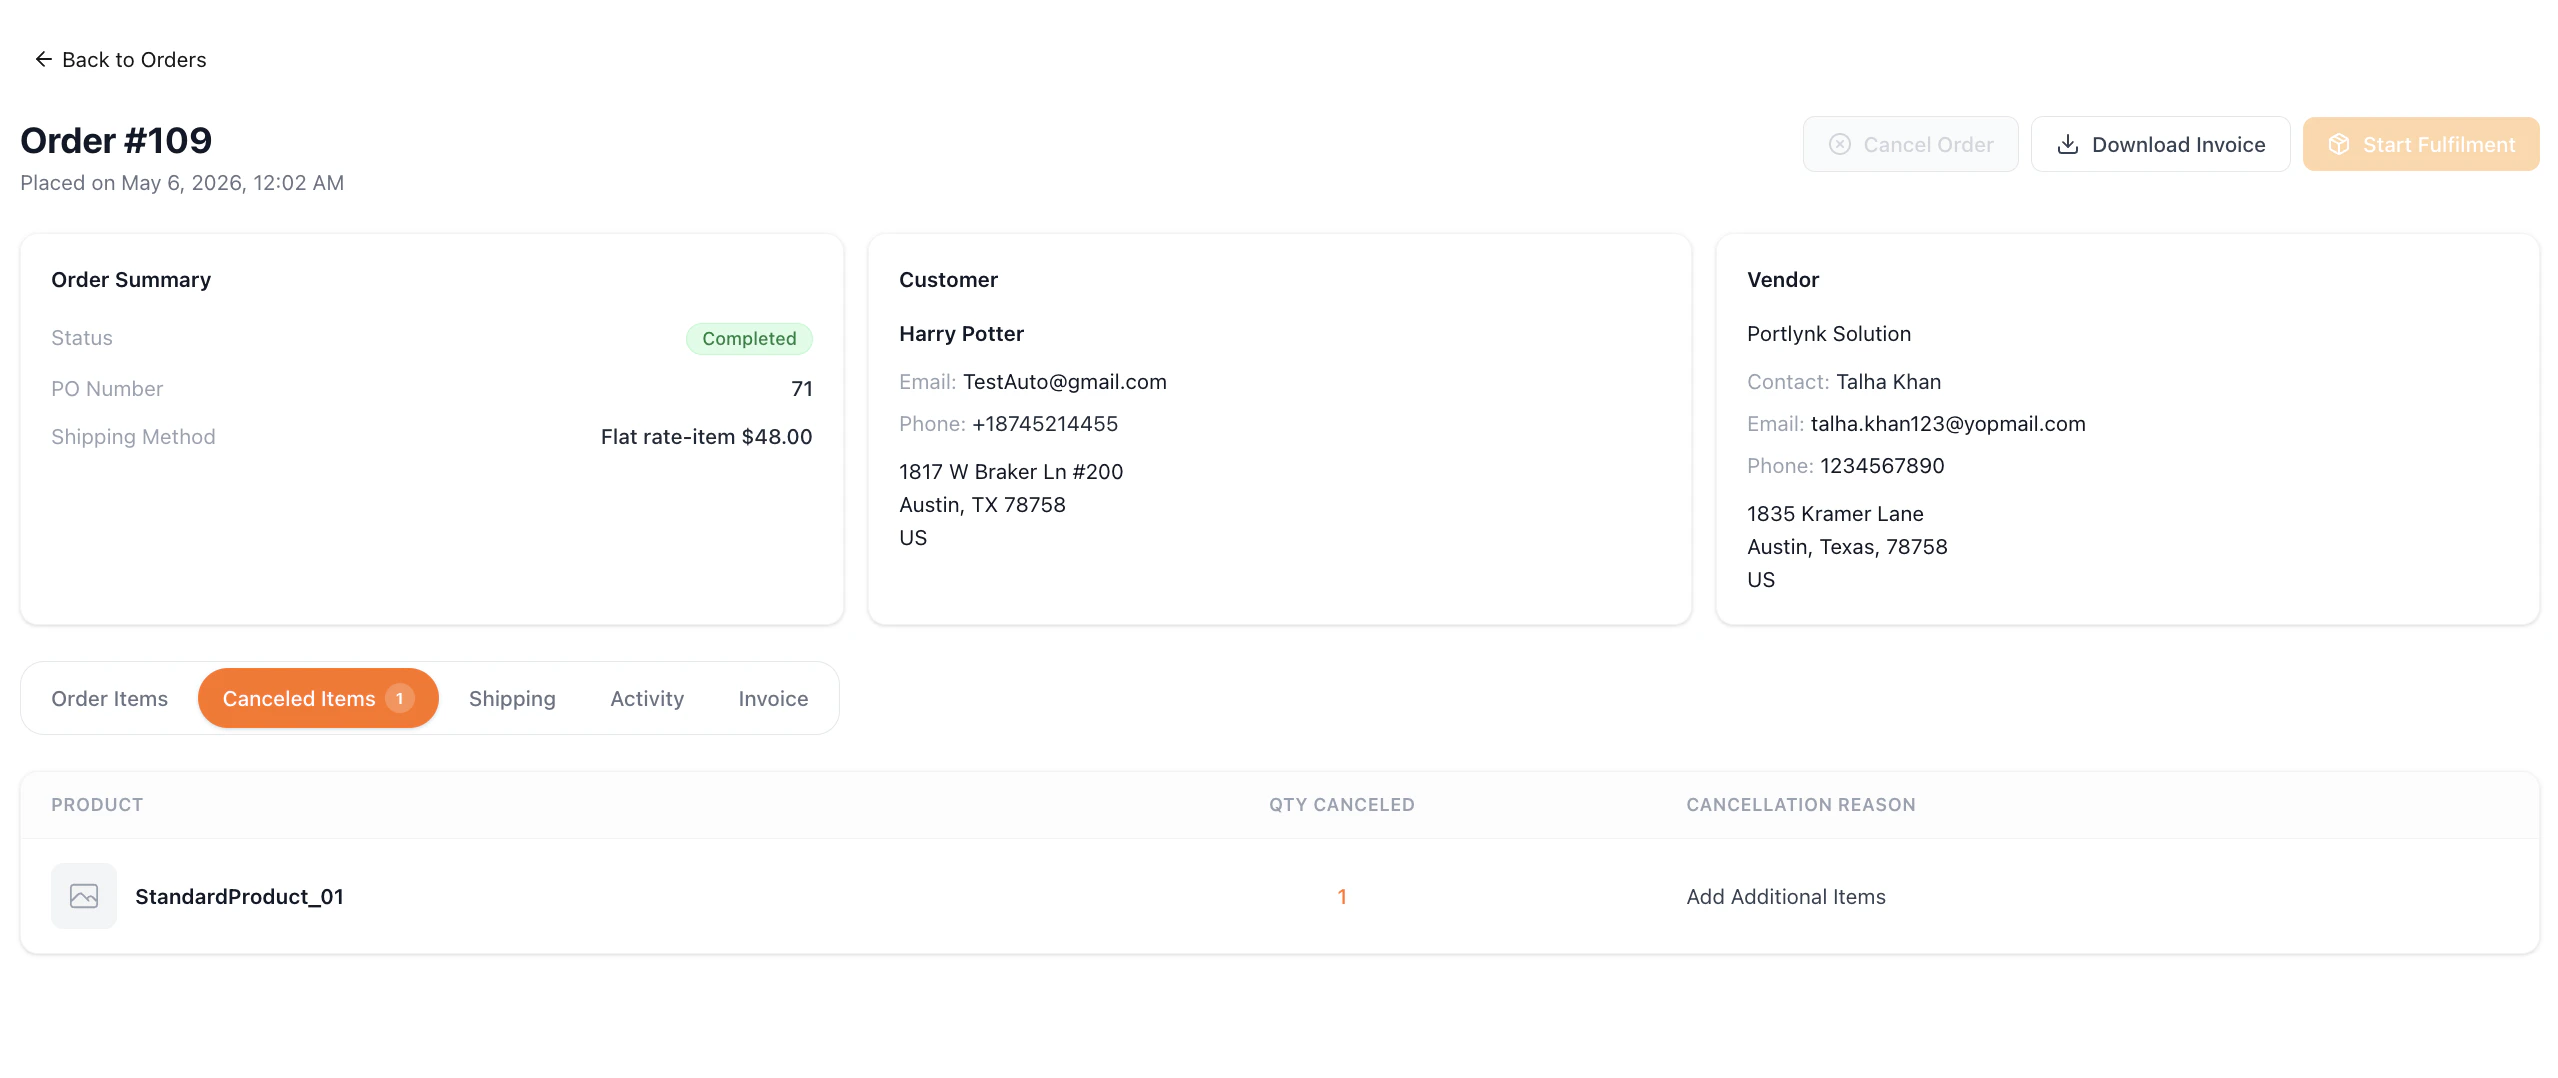
Shipping Tab
The Shipping tab displays a Tracking Information section per packing slip
Activity Tab
An Order Activity timeline in reverse-chronological order. Each entry shows an icon, a bold activity title, a short description, and a timestamp.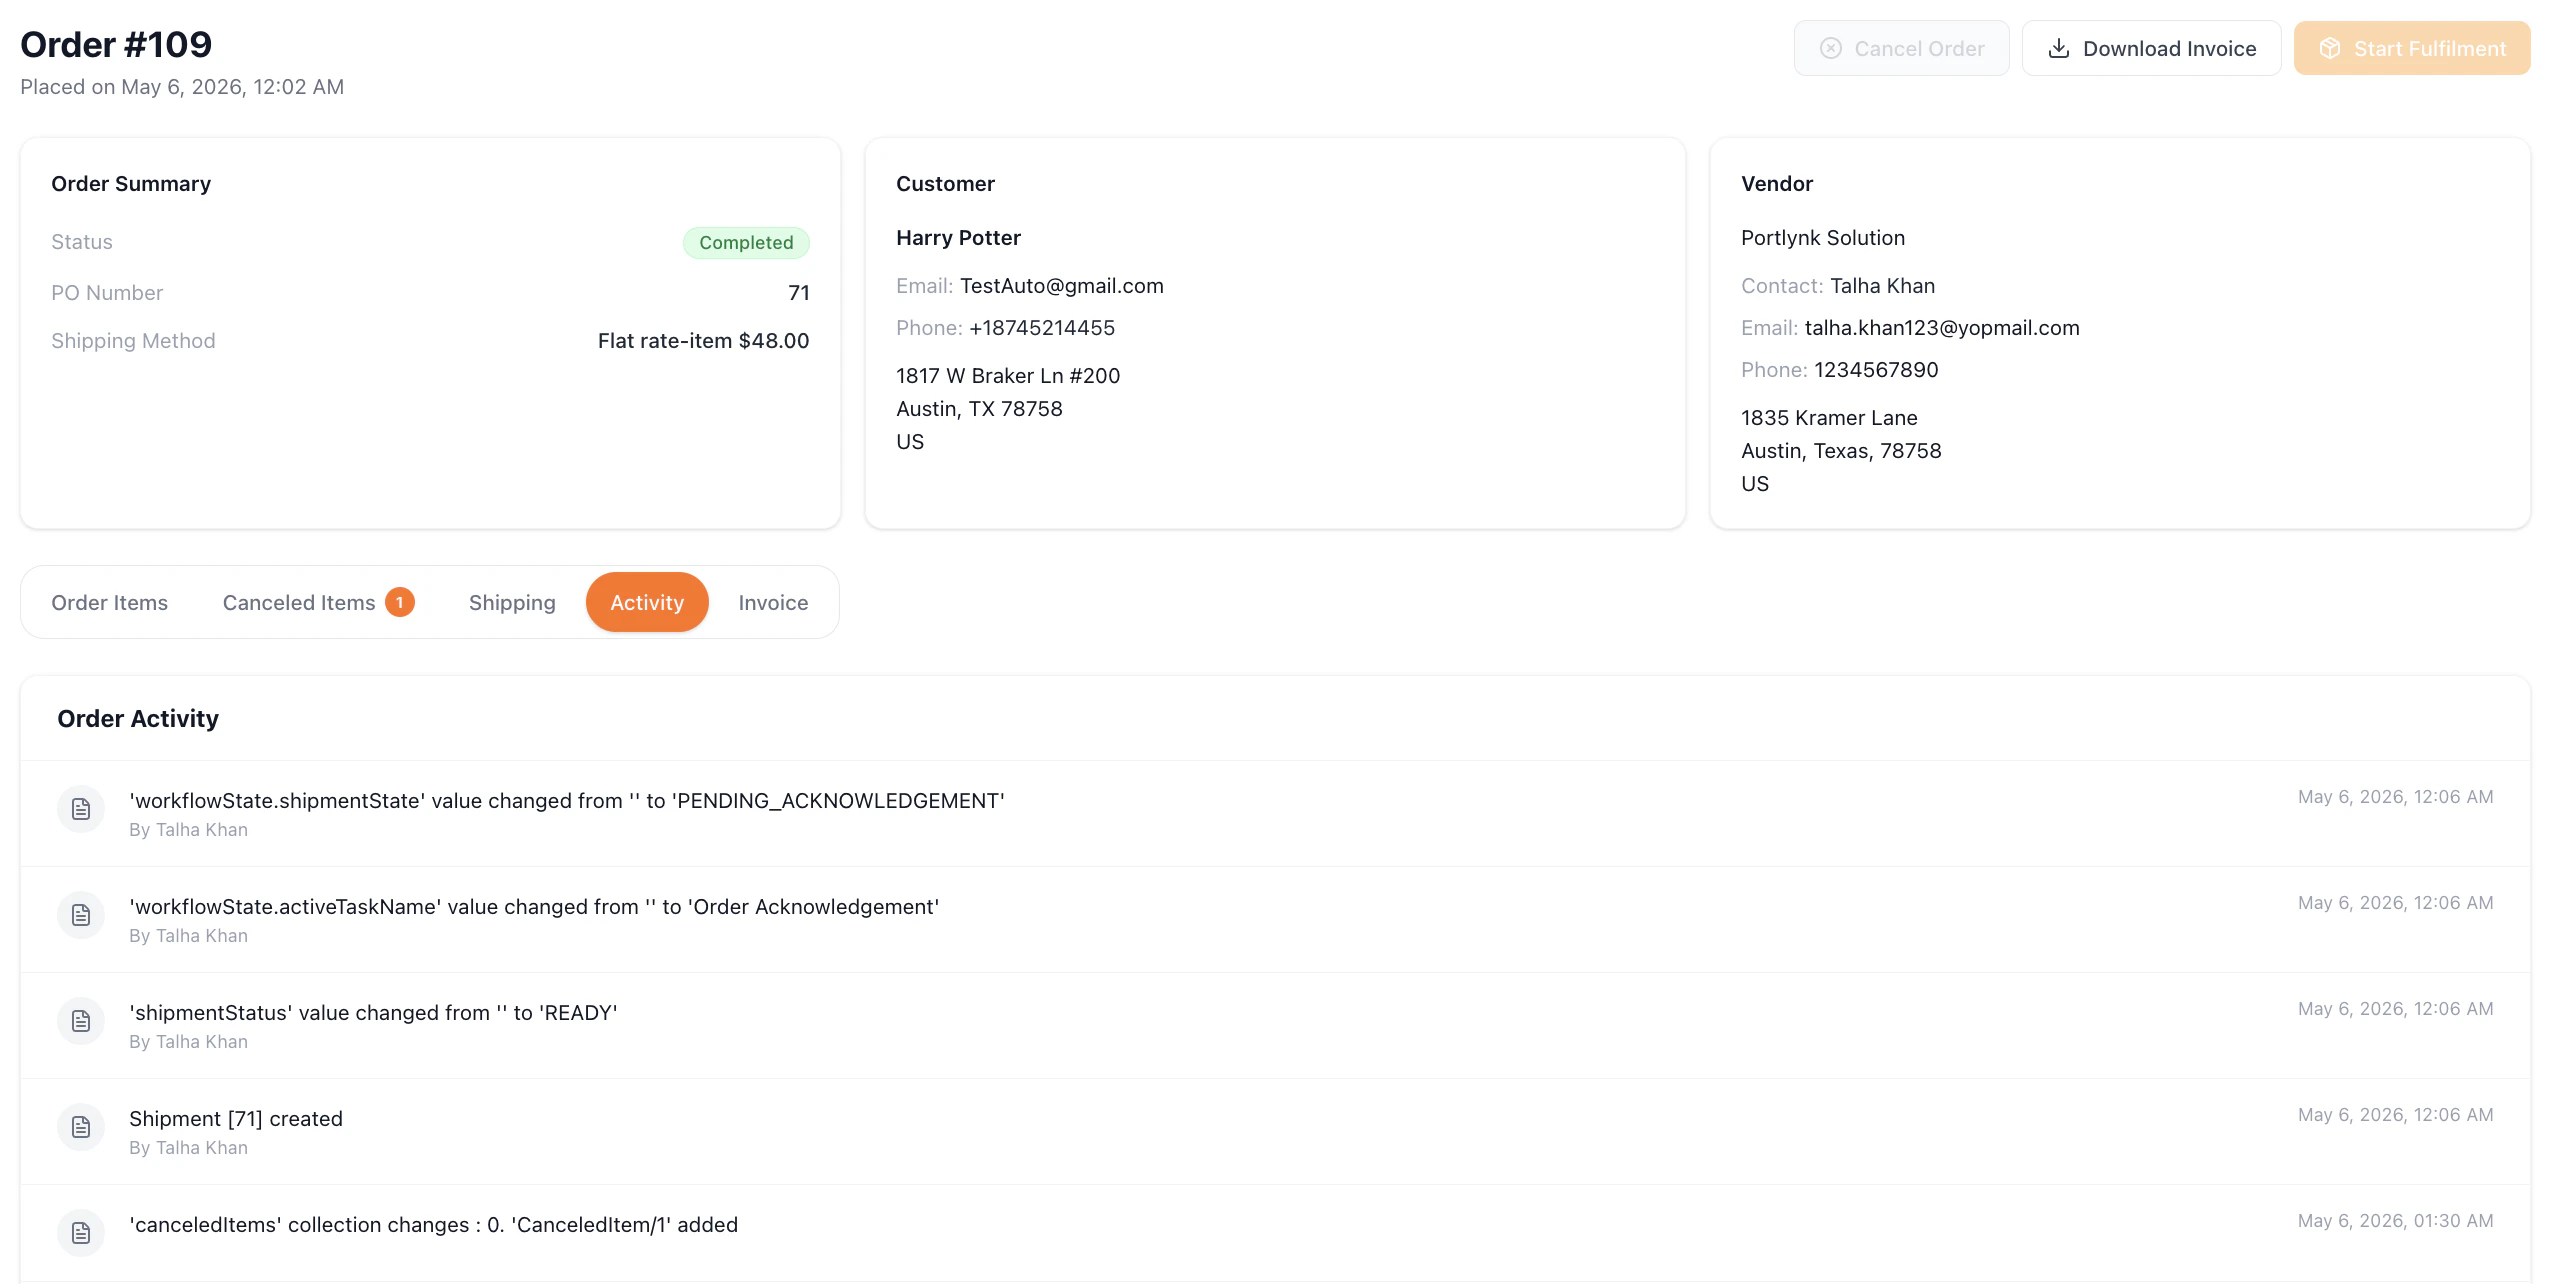
Invoice Tab
An Invoice Preview with a Download Invoice button at the top-right. The invoice document displays the INVOICE header with Kibo company details, invoice metadata, Ship To sections, the line-items table (Description, Qty, Unit Price, Amount), and totals .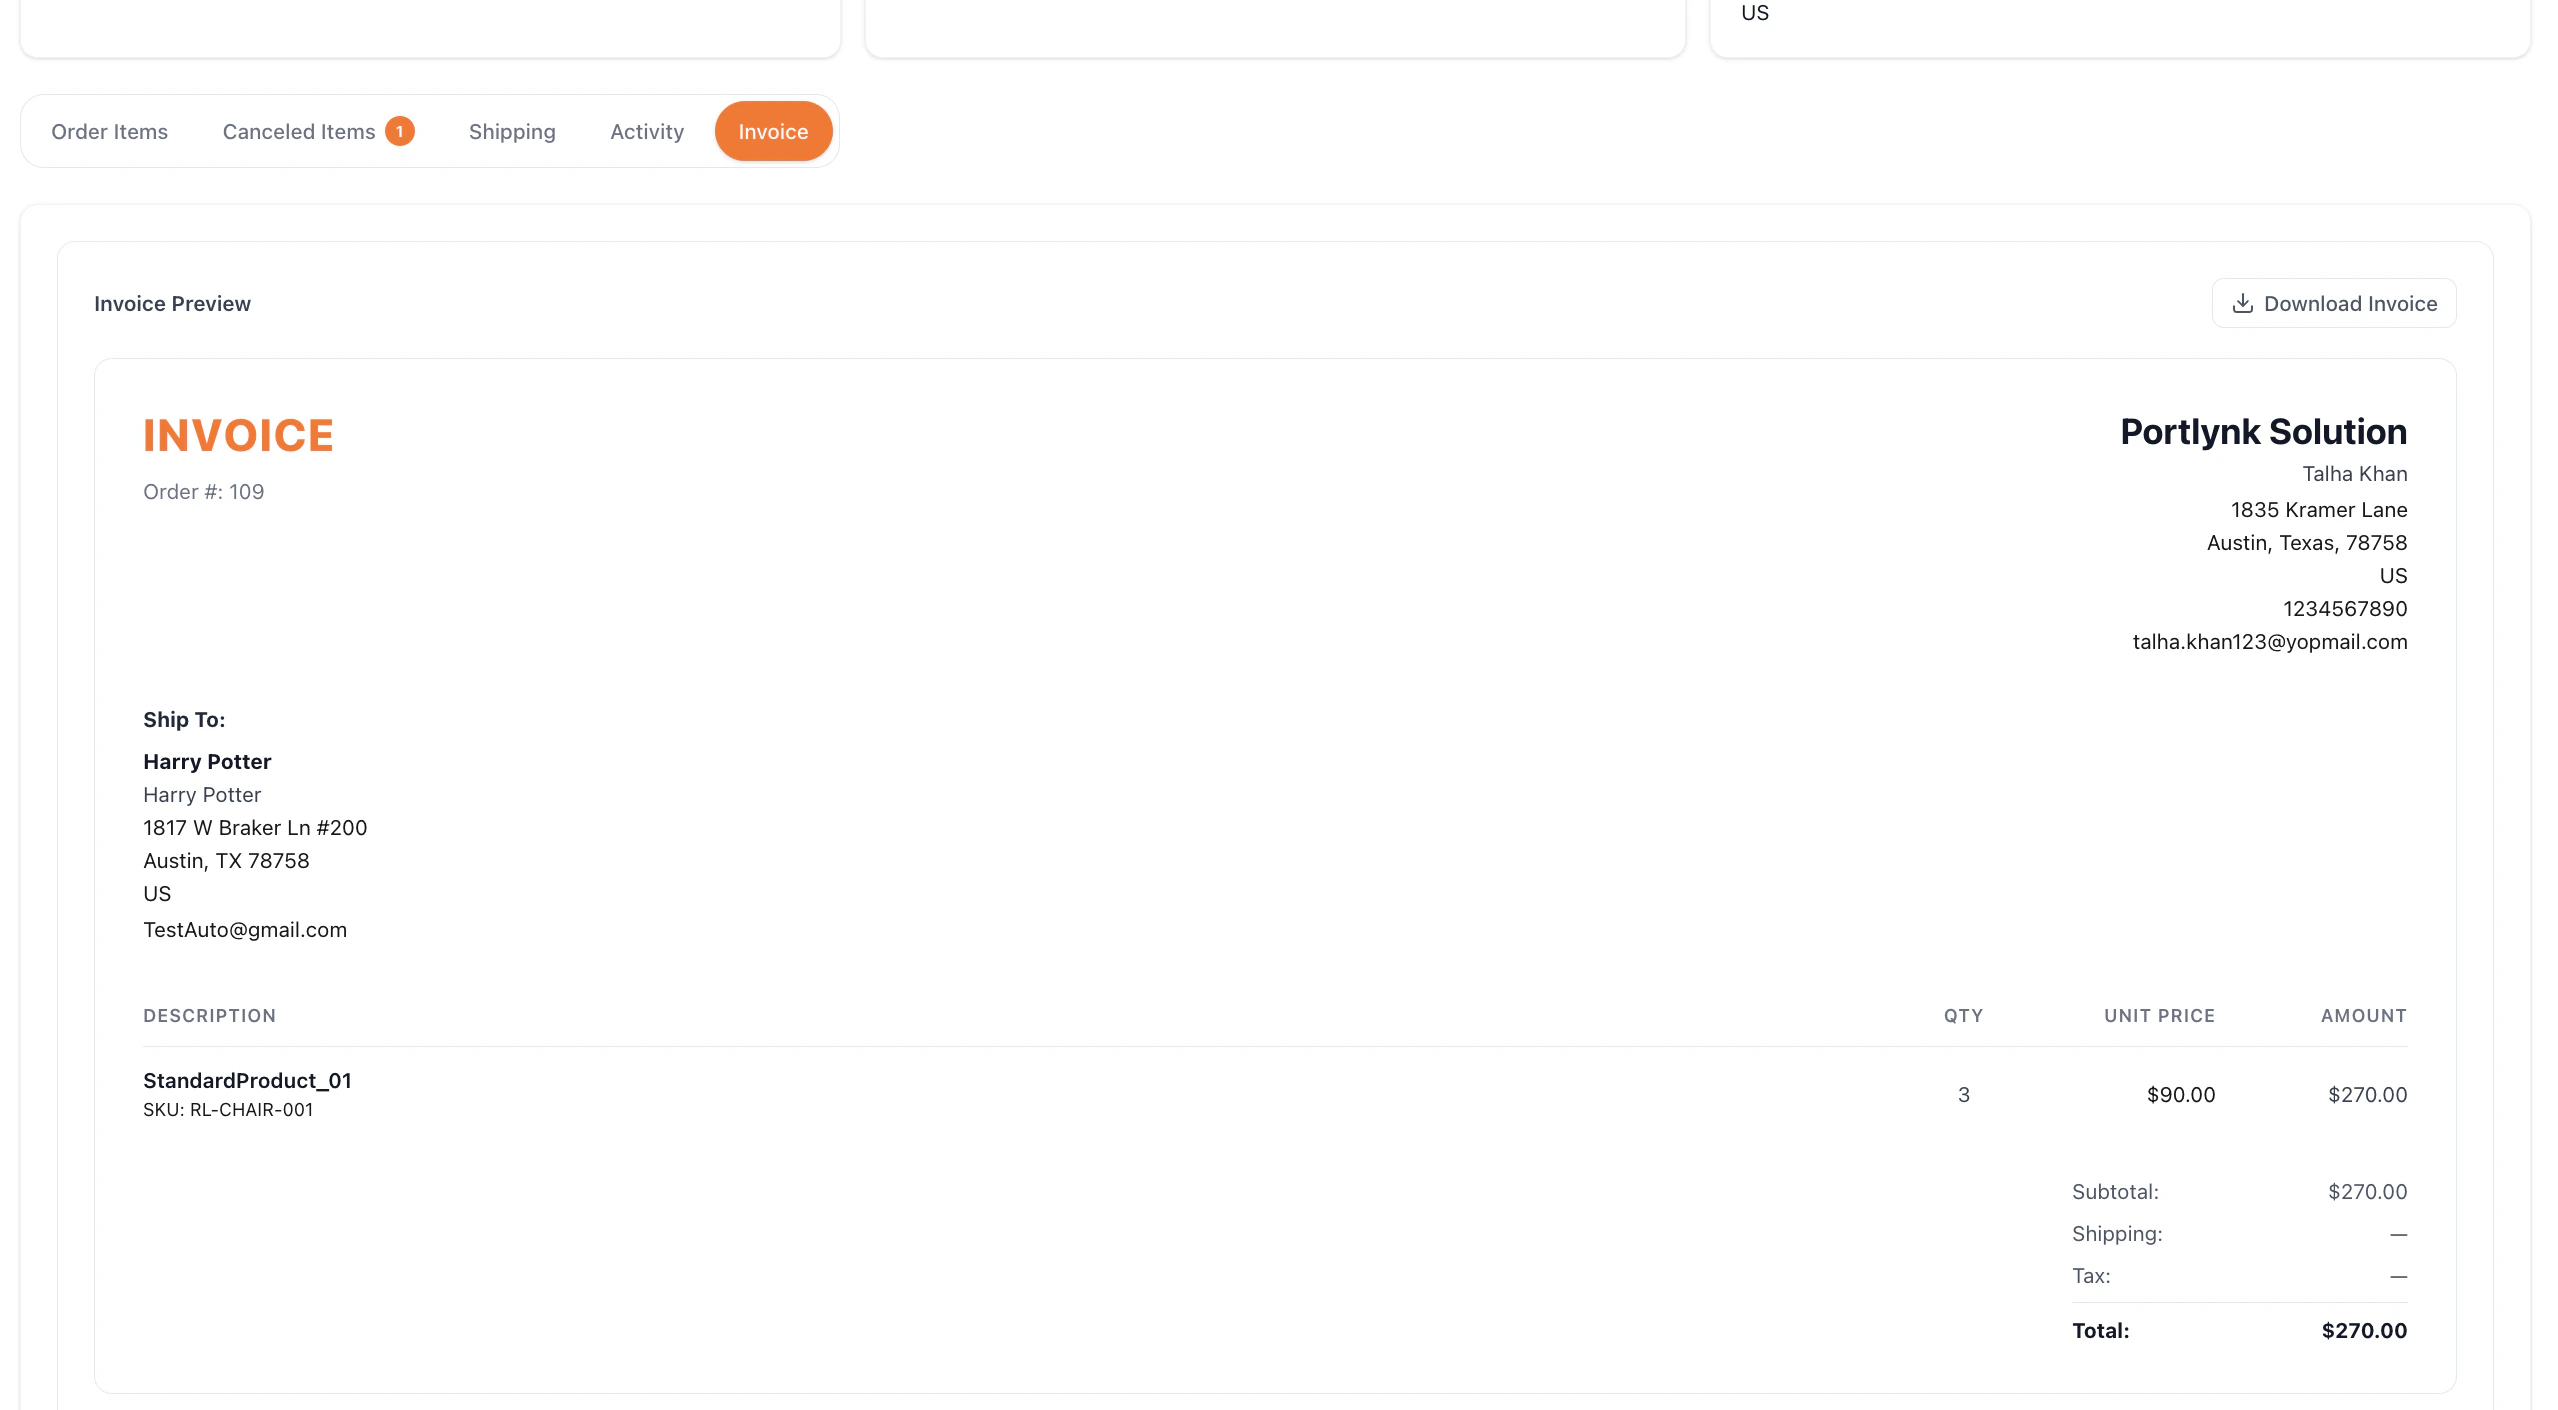
- Confirm carrier and service. The carrier and service type are pre-selected from the customer’s chosen shipping method. You can override either within the carriers your operator has configured for the fulfillment location; service types are filtered to the selected carrier.
- Select a package. If your operator has configured predefined packages on the location group, choose one from the dropdown — the L × W × H dimensions prefill and lock to that package. If no predefined packages exist, enter L × W × H manually.
- Enter weight. Weight is always entered manually. Dimension and weight units (in/lbs or cm/kg) follow the location group’s unit type and cannot be changed.
- Click Print Shipping Label. The system generates a PDF label on the operator’s carrier account and captures the tracking number automatically — no manual entry. The tracking number appears on the packing slip card and on the Shipping tab.
- Reprint or edit. Reprint returns the existing label. Edit generates a new label with a new tracking number and updates the order to the latest number.
Manual tracking entry remains available in operator-managed mode as a fallback for any slip. Also update the Shipping Tab subsection (under “View a Completed Order”), note that tracking is auto-captured from the generated label in operator-managed mode, or the manually entered number in vendor-managed mode.