

Watch: Filter Data Lists
Learn how to create and manage filter data lists for order routing
Note that changes to routing settings may not immediately take effect when processing orders. It may take up to 15 minutes for updates to be reflected in the system while the cache refreshes.
Filter Types
There are three types of filters that determine how its conditions are defined.- Custom Value: Compares an attribute against a specific value. The available logical operators depend on the attribute type, such as Equals or Not Equals for Booleans, Contains or Starts With for text, and Greater Than or Less Than for numbers. For example, a filter could evaluate
Fragile = TrueorTotal Order Price greater than or equal to $1000. - Custom Data List: Compares an attribute against a predefined list of values. These are global lists that can be reused across different filters. For example, a filter could evaluate
Shipping Zip/Post Code in [82001, 10001,85001] (Custom Zipcode List). - Data Point: Compares one attribute to another attribute instead of a fixed value. This is useful for dynamic, relative comparisons where both sides of the condition are attribute values. For example, a filter could evaluate
Shipment State/Province = Fulfillment Location State/Province.
Manage Filters
Filters are defined within scenarios and cannot be shared across multiple scenarios.Create a Filter
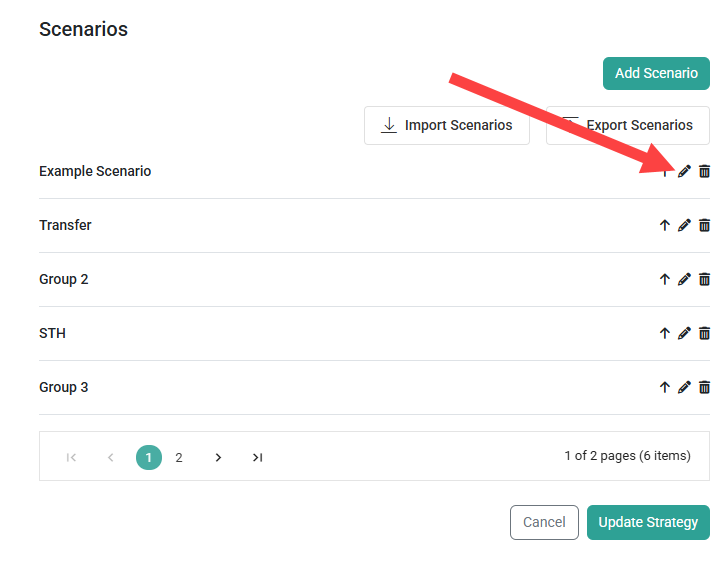
Filters are defined at the scenario level, meaning they are created and configured within each individual scenario.- Go to the List Strategies page and click the Edit icon on a strategy.
- Either create a new scenario or click the Edit icon on an existing scenario.
- The Filter Criteria is found on Step 3 of the scenario configuration flow.
- To create a new filter, enter a Filter Name.
- Select the Filter Type. This is the type of data that the filter will be based off of (custom value, custom data list, or data point).
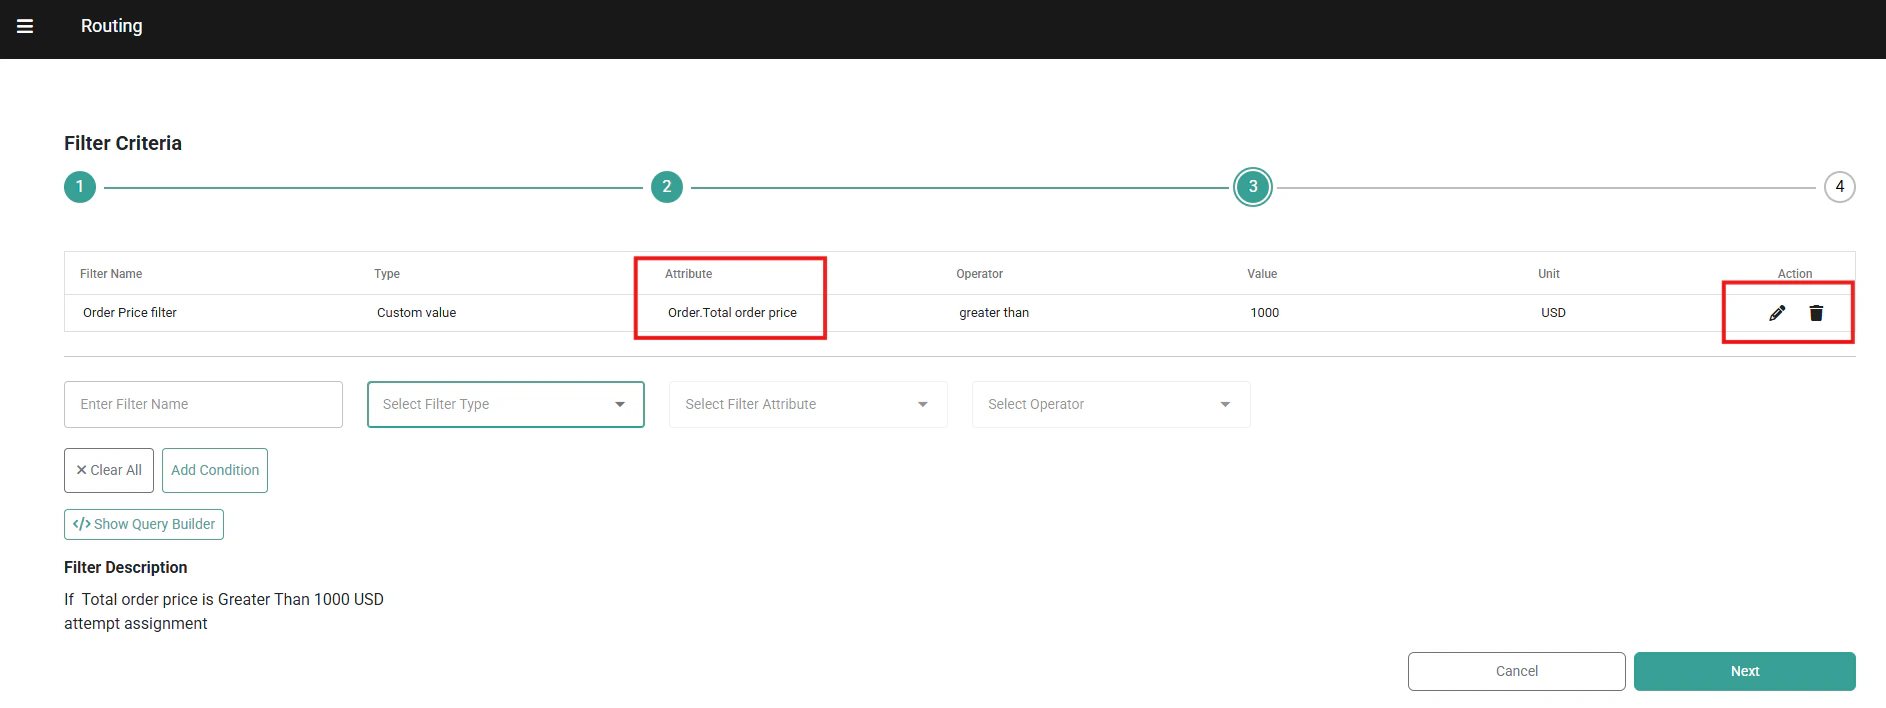
- Select the Attribute. This is the property that will determine whether the order should be assigned to a scenario with this filter. For an explanation of how each filter attribute works, see the table in the next section of this guide The attribute is displayed in the Filter Criteria summary table using dot notation in the format [Entity].[Attribute Name] — for example,
Account.Tax ExemptorLocation.Zip Code. This makes it easy to identify which entity a filter condition belongs to at a glance, especially in scenarios with many filters across different entity types. The column header remains Attribute and the value is read-only in the summary row.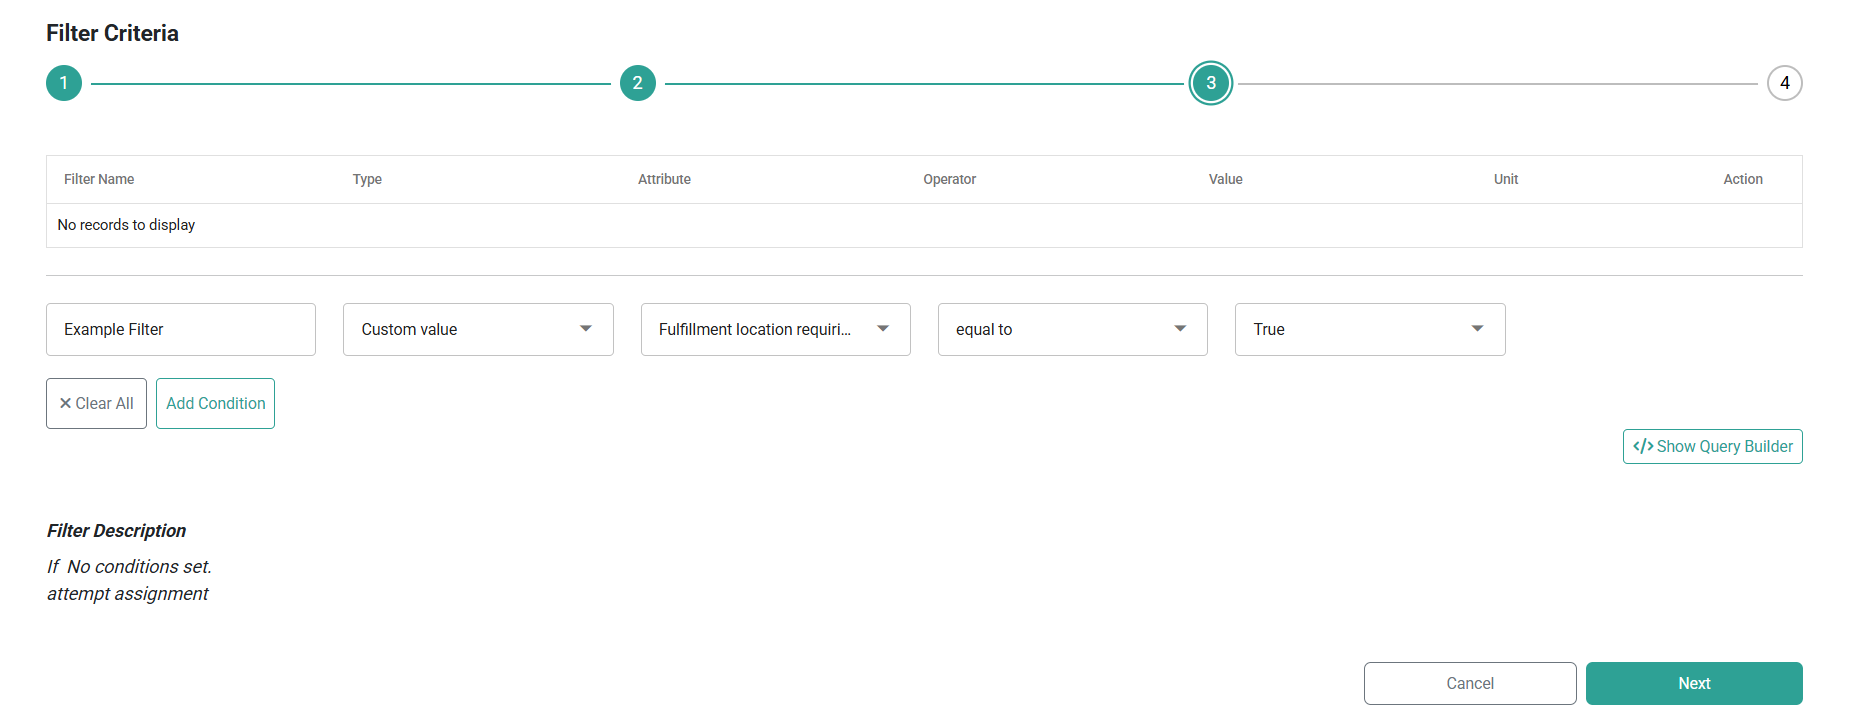
- Select the logical operator that should be applied when comparing the attribute. The possible conditions will change depending on the data type of the attribute you selected.
- For logic conditions that support multiple values, such “or” and “any of,” you will be able to select multiple values from the dropdown. For logic conditions that support only single conditions, like “equals” or “not equals,” you will only be able to select one value.
- If you select a list filter type, it will support the “in” or “not in” logic conditions. For example, if your filter attribute was Material then you could use “in” to compare it against the Iron, Steel, and Aluminum custom values. If the item matches any one of those values, it will attempt assignment. These are available for both first-class and extensible attributes.
- A field for a Custom Value, Data List, or Second Attribute will be displayed depending on the filter type you selected. Select or enter the appropriate value that the first attribute will be compared against.
- Click Add Condition to add the new filter to the table.
- To edit or remove existing filters, click the Edit or Delete icon on the right.
- Click Save on Step 4 of the configurations to save the filter(s) to the scenario.
Create Complex Filters
Complex filters enables you to create sophisticated filtering rules by combining multiple conditions with AND/OR operators and grouping logic. Unlike basic filters where all conditions in a scenario must be met with AND logic, complex filters allow you to define flexible criteria such as:(item is hazmat OR item weight > 50 lbs)(Distance < 50 miles OR Store Type = "AutoZone Pro") AND Customer Type = VIP
- Follow steps 1-9 from the basic filter creation process to add your individual filter conditions.
- Default Behavior: All conditions you add are automatically connected with AND operators by default, meaning all conditions must be true for the filter to match.
- To customize your filter logic with OR operators and grouping:
- Click the “Show Query Builder” button.
- This opens an interactive interface where you can modify the logical relationships between conditions
- Set AND/OR Operators:
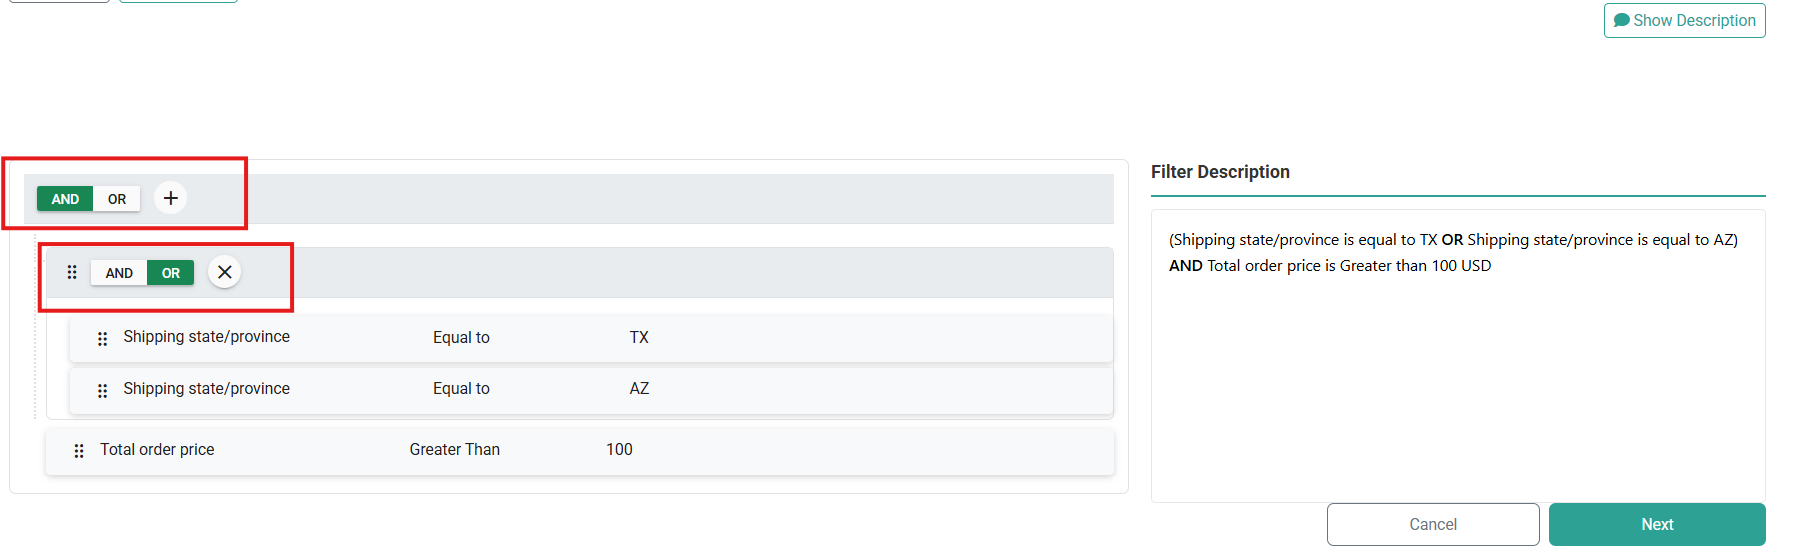
- Use the toggle button next to each condition or group to switch between AND and OR operators
- This allows you to create flexible logic like “(Condition A OR Condition B) AND Condition C”
- Create Condition Groups:
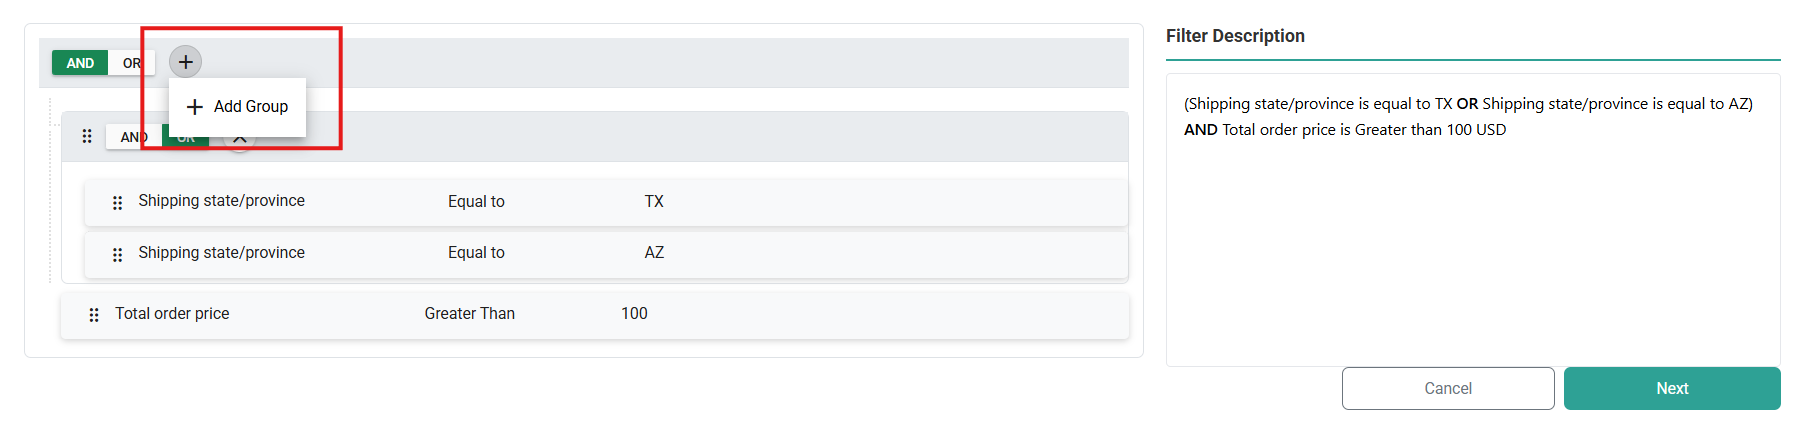
- Click the Plus (+) icon to create a new group
- Drag and drop conditions into the group to organize related logic together
- Set the AND/OR operator that applies within the group (determines how conditions inside the group relate to each other)
- Set the AND/OR operator that applies between groups and other conditions
- Preview Your Filter Logic:
- The filter description displays a human-readable summary of your complete logic
- Example: “(Shipping State = TX OR Shipping State = AZ) AND Order Price>100$”
- Review this carefully to confirm your logic resolves as intended
- Save Your Configuration:
- Once you’ve verified your filter logic is correct, navigate to Step 4 of the scenario configuration
- Click Save to apply the complex filter to your scenario
Filter Attributes
First class fields, or fields that are available out-of-the-box for use in routing filters, are listed below. They are grouped by location, customer, product, and order field topics and can be selected as filter attributes or comparison properties. To select custom attributes as filter properties, use Extensible Order Routing to enable those attributes. Once enabled, they will be available when configuring a filter.Location Fields
These fields are part of the location object in API data.Product Fields
Order Fields
Account Fields
Note: To get the below Call Off order First Class attributes make sure the B2B Wholesale OMS feature is enabled for your tenant. Contact Kibo Support to enable this capability.