

- Available to Promise = Available + Future
Enable Future Inventory
In order to allocate against future inventory, you must enable it in both your site settings and the item level.Enable for Site
To enable future inventory on your site:- Go to System > Settings > General.
- In the Site section, locate the Future Inventory Settings.
- Toggle Future Inventory on.
- Set the Future Date Limit you want to consider future inventory for. Only the amount within this date limit will be calculated into the quantity available to promise.
- For example, if you have a view of inventory for 12 weeks from the current time then you can choose to allocate future inventory for just the next 4 weeks.
- Set the Future Date Unit. This can be days, weeks, or months.
- Click Save.

Enable for Products
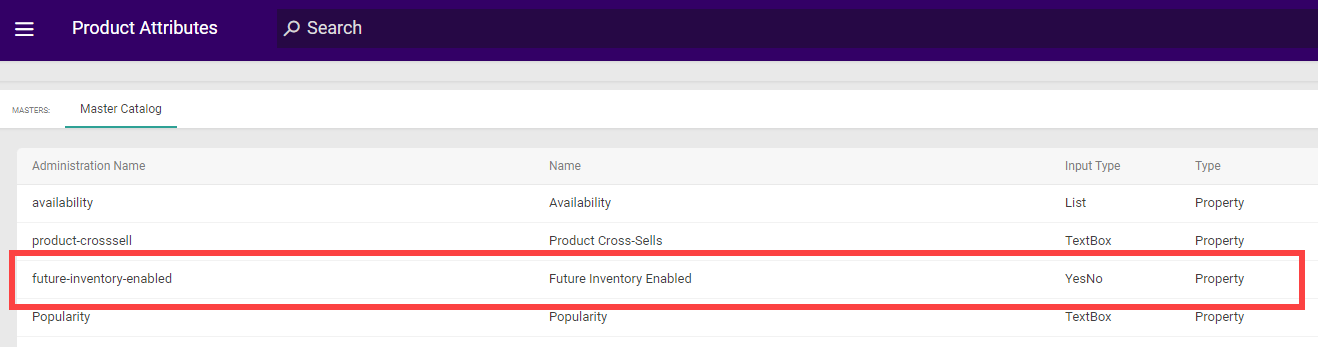
After enabling future inventory for your site, you can enable it for individual products either in the Admin UI’s product attributes or the Create Order API. To enable it via the Admin UI:- Go to System > Schema > Product Attributes.
- Click Create New Attribute and configure a new property called “future-inventory-enabled” with a Yes/No input type. See the Property Attributes documentation for more details about creating attributes.
- Go to System > Schema > Product Types.
- Select a product type or create a new product type.
- Note that this functionality is only supported for product types with the Standard Product, Configurable Product with Options, or Bundle Components usage.
- In the Properties section, click Add and then select the future-inventory-enabled attribute.
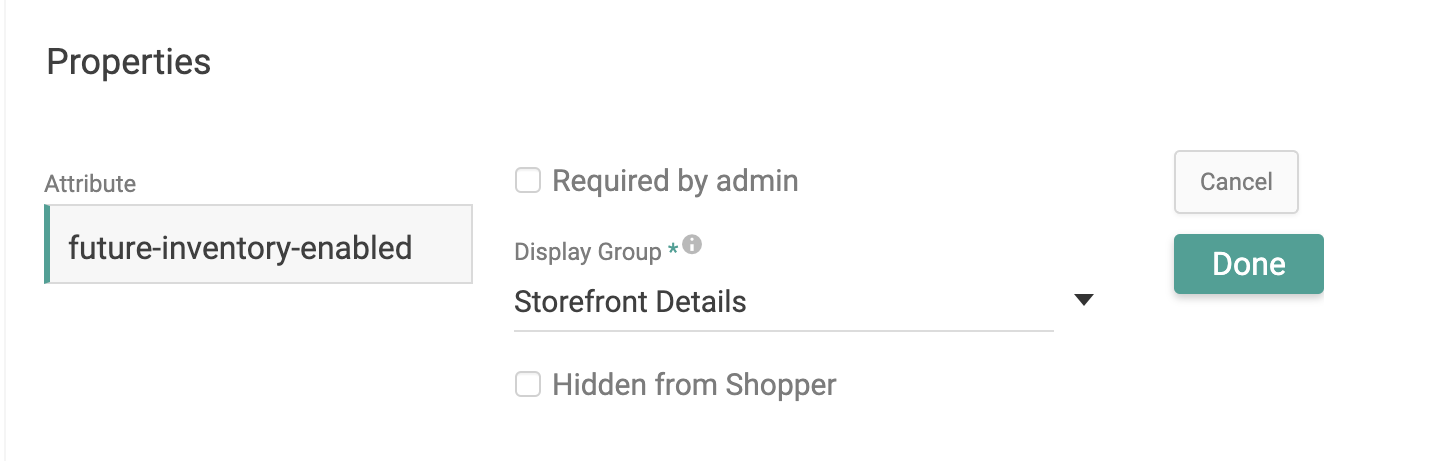
- Set the Display Group to “Storefront Details.”
- Click Done and then save the product type.
- Go to Main > Catalog > Products.
- Select a product of the appropriate product type or create a new one.
- In the Properties section, set future-inventory-enabled to true. It is false by default. If you selected a product type of Configurable Product with Options, this will only be set on the base product and then inherited by all product variants.

- Click Save.
properties in an order item’s items array to define the “future inventory enabled” property as shown below:
Set Future Inventory Records
You can set up future inventory records to be unique by their UPC-Location-Future Delivery Date or their UPC-Location-External ID. This means that if your delivery dates are not unique, then an external ID is needed to differentiate between records. External IDs may also be especially beneficial if you use purchase order numbers that you want to apply to future inventory. For example, if you have three future inventory updates for the same product on August 7 and do not have unique delivery date-times, then external IDs of PO1, PO2, and PO3 could identify each record. If your future date-times are unique such as 10:00, 2:00, and 5:00, then you will not need an external ID to tell the records apart. You can use REST APIs or flat file import to set future inventory levels. Kibo will perform updates based on what information you provide. If you have set up your records to be unique based on external ID, the following behavior will be performed.- If both an External ID and Delivery Date are provided: If a record for that ID already exists, then the existing delivery date and quantity will be updated to the new values. If one does not exist, a new record will be created.
- If only an External ID is provided: If a record for that ID already exists, the quantity will be updated. If one does not exist, then it will return an error. If you want to create a new record, you must provide both the ID and a delivery date.
- If a Delivery Date is provided: If a record for that delivery date already exists, the quantity will be updated. If one does not exist, then a new record is created.
File Import
Follow the steps outlined in the Inventory Import File guide to build a .CSV or XML file of your inventory data. For future inventory records, provide a delivery date and/or external ID such as in the below example:
Inventory APIs
Use the Refresh and Adjust APIs to set inventory records in place of the file import if desired, such as in the below example that includes both thedeliveryDate and externalId fields. You can then use the Adjust Future Date API to change the incoming date of existing records as needed.
Orders with Future Inventory
When assigning orders to fulfillment locations, current inventory is always prioritized before future incoming inventory. When considering future inventory, the following logic is used:- BOPIS: Earliest available date at the selected BOPIS location.
- STH: Order Routing will look for the earliest available date across locations.
Cart and Checkout Behavior
When an inventory check is done from a cart or checkout, the system will validate items against future inventory:- Items will not be considered Out of Stock if the total quantity can be satisfied by current and future inventory. They will only be Out of Stock if the sum of current and future inventory is less than the requested quantity.
- Backorderable items will not be placed into Backorder if the total quantity can be satisfied by current and future inventory. They will only be backordered if the sum of current and future inventory is less than the requested quantity.
- If the order includes reservation items, inventory can be reserved at a location as long as the sum of its available and future inventory meets the requested quantity. When the quantity in the cart is updated, then the reserved inventory will be deallocated or allocated as needed. (For BOPIS, the system will attempt to provide any needed inventory from the current stock at transfer locations first. If transfers are not enabled or there are no locations with current inventory, then the system will reserve from the pickup location’s future inventory.)

Shipment Behavior
Shipments that are created with future inventory begin in the Future status and cannot be fulfilled until inventory arrives at the location and the shipment moves into the Ready state. Shipments are moved from Future to Ready status by the “FutureInventoryShipmentRelease” job. Please request Kibo Support to enable this job for you. Future shipments always have a date associated with them to indicate when future inventory is arriving. The system will update shipments whenever their future inventory’s expected date or quantity changes, depending on the scenario:- If a future inventory record changes to a different delivery date, associated shipments will automatically update to match the new date (as long as it is not beyond the Future Date Limit). If only some shipment items change dates or the items change to two different dates, then the shipment is split based on those dates.
- If a future inventory record changes to a delivery date beyond the Future Date Limit setting, then those items on STH shipments are reassigned.
- If a future inventory record changes to a delivery date beyond the Future Date Limit setting, then those items on BOPIS shipments will be backordered. If any items in the shipment are not backorderable, then the shipment is split and those items will either be cancelled or sent to Customer Care (depending on your Action on BOPIS Reject site setting).
- If future inventory records change to a quantity of either 0 or an amount less than the required quantity on a shipment, then the unavailable quantity is turned into pending items on that shipment and will be allocated whenever inventory is available again. If the entire future inventory record (purchase order) is deleted while shipments are already allocated to it, the system automatically triggers the same reassignment process — see Cancelling a Future Inventory Purchase Order below.
- Cancelling a Future Inventory Purchase Order. If a purchase order (PO) that was represented as a future inventory record needs to be cancelled, you can delete that future inventory record via the API. The system handles this differently depending on whether any shipments were already allocated against that PO. If no shipments are allocated to the PO: Deleting the future inventory record removes it silently. No shipments are affected and no further action is taken. If shipments are already allocated to the PO: Deleting the future inventory record triggers automatic reassignment for all affected shipments. The system identifies which shipment lines were allocated against that PO and enters them into the standard reassignment flow — the same process that runs when inventory becomes unavailable for any other reason. You do not need to manually reassign these shipments. The reassignment flow applies to STH (Ship to Home) and Delivery shipments. For BOPIS shipments allocated to a cancelled PO, items will be backordered if backorder is enabled for that product, or split and cancelled/sent to Customer Care if it is not — consistent with the existing Action on BOPIS Reject site setting. What happens during reassignment: The system checks whether sufficient inventory (current or future) exists at any eligible location to fulfill the affected items. If inventory is found, the shipments are reassigned to that location. If no inventory is available, the items enter backorder and will be released when inventory becomes available — see Backorder Release for details.
Note that while the system automatically reassigns shipments when a future inventory PO is cancelled via the API (as described above), you cannot manually reassign Future shipments through the Order Admin UI
View in Inventory UI
All incoming On Hand, Available, and Allocated levels are displayed on the Inventory UI by default. Records that include future inventory will be underlined in the table, and hovering over them will display a summary of the current and future amounts. To filter for inventory arriving up to a specific date, enter a date in the View Future Inventory option in the top right.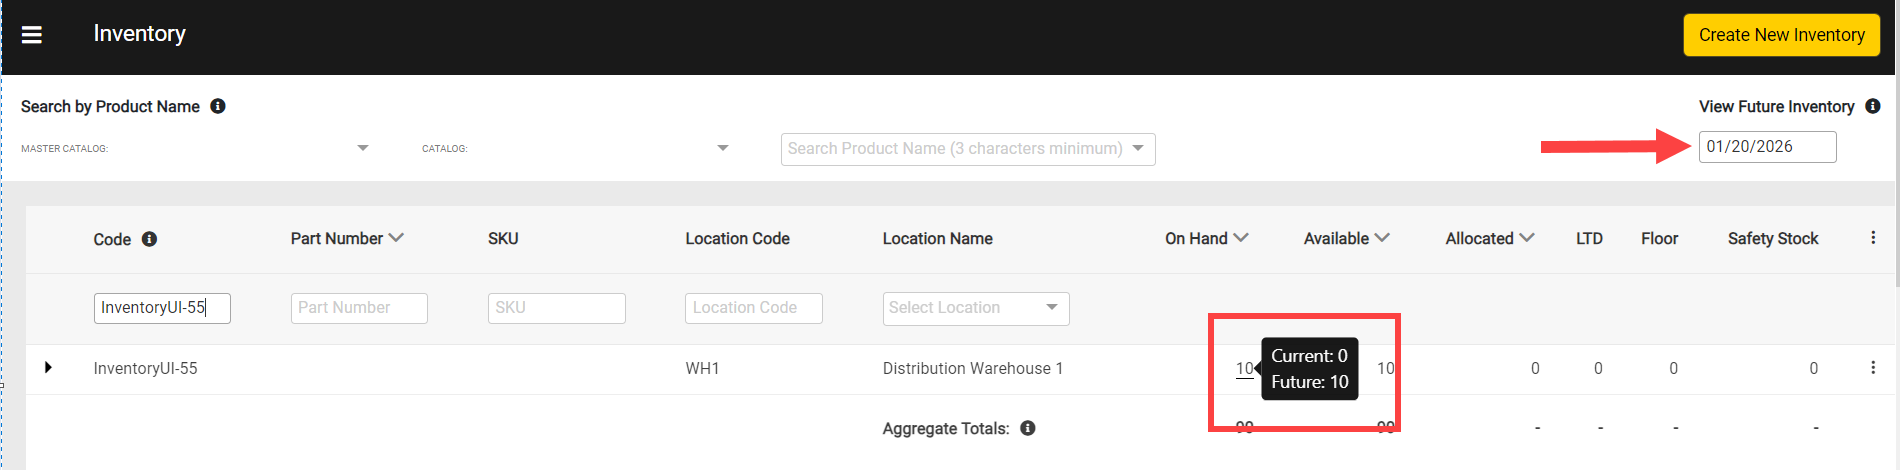
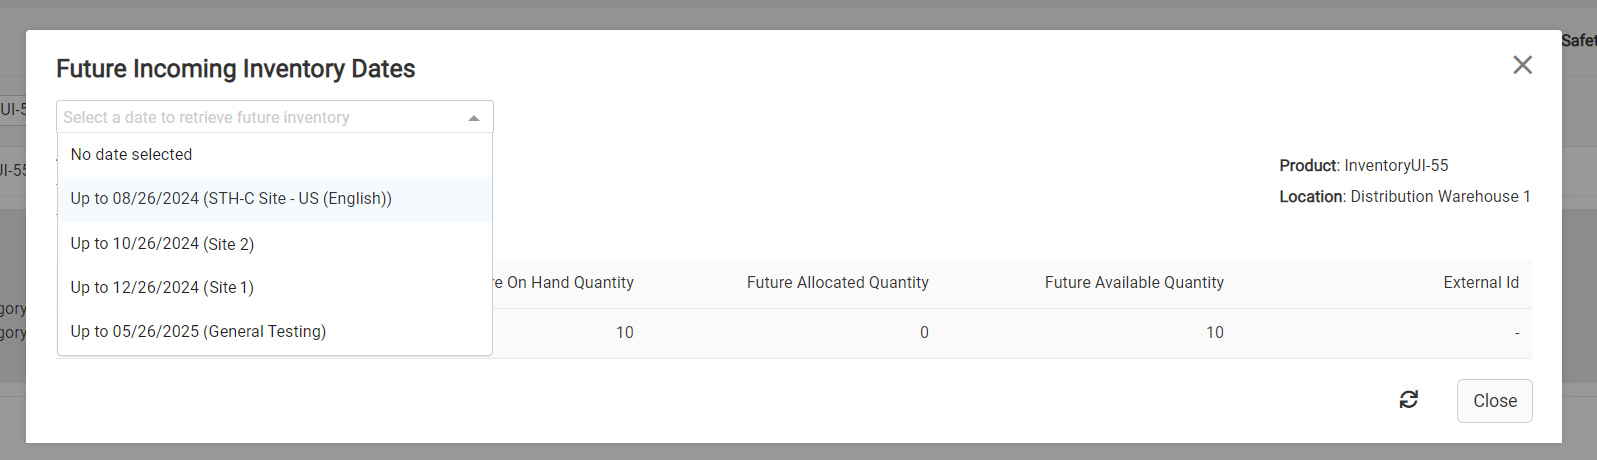
- Expand a table row that contains future inventory to view a breakdown of that product’s Current, Future, and Total (the sum of Current and Future) inventory levels. Then, click the Future Inventory Dates link.

- This will display a pop-up with more details about the inventory updates that are expected until the selected date. Select a site and future date from the drop-down menu shown below to filter results to inventory arriving within that site and time frame. These date options are pre-calculated by the system based on the future date limit configured in the site settings.
Assume Infinite Inventory on a Future Record:
To enable Infinite Inventory on a segmented record, include"includeItemsWithInfiniteInventoryFlag": true in the request when using the Refresh and Adjust APIs or inventory import process to create or update Future inventory. When active, this Boolean field overrides standard allocation rules, allowing allocation even if inventory is unavailable
To identify which inventory records have this flag enabled, use the Get Inventory API with the parameter includeItemsWithInfiniteInventoryFlag. Records with infinite inventory will return hasInfiniteInventory: true in the response.