Note: The Allocation Rebalancer operates on hard-allocated shipments — future shipments and backorder shipments. For soft-allocated reservations on Call-Off Orders, see theReservation Rebalancer.
How the Allocation Rebalancer Works
The Allocation Rebalancer processes two types of change events: Supply Change Events
Demand Change Events
Note: Demand Up events (new orders placed, quantities increased) are not tracked by the Allocation Rebalancer. New orders follow the standard order placement flow and result in new future or backorder shipments as appropriate.
Note: All references to purchase order changes in the Kibo platform translate to changes on Future Inventory Records —
On Inventory records keyed by UPC, expected delivery date, and destination location. Kibo OMS does not generate purchase orders directly; PO generation is handled in middleware between your ERP and the OMS.Rebalancing Flow
When a supply or demand change event is detected, the Allocation Rebalancer executes the following sequential flow: Step 1 — Capture and Accumulate Events. Change events are detected and stored. To prevent excessive processing from rapid successive events (for example, a purchase order receipt posting many line items individually), events are accumulated within a configurable debounce window (default: 60 seconds). All events for the same UPC-location within the window are collapsed into a single re-evaluation before the flow proceeds. Step 2 — Identify Impacted Future Shipments. The system identifies all future shipments allocated against the affected future inventory record at the location. Only shipments in Future status are eligible. Shipments in Ready status are never touched. Step 3 — Prioritize Future Shipments. The Future Shipment Rules run against the impacted future shipments to assign each a priority rank. Shipments matching higher-priority rules are protected first during reallocation. Step 4 — Reallocate Future Shipments. The system attempts to re-secure inventory for each impacted future shipment (processed in priority order) from alternate future inventory records within the configured time fence, by calling Order Routing. If reallocation cannot be preserved for a shipment, it is de-allocated and moved to the after-action queue (Backorder, Customer Care, or Cancel) as determined by Order Routing configuration. When supply decreases, the lowest-priority shipments lose their allocation first. Step 5 — Prioritize Backorder Queue. The Backorder Shipment Rules run against the full backorder queue — not only the newly affected shipments — to re-rank all backorder shipments against the revised inventory position. Step 6 — Release Backorders. Backorder shipments are released in priority order. Shipments that can be fulfilled from available inventory are released into the fulfillment pipeline. Shipments that cannot be satisfied remain on backorder.Note: If a change event produces no impacted future shipments (for example, a demand event such as an order cancellation), Steps 2–4 are skipped and the flow proceeds directly to Step 5.
Run Mode
An admin can configure how the rebalancing flow is initiated at the site level:
To configure the Run mode:
- Go to Main > System > Settings > Site
- Select the B2B tab.
- Under Inventory Balancing & Reservations , set the Run Mode to Fully Automated or Manual Only.
- Make Sure Allocation Rebalancer is Enabled
- Click Save.
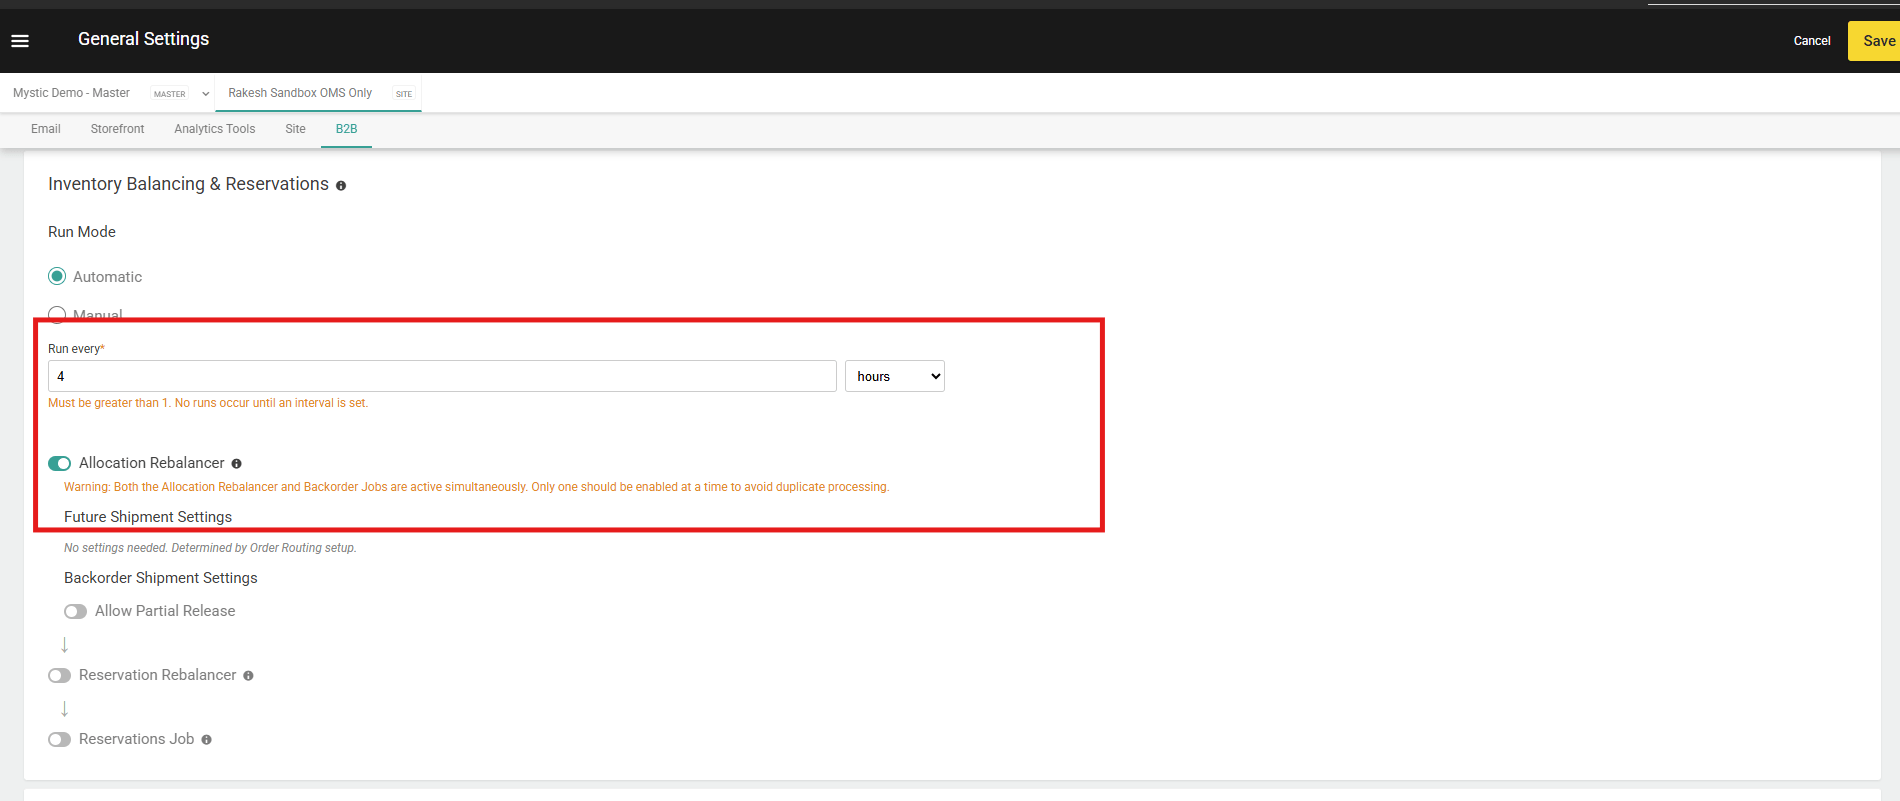
Note: The Allocation Rebalancer, Reservation Rebalancer, and Reservation job are orchestrated as part of a single site-level scheduling configuration. See Orchestrator Settings for details on sequencing and enabling or disabling individual components.
Time Fence
The time fence determines the window of future inventory that the rebalancer considers when reallocating future shipments or releasing backorders. It is calculated symmetrically around the shipment’s requested ship date:Start of Time Fence = requestedShipDate − timeFenceDaysEnd of Time Fence = requestedShipDate + timeFenceDays
Segmentation
If your tenant uses inventory segmentation, the Allocation Rebalancer respects segment tags during reallocation and backorder release. Inventory is only allocated from within the designated segment for each shipment.Prerequisites
Before using the Allocation Rebalancer, ensure the following:- The B2B Wholesale OMS feature is enabled for your tenant. Contact Kibo Support to enable this capability.
- Supply Demand UI(new Inventory UI) should be enabled for your tenant. Contact Kibo Support to enable this capability.
- At least one Future Shipment Rule is configured and enabled. See Future Shipment Rules.
- At least one Backorder Shipment Rule is configured and enabled. See Backorder Shipment Rules.
- The Run Mode (Automatic or Manual) is configured at the site level under Inventory Balancing & Reservations on the B2B tab.
- You have Admin or Super Admin role permissions.
Rebalancer Run Audit
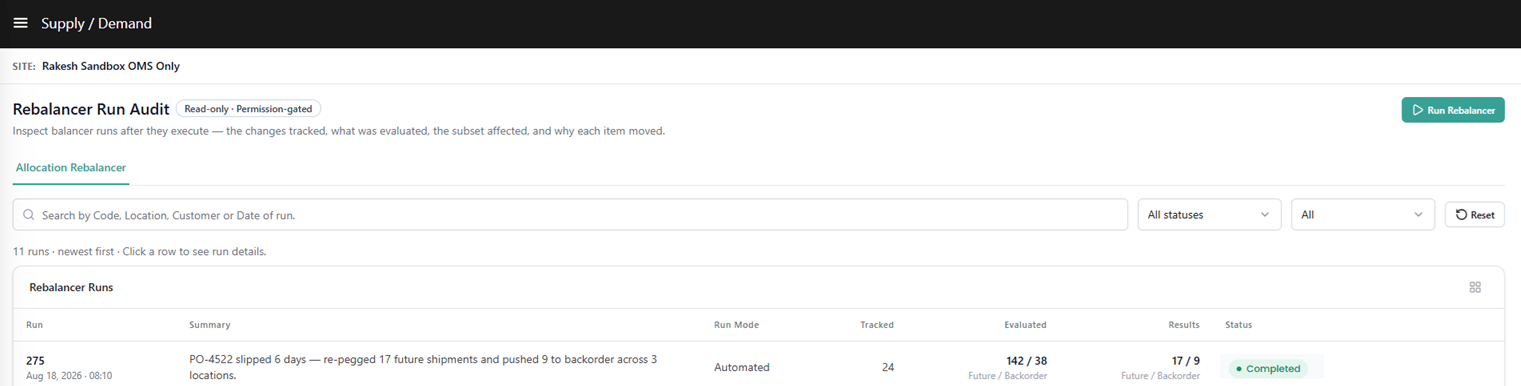
Every rebalancing run produces a full audit trail accessible on the Rebalancer Run Audit page. The audit trail is the primary tool for reviewing what changed in a given run, understanding why specific shipments were prioritized, and tracing outcomes back to the triggering supply or demand event. To open the Rebalancer Run Audit:- Go to Main > Fulfillment > Allocation Rebalancer.
- The Rebalancer Run Audit page opens with the Allocation Rebalancer tab selected by default.
- Select a Site from the site selector to filter runs for that site.
Run Rebalancer Button
If the site’s Run Mode is set to Manual, a Run Rebalancer button is visible in the header. Click it to manually initiate a rebalancing run. A manually triggered run executes the same coordinated pass as a scheduled run — the enabled jobs run in the fixed sequence within a single run. Each tab has its own Run Rebalancer button — there is no combined “run both” option. The Reservation Rebalancer is triggered from its own tab (see Reservation Rebalancer). If the site’s Run Mode is set to Automatic, this button is hidden. Runs are auto-initiated on the configured schedule and listed in the run table as they complete.Run List
The Run List is the default landing view within the Rebalancer Run Audit page. It displays a paginated list of all rebalancing runs for the selected site, ordered newest first. A live row count is shown above the table — for example, “5 runs · newest first” — and is always backend-computed.Search & Filters
Data Table Columns
Run Status Values
Run Detail
Click any run in the Run List to open its detail view. The Run Detail page provides a full breakdown of what the rebalancer evaluated and what outcomes it produced for that specific run.Header
The Run Detail header displays key metadata for the selected run at a glance:Note: If a run has a Partial or Failed status, the header badge prominently reflects this. All three tabs still render whatever subset of data was processed before the run halted — data is never silently shown as Completed. A Failed run additionally surfaces a fault reason consistent with backend fault states (
SKIPPED / FAULTED / ABORTED).Tab Bar
The Run Detail page contains three tabs, each with a count badge showing the number of records in that tab:- Supply/Demand Changes (default landing tab)
- Shipments · Future
- Shipments · Backorder
Supply/Demand Changes Tab
The Supply/Demand Changes tab is the starting point for understanding why a rebalancing run was triggered. It lists every tracked change event detected during the run — supply decreases (PO date slips, PO quantity drops) and demand decreases (cancellations) — and lets you trace forward to see exactly which shipments were impacted.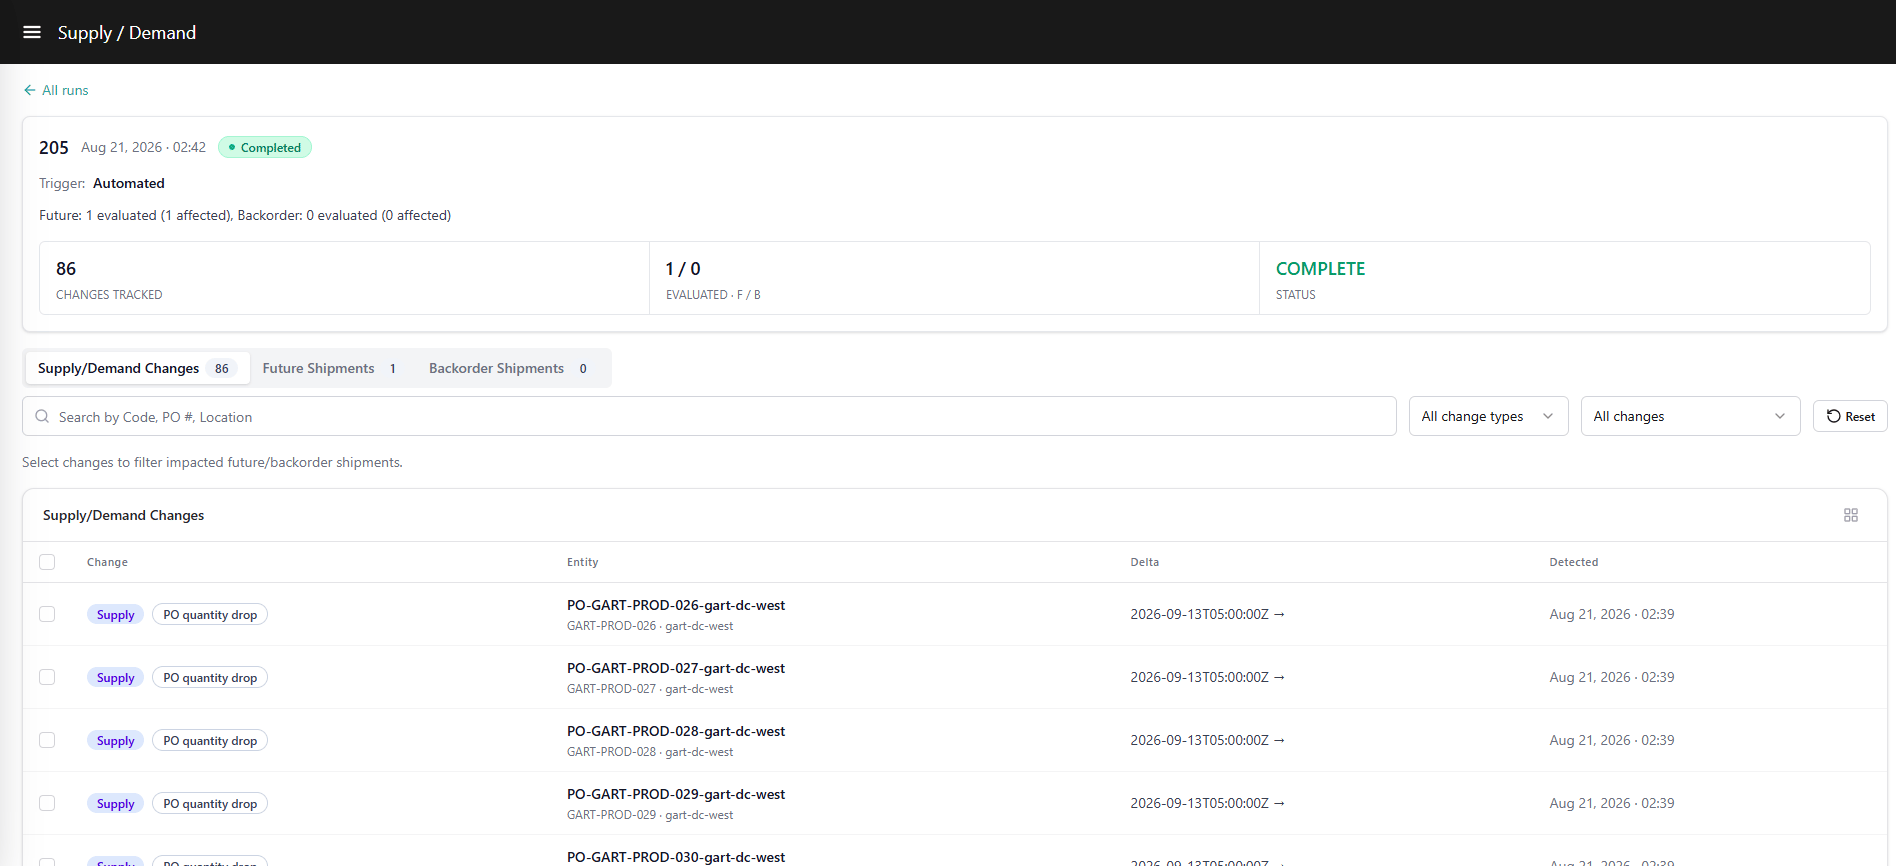
Search & Filters
Table Columns
Note: The PO number displayed in the Entity column is the External ID of the future inventory record — not a Kibo-native PO number. Kibo OMS does not generate purchase orders. Clients are responsible for interfacing the correct External ID value for each future inventory record so that it maps back to their PO reference in their ERP or middleware system.
Supply Down Event Sub-types
Demand Down Events
Selection & Cross-Tab Pre-filter
Selecting a row (single-select) shows a banner at the top of the table:“1 change selected · open Shipments · Future or Backorder to see impacted shipments.”The selected change pre-filters both Shipments · Future and Shipments · Backorder to display only the shipments whose affected shipment IDs include this event. Select “Clear change filter” or uncheck the row to restore both tabs to the unfiltered view.
Note: Selecting a Demand (Cancellation) event and then switching to Shipments · Future displays an empty state — not an error. Demand events never impact future shipments. The same event does feed the Shipments · Backorder tab.
Shipments · Future Tab
The Shipments · Future tab shows every future shipment the rebalancer considered during the run. Use this tab to understand which shipments were evaluated, what priority they were assigned, and what happened to each one. The tab supports two views, toggled at the top of the tab:- Evaluated (default) — The original shipments assessed during the run and their individual outcomes.
- Results — The final state of every shipment touched by the run, including newly created shipments produced by splits, re-pegs, or backorder moves.
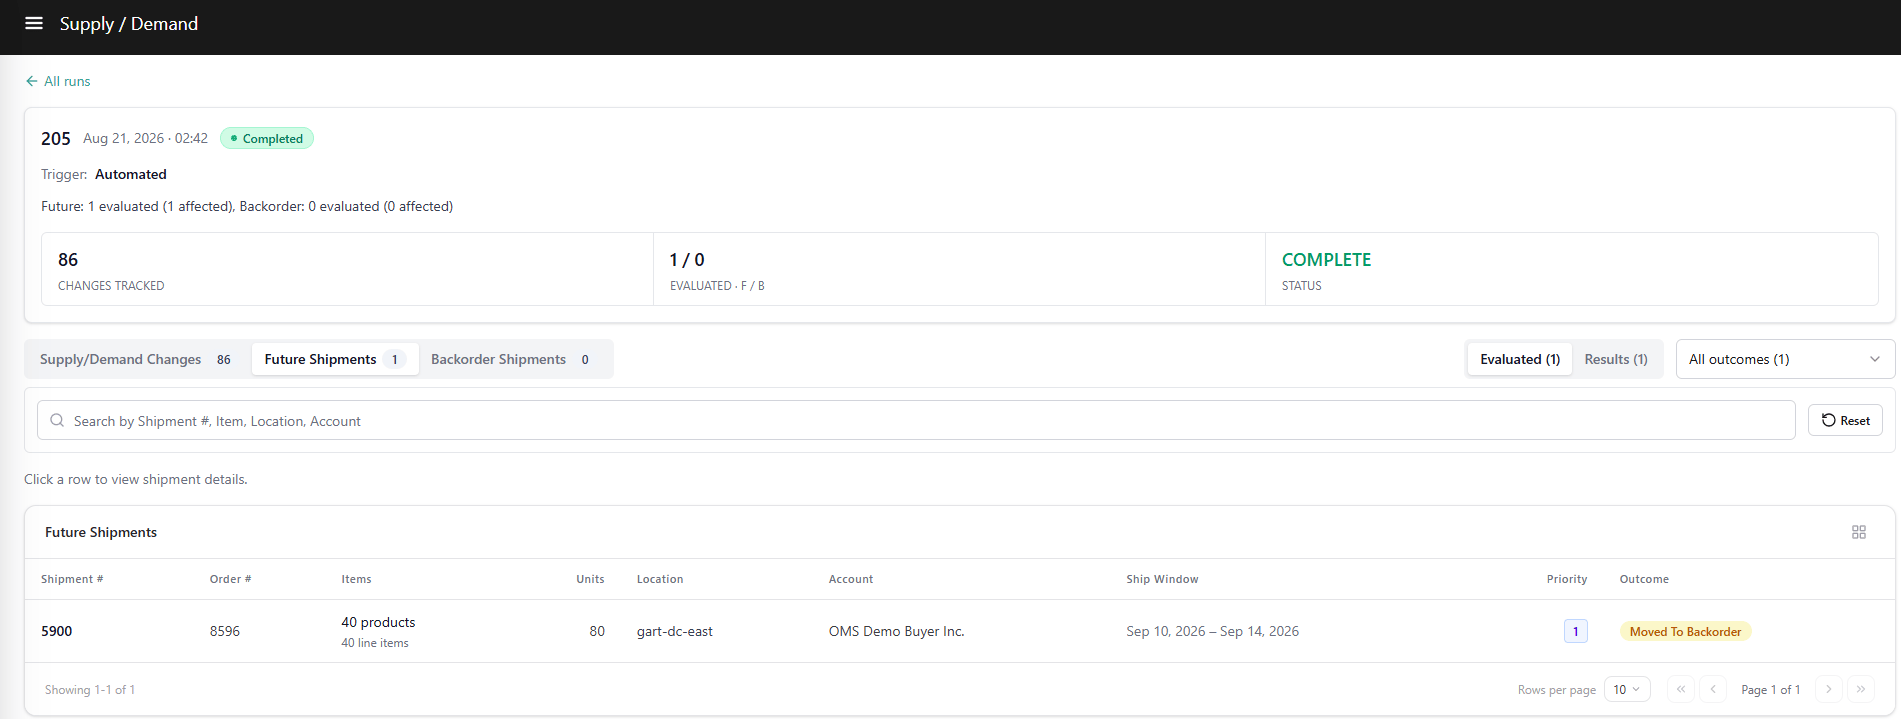
Search & Filters
Free-text search by Shipment #, Item, Location, or Account.Evaluated View — Columns
Evaluated Outcome Values
Results View — Columns
The Results view shows the final state of every future shipment touched by the run, including newly created shipments from splits, re-pegs, or backorder moves that are not visible in the Evaluated view.Results View — Result Type Values
Shipments · Backorder Tab
The Shipments · Backorder tab shows the full backorder queue evaluated during the run. Unlike the Shipments · Future tab — which only shows shipments newly impacted by the triggering event — this tab always shows the entire tenant backorder queue, because the Backorder Shipment Rules re-rank all backorders together against the revised inventory position on every run. The same Evaluated / Results toggle pattern applies.Search & Filters
Free-text search by Shipment #, Item, Location, or Account.Evaluated View — Columns
Evaluated Outcome Values
Results View — Columns
Results View — Result Type Values
Shipment Detail Panel
Clicking any row in Shipments · Future or Shipments · Backorder opens the Shipment Detail Panel — a side drawer that provides a full breakdown of a single shipment’s evaluation context, outcome, and line-level detail. The panel is read-only. The panel layout and fields are consistent across both tabs, with minor differences in outcome terminology between future and backorder contexts.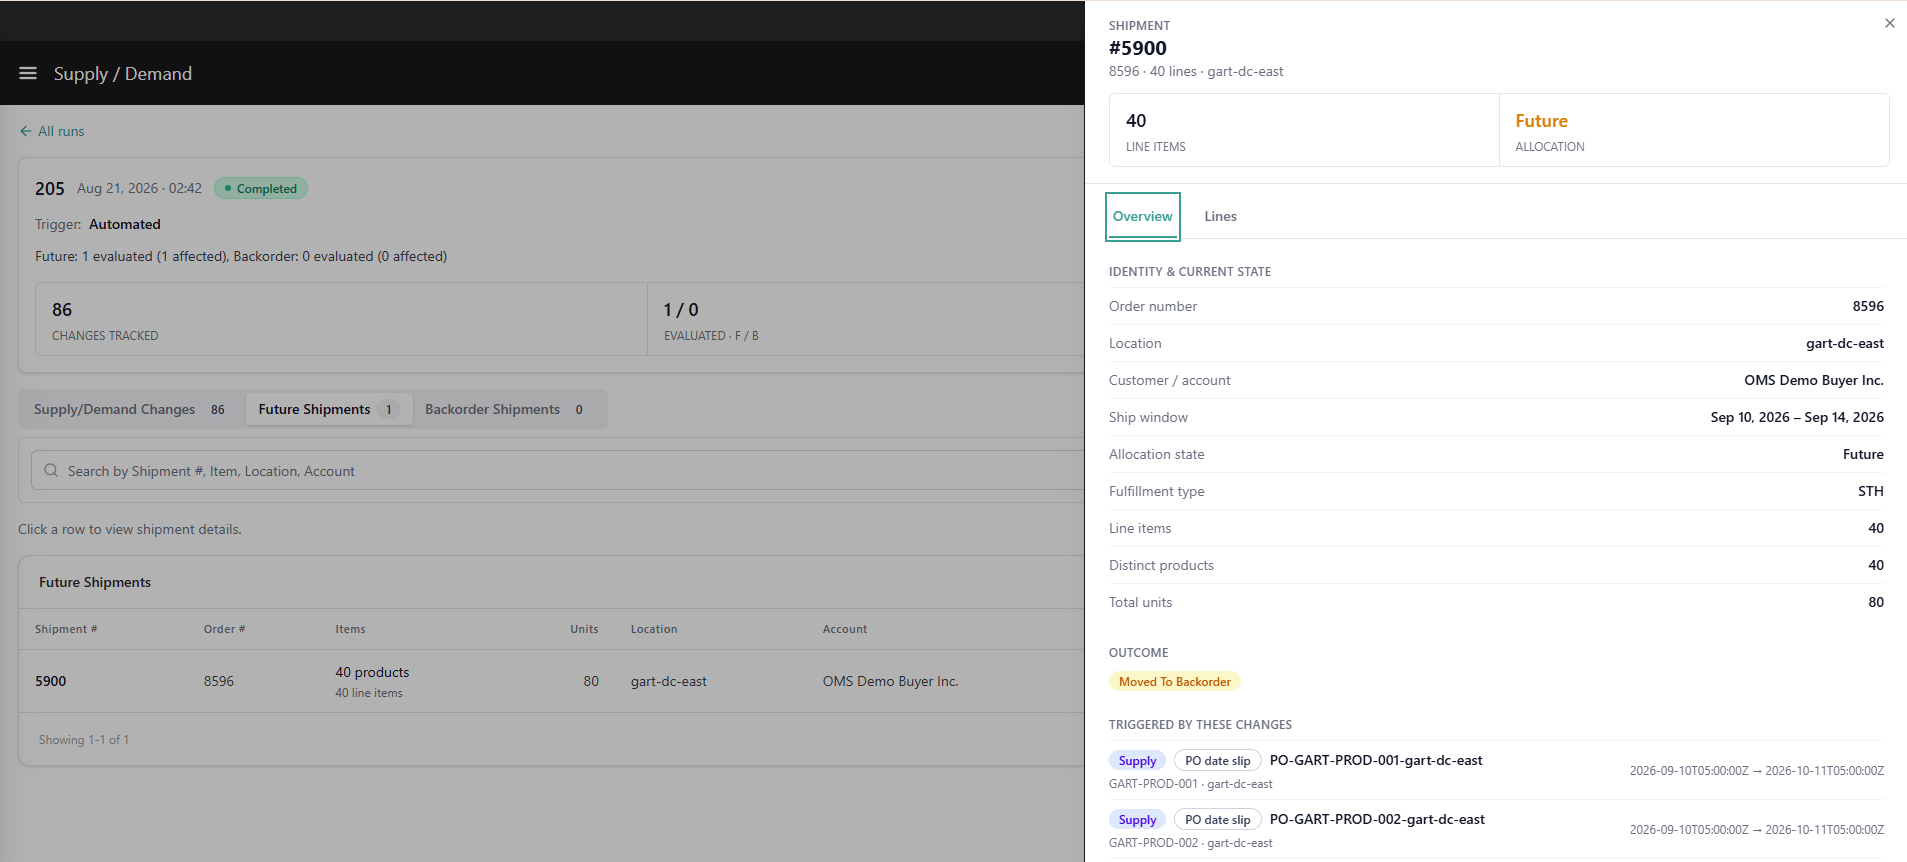
Panel Header
Overview Tab
The Overview tab provides a summary of the shipment’s evaluation context and outcome, organized into four blocks:Status Block
Identity & Current State Block
Outcome Block
Shows the original shipment and every shipment that resulted from the run:
For shipments that were not split — for example, a shipment fully re-pegged as a whole or fully moved to backorder — the Outcome block still shows a one-line summary rather than an empty state. For example: “Original demand #1163 · 420 units — Fully re-pegged into one shipment” or “Moved to Backorder (Fully).”
Triggered by These Changes Block
Lists every supply or demand change event that caused this shipment to be evaluated during the run:Note: For shipments on the Shipments · Backorder tab, the Triggered by these changes block can include both Supply events (PO date slip, PO quantity drop) and Demand events (Cancellation) — unlike the Future tab where only Supply events apply.
Lines Tab
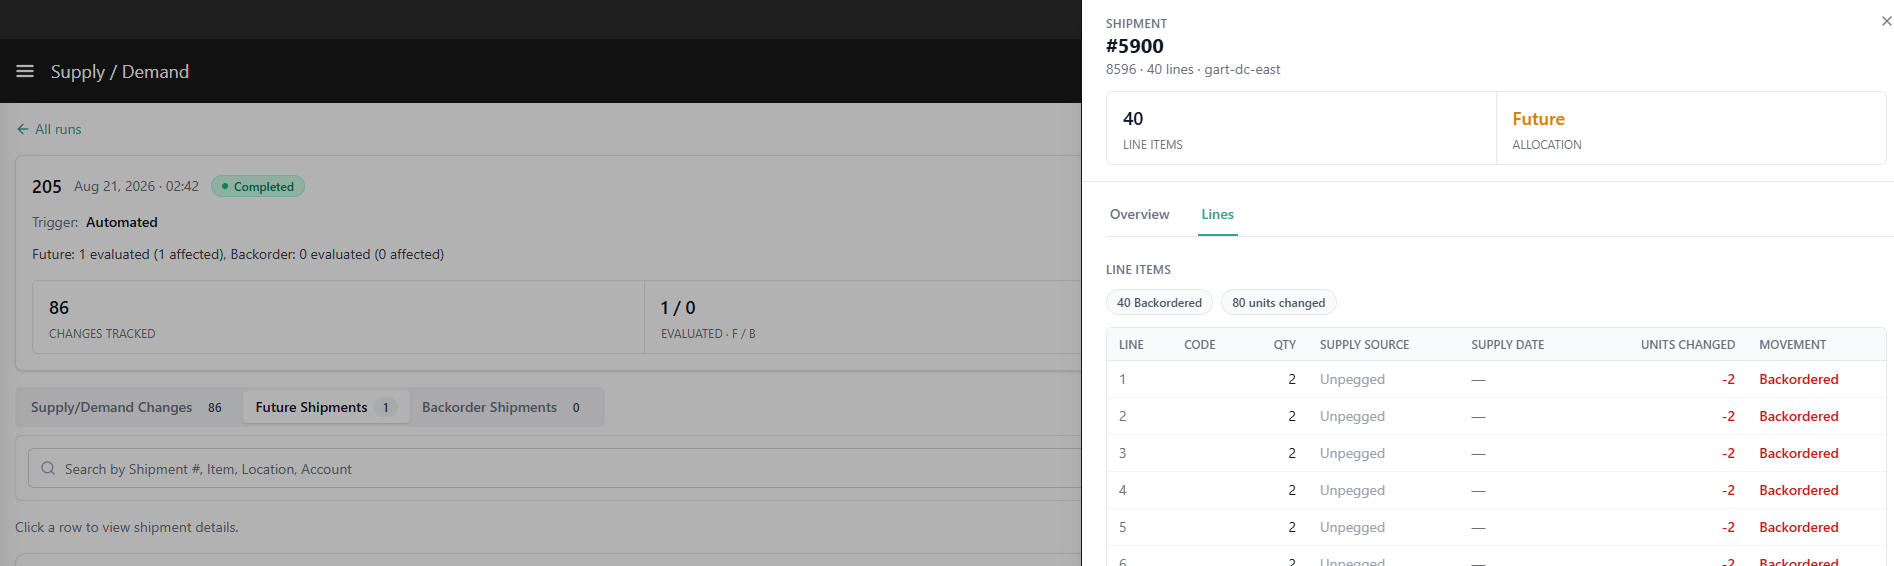
The Lines tab provides a line-by-line breakdown of every item in the shipment, including the supply source assigned to each line.