Watch: Transfer Shipments
Learn how transfer shipments work to fulfill orders from alternative locations
Transfer Shipment Process
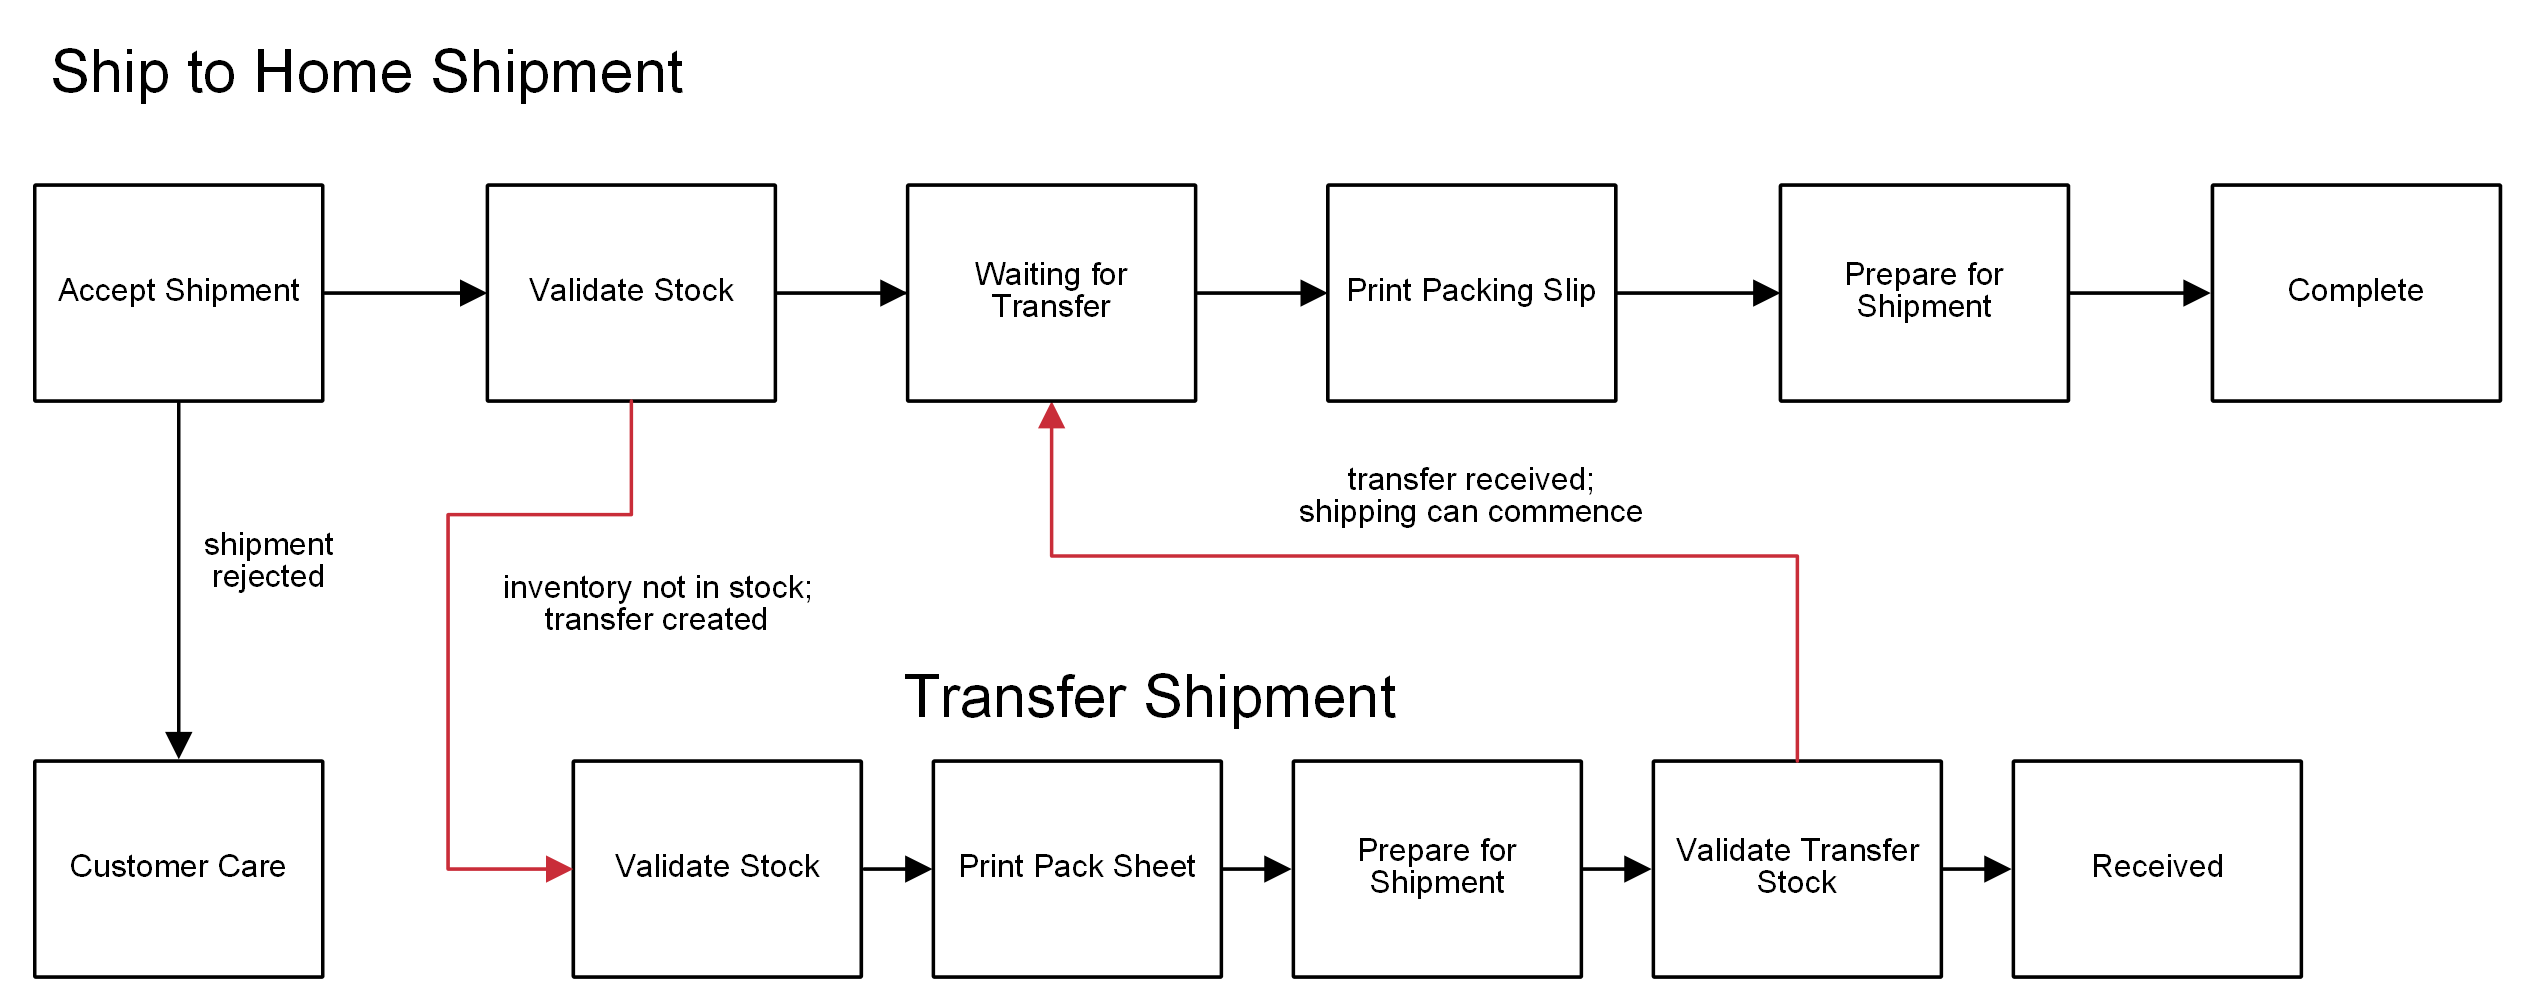
When a transfer is created, the parent shipment will go into Waiting for Transfer step after validating stock and can only move on to finish fulfillment once all associated transfers have been received by the location. Transfer shipments will go through their own process of validating stock, being shipped, and validated by the recipient location. The diagrams below show how transfer shipments fit into their parent shipments’ fulfillment flows. For more details about all shipment processes, reference the Fulfillment Method Types guide.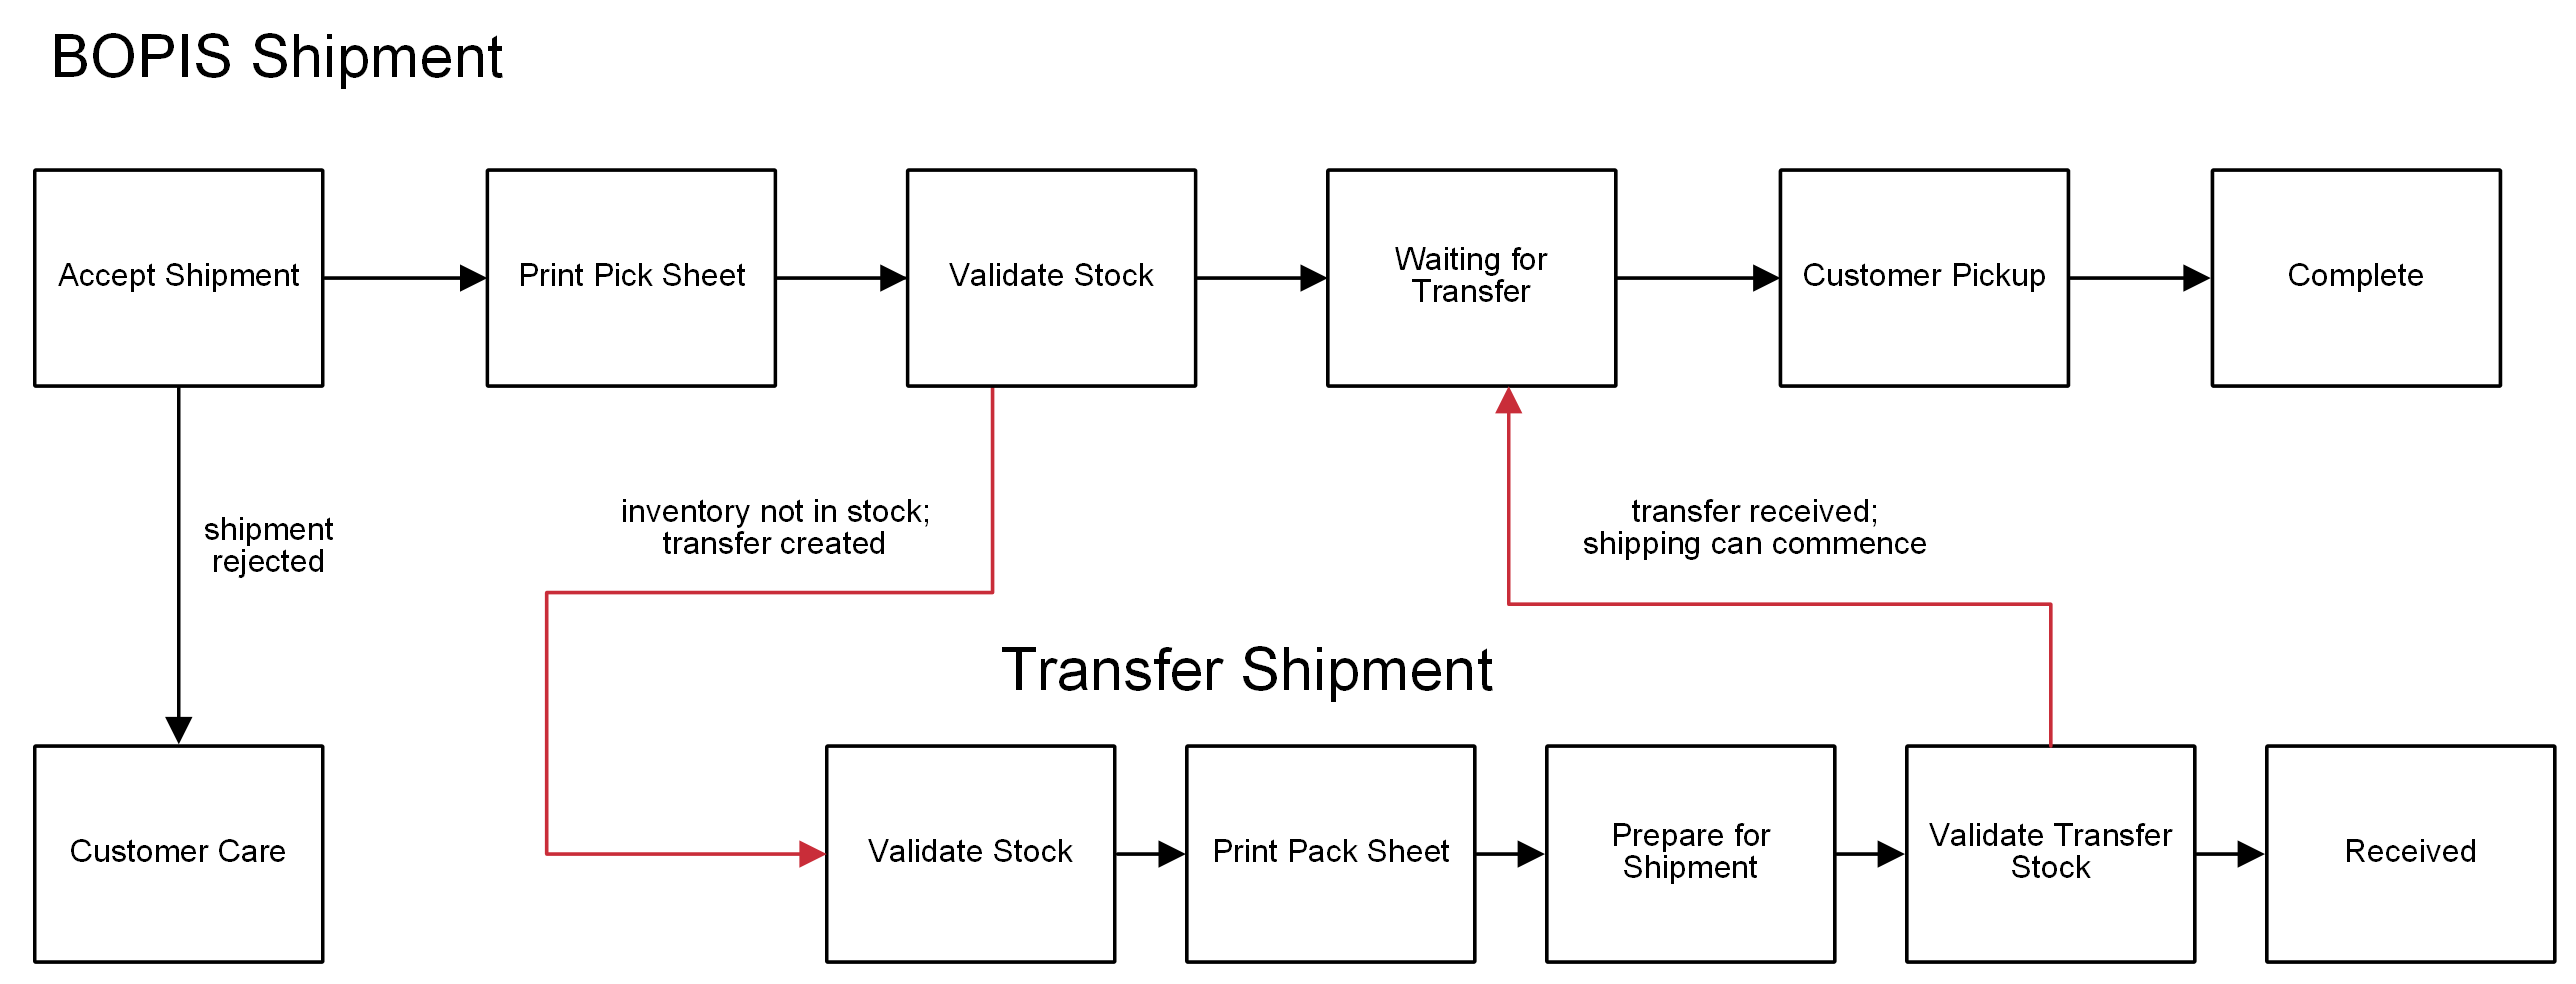
Select Transfer BPM
If you want to use a different BPM for transfer shipments than the default one, you can change it at the location group level. This will determine the steps that all transfers go through.- Go to Main > Supply > Location Groups.
- Click a group in the main Location Groups table to open a similar location selection screen.
- Click Config Settings in the header to switch to another configuration screen, which displays other options that are applied to all locations in the group.

- Select a site in the left-hand navigation bar.
- In the BPM Configurations section, select your preferred BPM from the Transfer drop-down menu.

- Click Save.
BOPIS Transfers
Transfer shipments for BOPIS get created when one of the following two scenarios occur:- If there is not enough inventory at the selected pickup location but there is inventory available at transfer-enabled locations, then Order Routing automatically creates transfer shipments to transfer inventory to the pickup location.
- While fulfilling the order, the fulfiller at the pickup location finds that there is not enough quantity at the location and requests a transfer for the quantity that isn’t available. Order Routing determines the optimal qualifying locations to transfer inventory to the parent location.
Configure BOPIS Transfers
In order for fulfillment locations to provide pickup location with missing inventory via transfers, you must first enable BOPIS transfers in the site settings:- Go to System > Settings > General > Site and locate the Transfer settings.
- Toggle on BOPIS transfer.
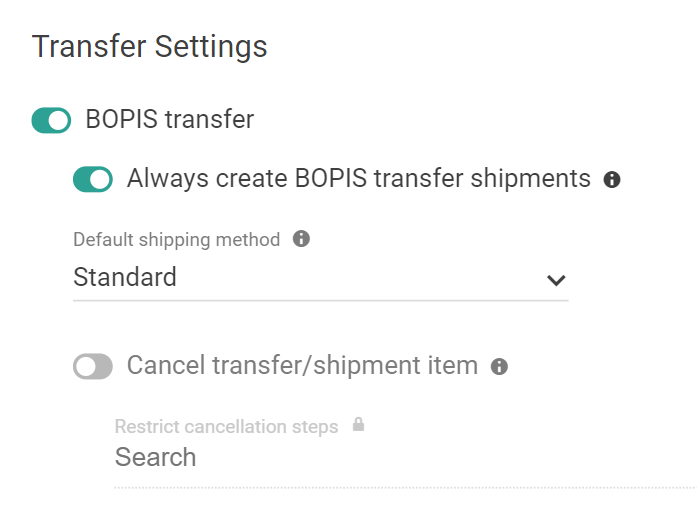
- If desired, toggle on Always create BOPIS transfer shipments to allow creation of a transfer shipment regardless of inventory availability. Then select a default shipping method.
- If desired, toggle on Cancel transfer/shipment item to cancel transfer shipments or items whenever a cancellation occurs on the parent BOPIS shipment or item. You can also restrict selected cancellation steps for the fulfillment process.
- Click Save.
- Go to Main > Supply > Locations.
- Select a location from the table.
- In the Transfer settings section, toggle on Transfer Enabled.
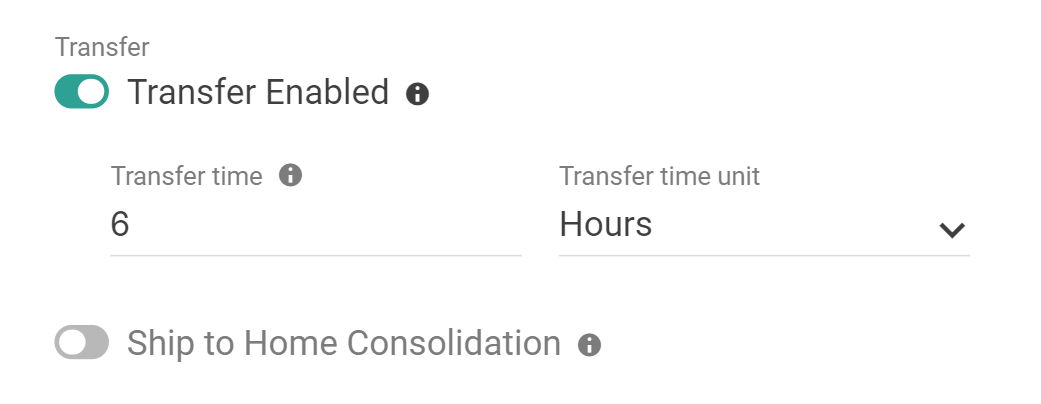
- Enter the usual transfer time and units.
- Click Save.
Customer Emails
There are two email messages that can be sent during the BOPIS transfer process to keep the customer up-to-date on the progress of their order and communicate with them that there are some items that must be waited on before the pickup is ready. Enable these emails in your site settings.- Transfer Shipment Created informs the customer that some inventory in their order was not available and is being transferred to their pickup location. This is triggered upon the creation of a transfer shipment.
- Transfer Shipment Shipped informs the customer that their transferred items have been shipped and they should be on the lookout for a pickup email soon. This is triggered upon completion of the transfer shipment’s fulfillment, before it is received by the pickup location.
Request a Transfer
Transfers can be requested during the Validate Stock step of the fulfillment process.- During Validate Stock, enter the In Stock quantity.
- Click Transfer Shipment to request a transfer for the remaining items. This button will appear as long as the available quantity is less than the target quantity of the shipment.
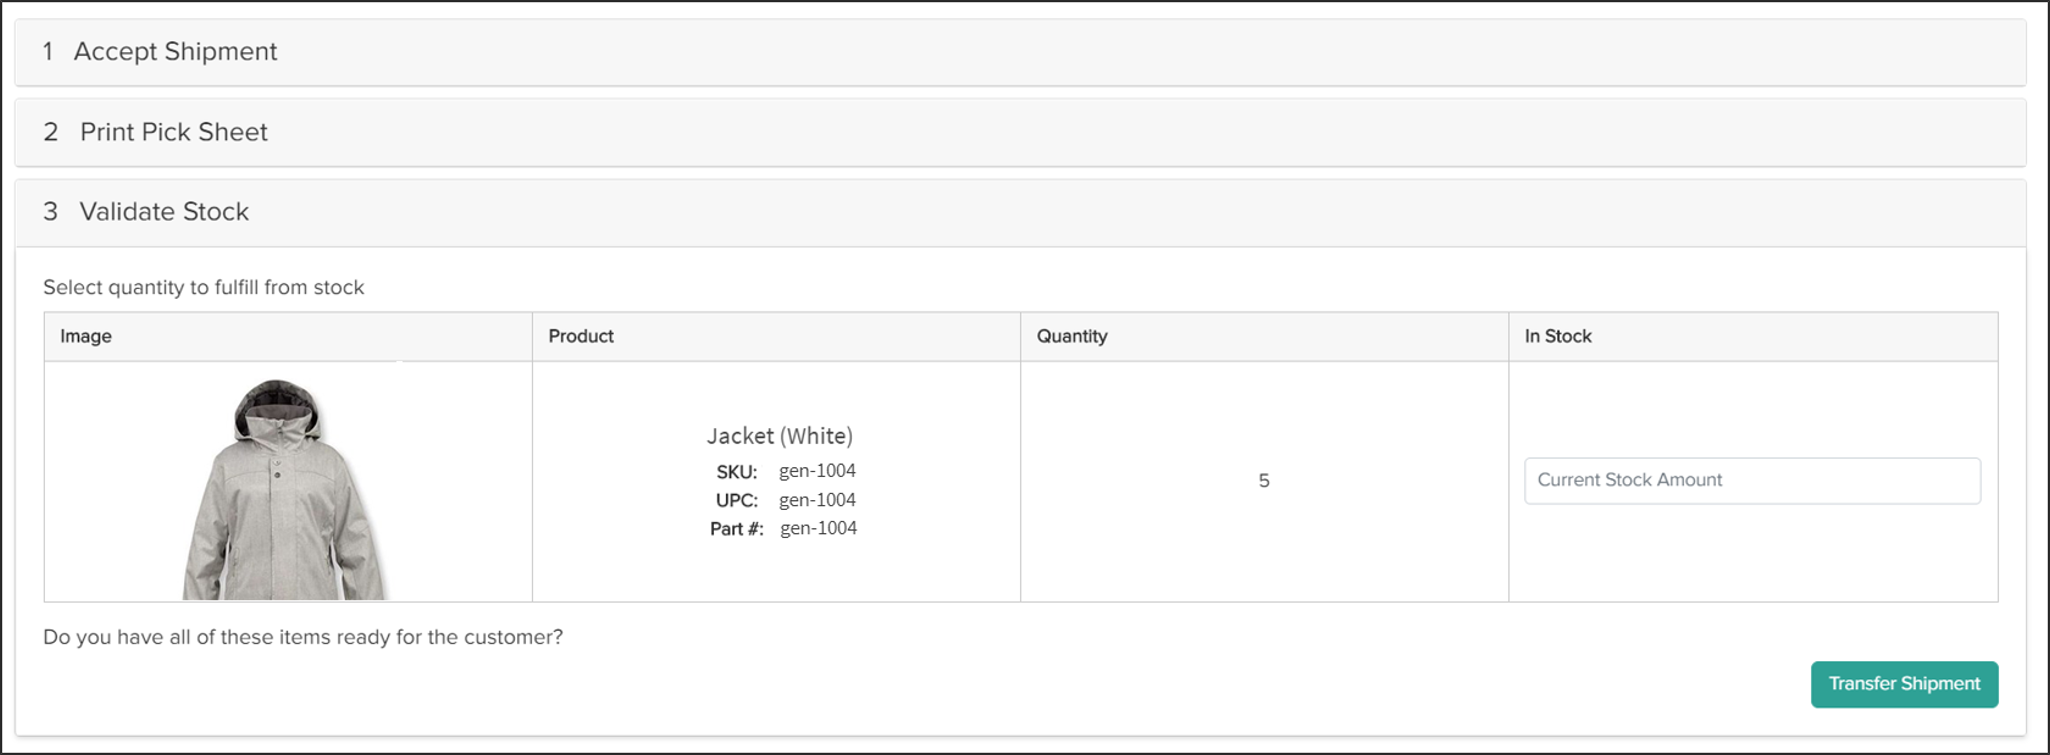
- A pop-up will appear to confirm the transfer request. Enter a reason such as “Item Not Available.” These reasons may be customized for the implementation, and not the exact same list as shown here.
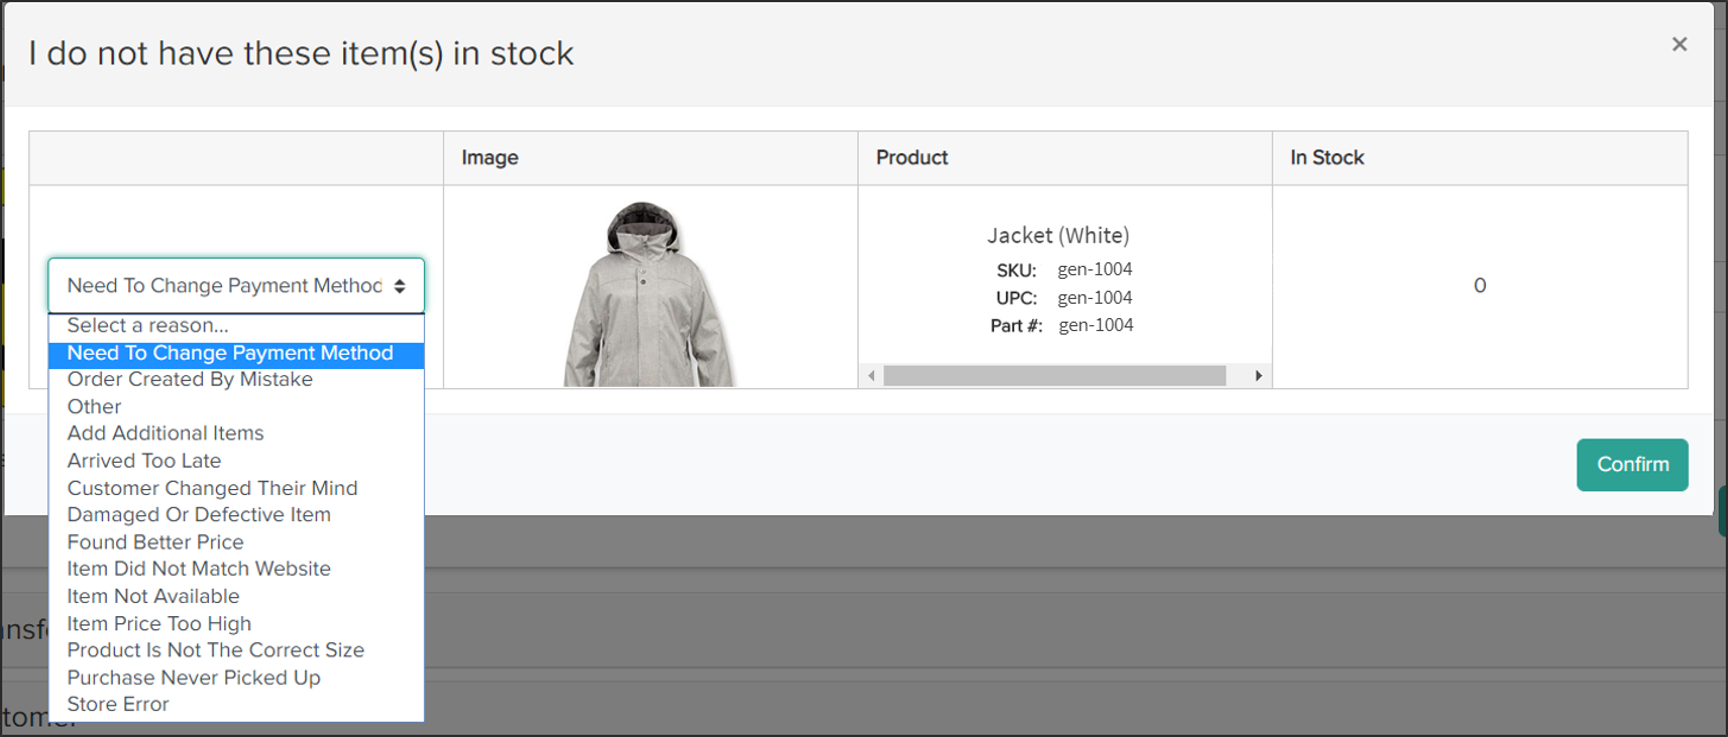
- Click Confirm. This will submit the request and the parent shipment will be placed into Waiting For Transfer.
Fulfill a Transfer
On the fulfiller interface dashboard, the user can see all transfer shipments that are assigned to the location in either the Shipment Quick View at the top of the screen (shown below) or the Assigned Shipments table below the quick view.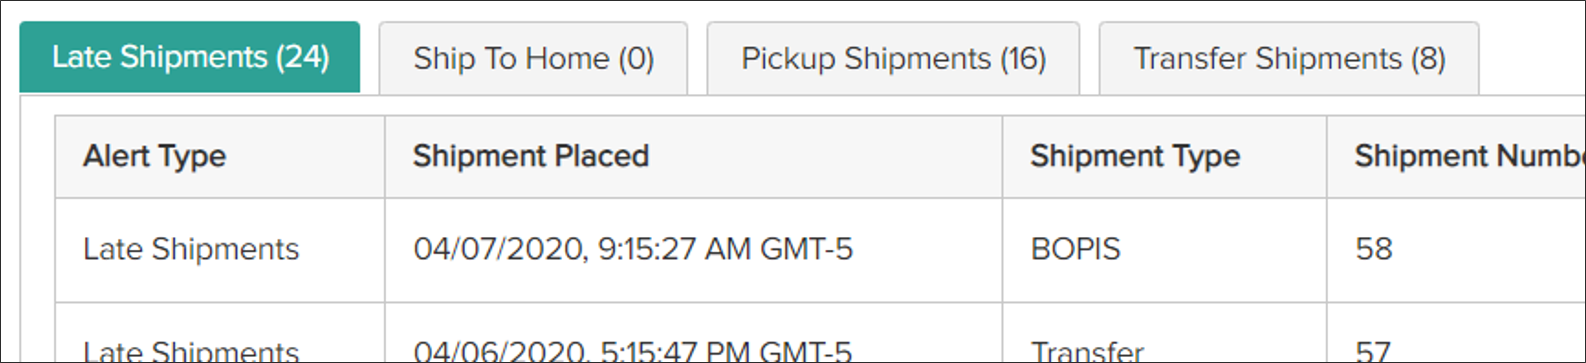
- The first step is to validate stock by selecting the In Stock quantity.
- If there is enough available stock, click Proceed To Print Packing List. If not, request another transfer.
- Pack the shipment and send it to the fulfiller that requested it, much like a regular shipment.
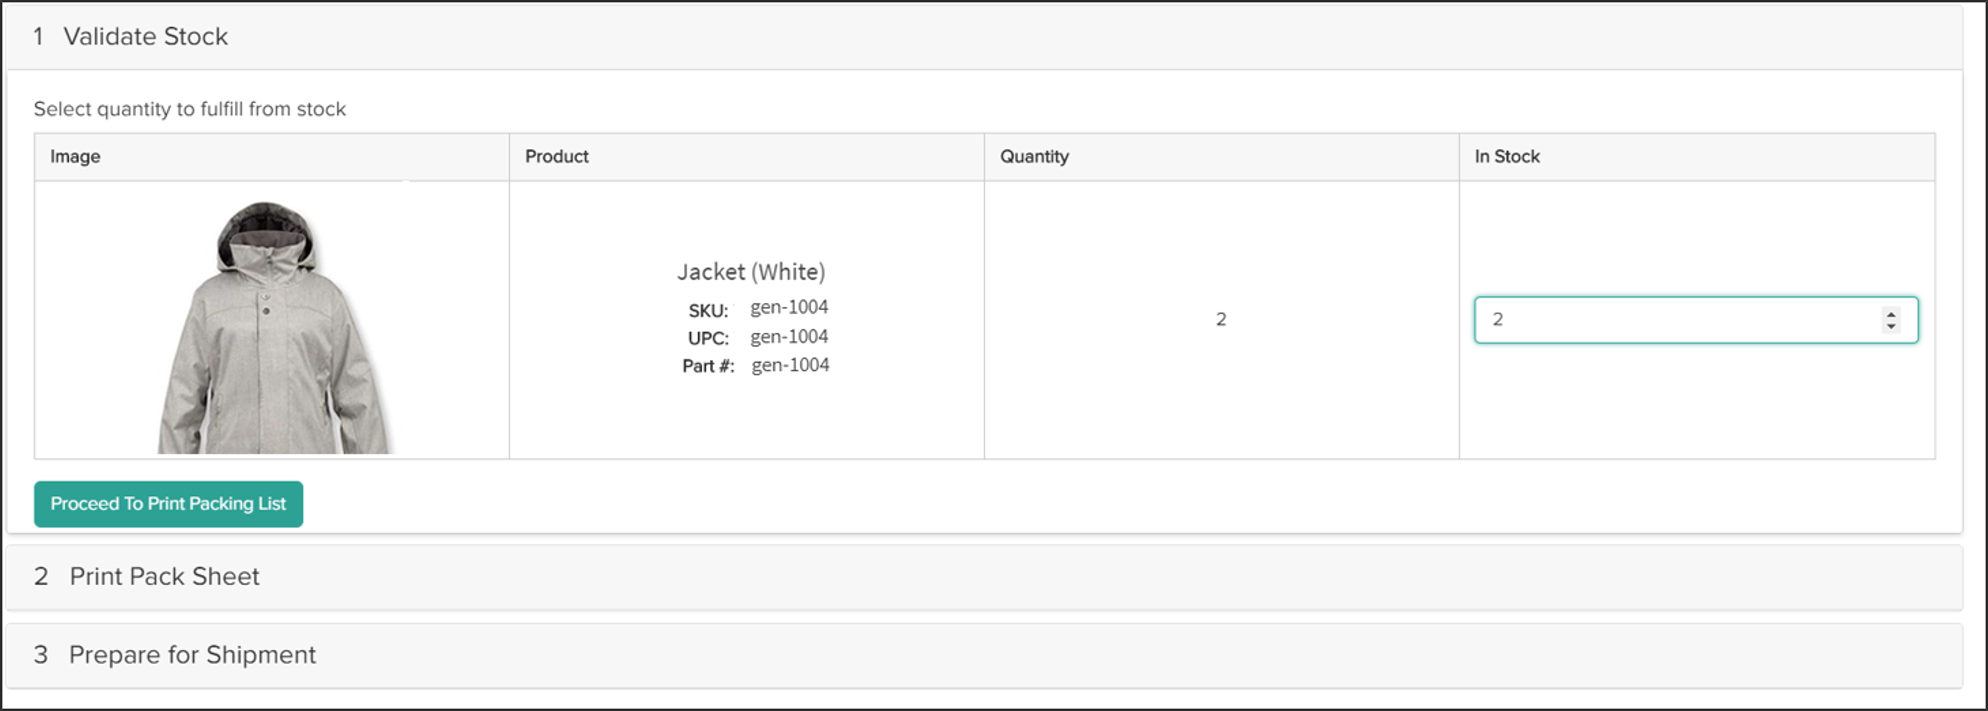
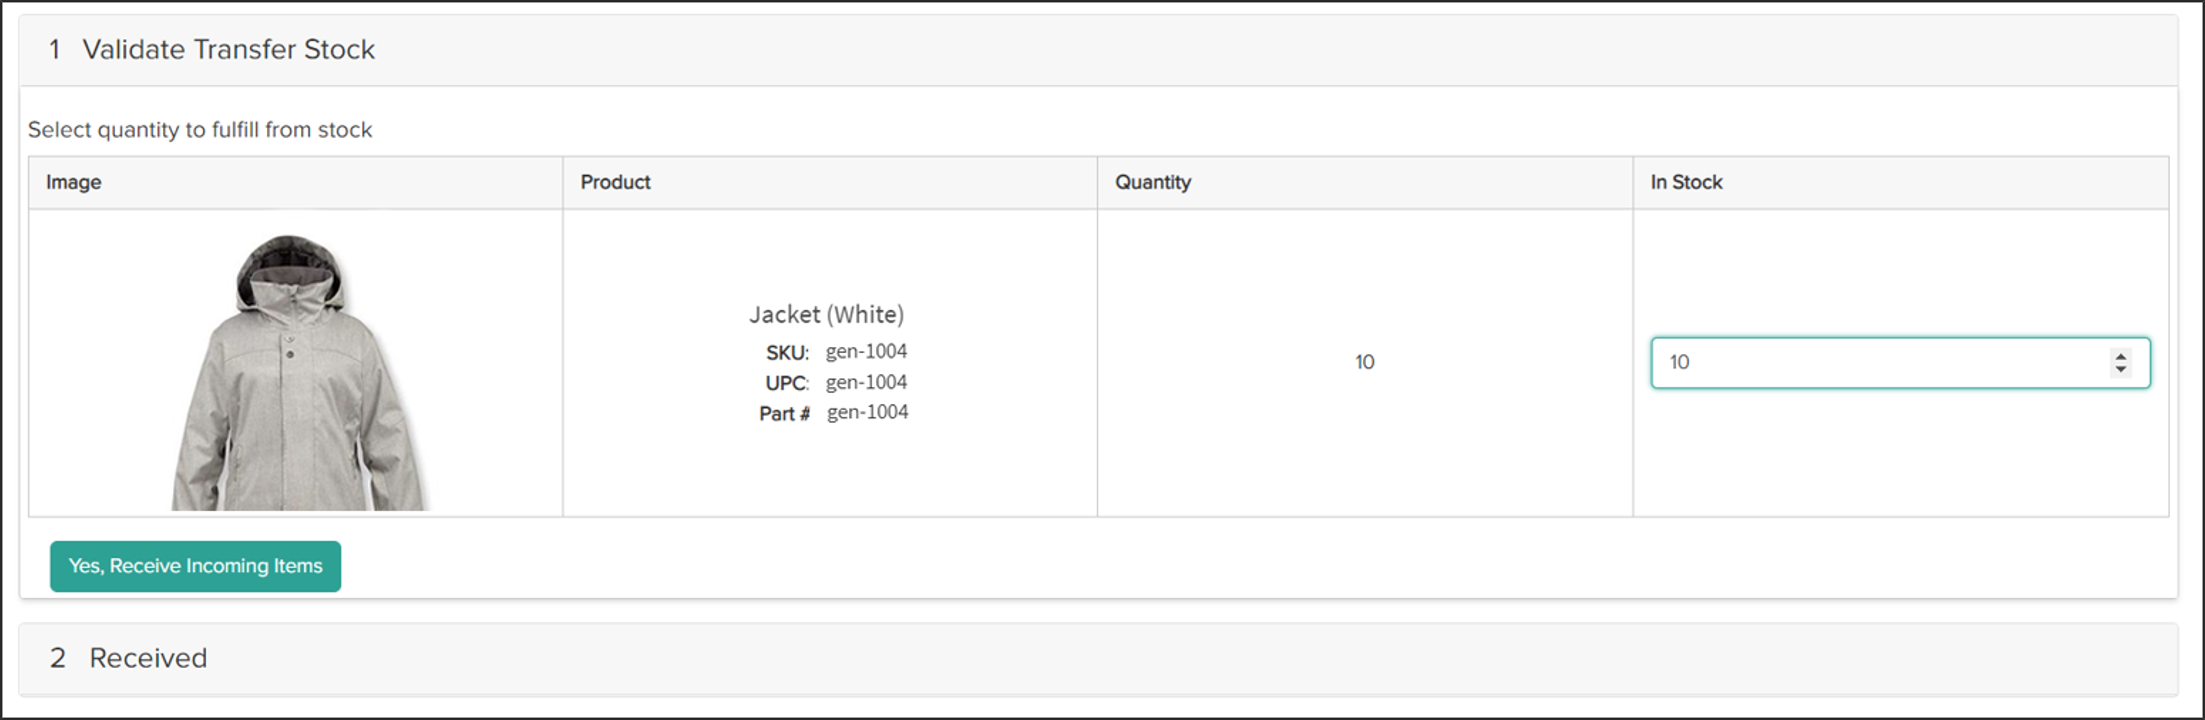
- Select an incoming transfer shipment to open the Validate Transfer Stock step.
- Indicate the available quantity that is now in stock from the transfer.
- Click Receive Incoming Items to mark the transfer as Received.
Transfer Event Notifications
As transfer shipments are fulfilled, event notifications will be triggered in addition to the standard STH and BOPIS fulfillment notifications. Notifications will be sent for the following transfer shipment events:- Transfer Shipment Created
- Transfer Shipment Assigned
- Transfer Shipment Shipped
- Transfer Shipment Sent to Customer Care
Multi-Package Receiving
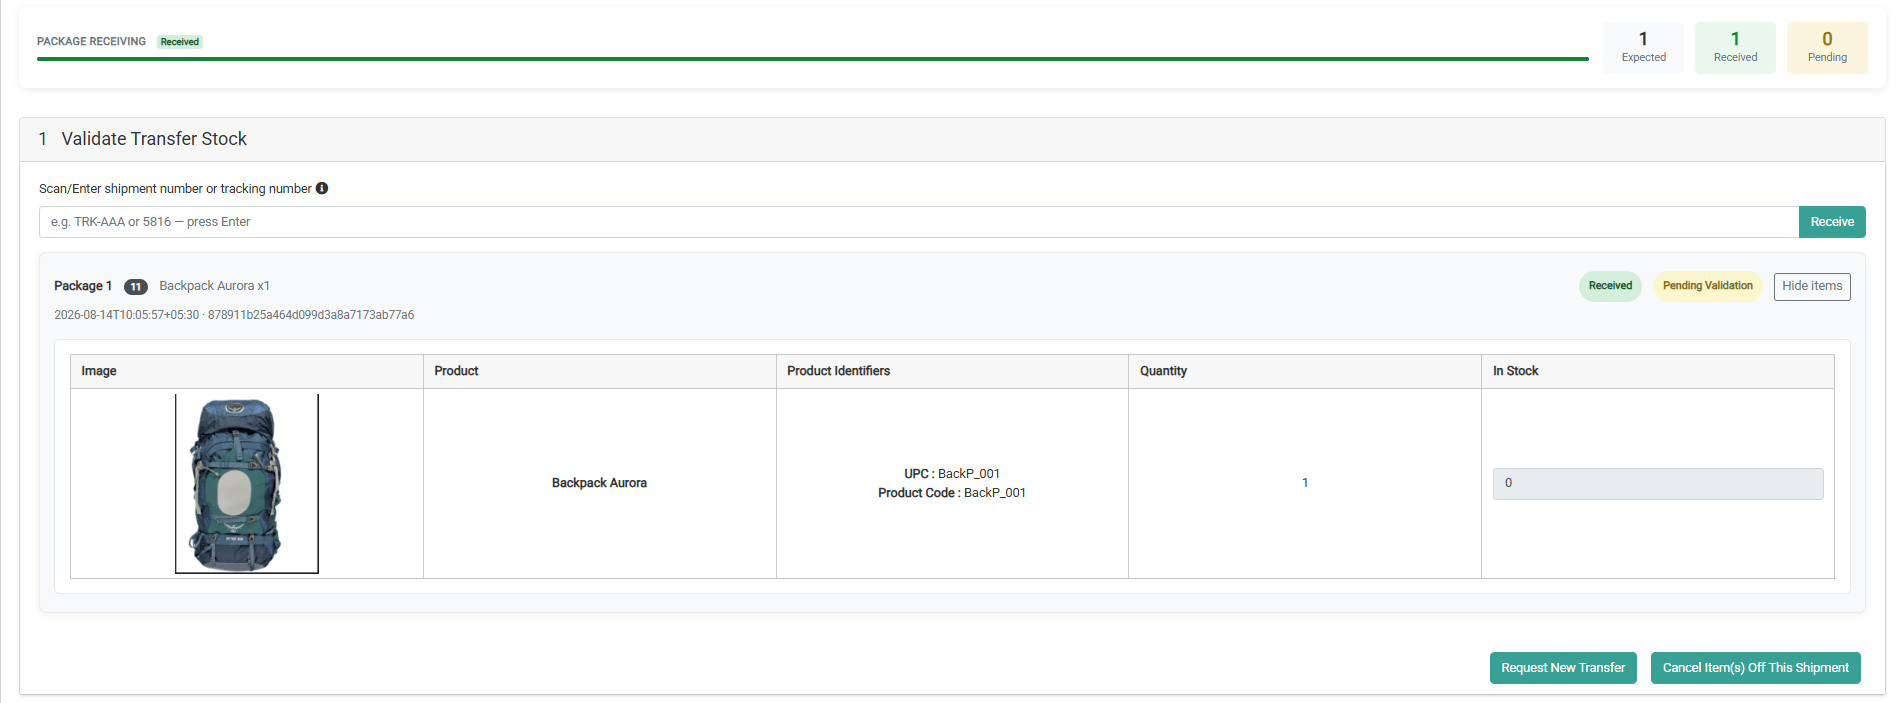
Multi-Package Receiving extends the standard Receive Transfer Shipment process in the Fulfiller UI. When a transfer shipment physically arrives as multiple packages (boxes), each containing its own set of items, this feature allows fulfillers to receive each package independently rather than waiting for all packages to arrive before recording any receipt.Note: Multi-Package Receiving is a tenant-level feature that is disabled by default. Contact your Kibo representative to have it enabled for your tenant. When the feature is off, the existing all-or-nothing receiving flow is unchanged — no UI differences, no new statuses, and no change in behavior.
How It Works
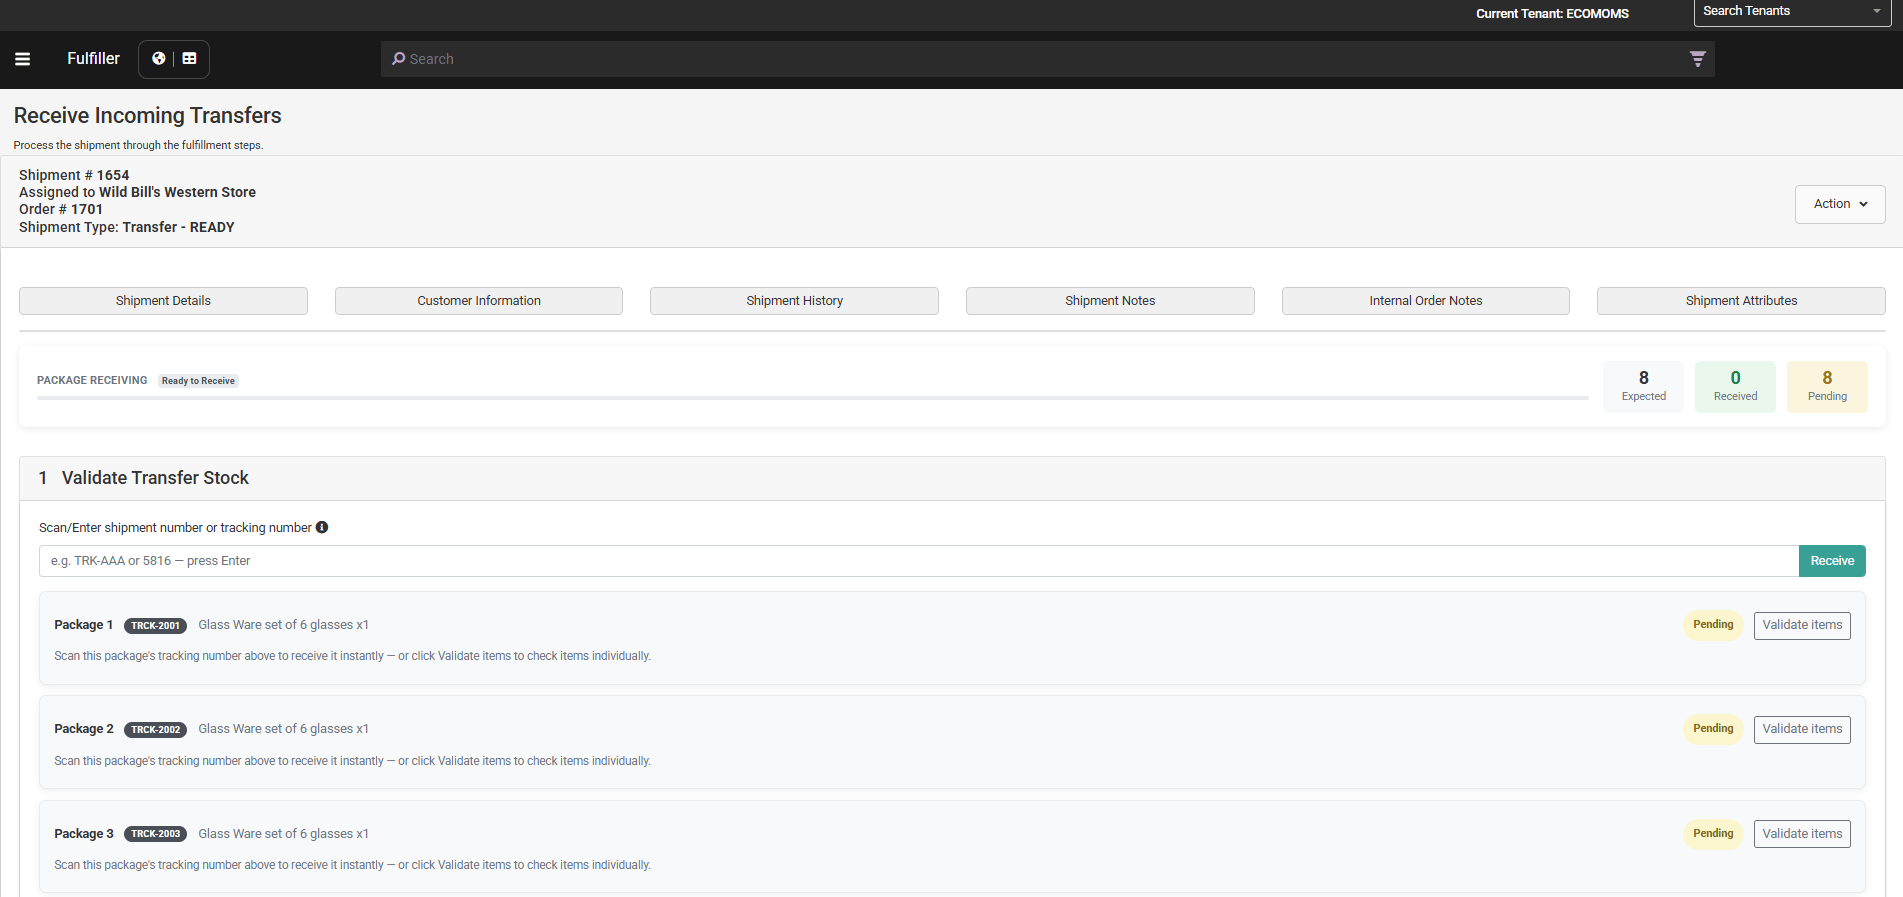
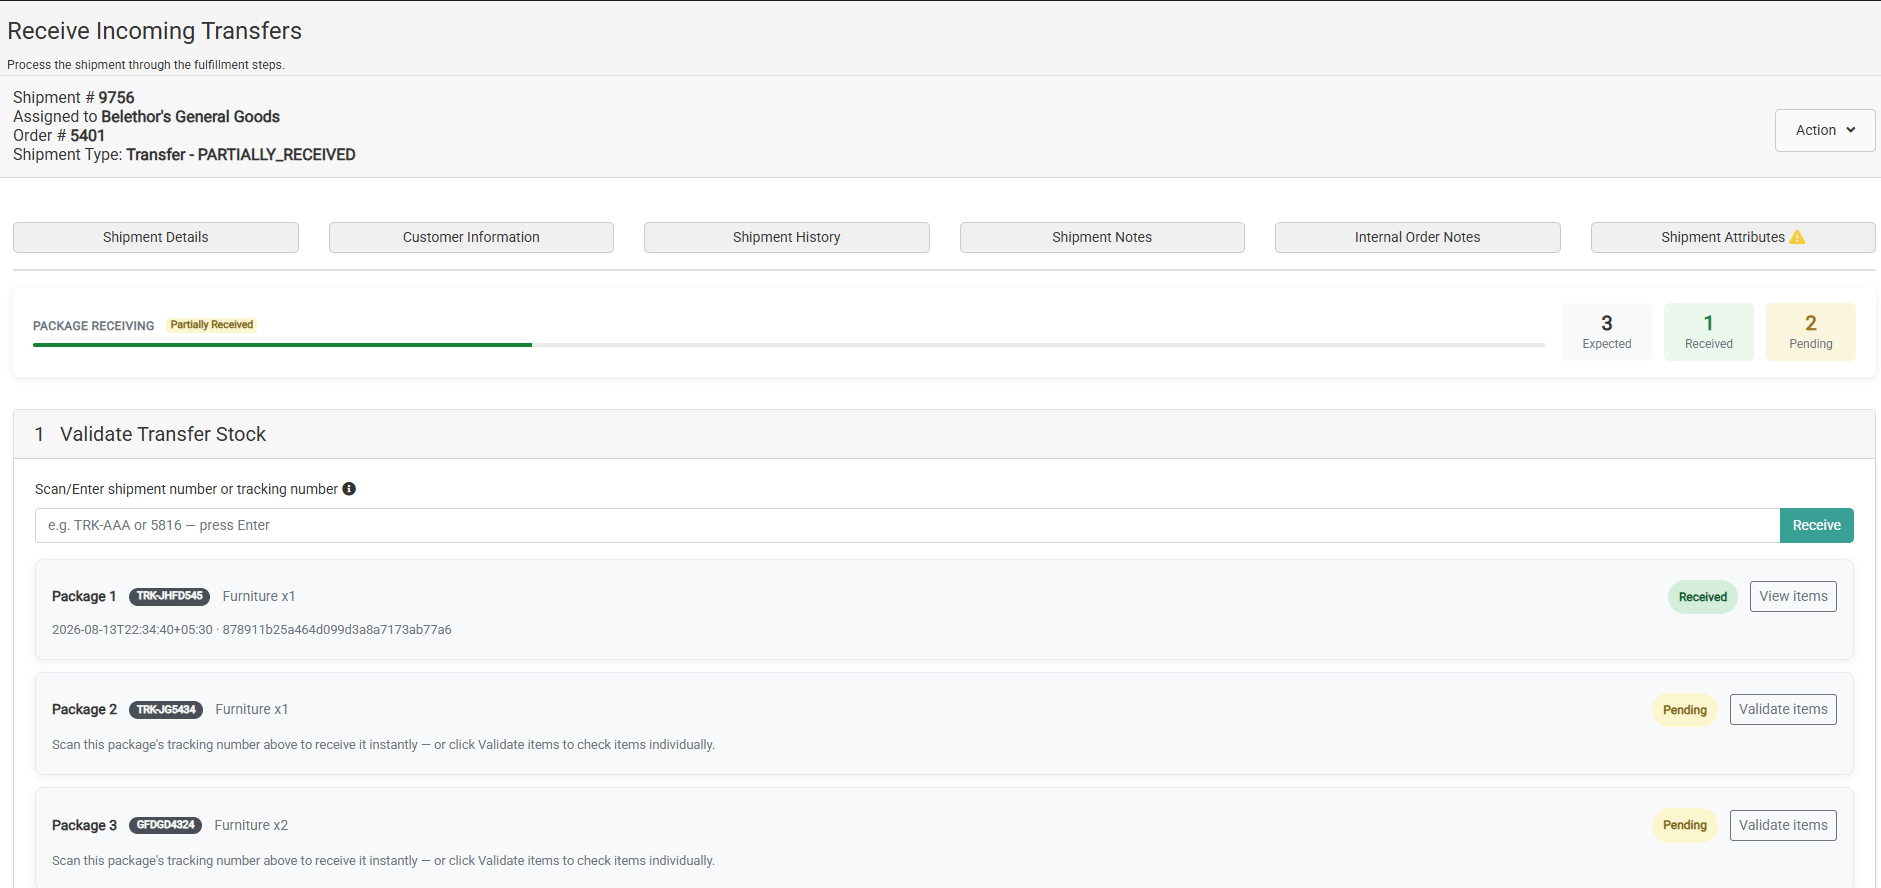
Once enabled, the Receive Transfer Shipments screen is updated to show a package summary for any incoming transfer shipment that contains multiple packages. This summary displays:- Total packages expected
- Packages received so far
- Packages still pending
Important: When a package is received, inventory for the items in that package is made available at the destination location immediately. Downstream actions (inventory availability, parent shipment updates, event notifications) fire per package — they do not wait for the full shipment to be complete
Receiving Methods
Fulfillers can receive each package using any of the following three methods. All three can be used within the same shipment — for example, Package 1 via tracking number scan, Package 2 via item-level validation, and Package 3 via the Receive Transfer Shipments screen.Method A — Tracking Number Entry (Within a Package)
Use this method when all items and quantities within a package are physically present and accounted for.- On the Receive Incoming Transfer screen, locate the package you want to receive.
- Scan or manually enter the package’s tracking number in the tracking number input field.
- Press Enter. The system resolves the tracking number to the matching package and marks it received immediately — no item-level scanning is required.
- The package summary updates to reflect the newly received package.
Method B — Item-Level Validation (Within a Package)
Use this method when you need to scan and validate individual items within a package, particularly when a shortfall or damage is present.- On the Receive Incoming Transfer screen, open the package you want to receive.
- Scan or enter each item within the package using the existing item scan flow. Barcode, UPC, and in-stock validation rules apply as normal.
- Once all line items have been entered, click Yes, Receive Package to mark the package as received regardless of whether quantities fully match the expected amounts.
- Review the package result:
- All quantities match → Package displays a green indicator (Received).
- One or more items are short → Package displays a green pill (Received) alongside a yellow pill (Pending Validation).
Note: Inventory is updated immediately for the quantities validated in the package — including partial quantities. This does not wait for exception resolution.
- If a short item is unique to this package (its expected quantity is not split across other packages in the shipment), the Substitute button is enabled immediately for that line item.
- If a short item’s expected quantity is split across two or more packages in the shipment, the Substitute button is disabled for that line item in all packages it appears in. These items can only be resolved via the shipment-level exception panel (see Shipment-Level Exception Handling).
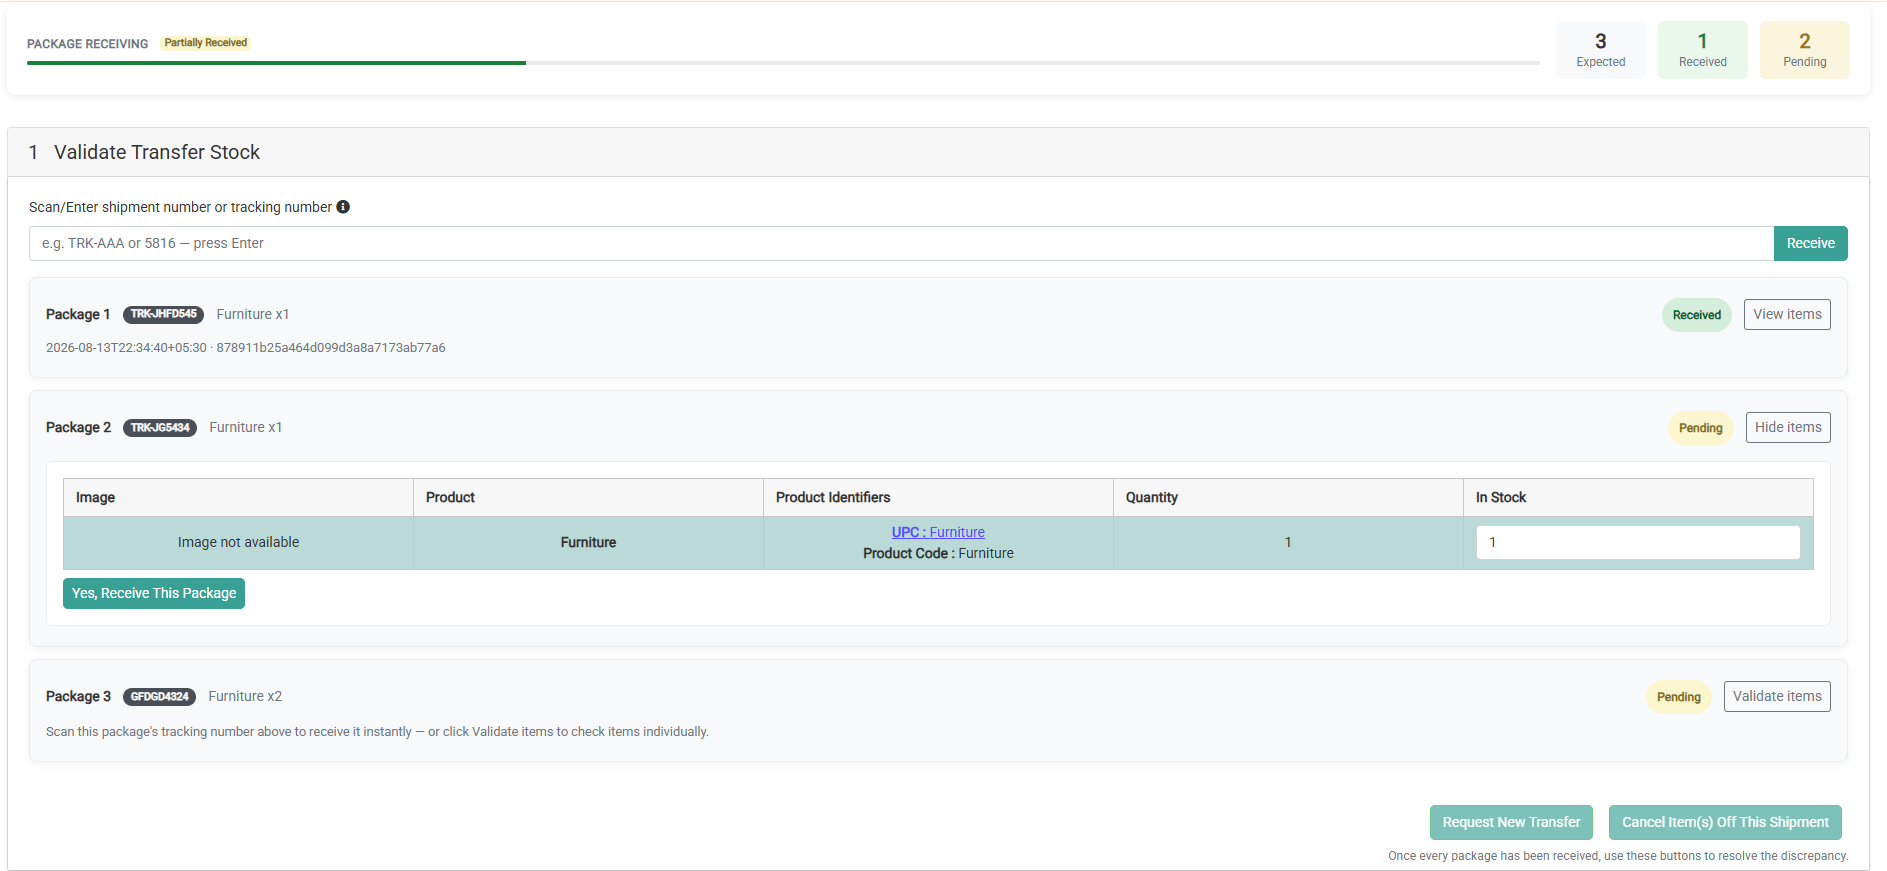
Method C — Tracking Number or Shipment Number Scan (Receive Transfer Shipments Screen)
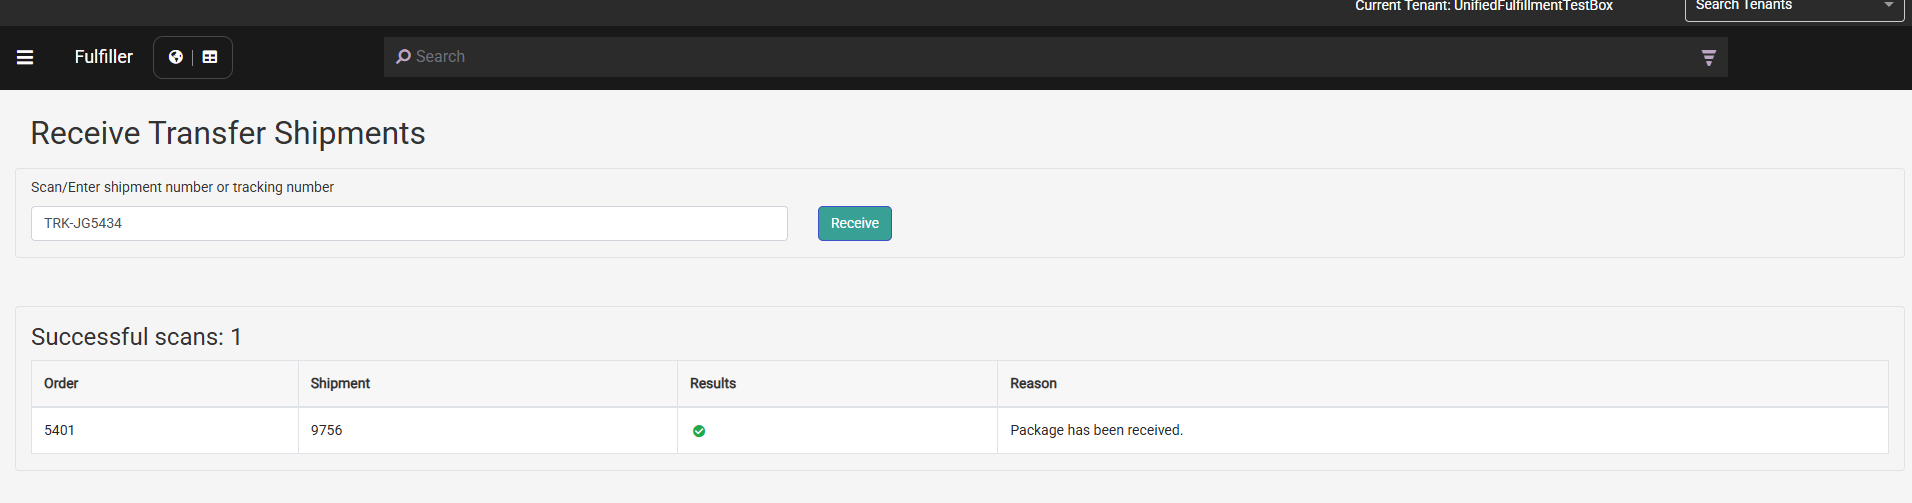
Fulfillers can also scan or enter a tracking number or shipment number directly on the Receive Transfer Shipments landing screen, without first opening an individual package.Note: Today, scanning a tracking number on a multi-package shipment immediately marks the entire shipment Received/Fulfilled. With Multi-Package Receiving enabled, that same scan marks only the matched package as received and places the shipment into Partially Received.
Shipment-Level Exception Handling
Once every package in a shipment has been marked received, the system checks whether validated quantities match expected quantities across the entire shipment. If a mismatch exists on one or more line items, a shipment-level exception panel appears beneath the package listing. This panel provides two resolution options:- Request New Transfer — Request additional inventory to cover the shortfall.
- Cancel Item(s) Off This Shipment — Cancel the short quantity.
Important: Both options in the exception panel remain disabled while any package is still outstanding (i.e., while the shipment is in Partially Received status). They become available only once all packages have been received and a quantity mismatch remains.