

- Updating visible content on your site pages, like banner images, employee biographies, upcoming events, and press releases
- Supporting user-generated content (e.g., product reviews, comments)
- Augmenting system data, such as categories, locations, and customer accounts
- Enabling data-driven enforcement of business, regulatory, or compliance rules on your site
- Migrating pre-existing static content to a storefront
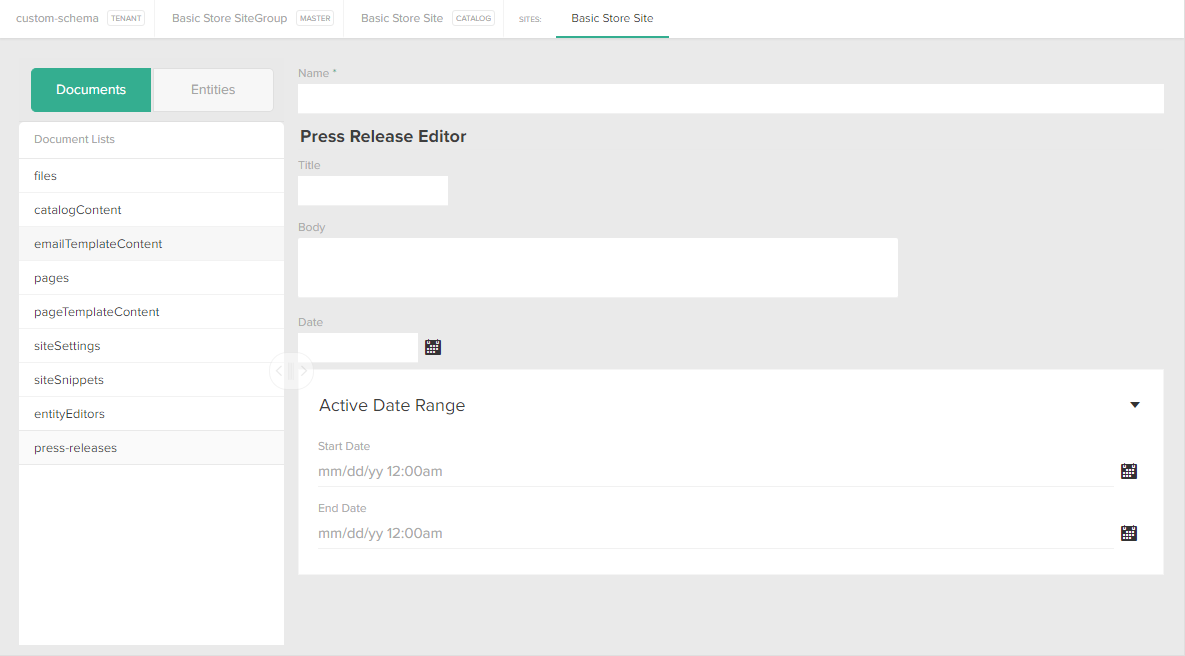
- Creating custom editors to enable non-developers to manage custom data in Admin
- To create data used for logic, rules, or mapping within any part of the platform. For example, gamifying storefront purchases with entity lists. The Entity Management System, which can be thought of as a schema-less database, is best suited for these scenarios.
- To create visible site content for the retailer’s storefront websites and native applications. For example, posting press releases with document lists. The Content Management System (CMS) is best suited for these scenarios.
Dynamic Content Storage
In KCCP, each object is stored in a list. Both the Content Management System and Entity Management System support custom list creation. A list is similar to a database table, describing the types of data that can be stored, which properties should be indexed for high-scale retrieval, and the list’s read/write security model. Currently, you can create lists with the API or API Extension applications. The two types of lists you use to extend KCCP are Document Lists and Entity Lists. Document Lists are stored in the Content Management System (CMS) and Entity Lists are stored in the Database (MZDB). Lists offer the following capabilities:- Allow you to store and query your data independently of other system content
- Provide a resource for defining list metadata
- Provide a resource for managing objects in a list
Views
Every document list has aviews property, which can be used as a security mechanism to mask certain properties of, or determine which users have access to, a list. For example, an administrator may have access to the full document list through an “administrator” view, whereas designers may only have access to a subset of the documents and/or subset of the properties through a “designer” view.
Views can also support filters, which have the ability to limit which documents are returned by GET operations from certain views. The filter for a view uses the same query syntax as the standard API filters (’Id eq foo’). When viewing custom data in Admin, the list of fields that appears as columns in the grid is determined by the fields defined in the views property. Each field must indicate whether or not it is sortable. All view fields can be queried.
To render a list of documents or entities in Admin (Custom Schema and Content Editor), you must create a view for it and set the isVisibleInStorefront property to true, as well as set "usages": ["entityManager"] in the document or entity configuration. Views are similar to traditional relational database management system (RDBMS) views and can filter the documents/entities and alter the schema in an underlying list.
The following JSON shows an example of a custom definition that contains one view and three view fields:

Custom Editors
You can create documents directly through the API or from within Admin, which provides two interfaces for managing document objects.- Custom Schema: Displays the objects within a given document list at System > Schema > Custom Schema and allows Admin users to create, edit, delete, and publish documents using custom editors.
- Content Editor: Displays document lists and documents in Main > Content > Editor and allows Admin users to edit and publish documents from a template (such as for email notifications and packing slips).
include_documents Hypr tag or theme widget to render a document on your site. Refer to Render Documents on Your Site for more an example.
Editors are Javascript objects that use the Ext.js library to build editor components. Developers can create editors that non-developers can use to create new list objects (aka documents) in Admin. You must create a custom editor using an application that calls the API.
Refer to the documents custom schema example to learn how to leverage the .NET SDK to create an editor through the API.
Page Templates and Hypr Tags
To display documents on your site, you must configure a page template with aninclude_documents Hypr tag that points to your document list. Refer to Render Documents on Your Site for more information.
Custom Schema Examples
In general, document lists are best suited for visible content on a site, such as biographies, event announcements, and/or press releases. Entity lists are better suited for augmenting system data like categories, locations, and customer accounts or keeping track of intermediate entities used to drive the storefront experience. However, there are exceptions, such as when:- Drafting and Publishing objects is required. Only document lists support this.
- Active date ranges are required. Only document lists natively support this feature, including storefront preview.
- More than 2,000 objects must be sorted or filtered by one or more custom properties. Only entity lists support indexing properties and should be used in this scenario.
Entities
As a game retailer, you may want to gamify storefront purchases for shoppers, so that whenever a shopper purchases a certain set of products, he is awarded a particular achievement badge. You also require the ability to define new purchase conditions (achievement rules) and badges. The Entity Management System provides a flexible approach for authoring and executing these rules. First, create an entity list. For example:- If the checkout event satisfies a rule, the system awards the shopper with the corresponding achievement badge on the checkout confirmation page.
- The application evaluates the achievement rules whenever the platform fires an Order Opened application event. The application then evaluates the rules against the order to see if any products satisfy a rule, finally sending an email with any earned achievements.
- Evaluate rules that span multiple orders
- Provide shoppers with tools to share their badges via social media
- Create a dynamically generated top badge-earners page
Documents
You may want to post press releases or blog posts to your site on a regular basis without the assistance of a developer every time you need to do so. With the CMS, you only need a developer to do the initial configuration so that non-developers can add, edit, delete, and publish documents through the Admin interface. Initial developer configuration includes:- Creating a backend application to configure the following custom schema through the API:
documentTypeto describe what fields comprise a documentdocumentListto define the view that displays document data on the storefrontentityEditorso non-developers can manipulate list objects (aka documents) through the Admin interface- You can use the API to programmatically create
documentsin bulk. This example focuses on manually administering documents using a custom editor.
- Creating Hypr templates that use Hypr tags and adding them to your theme to render documents on your site.
- Adding a page to the navigation bar.
Configuring the Custom Schema
This example explains how to create a .NET console application in Microsoft Visual Studio that configures all required schema for posting press release documents on your site. The following console application leverages the .NET SDK.- Log in to Dev Center.
- Create a new application.
- Add the
Site Create ContentandSite Create Document Listbehaviors to the application. This step is required to grant your application the necessary permissions to create custom documents and document lists. - Install the application to the sandbox of your choice and enable it in Admin. If you decide to add additional behaviors to your application after this step, you must reinstall the application to your sandbox and re-enable the application in Admin to apply the new behaviors.
- Note the application key, shared secret, tenant ID, and site ID. You can obtain the application key and shared secret from the application details page. You can obtain the tenant ID and site ID by viewing your live site through the Content Editor and looking at the URL, which has the pattern
t_TenantID_‑s_SiteID_.sandbox.mozu.com.
- Create a new project in Visual Studio.
- Choose to develop a Console Application and click OK.
- Open the NuGet packet manager (Tools > Library Package Manager > Manage NuGet Packages for Solution).
- Search for Mozu in the online package search box.
- Install the Mozu.Api.SDK and the Mozu.Api.ToolKit packages, and then close out of the NuGet packet manager.
- Open the
App.configfile in your solution root directory for editing. This is the file where you specify the configuration data for your application. - Within
App.config, specify your application configuration within anappSettingsblock inside of theconfigurationblock, as shown in the following example, replacing the placeholder values with your application-specific values (leave thestartupandruntimeblocks as is). You always need to specify an application key, shared secret, and tenant ID for your application to make successful calls to the API. The site ID is required for most API calls, but not all, and the master catalog ID is required for some API calls, but not all.
- Right-click your project directory in Solution Explorer and select Add > Class.
- Name the class Bootstrapper.cs and click OK.
- Code the
Bootstrapper.csfile so that it matches the following example, making sure to replace the namespace value with your application name:
-
Code your main program file to match the following example, which obtains a API context and creates a document type, document list, and entity editor:
-
Click Start to run your application. After it builds, the application creates the following schema:
documentType: press-release-templatedocumentList: press-releasesentityEditor: press-release-editor
Render Documents on Your Site
To render documents on your site, you must do one of the following:- Create Hypr templates and use Hypr tags (e.g.,
includeandinclude_documents) - Create a theme widget that retrieves your documents from the CMS and add it to a dropzone
include_documents Hypr tag method.
- Navigate to your local theme directory.
-
Open your site’s
theme.jsonfile in a text editor. -
Add the following to the
pageTypestop-level array: -
Create a new Hypr page template called
press-release.hyprthat contains the following code:This is the template where you add HTML to style the content that displays on your site. Refer to Hypr Templating System for more information. -
Create a new Hypr page template called
document-list.hyprthat contains the following code: -
Create a new Hypr page template called
press-release-render.hyprthat contains the following code: - Build and upload your theme files to Dev Center.
- Go to Admin > Main > Content > Editor.
- Click Content > Pages > Templates > Press Release.
- Verify that all documents from your list display on the page.