- Core: This tab displays all metadata associated with your application and all the sandboxes where the application has been installed. Application metadata is shared with all packages.
- Packages: This tab displays configuration options specific to an application package. You can create individual packages so multiple developers can work on the same application. Package configurations are not shared between packages. You must download application files from each package and merge them using your own source control system. Refer to Applications for more information about configuration options. The Release package is created by default when you create an application and cannot be deleted.
- Release Notes: This tab displays release notes for a selected package. You can add notes to record changes, describe development workflows, or provide instructions for working with applications.
- Status
- Version
- API version
- Application key
- Shared secret
- Active package
<_Dev Account namespace_> . <_Application ID_> . <_Version number_> . <_Release package_>. The dashboard lets you show or hide the shared secret.
The credentials described above apply to the original (V1) security model, in which a single application key and shared secret are used everywhere. Apps that use the enhanced (V2) security model manage environment-specific credentials instead. See Application Credentials and Security for details.
When you’re finished testing a custom application, you must submit it to Kibo for the certification process. Only certified applications can be deployed to a production tenant.
Application Credentials and Security
Kibo supports two security models for applications.
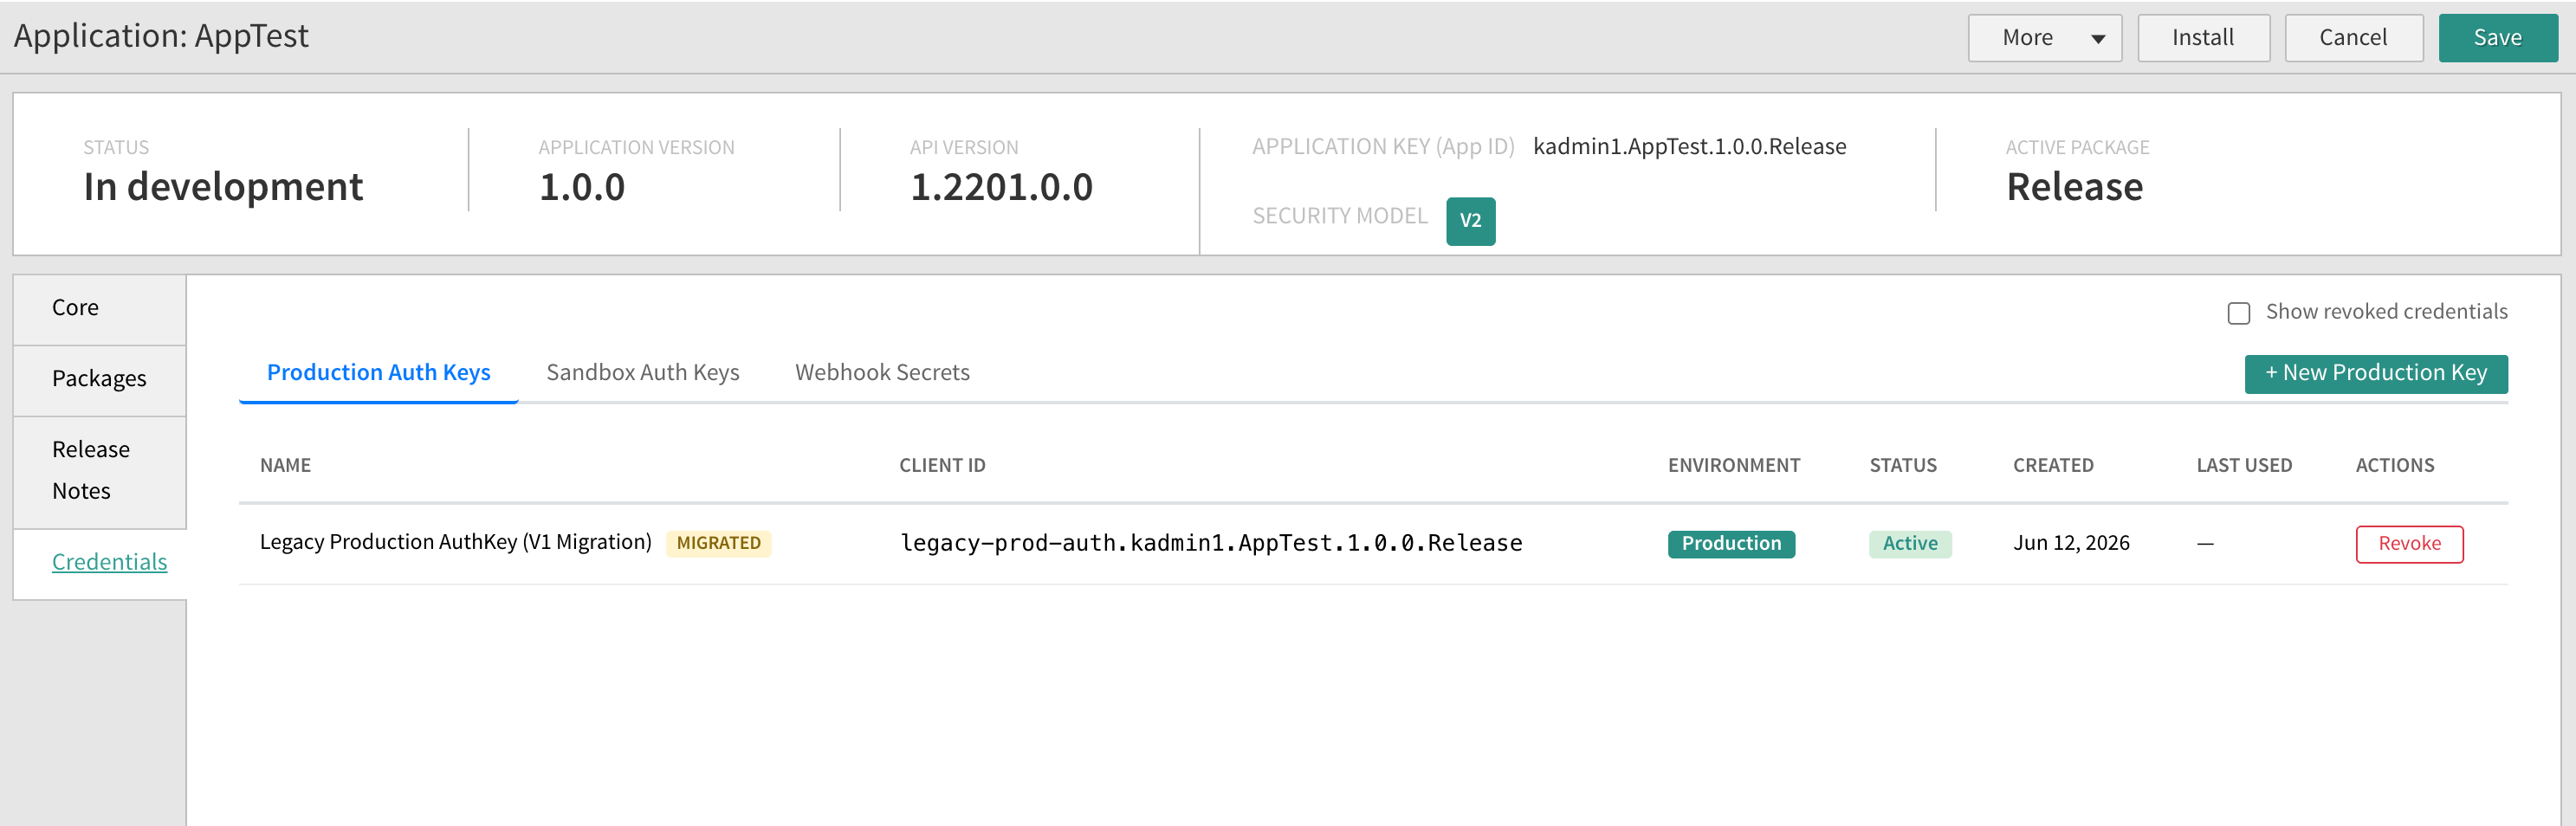
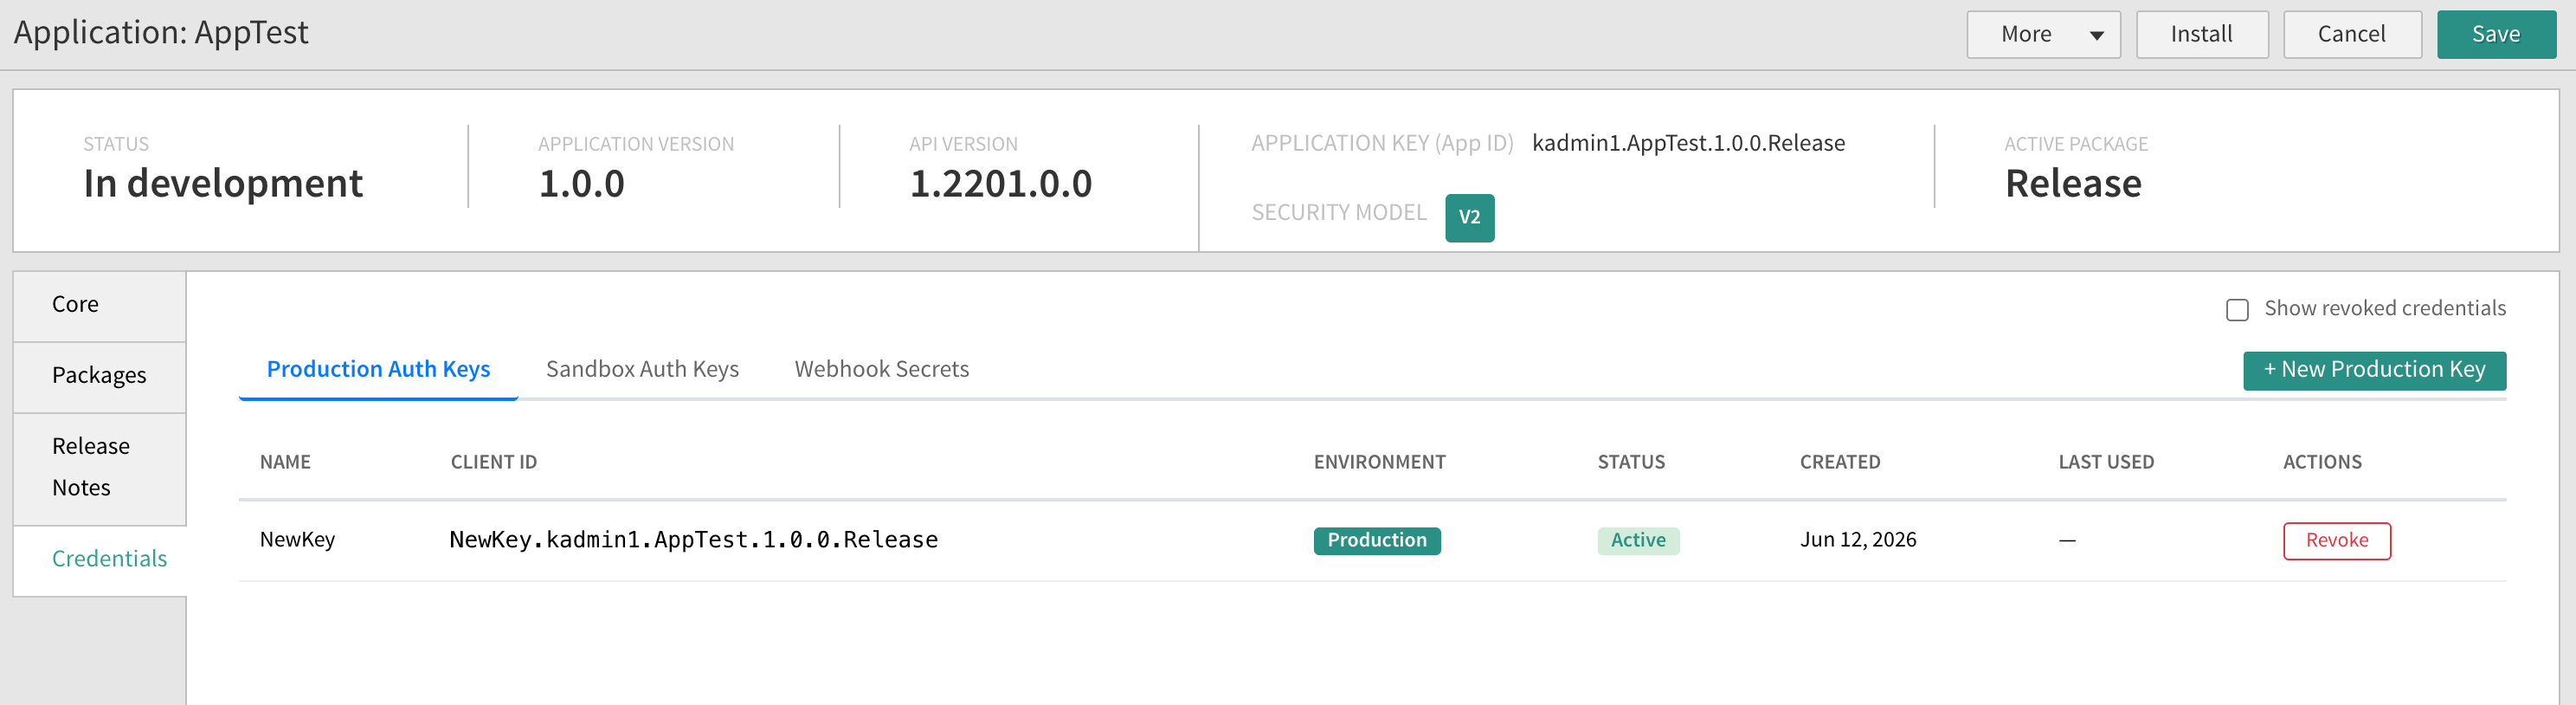
After an app is upgraded, its Security Model shows V2 in the Application Editor dashboard, and a Credentials tab is added where you manage environment-specific auth keys and webhook secrets.
Environment-Separated Credentials
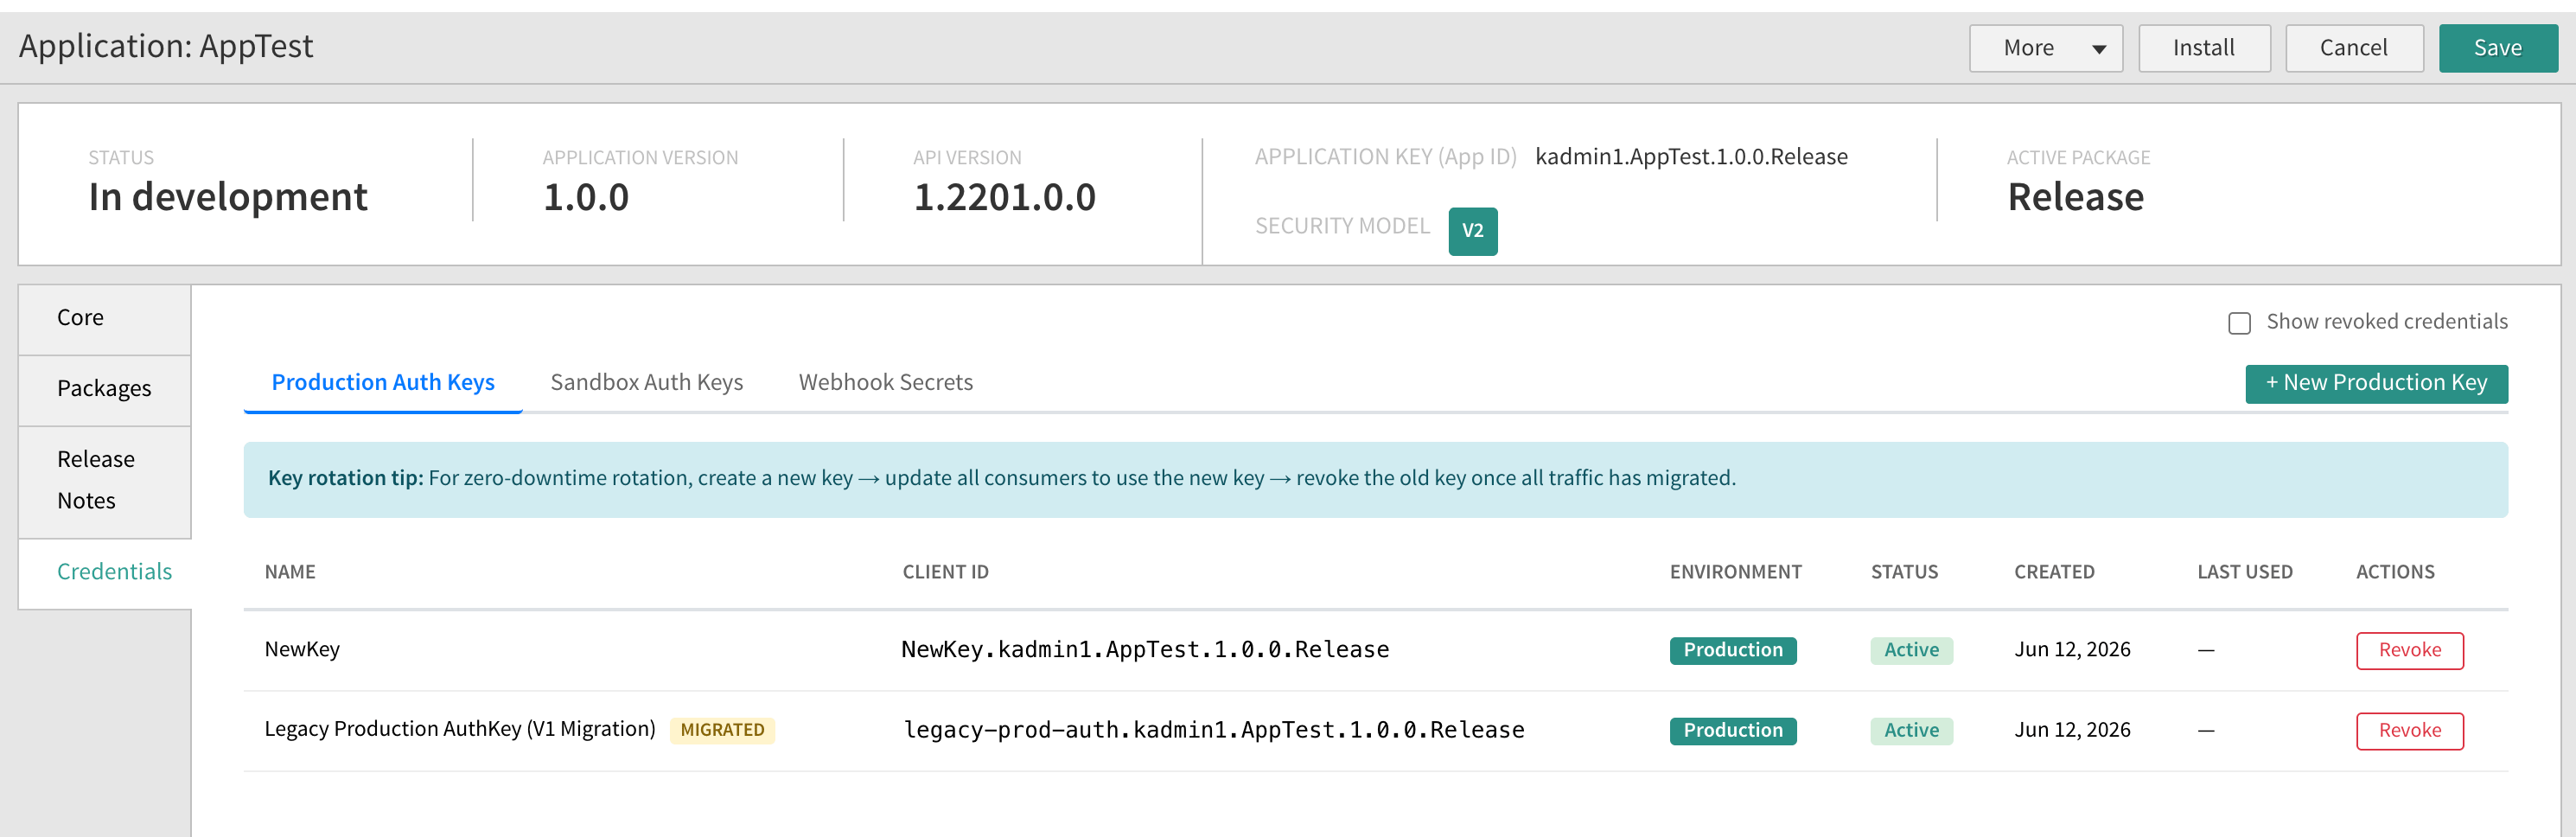
In the V2 model, an application has distinct authentication keys for each environment, managed on separate tabs in the Credentials view:- Production Auth Keys authenticate only against Production tenants.
- Sandbox Auth Keys authenticate only against Sandbox tenants.
Application Key vs. Client ID
A V2 application uses two related identifiers:- Application Key (App ID): The immutable identifier for the app (for example,
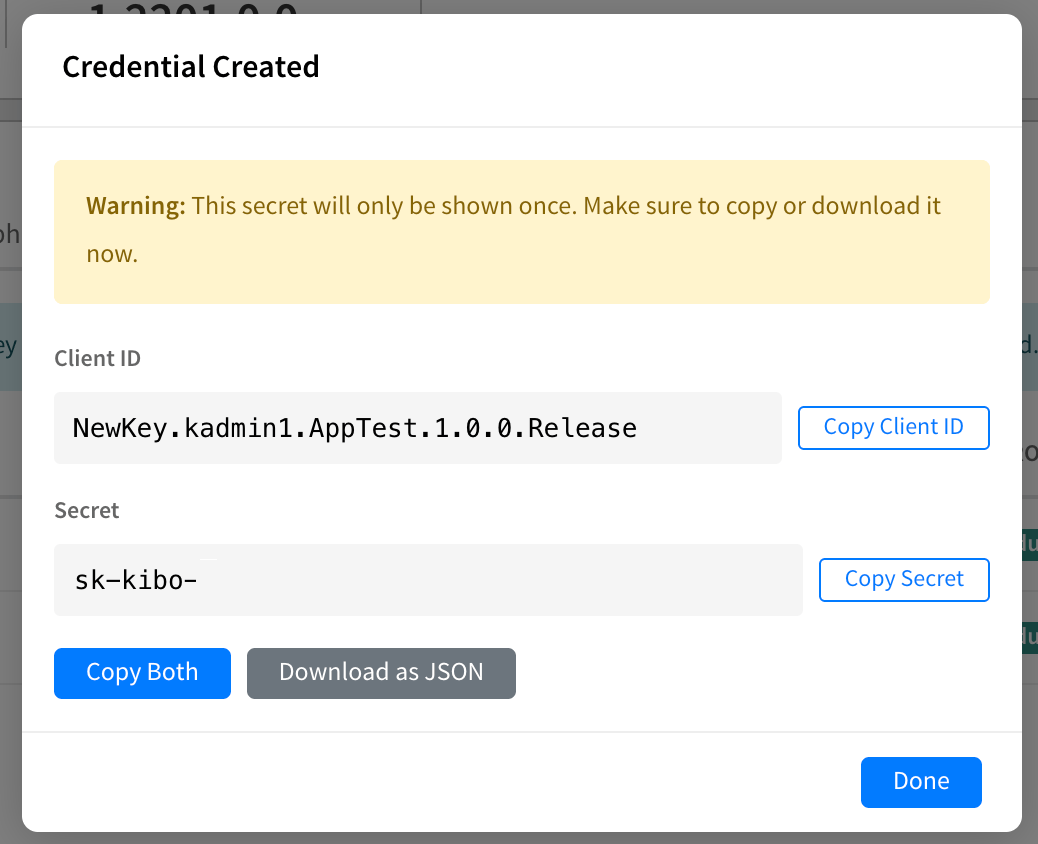
kadmin1.AppTest.1.0.0.Release). It never changes and is used for logging, reporting, and permissions. - Client ID: The identifier for a specific credential. Each credential has its own Client ID that can be rotated or revoked independently. The Client ID is formed by prefixing the key’s name to the Application Key, for example
NewKey.kadmin1.AppTest.1.0.0.Release. The environment a credential belongs to is shown in its own column and by the Production and Sandbox tabs, rather than in the Client ID itself.
Upgrade an Application to V2
When you are ready to adopt the enhanced security model, use the Upgrade to V2 action in the Enhanced Security Available banner on the application’s Core tab.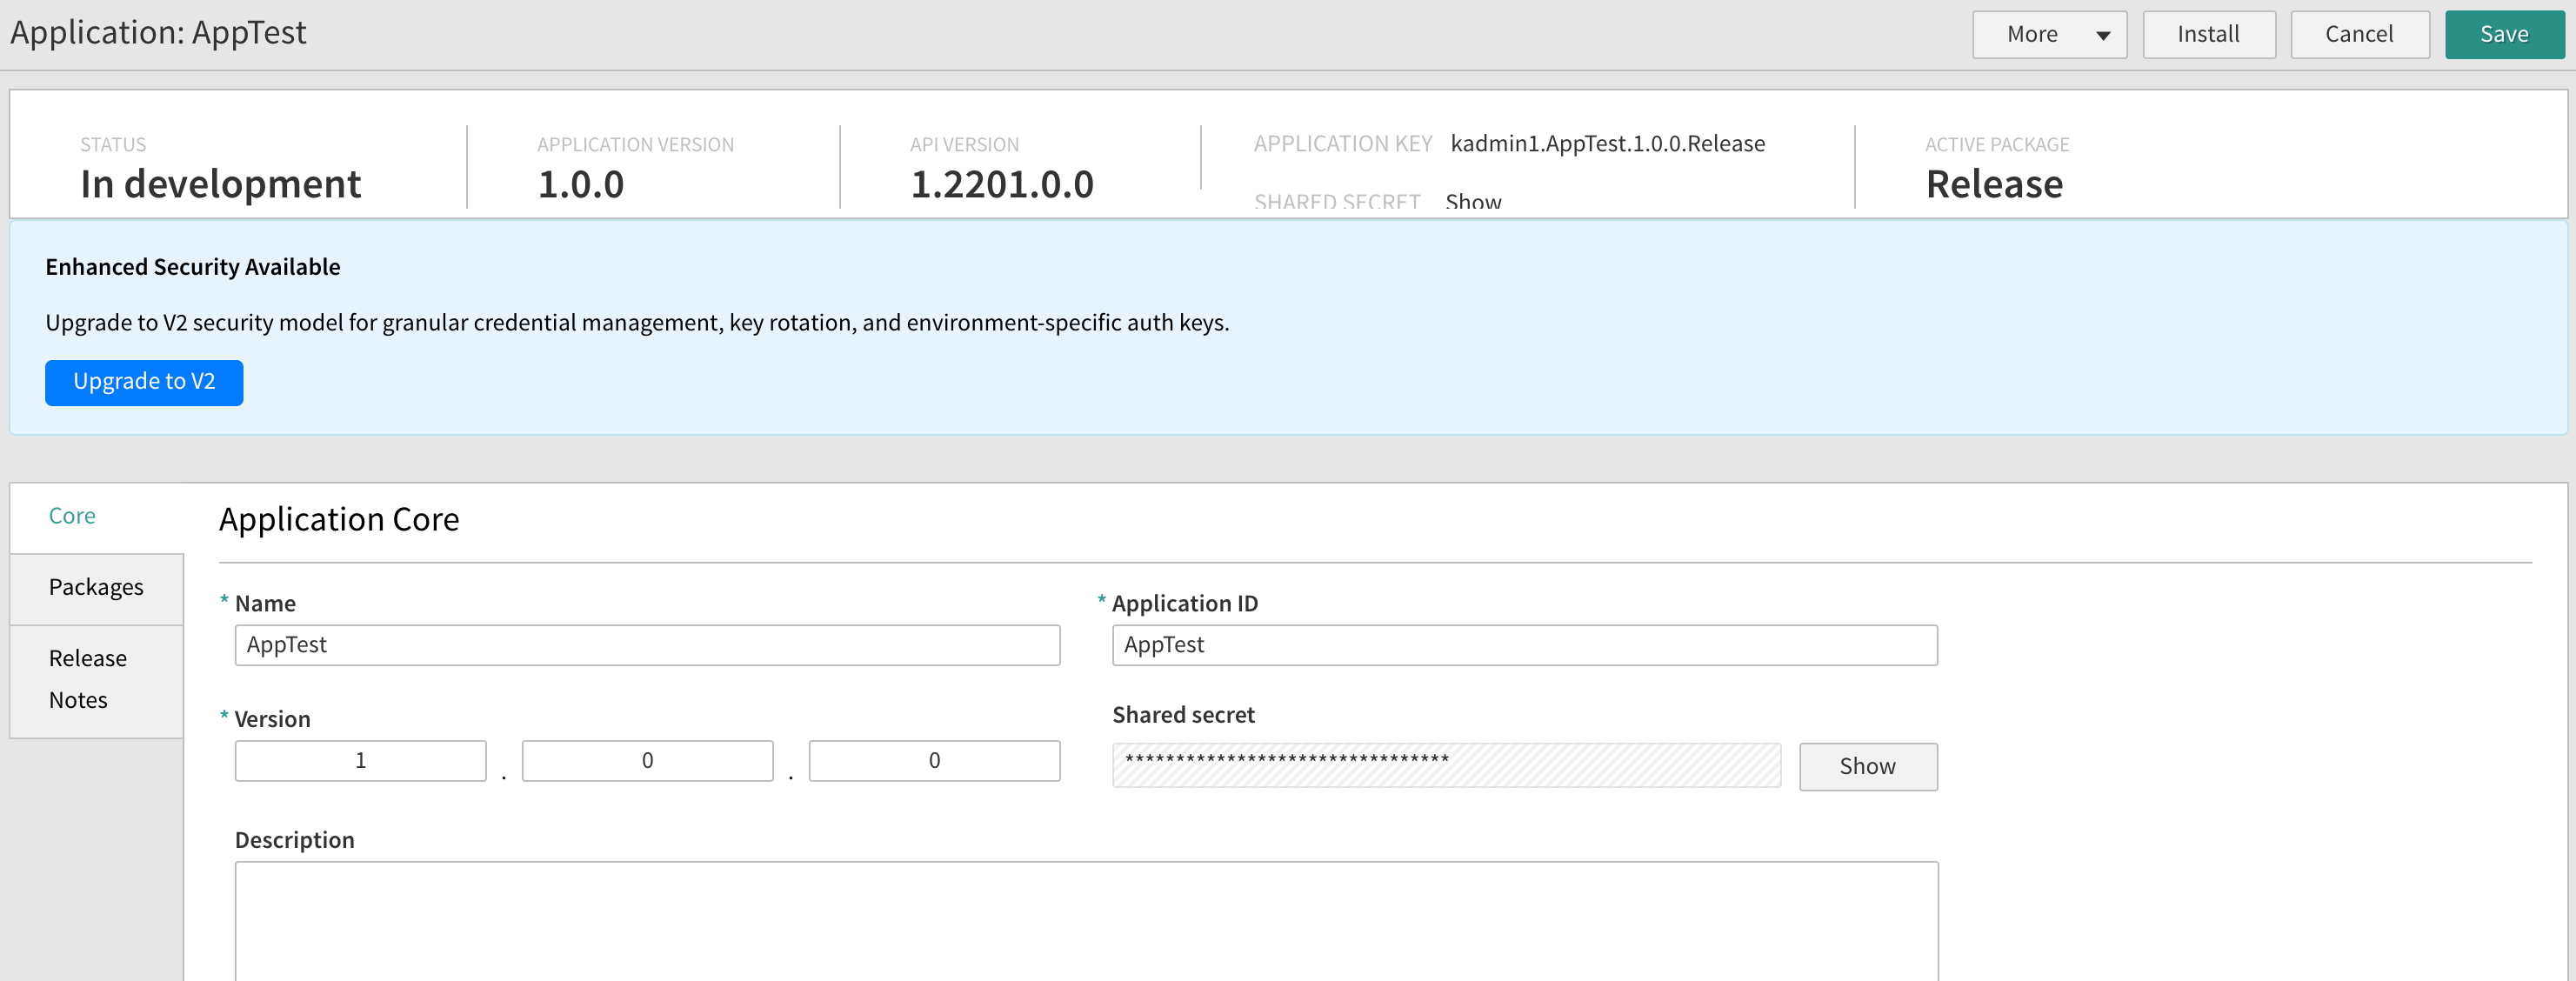
- Upgrading is a one-way operation. After an app is upgraded to V2, it cannot return to the V1 shared-secret model.
- Existing integrations keep working during the upgrade. Your current V1 application key and shared secret are migrated into the V2 structure as Legacy credentials, so running connections are not interrupted.
- After upgrading, the Legacy credentials are independent of one another. To complete the security improvements, rotate each one to a new, unique value. Rotating one credential does not affect the others, so you can migrate piece by piece.
- Log in to Dev Center.
- Click Develop > Applications.
- Double-click the application you want to upgrade.
- Reveal and note the current V1 Shared Secret, and store it via a safe method.
- On the Core tab, in the Enhanced Security Available banner, click Upgrade to V2. This hides the V1 Shared Secret. The V1 secret is permanently and irrevocably hidden, and continues to function.
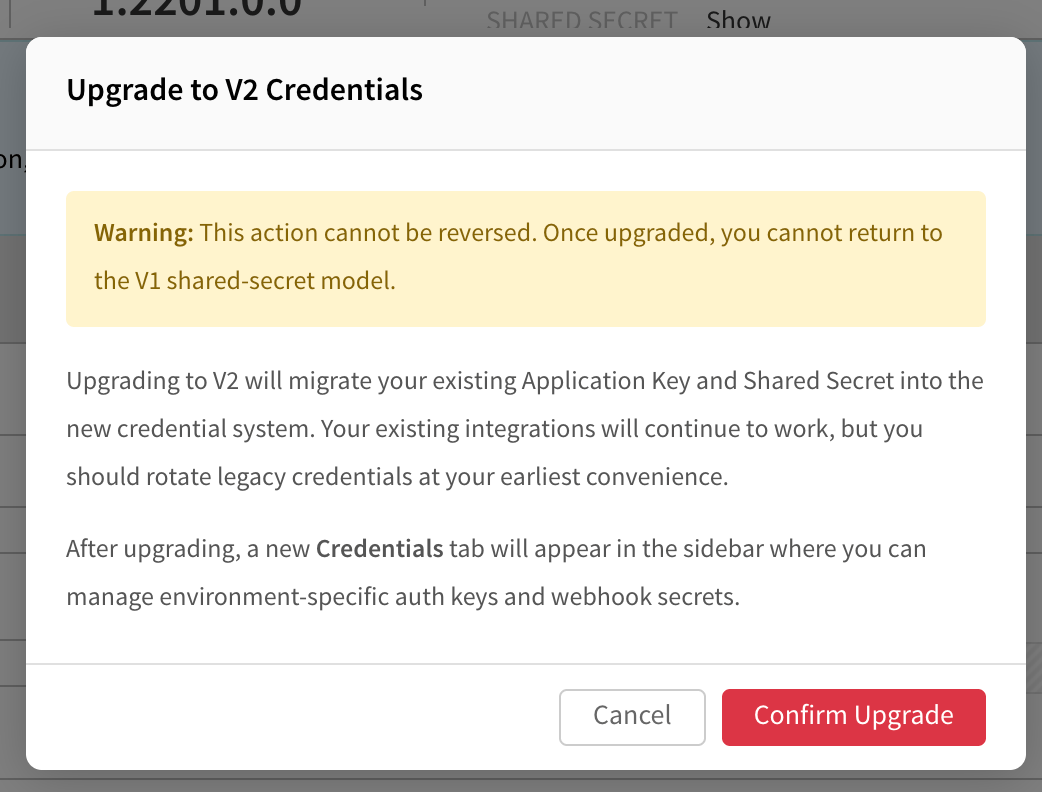
- In the Upgrade to V2 Credentials dialog, review the warning that the action cannot be reversed, then click Confirm Upgrade.
Generate a Credential
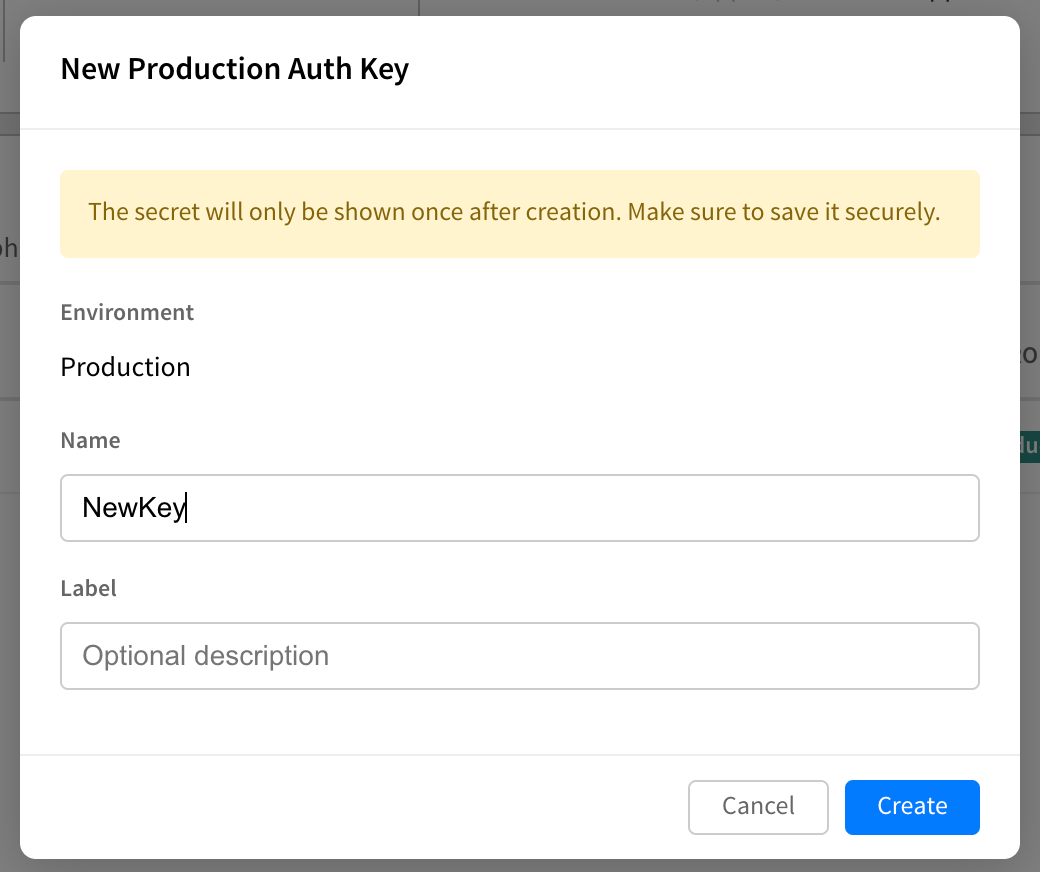
Each environment can have more than one active key, which is what enables zero-downtime rotation. To add a credential:- On the Credentials tab, select the Production Auth Keys, Sandbox Auth Keys, or Webhook Secrets tab.
- Click + New Production Key (or the equivalent button for the selected tab).
- Enter a Name and an optional Label, then click Create.
Rotate and Revoke Keys
Each credential in the key list shows the following details:
Select Show revoked credentials to include previously revoked keys in the list.
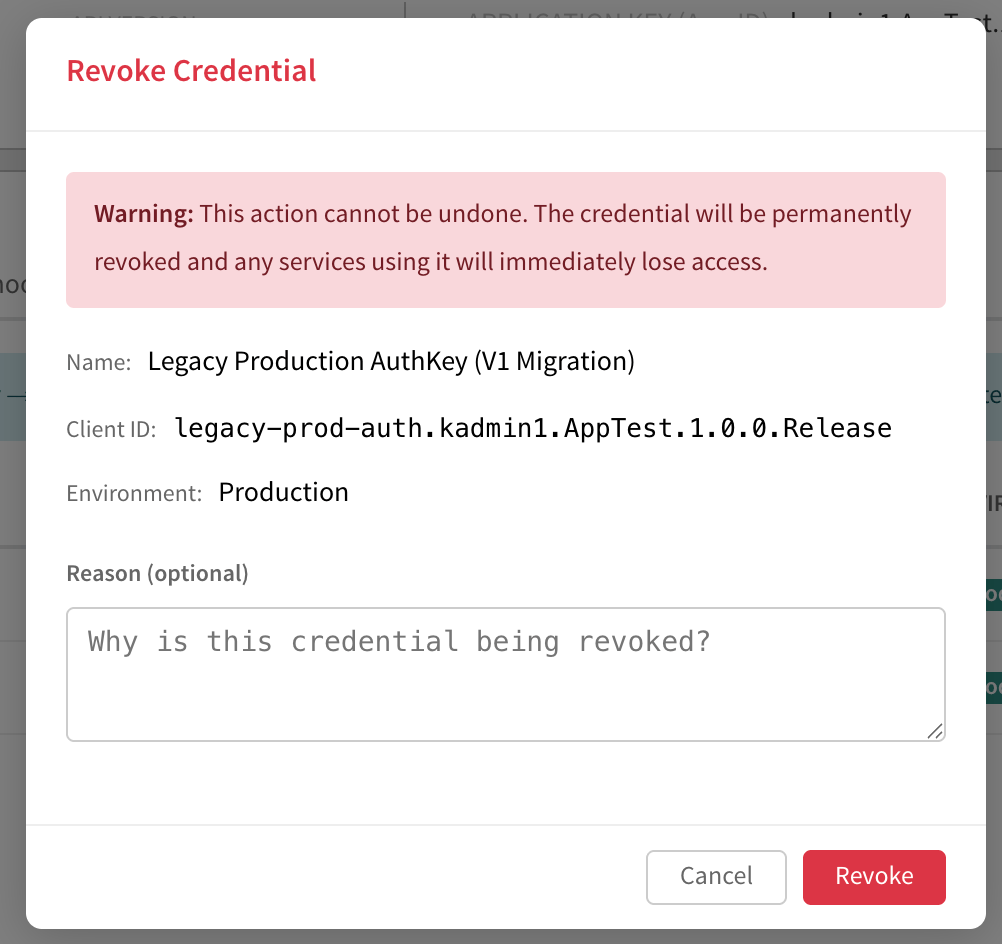
To rotate a key with zero downtime:
- Create a new key for the environment and save its secret.
- Update your application or service to use the new Client ID and secret.
- Revoke the old key once all traffic has moved to the new one.
Webhook Signing Secret
V2 provides a dedicated signing secret for verifying webhooks, managed on the Webhook Secrets tab and separate from your authentication credentials. Each environment has its own webhook signing secret, and it can be rotated independently of your auth keys. For details on verifying webhook signatures, see Verify Event Authenticity.IP Filtering
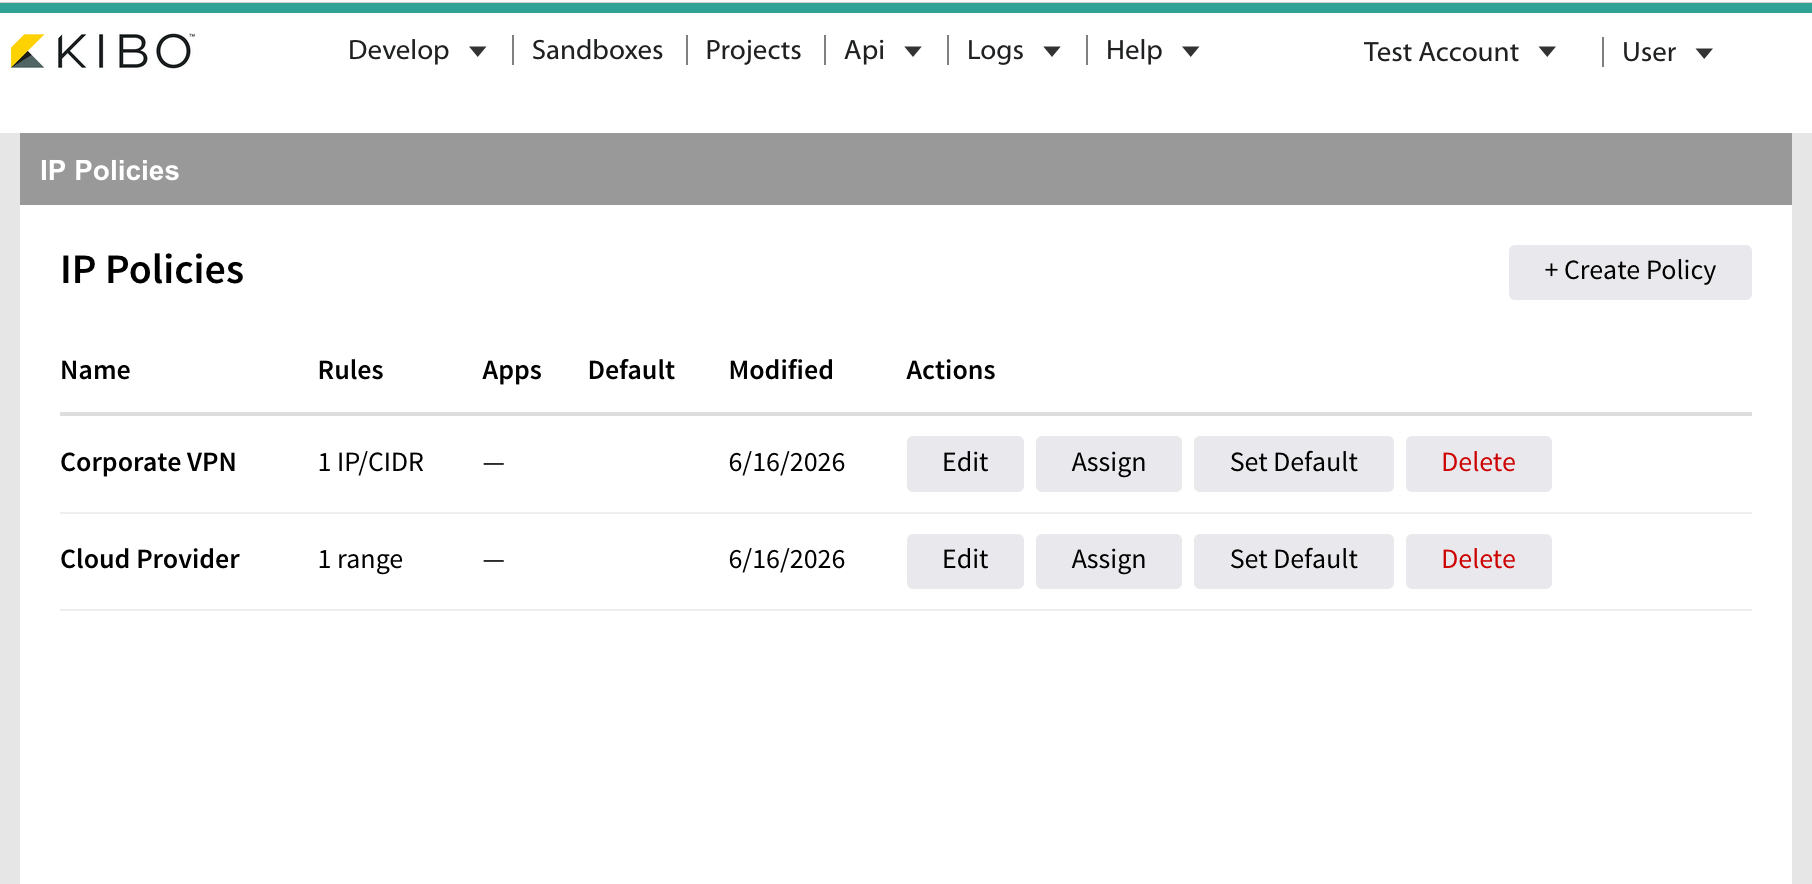
IP filtering lets a Developer Account owner restrict where application credentials can authenticate from. If a key is leaked, it is useless from any network or country that is not on the allow list. You define reusable IP Policies at the account level and then assign them to one or more applications. IP filtering protects application (API) credentials in Dev Center. To restrict access to Admin and storefronts by IP address instead, see IP Restrictions.Account-Level Policies
An IP Policy is a named set of allow rules that you can reuse across applications. To manage policies, in Dev Center click the account name drop-down menu (top-right) and select IP Policies.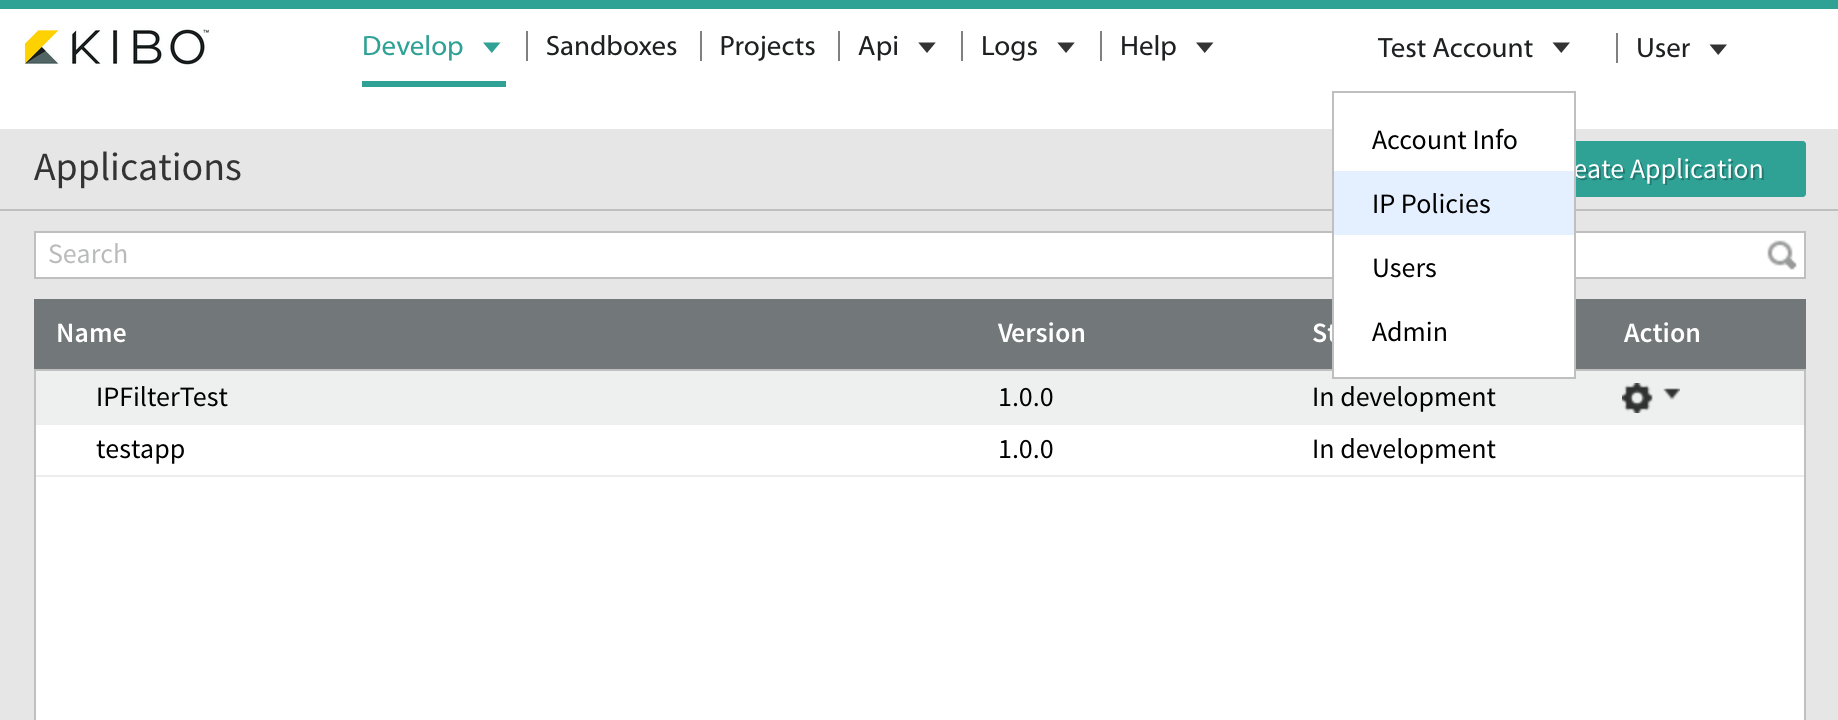
Create a Policy
- Click + Create Policy (or Create Your First Policy on an empty account).
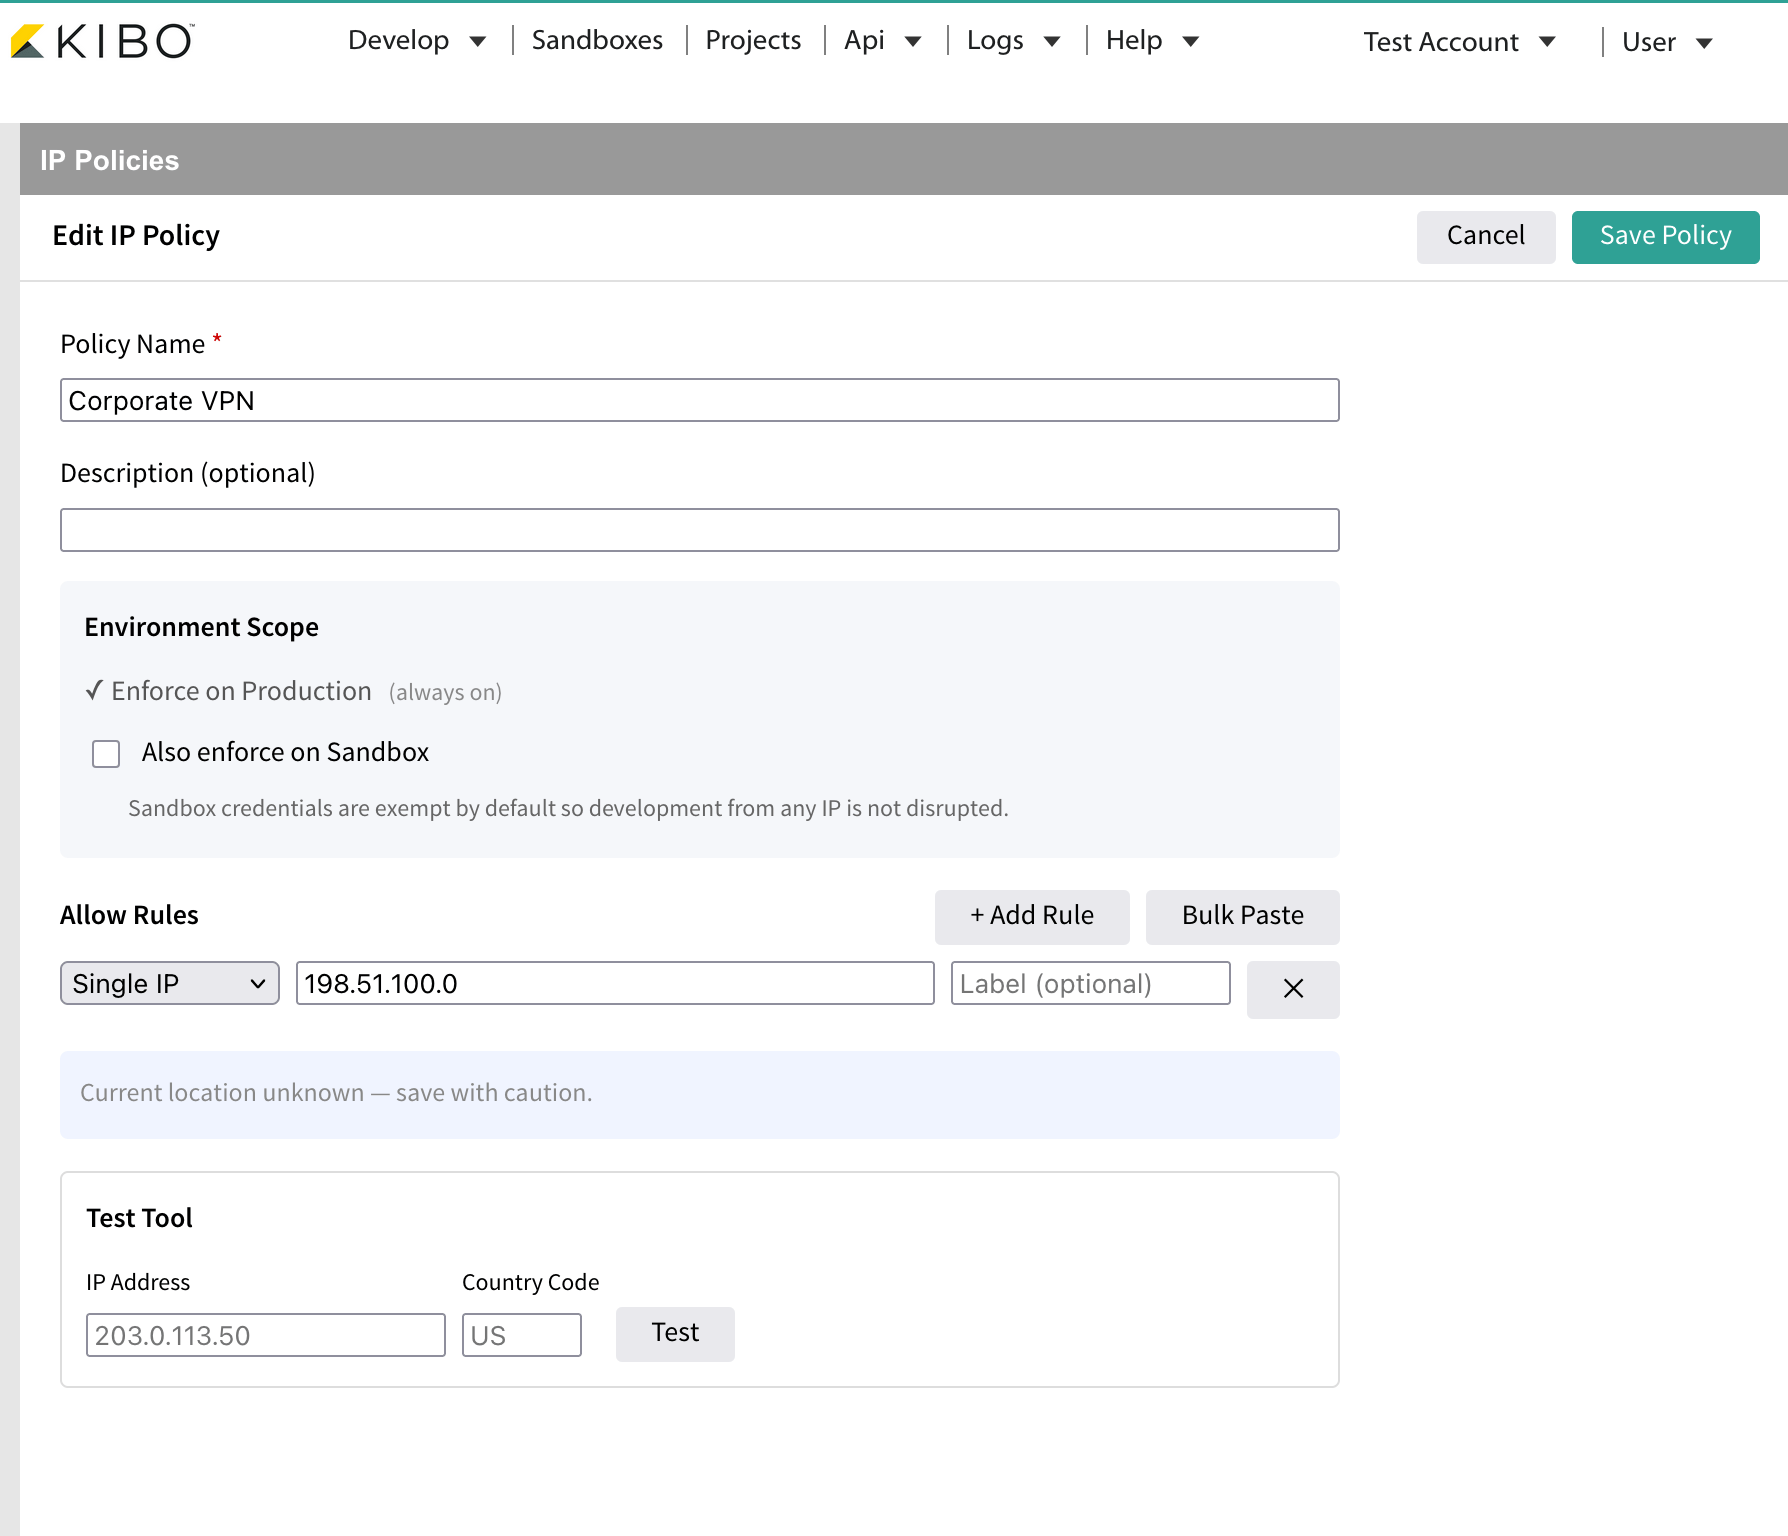
- Enter a Policy Name (required) and an optional description.
- Under Environment Scope, enforcement on Production is always on. Select Also enforce on Sandbox if you want the policy to apply to Sandbox credentials too. This is off by default so that development from any IP is not disrupted.
-
Add at least one allow rule with + Add Rule. Each rule can be one of the following types:
You can also paste a list of IPs, CIDRs, ranges, or country codes at once with Bulk Paste.
- Use the Test Tool at the bottom of the editor to verify whether a given IP or country code would be allowed before you save.
- Click Save Policy. If your current IP would be blocked by the rules you are saving, a lockout warning appears and requires explicit confirmation before saving.
Manage Policies
Applications with no explicit policy assignment inherit the account default. Setting a new default is a high-impact action, so the UI shows how many currently-open apps will start enforcing before you confirm.
Per-App IP Filtering
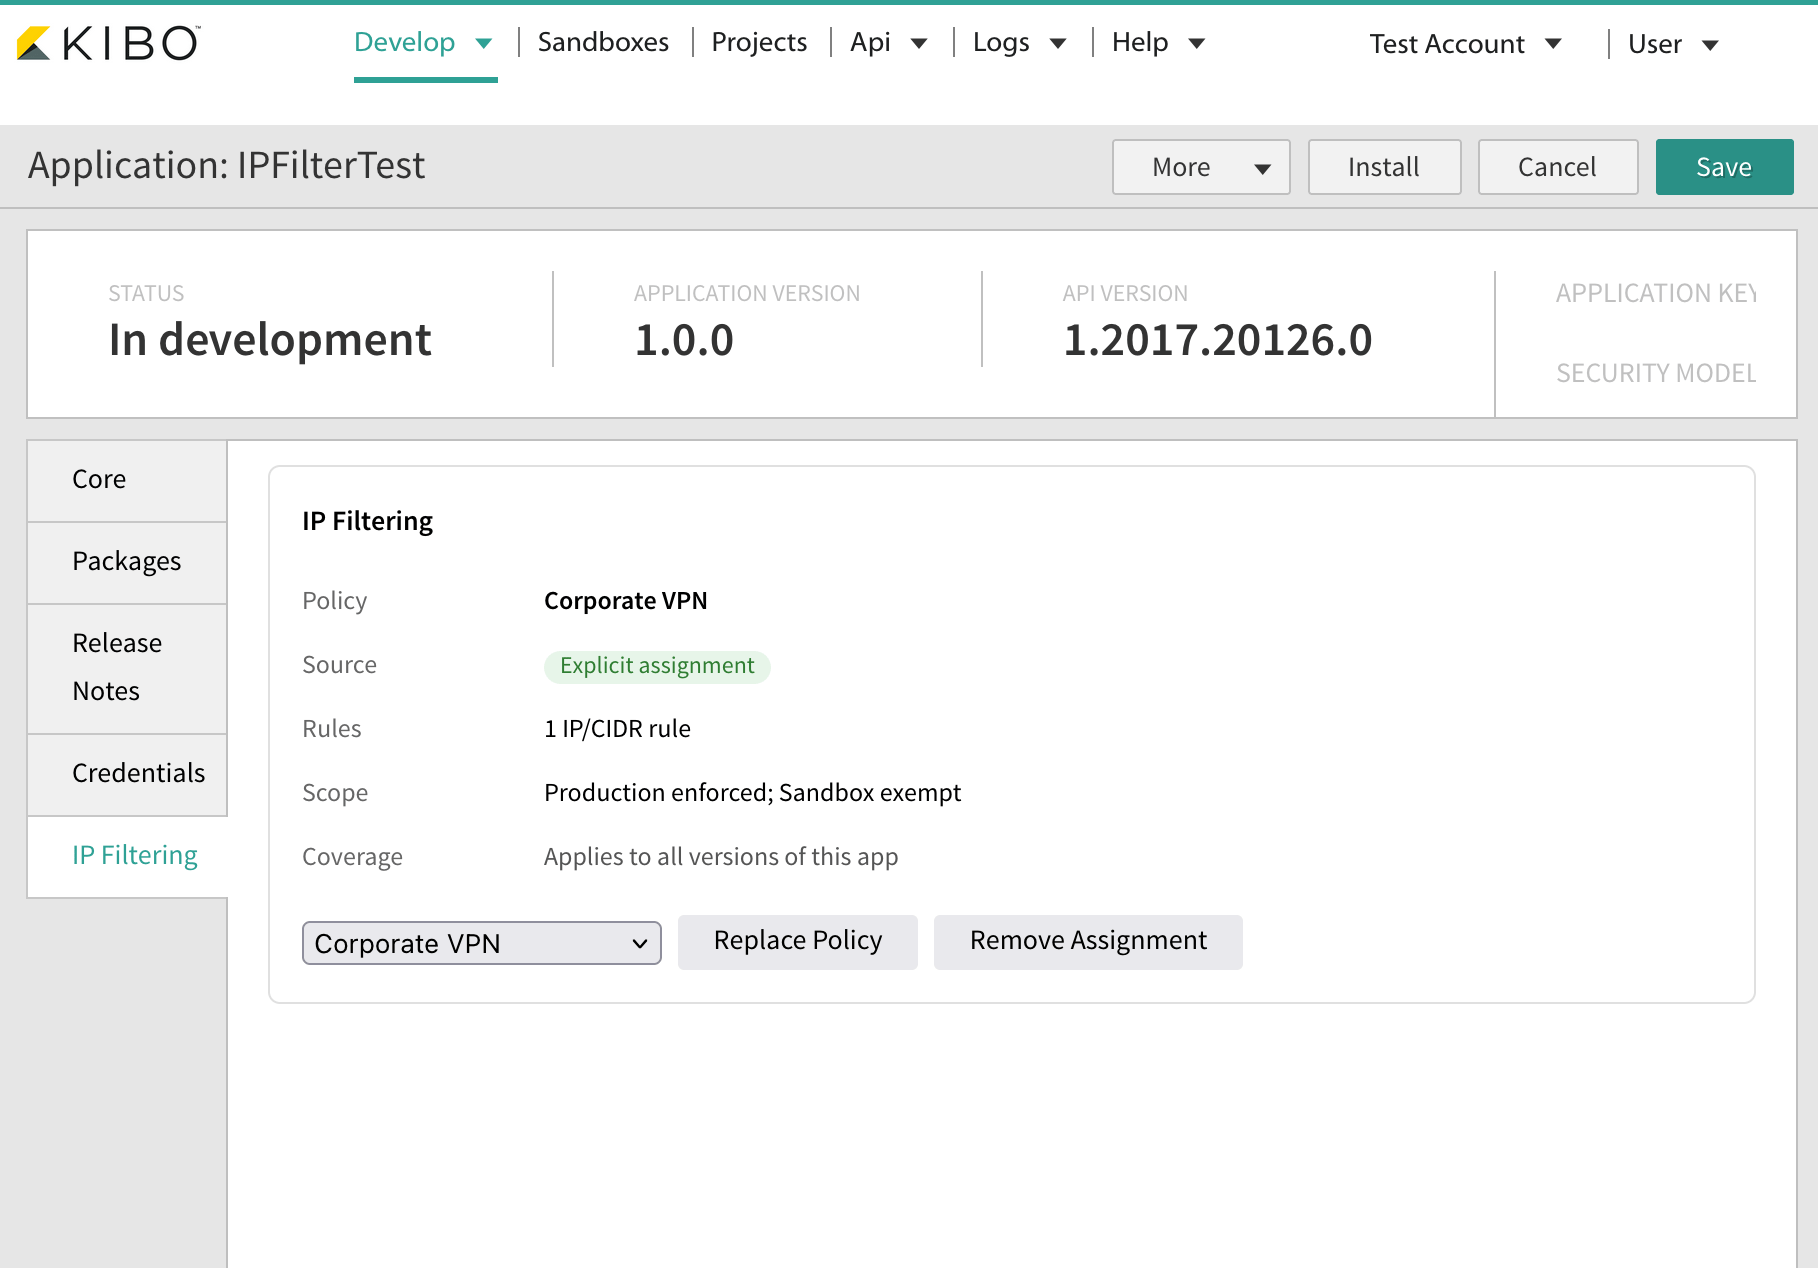
On any application’s edit page, click the IP Filtering tab in the left sidebar to see the policy in effect for that app:- Policy is the effective policy name.
- Source is either
Explicit assignment(set directly on this app) orInherited from account default. - Rules summarizes the rules (for example, “2 IP/CIDR, 1 range”).
- Scope shows that Production is enforced and Sandbox is exempt unless the policy opts in.
- Coverage confirms the policy applies to all versions of the app automatically.
Enforcement
- Enforcement is immediate and a hard block — there is no monitor-only mode.
- All credentials of every version of an assigned app are covered. There is no per-version or per-credential override.
- Sandbox credentials are exempt unless the policy’s Also enforce on Sandbox option is set.
- Internal and service-to-service authentication paths are exempt from enforcement.
- Country rules apply only to traffic that transits Cloudflare, whereas IP rules apply on all paths.
Tips
- Use the Test Tool before you assign a policy to production apps.
- Always review the lockout warning — it shows whether your current IP or country would be blocked by the rules you are saving.
- After you change the rules on an existing policy, the lockout banner indicates the check is stale until you save and re-open the editor.
App Documentation
The Apps & Integrations documentation provides a library of integrations for the Kibo Composable Commerce Platform, including applications developed by both Kibo and third parties to extend the functionality of your site and evaluate the capabilities of solution partners to enhance the functionality of your storefront. If you already have a Dev Center account, you can install licensed applications on a sandbox by selecting them in the Dev Center. You can also install them from another Developer Account to which you’ve been granted access. Refer to Install an Application for more information. Note that:- Some applications require API Extensions. You cannot install these applications if your tenant doesn’t have API Extensions enabled.
- Some Kibo-developed applications and integrations need to be configured after installation. Refer to the application’s documentation for more information.
- Contact Kibo Support for assistance installing and configuring apps as needed.
Collaborative Application Development
Dev Center lets you work collaboratively to create applications. Kibo uses the concept of “file-based applications” which means you can download a file-based representation of the application definition to work on collaboratively with your team using your own source control process. There are two types of packages: Release packages: Release packages contain all the files the developer intends to upload when submitting a theme for final certification. Development packages: Adding a development package lets you have your own unique workspace with your own details, behaviors, events, attributes, and capabilities. If you want to share package elements between packages, you can clone a package. Here is how this works:- Download the Release Package set of files and managed these file locally using a source control system.
- Create packages on the Packages tab for each developer.
- Divide the files and assign individual packages between developers within the same Dev account. Each package represents an individual work space where a developer can upload and download his files as needed for application development.
- Each developer works on the assigned files individually within the developer’s package.
- When the developer finishes, the developer works with the local source control system to merge his work into the source control system.
- Upload the files that compose the Release Package back into Dev Center.
- Because this is a fluid process, work continues in this fashion until the application is complete.
Create an Application
You must give an application a unique name and ID.- Log in to Dev Center.
- Click Develop > Applications > Create Application.
- Enter a unique application name and ID.
- Click Save.
Configure Package Details
- Log in to Dev Center.
- Click Develop > Applications.
- Double-click the application you want to configure.
- Click the Packages tab.
- If your application includes a graphical interface that the client must user to configure the application, enter the URL in the Configuration URL text box.
- Provide a description of the application’s purpose in the Package Description text box.
- Click Save.
- Select application behaviors
- Subscribe to an event
- Import application attributes
- Create and configure capabilities
Create a New Package
Whether you create a package to work on an application using the Dev Center user interface or to create a collaborate developer environment, a new package lets you work on an application without affecting the Release package. A new package does not contain any package details from the Release Package. If you want to create a new package that contains previously created details, behaviors, events, attributes, and capabilities, you need to clone the package. Complete the following procedure to create a new package.- Log in to Dev Center
- Click Develop > Applications.
- Double-click the application you want to open.
- Click the Packages tab.
- Click New.
- Enter a name for the package.
- Click Save.
Clone a Package
To copy the details, behaviors, events, attributes, and capabilities of another package:- Log in to Dev Center.
- Click Develop > Applications.
- Double-click the application you want to open.
- Click the Packages tab.
- Select the package you want to clone from the Active Package drop-down menu.
- Click Clone.
- Enter a name for the package.
- Click Save.
Rename a Package
You can rename any package, except for the Release Package.- Log in to Dev Center.
- Click Develop > Applications.
- Double-click the application you want to rename.
- Click the Packages tab.
- Select the package you want to rename from the Active Package drop-down menu.
- Click Rename.
- Rename the package.
- Click Save.
Delete a Package
You can delete any package, except for the Release Package.- Log in to Dev Center.
- Click Develop > Applications.
- Double-click the application you want to delete.
- Click the Packages tab.
- Select the package you want to delete from the Active Package drop-down menu.
- Click Delete.
Select Application Behaviors
Behaviors represent the functions of your application.- Log in to Dev Center.
- Click Develop > Applications.
- Double-click the application you want to configure.
- Click the Packages tab.
- Select the package you want to configure from the Active Package drop-down menu.
- Click the Behaviors tab
- Click Select Behaviors.
- Select a Behavior category.
- Select a Behavior name.
- Repeat for as many behavior categories as necessary.
- Click Save.
Subscribe to an Event
When you configure an endpoint, you can subscribe to one or many events. To view these endpoints after configuration, expand the endpoint from the Events grid on the Events tab. To understand events and why you may want to configure them, refer to Event Subscription. To configure an application endpoint and subscribe to events in Dev Center to receive push notifications: Only applications in the “In Development” state can be configured.- Log in to Dev Center.
- Click Develop > Applications.
- Double-click the application to which you want to add an event subscription.
- Click the Packages tab.
- Select the package you want to configure from the Active Package drop-down menu.
- Click the Events tab.
- Click Add Event Subscription.
- In the Add Event Subscription dialog box, do the following actions:
- In the Endpoint text box, enter the URL to which push notifications of the event will post.
- In the Event category list, select a category.
- In the Event list, select an event.
- Repeat for as many event categories as necessary.
- Click Save.
- Test the event to verify push notifications are sent to the associated endpoint.
Remove a Registered Event
To remove a registered event from a subscribing application in Dev Center: Only applications in the “In Development” state can be configured.- Log in to Dev Center.
- Click Develop > Applications.
- Double-click the application you want to configure.
- Select the package you want to configure from the Active Package drop-down menu.
- Click the Events tab
- Select the event you want to delete and then right-click and select Delete.
- Click Save.
Import Application Attributes
As you develop your application, you might discover that you require a customer, order, or product attribute for your application’s implementation to work. For example, if you are developing a tax capability, you might require each product in a site’s catalog to have a defined “tax code” attribute. After you create the custom attributes necessary for your application in your development tenant, you can import them into your application configuration in Dev Center. When a client installs the application, the installation automatically configures all attributes associated with the application so that the client does not have to recreate them in Admin For example, if an application includes a Boolean product property attribute called “Taxable” and a customer attribute called “Tax exempt,” after installing the application, the attribute definitions appear in Admin When an attribute is configured in Admin and the application which contains the attribute is installed in a sandbox, you can import existing attributes into an application using Dev Center. The Attribute tab lets you import attributes from a sandbox and display the attribute values in the Attributes grid.
When you import attributes from a sandbox, the sandbox you select has an impact on what displays in the form. If you change the selected sandbox, then the attributes that were previously listed are lost. When you select “Import,” it always overwrites whatever is currently in the application with whatever you choose in this task. The attribute namespace lets you configure either a unique namespace or lets you share a namespace with other applications or attributes. When you use the same attribute namespace, you share data. Complete the following procedure to import the customer, order, and product attributes required for your application into the application’s configuration.
Attributes must have unique names. Importing attributes with names that match attribute names that already exist in your application will fail. Depending on what release you are using, your options may vary.
You must define the attributes in Admin and you must have a configured sandbox that includes attributes that you can import.
To import application attributes:
- Log in to Dev Center.
- Click Develop > Applications.
- Double-click the application where you want to import attributes.
- Click the Packages tab.
- Select the package you want to configure from the Active Package drop-down menu.
- Click the Attributes tab.
- Enter a namespace in the Attribute Namespace text box.
- Click Import from Sandbox.
- In the Import from Sandbox dialog box:
- Click Select Sandbox.
- Select a sandbox and click OK.
- Select a category from the Attribute Category drop-down menu.
- Select the attributes to import from the Attributes list.
- Click Import.
<_namespace_> ~<_attribute name_>. Now, applications use <_Dev Account namespace_><_namespace value_><_attribute name_>.
Download Application Files
If you want to manage your application development using files rather than the Application Editor, you can download and configure the following files:- attributes.xml
- behaviors.xml
- capabilities.xml
- core.xml
- events.xml
- packageconfig.xml
- Log in to Dev Center.
- Click Develop > Application.
- Double-click the application you want to download.
- Click the Packages tab.
- Select the package you want to download from the Active Package drop-down menu.
- Click More > Download.
Manage Capabilities
In Dev Center, you can configure a capability, determine the types of functionality it performs, and configure the endpoints that let Kibo send requests to the capability. The capability configuration process begins after you have created an application and configured the Configuration URL in the Packages tab . When the capability is installed, the merchant can select the countries to enable from the list of supported countries, based on the merchant’s implementation. You can edit a capability at anytime by double-clicking it on the Capability configurations grid.Create a Capability
In this task, you configure the type of capability and the endpoints to which the capability sends requests. You must have created an application and configured the Configuration URL prior to configuring the capability.- Log in to Dev Center.
- Click Develop > Applications.
- Double-click the application in which you want to configure a capability.
- Click the Packages tab.
- Select the package you want to configure from the Active Package drop-down menu.
- Click the Capabilities tab,
- Click Add Capability.
- Select a capability from the drop-down menu and click OK.
- In the specific capability dialog box, enter the endpoint for the capability in the
<capability type>endpoint URL text box. - Configure other capability options (if required).
- Click Save.
Remove a Capability
To remove a capability:- Log in to Dev Center.
- Click Develop > Applications.
- Double-click the application that contains the capability you want to remove.
- Click the Packages tab.
- Select the package you want to configure from the Active Package drop-down menu.
- Click the Capabilities tab.
- Right-click the capability you want to remove and select Remove.
Install a Capability
To install a capability in a sandbox:- Log in to Dev Center.
- Click Develop > Applications.
- Double-click the application that contains the capability you want to install in a sandbox.
- Click Install.
- Select a sandbox from the list and click OK.
Select Active Settings
Complete the following procedure to select the active capability settings from a subset of values supported by the capability.- Log in to Dev Center.
- Click Sandboxes.
- Right-click the sandbox in which you installed the capability and click View.
- In Admin, click Settings > Applications.
- Expand the capability type category and click the capability.
- For each country, shipping carrier, or credit type you want to enable for the capability (depending on its capability mode), select the item to highlight it. If it is highlighted in blue, it is active.
- Click Save.
Configure a Capability
Complete the following procedure to access the capability configuration page you defined in Dev Center and configure the capability settings. The configuration URL must be defined in Dev Center.- In Admin, for the capability, click Configure.
- Define the settings for the capability and click Save.
Initialize a Capability
Complete the following procedure to initialize a capability with active settings and configuration.- Log in to Dev Center.
- Click Sandboxes.
- Right-click the sandbox where you installed the capability and select View.
- In Admin, click Settings > Applications.
- Click the application that contains the capability you want to initialize.
- Click Configuration.
- Use the custom code provided by the third-party capability provider to initialize your capability. When the capability initializes, the Enable App button activates.
- Click Enable App.
Enable a Capability
To enable the capability to perform functionality for the installed sandbox tenant or site, complete the following procedure. If the Enable App button is grayed out, you must first initialize your application.- In Admin, click Settings > Applications and click the application.
- Verify the application Initialized status is set to “Yes”.
- Click Enable App.
Upload File-Based Applications
You can create and define an application using the Dev Center user interface, or you can download a file-based representation of the application definition, edit the files in your local development environment, and upload them to Dev Center. When you are ready to upload application files, you must:- Ensure you include core.xml and packageconfig.xml in every upload.
- Create a zipped package of your files.
- Include only one package. If not, your upload fails and you are prompted to fix your package.
- Match the package to which you are uploading.
- Ensure the package to which you want to upload currently exists.
- Log in to Dev Center.
- Click Develop > Applications.
- Double-click the application to which you want to upload files.
- Click the Packages tab.
- Select the package you want to upload files to from the Active Package drop-down menu.
- Click More > Upload.
- In the file manager, browse to the compressed archive that includes your files.
- Click OK.
- Click Upload.
Create a Change Note
As you make changes to your application or theme, it’s a good idea to note the changes you make or any special instructions for working with application.- Log in to Dev Center.
- Click Develop > Applications.
- Double-click the application to which you want to add a change note.
- Click the Packages tab.
- Select the package to which you want to add a change note from the Active Package drop-down menu.
- Click the Release Notes tab.
- Click Create Change Note.
- Enter comments about the change you made.
- Click Save.
Create a New Version of a Certified Application
When you create an application for the first time in Dev Center, this is the first available version of the application. When coding is finished, you submit the application version for certification. If the application passes certification, it can be promoted to a production environment (in the case of tenant-specific custom applications). After you certify an application, you can create a new version. Kibo allows for semantic versioning (Major.Minor.Revision). How you version your application is up to your in-house versioning practices. New versions must use a unique number. Complete the following procedure to create a new version. Versioning is not automatic, it is a manual process.- Log in to Dev Center.
- Click Develop > Applications.
- Right-click the application you want to version and select Create new version.
- In the Application editor, enter the new version number.
- Click Save.
Install an Application
There’s more than one way to install an application on a sandbox. The most common way is to select from a list of applications in your Developer Account, but you can also install some licensed applications directly from another Developer Account to which you’ve been granted access. To select an application to install from your Developer Account:- Click Develop > Applications.
- Double-click the application you want to install.
- Click Install.
- Select the sandbox where you want to install the application and click OK.
- Click Sandboxes.
- Select your sandbox.
- Click View Sandbox.
- In Admin, to enable your application, click Settings > Applications.
- In the Applications page, verify the your application appears in the list.
- Double-click the application.
- Click Enable App.
- Log in to Dev Center.
- Click Sandboxes.
- Double-click the sandbox where you want to install an application.
- Click the Installed Assets tab.
- Click Install App.
- Select an account from the Developer Account drop-down menu.
- Select the application you want to install and click OK.
- Select your sandbox.
- Click View Sandbox.
- In Admin, to enable your application, click Settings > Applications.
- In the Applications page, verify the your application appears in the list.
- Double-click the application.
- Click Enable App.
Submit an Application for Certification
When you finish developing your application and have completed the store profile, you can submit your application to the certification process. Once you submit your application for certification, the team reviews and certifies that it meets the criteria. When you submit your application, the application version is locked. You cannot modify this version once you submit it. If you have questions about the certification process, please consult with your Account Executive or your Partner Manager.- Log in to Dev Center.
- Click Develop > Applications.
- Double-click the application you want to submit for certification.
- Click More > Submit for certification.
- Click Submit for Certification.

Delete an Application
When you no longer need an application, you can delete it from Dev Center. Deleting an application moves it to the Deleted status, after which:- The application is no longer available to install on any sandbox or production tenant.
- Any attempt to authenticate against the application is rejected, so existing integrations that rely on its credentials stop working.
- Log in to Dev Center.
- Click Develop > Applications.
- Double-click the application you want to delete.
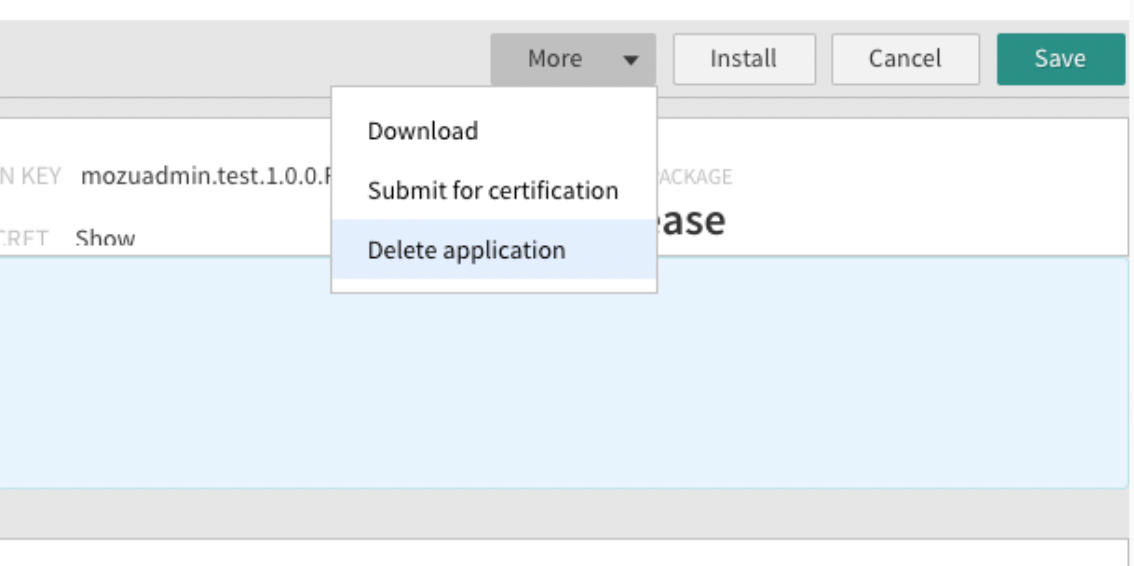
- Click More > Delete application.