Scenarios are groups of locations that an order can be routed within, filters that exclude certain locations from different routing cases, and after-actions that control which steps Order Routing takes when determining whether that scenario is a match for shipment items. Fulfillment paths within routing strategies are usually made up of multiple scenarios, ranked by priority.
View All Scenarios
Scenarios are displayed as part of each fulfillment path summary in the routing strategy details. To view more detailed information, click View Scenarios on that page. This will display a list of all scenarios assigned to that path the following information and actions.
- Scenario Details: Click the scenario name to view more details and a list of the locations within the scenario.
- Status: Click the status toggle to activate or deactivate this scenario as needed. If disabled, it will be skipped during assignment.
- Filters: Each of the filters applied to the scenario are listed, with the ability to create a new filter or add/remove existing ones.
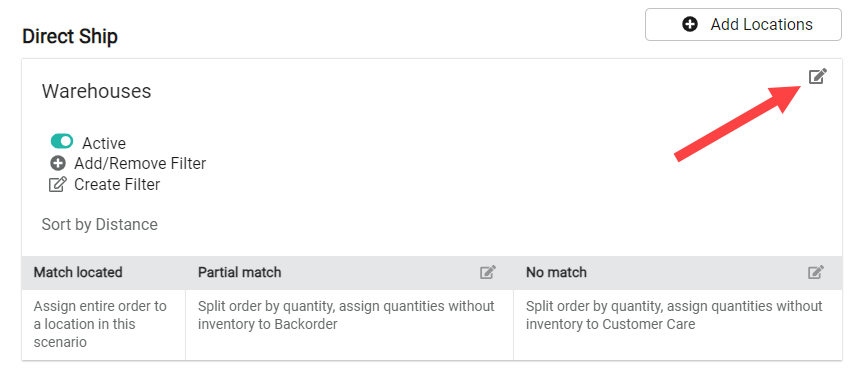
- After-Actions: Click the icon in the corner of a table column to change the after-actions that should be taken when the scenario is determined to be a match for the order (can fulfill entire order), a partial match (can fulfill some of the order items), or no match (cannot fulfill any items in the order). See the After-Action Logic section for an explanation of these options.
- Use the icons in the top right corner to delete, duplicate, or change the current rank of a scenario.

Create a New Scenario
Begin creating a new scenario by clicking Add Scenario in the top right of a fulfillment path on the routing strategy details page.

This will direct you through four pages of the scenario creation flow. On the first page:
- Enter the scenario Name and Description.
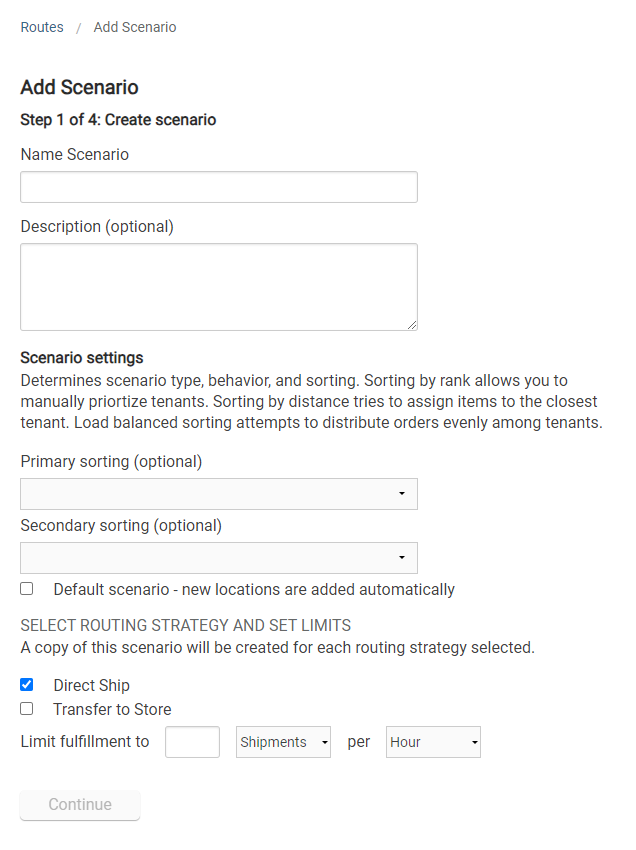
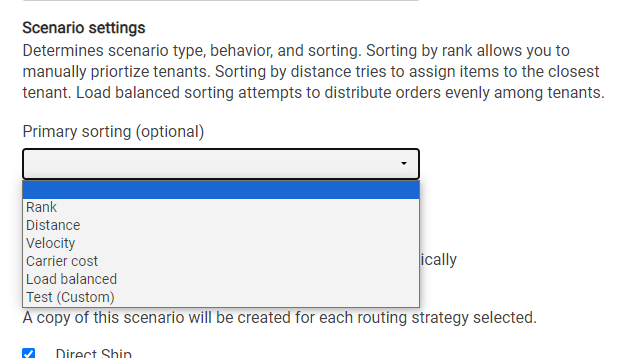
- Configure the primary and secondary sorting options to determine how to prioritize locations within a scenario. In the event of a tie using the primary sort, the secondary sort will determine which location is preferred.
- Rank: Allows manually prioritized locations by numeric rank.
- Distance: Prioritizes locations closest to the shipping address.
- Velocity: Based on maximum LTD (Life to Date) inventory values of the order items at each location candidate. Prioritizes locations with lower values to improve product turn and reduce markdowns by assigning orders to locations with the slowest moving inventory.
- Carrier Cost: Queries FedEx to get the actual shipping cost and prioritize locations with the lowest costs. Note that this does not calculate based on the rates of any other carriers.
- Load Balanced: Distributes order assignments evenly among locations.
- Indicate whether this should be the default scenario that new locations are automatically added to or not.
- Select which route the scenario should be applied to. Selecting multiple routes will copy the scenario to each.
- Set any fulfillment restrictions to limit the number of shipments, items, or dollar amounts that can be fulfilled by this scenario per hour, day, week, or month.
- These limits enable location holds and ensure that the locations will be able to handle the fulfillment load in a given amount of time. If a location has reached the fulfillment limit then no more shipments will be assigned to it.
- The time period is calculated from the current moment, rather then by the calendar. For example, if you set a limit for 500 orders per day then a location can only fulfill up to 500 orders within the past 24 hours from that moment. If you selected 1 hour then it would look back one hour ago from now.
- Click Continue.


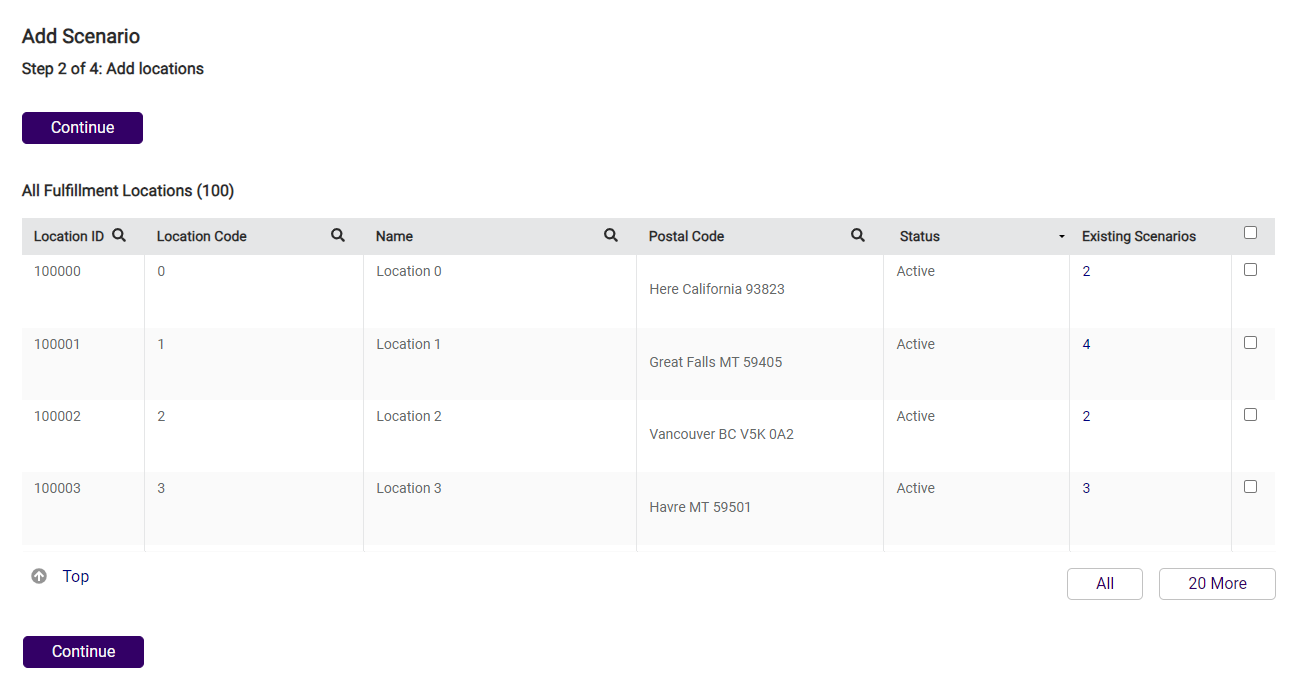
If locations were not already selected before initiating scenario creation, you are able to add locations on the next page.
- Select one or multiple locations by selecting the checkbox.
- Click Continue.

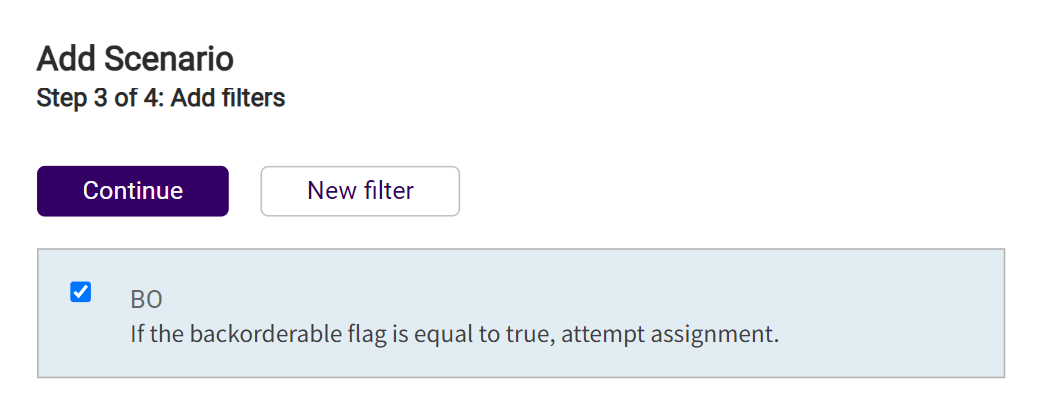
The next page allows you to add filters. If no filters are desired, just click Continue. To select and/or create filter(s), complete the following steps.
- Select existing filter(s) if applicable, or click New Filter.
- If creating a new filter:
- Enter new Filter Name.
- Select Type: Set up a custom value or choose an existing data point.
- Select Filter Attribute: The parameter to base the filter on.
- Select Logic.
- Select Comparison Property or Custom Value.
- Click Continue.

Finally, you must configure the scenario's after-actions. For more information about after-action behavior and what these options mean, see the After-Action Logic section of this guide.
- Select the preferred behavior that Order Routing should take in the event of only finding partial inventory for an order available in this scenario.
- Select the behavior that Order Routing should take if there is no available inventory for an order in this scenario.
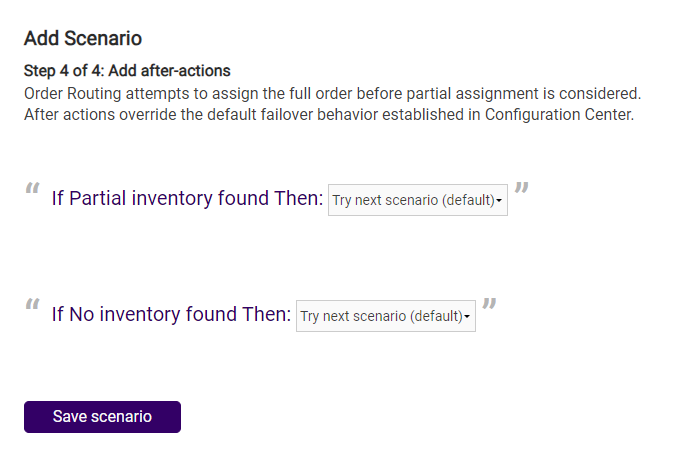
- Click Save Scenario.

Edit an Existing Scenario
To edit a scenario's basic information:
- Go to Routing Strategy and click on a strategy.
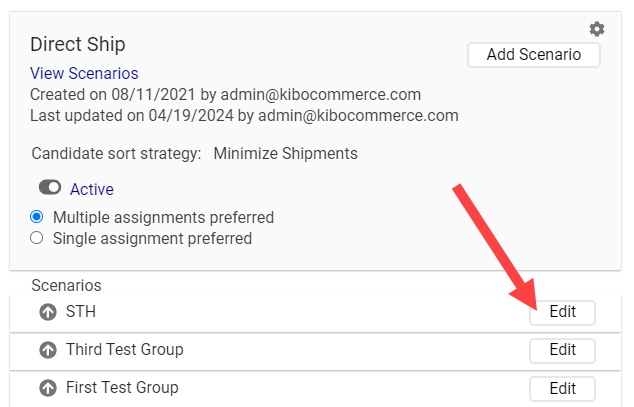
- Either click Edit on a scenario (shown below) or click View Scenarios and then a scenario's name.
- This will display the scenario details. Click the Edit icon in the top right.
- Enter the scenario's Name and Description.
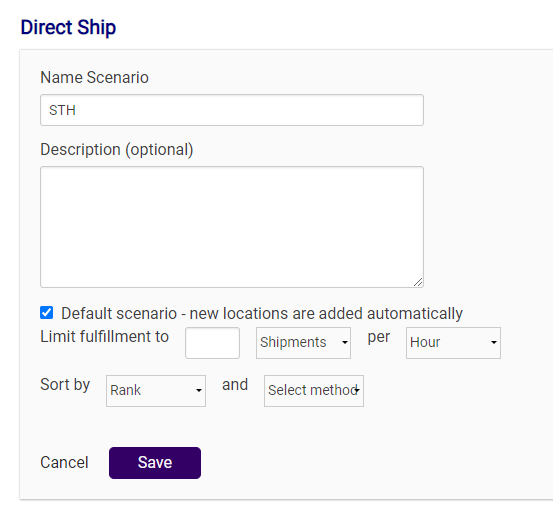
- Indicate whether the scenario is the Default scenario for new locations to be added to.
- Limit fulfillment frequencies by entering a number of shipments/items/dollars that can be assigned within this scenario per hour/day/week/month.
- Select a Sort for this scenario, such as rank or distance.
- Click Save.


Manage Scenario Filters
While viewing the scenario details, click either Create Filter (which will take you to the filter configuration flow) or follow the below steps to update the filters currently assigned to the scenario:
- Click Add/Remove Filter.
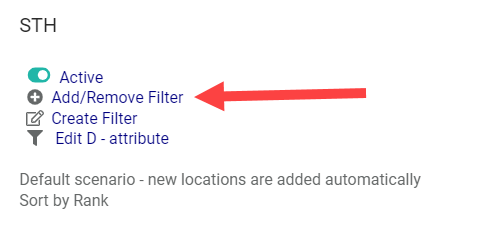
- This will open a pop-up with all existing filters in your routing strategy. Click the checkboxes as needed to select filters you want to add and unselect filters you want to remove.

- Click Save.


Manage Scenario Locations
You can both add new locations and edit existing locations while viewing a scenario's details.
Add New Locations
To add new locations to a scenario:
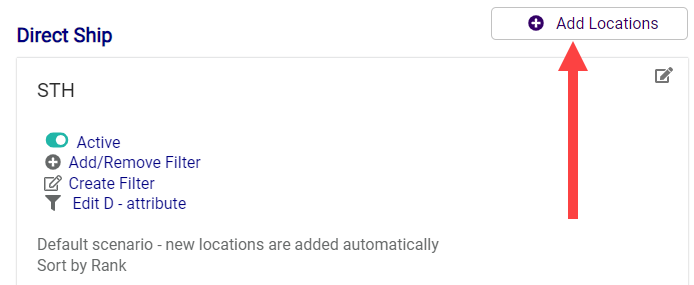
- Go to Routing Strategy and click on a strategy.
- Either click Edit on a scenario (shown below) or click View Scenarios and then a scenario's name.
- Click Add Locations in the top right.
- Select locations from the list by clicking their checkboxes.
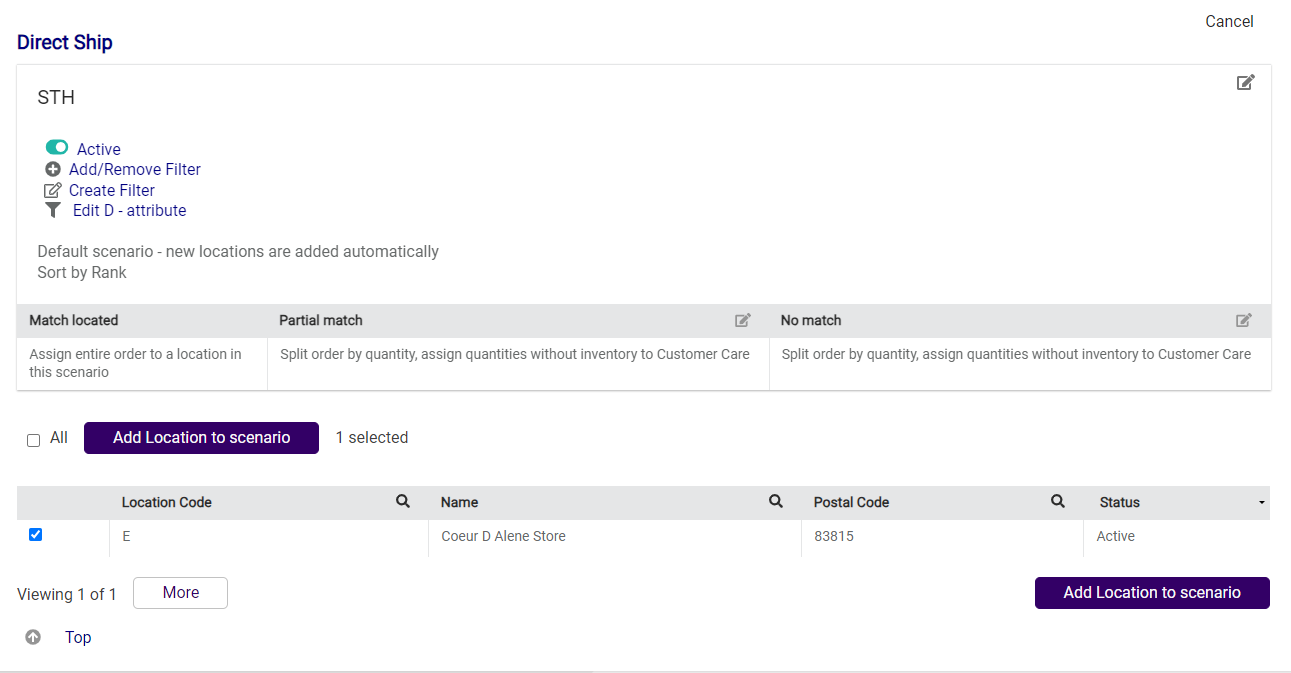
- Click Add Location to Scenario.


Edit Existing Locations
To edit or perform other actions on the locations in a scenario:
- Go to Routing Strategy and click on a strategy.
- Either click Edit on a scenario (shown below) or click View Scenarios and then a scenario's name.
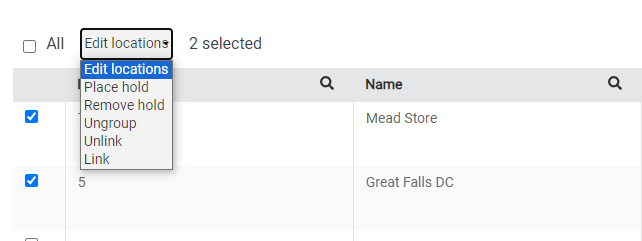
- Select at least one location using the checkbox in the table.
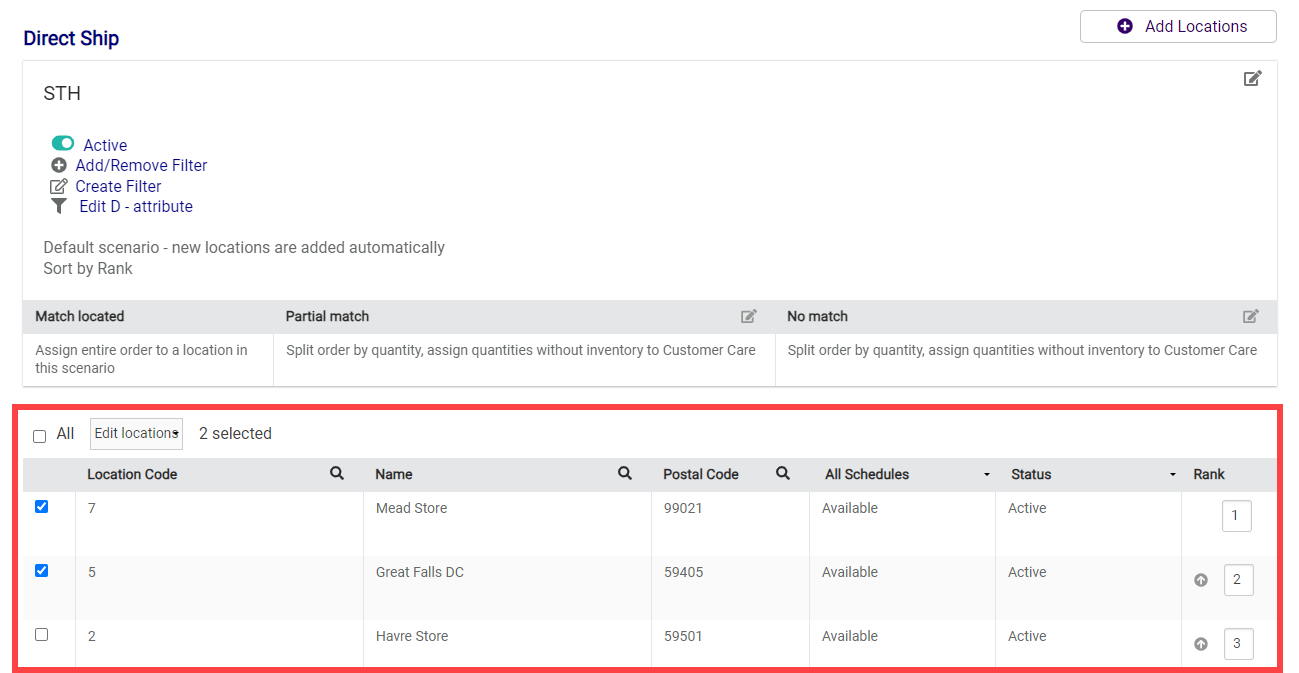
- Expand the Edit locations dropdown and select the action you want to perform on the selected location(s). A common use of this is to place a location on hold (and then remove it from the hold). This will temporarily prevent any shipments from being assigned to that location, without fully deactivating the location.


After-Action Logic
When a scenario is being considered for assignment, order routing considers the locations within the scenario, the available inventory in each of those locations, and any filters set in the scenario. Then it will determine whether the scenario is a match (can fulfill entire shipment), a partial match (can fulfill some of the items), or no match (cannot fulfill any items). If a full match is found, the shipment will be fully assigned within that scenario. This cannot be reconfigured.
In the event of a partial match, in which some inventory is available within the scenario but not the entire shipment, the most common behavior is splitting the shipment. If you don't want to split shipments, you can choose to try the next scenario, cancel the entire order, assign the entire order to Customer Care, or assign the entire order to Backorder instead.
Split Shipment Behavior
Shipments can be split based on line item or quantity by assigning available items to a location, and the remaining quantity either assigned to another location, cancelled, sent to Customer Care, or sent to Backorder. If split by line item, the entire quantity of a line item will always be assigned to another location. Splitting by quantity would allow some inventory of one line item to be assigned to one location.

If a shipment will be split, then an additional setting for Restart attempt for partial assignment will appear. This determines where Order Routing will attempt to assign the remaining items. These options are:
- Start Over at Beginning: Go back to the highest priority scenario and try to assign the remaining items to a location in that scenario.
- Current Scenario: Try to assign the remaining items to any location within the current scenario that the split occurred in. If no location can fulfill the items, then move on to the next scenario.
- Scenario Rank: Try to assign the items to locations in the next scenario of the ranking order.

Kibo Engineering can configure a limit that specifies the allowed number of order splits in the back-end. Contact Engineering or Kibo Support if you would like to enable this.
Ship-to-Home Consolidation
If you have locations enabled for STH Consolidation then specific logic is followed to determine how to consolidate shipments:
- If a full match is not available, Order Routing will check whether any of the suggested routing locations are enabled for STH consolidation as a partial match. If so, then it will assign the parent shipment to the first consolidation location it finds instead of performing the usual after-action (such as splitting). It will then create transfers to fulfill all of the missing items from transfer-enabled locations. Thus, one single shipment will be sent to the customer from the consolidated location.
- If no locations have STH consolidation enabled, or there are not locations enabled to provide transfers, then it will proceed with the standard process of splitting the shipment.
- If an item is unavailable or on backorder, then a separate STH shipment will be created and reassigned for future delivery so that it does not block the available items from being consolidated and shipped. Likewise, any items that can't be successfully routed or is rejected from the parent location will follow the configured after-action logic such as being canceled or sent to Customer Care as a separate STH shipment.
When a shipment is being consolidated, it cannot be manually reassigned. There is no direct way to reassign the parent STH shipment through either manual or auto-assignment once the shipments have been created.