 |
| Platforms: Legacy eCommerce, KCCP eCommerce and eCommerce+OMS
|
The Push Notifications application integrates Amazon Simple Notification Service (Amazon SNS) with your Kibo tenant and mobile apps so you can send push notifications to mobile users. For example, you can use this application to send details about promotions to customers who use your site's mobile app. When customers tap the notification, they are directed to a specific space within your mobile app for targeted purchasing. The Push Notifications Application works with both iOS and Android-based mobile apps.
Amazon SNS is part of Amazon Web Services (AWS), and is a Web service that makes it easy to set up, operate, and send notifications from the cloud. You must have or create an AWS account to use this application.
Application Features
- Target recipients by app or customer segment
- Schedule notifications for a specific date and time
- Configure a specific landing page for shoppers who tap a notification
- Search and filter previously sent notifications
- Supports iOS and Android
Register Your Mobile App with AWS
The Push Notifications Application enables you to create push notifications in Admin. The app uses Amazon SNS to send the actual notifications to your mobile apps. There are a couple configuration tasks you must complete in Amazon Web Services to ensure that Kibo and AWS communicate correctly.
Create SNS Platform Applications
Before you can send notifications to your app users, you must add your app as a Platform Application in your Amazon SNS account. You must complete this process for every platform your app supports:
- Log in to your AWS account and go to the Amazon SNS console.
- Click Create Platform Application.
- Enter an Application Name. This name will not be visible to customers.
- Select the Push Notification Platform that your app runs on.
- Enter the required credentials for the platform. Click the Learn more link in the Create platform application dialog if you need help locating these credentials.
- Click Create Platform Application.
Create an Identity Pool and Roles
Your mobile app must have roles defined for it in Amazon Cognito. Roles exist within Identity Pools. Refer to the Amazon Cognito documentation for more information.
- In your AWS account, go to the Amazon Cognito Console.
- Click Create new identity pool.
- Enter your app name as the Identity pool name.
- (Optional) Check Enable access to unauthenticated identities to allow guest users to interact with your app.
- Click Create Pool.
- On the next page, expand Hide Details.
- In the Role Summary, create a new IAM Role for the platform your mobile app supports. You must create separate roles for each platform.
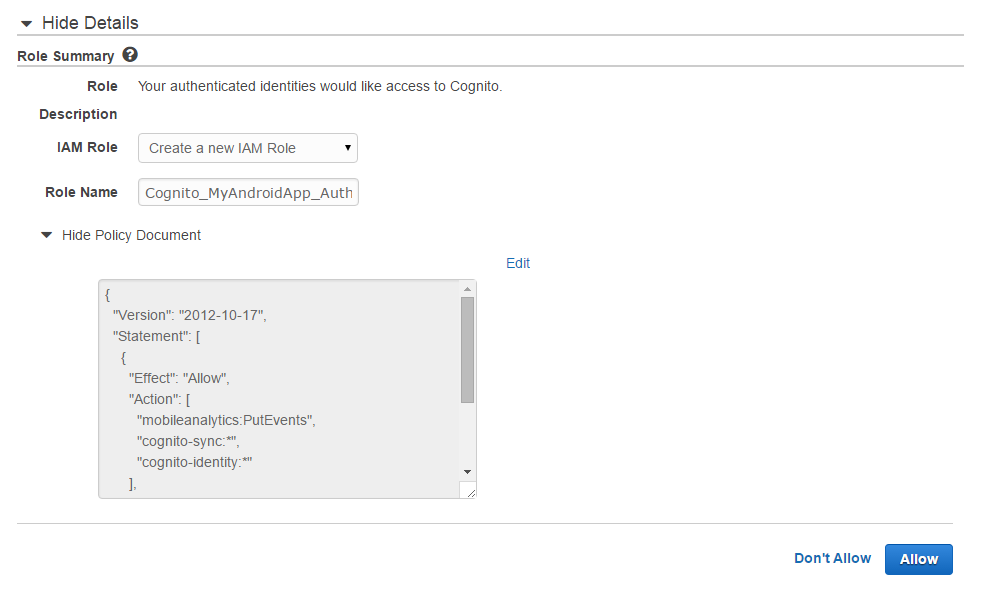
- Click Allow.
You are now ready to install, configure, and enable the Push Notifications Application in Kibo.
Install the App
For assistance installing the application, please reach out to your SI partner or Kibo's professional services and enablement team.
Configure the App
Review the configuration requirements to ensure you have everything you need to be successful before you begin, and then complete the steps in this section.
Configuration Requirements
- You must have an active Amazon Web Services account.
- You must know your Amazon S3 Key and S3 Secret.
- You must have registered your mobile app with AWS.
- The Push Notifications application must be installed on your tenant.
Enable Kibo eCommerce to Access SNS
- In Admin, go to System > Customization > Applications.
- Click Push Notifications.
- In the Kibo app configuration settings dialog, go to the Settings tab.
- Enter your AWS Credentials.
- Under Supported Mobile Applications, enter the names of all the mobile apps for which you want to send push notifications. The Apps you list must match your Platform Application names in Amazon SNS.
- Click Save.
Enable the App
After configuration, enable the Push Notifications application to apply its functionality to your tenant.
- In Admin, go to System > Customization > Applications.
- Click Push Notifications.
- Click Enable App.
After you enable the app, a new Push Notifications extension appears under Main > Marketing in the Admin mega menu. You will use this extension to create and schedule push notifications for all your Kibo apps.
Create a Notification
- In Admin, go to Main > Marketing > Push Notifications.
- In the Push Notifications extension, click Create New Notification.
General
- Enter a Name for the notification. This name only appears to Admin users, so you can choose a name that is internally meaningful and that will help you identify the marketing campaign with which the notification is associated.
- In Target App, enter the names of all the apps you want to receive the notification.
- Set the Status for the notification:
- Scheduled—Sends the notification at the future Delivery Date/Time you specify. You can edit scheduled notifications up until they are sent.
- Unscheduled—Does not set a specific time or date to send the notification. You can save unscheduled notifications as drafts or send them immediately.
Message
- Enter the Title and Message text that customers will receive. Amazon SNS supports the maximum payload size that is supported by the underlying platform (iOS or Android). Be sure your text conforms to those limits.
- Enter the URL that customers will be directed to if they tap on the notification.
Audience
- Select your audience:
- All Customers—Sends the notification to all customers who have installed your mobile app.
- Customer Segment—Sends the notification only to customers in the segment you specify.
- Click Save or Save and Send Now.
The notification now appears in the list of notifications. Until the notification is sent, you can use the options under Actions to send, edit, or delete the notification.
Sample Use Case
The following is just one possible use case for the Push Notifications app.
Example: Send VIP Customers a Discount Code for Boots
Scenario: You are a clothing and accessories retailer nearing the end of your winter season. You want to start moving your inventory of boots by sending a 20% discount to shoppers who have spent more than $1,000 on your site. They will receive this notification at 9 AM on Friday morning.
Solution:
- Create a customer segment named "VIP" for customers with a lifetime value of $1,000 or more.
- Create a line-item discount and set the scope to apply to your "Boots" category. Make sure the discount is valid for the time of the promotion.
- Create a coupon code for the discount, such as "VIPBOOTS."
- Go to the Push Notifications extension and create a new notification.
- Name your notification something logical, such as "VIP Boots," and select your mobile app as the target.
- Set the Status to Scheduled and set the Delivery Date/Time to 9 AM on Friday.
- Set the Audience to Customer Segment, and select VIP.
- Make the Title "VIPs Save 20% on Boots" and the Message "VIPs only! Save 20% on a new pair of boots. Use code VIPBOOTS at checkout."
- Set URL to your Boots category page, so that when a user taps the notification, they are taken directly to boots.
- Click Save.
Your push notification will be delivered to VIPs on Friday at 9 AM.