 |
| More Info: Technical Specs & Tests Platforms: Legacy eCommerce, KCCP eCommerce and eCommerce+OMS |
Amazon Payments is a fast, easy and trusted way for customers to make purchases on your website using information stored in their Amazon account. With the Pay with Amazon application and accompanying theme upgrade, you can add Pay with Amazon buttons directly to your cart and checkout pages. This app enables your customers to take advantage of a one-click checkout experience while you benefit from Amazon's secure payment processing.
Application Features
- Enables Pay with Amazon on eCommerce shopping cart and checkout pages. Customers with an Amazon.com account can check out directly from the cart.
- Connects eCommerce to your existing Amazon merchant account.
- Communicates necessary order and shipping information between both systems.
- Imports all necessary order information back into eCommerce for payment capture, fulfillment, and order history.
- Can be enabled alongside any other payment providers or gateways, including PayPal Express and Visa Checkout.
Setup Overview
The following steps are required before you can use Pay with Amazon on your site(s):
- Install the Pay with Amazon Application on your tenant.
If you create a new site in a tenant after installing the Pay with Amazon Application, you must reinstall the app to apply the payment configuration settings to the new site.
- Update your Kibo theme.
- Configure Pay with Amazon on your Payment & Settings page.
- Enable the app.
Install the App
Kibo offers two options for adding Pay with Amazon functionality to your tenant:
- (Recommended) Contact your SI partner or Kibo's professional services and enablement team for assistance installing the application.
- Build the application from the Kibo-provided code on GitHub and install it to Dev Center. This option requires that you have API Extensions enabled on your tenant, and is only recommended if you are working with Kibo Professional Services or a Kibo Partner and need a highly customized integration. Contact your sales or professional services representative for more information.
If you create a new site in a tenant after installing the Pay with Amazon Application, you must reinstall the app to apply the payment configuration settings to the new site.
Update Your Kibo eCommerce Theme
Installing and configuring the Pay with Amazon app enables you to accept payments via Amazon Payments. However, you still must enable Pay with Amazon functionality on your storefront so that customers can use it. Kibo provides a couple sample themes on GitHub that you can use to integrate Pay with Amazon functionality:
- Select your sample theme:
- PayWithAmazon-Theme—Contains the full source files for the Kibo Core 9 theme, with the required changes to enable Pay with Amazon. A branches of this theme is also available for Core 8.
- ThirdpartyPayments-Theme—Contains the full source files for the Kibo Core 9 theme, with the required changes to enable both Pay with Amazon and PayPal Express. Use this theme if you are enabling both payment options at the same time. A branch of this theme is also available for Core 8. Note that PayPal Express requires the installation of a separate app.
- Review and apply the changes made in our sample implementation to your own theme. You can run the
git diffcommand in any command-line shell to see the differences between the sample implementation and your own theme. - Use the Kibo Theme Generator or run Grunt to build the theme.
- Upload the resulting ZIP file to Dev Center.
- Install the updated theme to the sandbox you're working in.
- In Admin, go to Main > Content > Themes.
- Click the dots next to the new theme and select Apply.
Configure the App
Configuration Requirements
You must have the following two resources to use the application:
- An active Amazon Payments account.
- Your Amazon Seller ID, Client ID, and MWS Auth Token.
For help setting up your Amazon Payments account, associating it with Kibo, and finding your Amazon credentials, go to Pay with Amazon for Kibo eCommerce in the Amazon Payments Support portal.
If your Amazon Payments account is still not associated with Kibo after you've gone through the registration flow (Step 3 in the link above), try to generate the MWS auth token following these steps:
- Once logged into Seller Account, go to the App Management page.
- Click Authorize New Developer.
- Enter the below details for Developer Name and ID.
- Name: Mozu eCommerce Platform
- ID: 821245490129
- Click Next and complete the prompts to see the MWS auth token to be used in Kibo.
Configure Your Payment Settings
After the Pay with Amazon application is installed, you must configure your payment settings in Admin to connect Kibo with your Amazon Seller account.
If you create a new site in a tenant that already has the Pay with Amazon Application installed, you must reinstall the app to apply the payment configuration settings to the new site.
- In Admin, go to System > Settings > Payments.
- Check the PayWithAmazon checkbox to display the configuration fields:
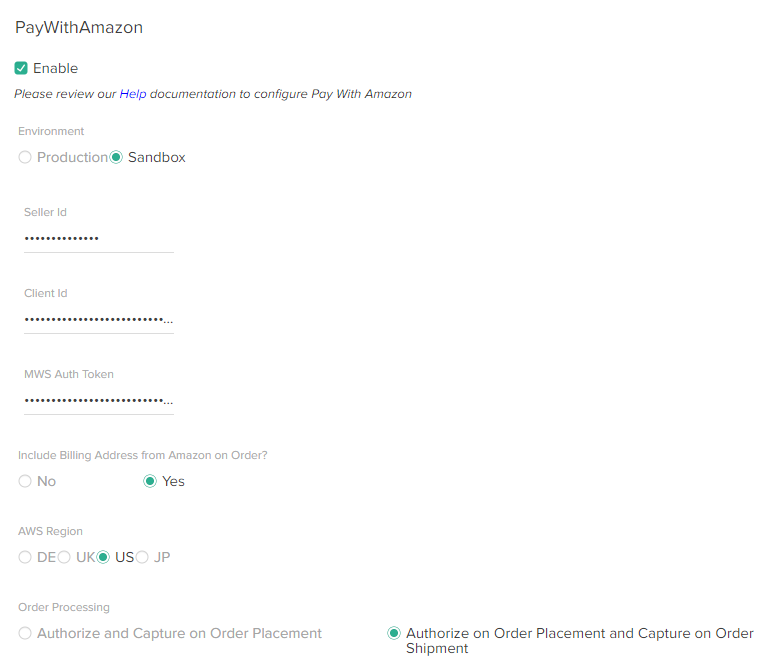
- Select the Amazon environment to use:
- Sandbox—Use Amazon's sandbox environment for testing your Pay with Amazon integration.
- Production—Use a working Amazon environment that processes payments.
- Enter the following values, which you can obtain from Amazon Seller Central (https://sellercentral.amazon.com/):
- Seller ID
- Client ID
- MWS Auth Token
- Select whether you want to Include the Billing Address from Amazon on Order.
- Select an AWS Region.
- Select an Order Processing method:
- Authorize and Capture on Order Placement—Authorize AND capture payment when an order is placed.
- Authorize on Order Placement and Capture on Order Shipment—Authorize a payment when an order is placed, but do not capture the payment until the order has shipped.
- Click Save to save your Pay with Amazon settings.
Whitelist Your Kibo eCommerce Site(s) in Amazon Seller Central
To enable users to log-in to Amazon from your Kibo site(s), you must add each of your site URLs as Allowed JavaScript Origins in Amazon:
- Log in to your Amazon Seller Central account.
- In the drop-down menu to the left of the Search field, select Login with Amazon.
- In the Applications list on the left of the page, select your Pay with Amazon application.
If the app does not appear in your Applications list, click Register new application and fill out the required fields.
- Scroll down to Web Settings and click Edit.
- Enter the secure (HTTPS) URL for your Kibo site.
- (Optional) Click Add Another to add additional site URLs.
- Click Save.
Enable the App
After configuration, enable the Pay with Amazon application to apply its functionality to your tenant:
- In Admin, go to System > Customization > Applications.
- Select the Pay with Amazon Application.
- Click Enable App on the app page.
Use the App
After you have installed the app and merged the theme changes, Pay with Amazon buttons appear on the cart and checkout pages of your Kibo site.
Pay with Amazon from the Cart Page
With Pay with Amazon enabled, your customers see a Pay with Amazon button from the Cart page of your site. Complete the following steps to test the user experience.
 Sample Cart page as it appears to a customer
The Pay with Amazon button in this example has a label indicating you are interacting with a Sandbox environment in Amazon Seller Central. You can switch between Amazon Production and Sandbox environments on the System > Settings > Payments page.
- Click Pay with Amazon to launch a modal browser window for Pay with Amazon.
- Create or log in to your Amazon account. Because you are testing the customer's experience, this should be a different account than your merchant account. You can also choose to remember your account info so you can skip the log-in process for future purchases.
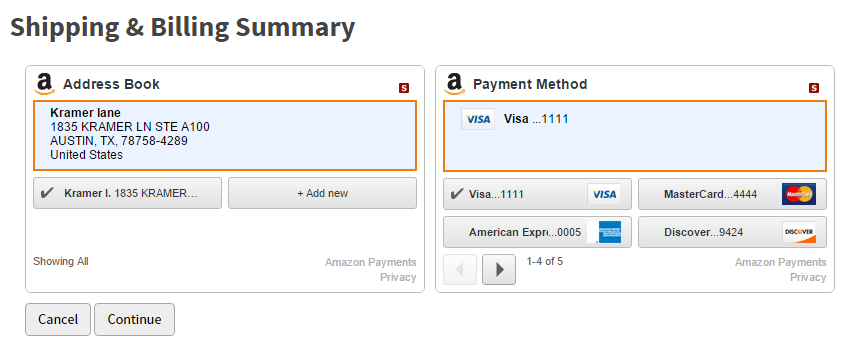
- On the Shipping & Billing Summary page, select your preferred shipping address and payment method and from the options saved in your Amazon account. You also can add a new address from this page.
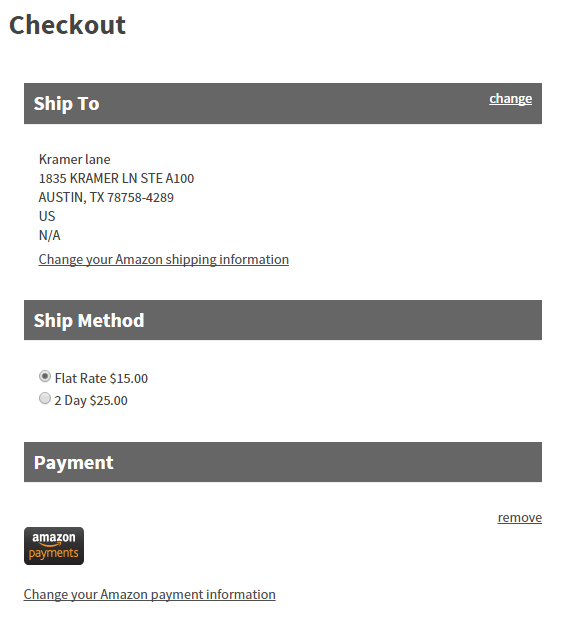
- Click Continue to go to the eCommerce Checkout page. The shipping information from Amazon appears in eCommerce, and an Amazon logo appears in the Payment Information section.
- (Optional) Apply coupons or make changes. You can change any of the information on the Checkout page up until the time you click Place Order. Kibo automatically updates Amazon with any changes made through the Checkout page before the order is placed.
- Click Place Order. Kibo adds any shipping, fees, and taxes to the total charged to your Amazon account, and removes any amount covered by discounts or gift cards.
Pay with Amazon from the Checkout Page
A customer who chooses Checkout from the Cart page can still check out with Amazon. Complete the following steps to test the user experience:
- On the Checkout page, select your Shipping Method.
Kibo cannot change the addresses associated with an Amazon account. Any changes to the shipping or billing addresses on the Checkout page will be ignored.
- (Optional) Apply any coupons, gift cards, or store credits.
- Under Payment Information click Pay with Amazon:
If you are not already logged in to your Amazon account, a browser window appears and prompts you to log in.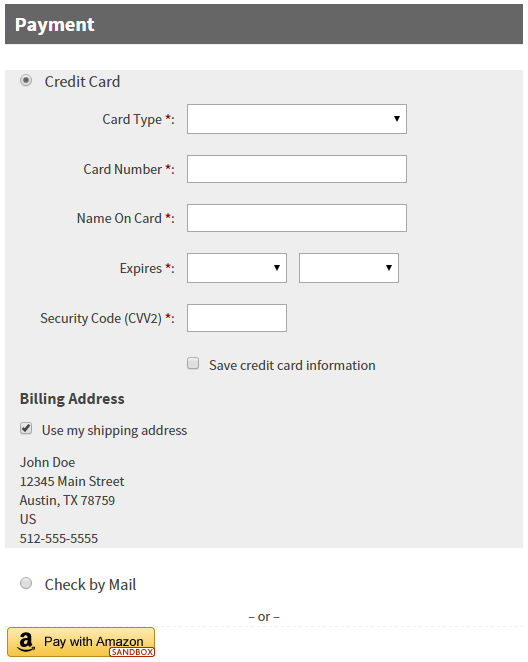 Sample Checkout page as it appears to a customer.
 - On the Shipping & Billing Summary page, select your preferred shipping address and payment method and from the options saved in your Amazon account.
- Select your preferred payment method.
- Click Continue to return to the eCommerce Checkout page.
- Click Place Order to complete the order.
Payment Authorization and Capture
Depending on the Order Processing method you chose when you configured the app, when a customer clicks Place Order on an eCommerce Checkout page, Kibo either just authorizes the order or authorizes the order and captures payment.
The order appears in the Orders module in Admin. The following images show how information on the order Payments tab maps to the Amazon Payment Details:
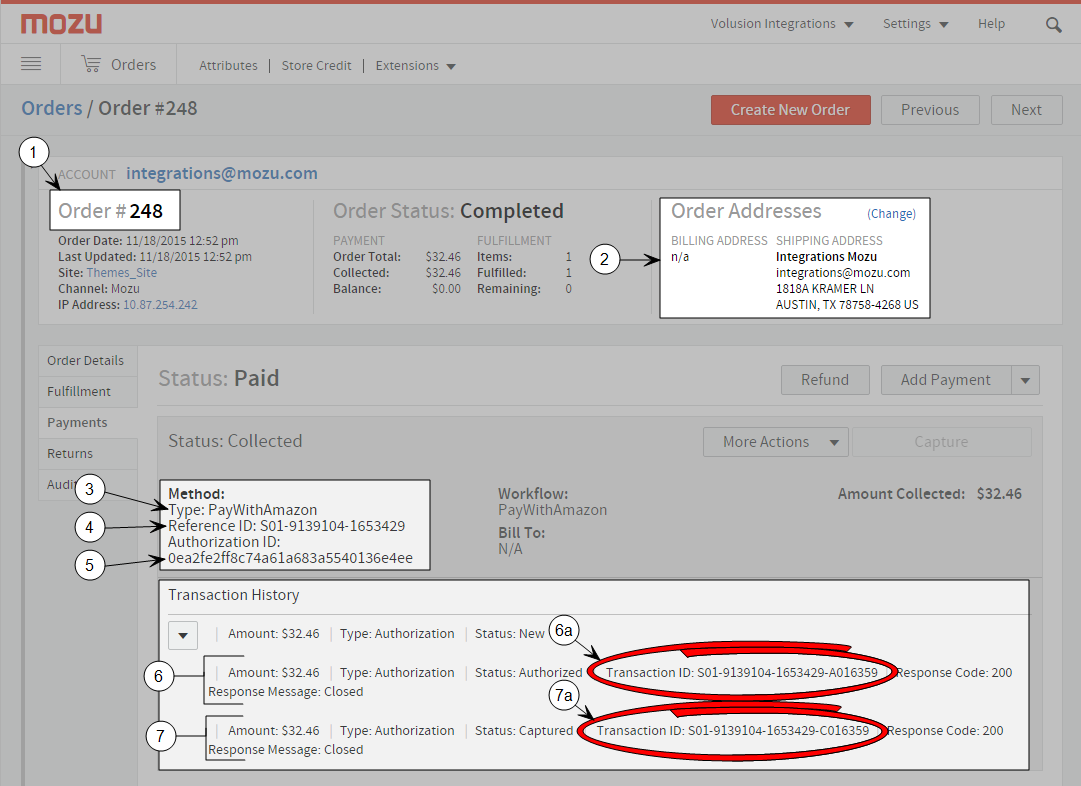 A sample Pay with Amazon order in Kibo.
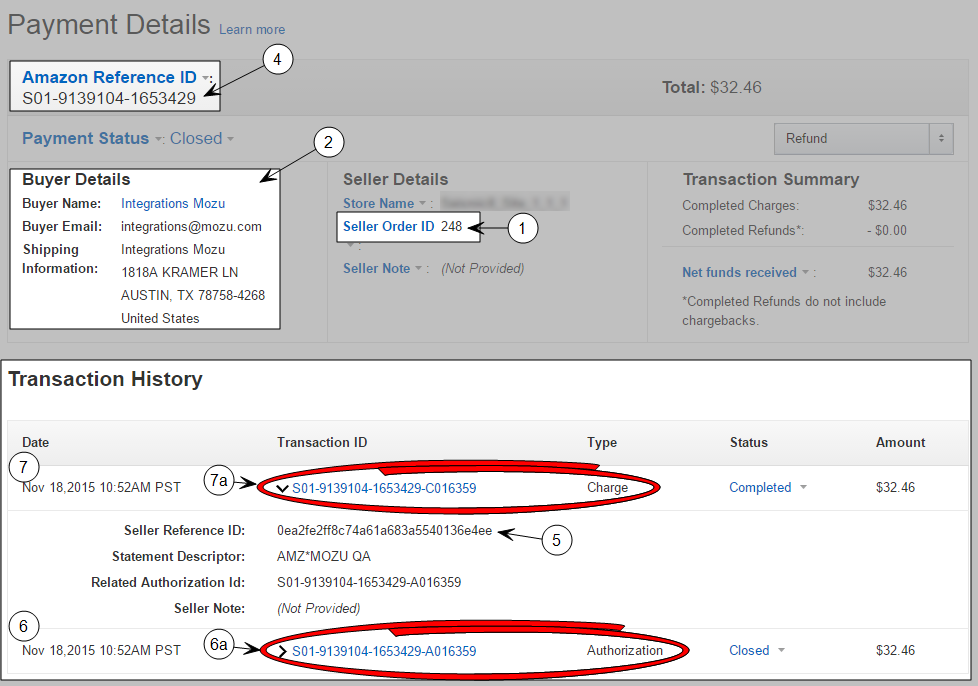 The Payment Details page for the same order in Amazon.
| Caption | Description |
|---|---|
| 1 | The Order Number in eCommerce matches the Seller Order ID in Amazon. |
| 2 | The Billing Address appears as NA in eCommerce because Kibo does not get that information from Amazon. However, the Shipping Address, including the buyer name and email address, match in both systems. |
| 3 | The payment Method indicates this is a Pay with Amazon transaction. |
| 4 | The Reference ID in Kibo matches the Amazon Reference ID. You can copy and paste this ID into the Search box on the Amazon Manage Transactions page to find the order in Amazon. |
| 5 | The Authorization ID in Kibo matches the Seller Reference ID in Amazon. |
| 6 | The Transaction History entry for the payment authorization.
|
| 7 | The Transaction History entry for the payment capture.
|
Returns
If you return or credit a payment in eCommerce, the return appears as a credit in the customer's Pay with Amazon account, and the value of the purchase is returned to the customer's credit card.
Declines
The Pay with Amazon Application does not process declines. If you decline a payment in eCommerce, you must also manually decline the payment in Amazon.