> ## Documentation Index
> Fetch the complete documentation index at: https://docs.kibocommerce.com/llms.txt
> Use this file to discover all available pages before exploring further.
# Vendor Locations
The Locations module on the Vendor Portal lets you create, configure, and manage them. Locations created here are automatically mirrored into Kibo Admin so the operator's order routing engine can include them in routing decisions.
Learn how a vendor creates and configures fulfillment locations in the Vendor Portal
## **Add a Location**
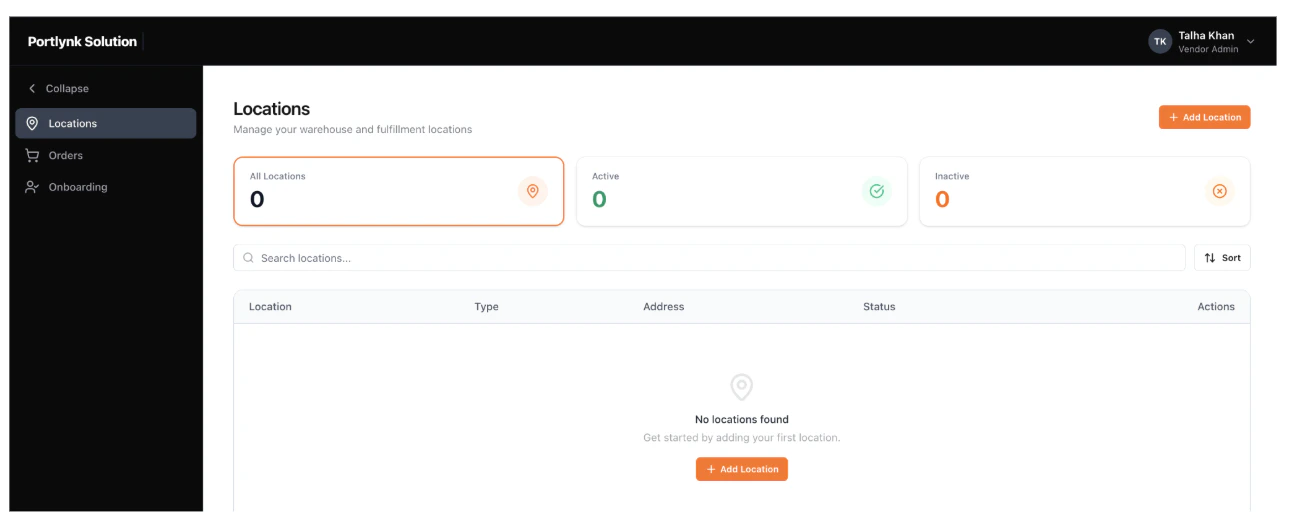 You can create locations at any time, including while your onboarding is still under operator review. The location is usable for routing as soon as your vendor record is marked Active.
1. In the left navigation, click **Locations**.
2. Click **+ Add Location** in the top-right of the page.
3. The Add New Location form opens with four tabs: **Location**, **Hours**, **Cut Off Times**, and **Attributes**. Complete each tab in turn, then click Save.
Note: The location can be saved just by filling mandatory attributes in the Location tab; the Hours, Cut Off Times, and Attributes tabs are optional
You can create locations at any time, including while your onboarding is still under operator review. The location is usable for routing as soon as your vendor record is marked Active.
1. In the left navigation, click **Locations**.
2. Click **+ Add Location** in the top-right of the page.
3. The Add New Location form opens with four tabs: **Location**, **Hours**, **Cut Off Times**, and **Attributes**. Complete each tab in turn, then click Save.
Note: The location can be saved just by filling mandatory attributes in the Location tab; the Hours, Cut Off Times, and Attributes tabs are optional
 ### **Location Tab**
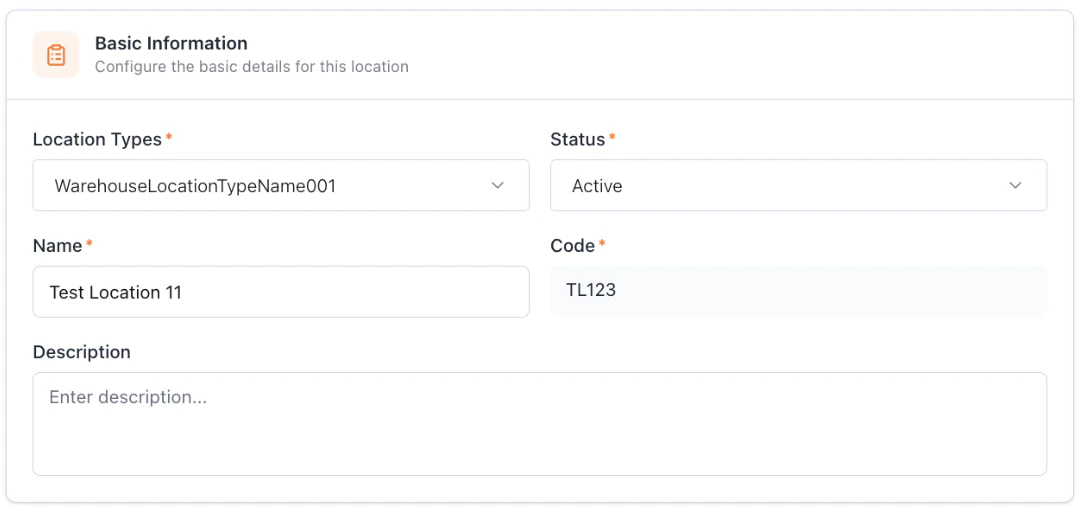
The Location tab captures four groups of fields.
**Basic Information:**
* **Location Type** — dropdown configured by the Kibo Admin or operator (e.g., Warehouse, Fulfillment Center, Store).
* **Status** — **Active** or **Inactive**. Inactive locations are not eligible for order routing.
* **Name** — the human-readable label.
* **Code** — a unique identifier.
* **Description** — optional narrative.
Note: he code must be unique across all vendors of the same Kibo client (the operator), not just per vendor. Because every vendor location is mirrored into the operator's Kibo Admin, attempting to use a code another vendor of the same client has already used returns a duplicate error.
### **Location Tab**
The Location tab captures four groups of fields.
**Basic Information:**
* **Location Type** — dropdown configured by the Kibo Admin or operator (e.g., Warehouse, Fulfillment Center, Store).
* **Status** — **Active** or **Inactive**. Inactive locations are not eligible for order routing.
* **Name** — the human-readable label.
* **Code** — a unique identifier.
* **Description** — optional narrative.
Note: he code must be unique across all vendors of the same Kibo client (the operator), not just per vendor. Because every vendor location is mirrored into the operator's Kibo Admin, attempting to use a code another vendor of the same client has already used returns a duplicate error.
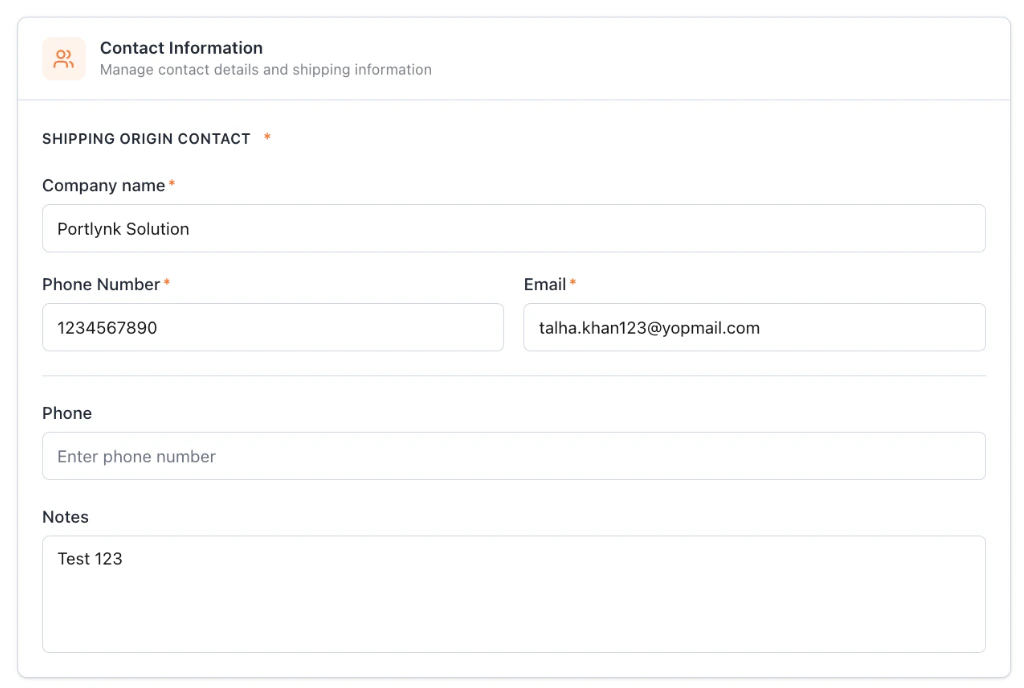
 ### **Contact Information:**
* **Shipping Origin Contact** — the company-name display surfaced on shipping documents (required).
* **Phone Number**, **Email**, secondary **Phone**, and **Notes** — all optional.
### **Contact Information:**
* **Shipping Origin Contact** — the company-name display surfaced on shipping documents (required).
* **Phone Number**, **Email**, secondary **Phone**, and **Notes** — all optional.
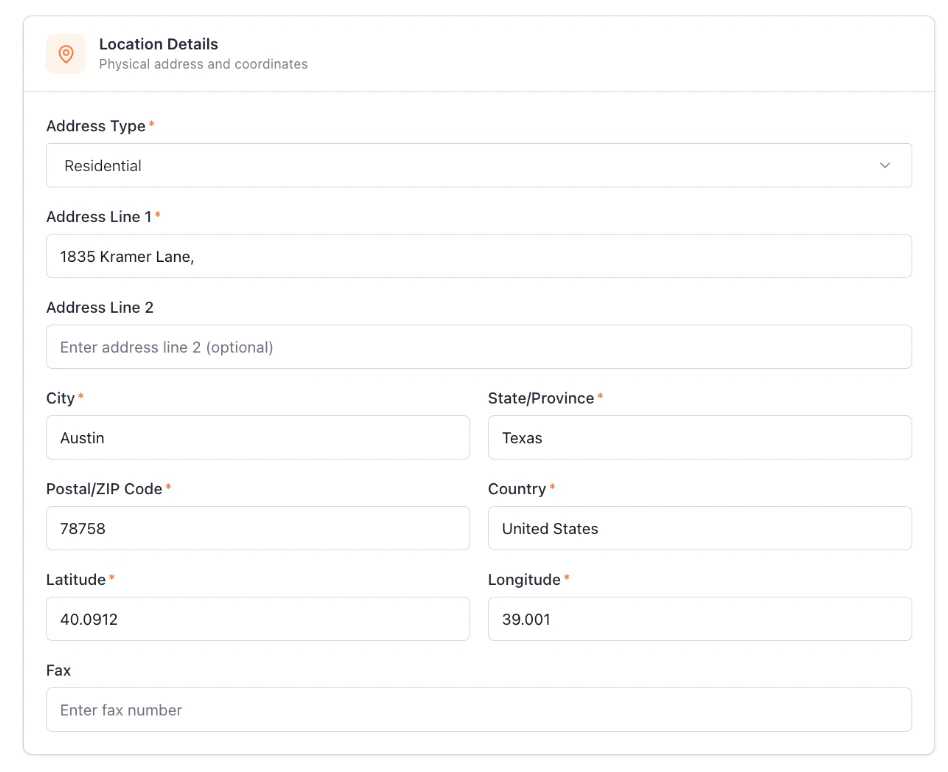
 ### **Location Details:**
* **Address Type** — dropdown configured by the **Kibo Admin** (e.g., Commercial, Residential).
* **Address Line 1**, **Address Line 2** (optional), **City**, **State / Province**, **Postal / ZIP Code**, and **Country**.
* **Latitude** and **Longitude** — used by the routing engine for proximity calculations.
* **Fax** — optional.
### **Location Details:**
* **Address Type** — dropdown configured by the **Kibo Admin** (e.g., Commercial, Residential).
* **Address Line 1**, **Address Line 2** (optional), **City**, **State / Province**, **Postal / ZIP Code**, and **Country**.
* **Latitude** and **Longitude** — used by the routing engine for proximity calculations.
* **Fax** — optional.
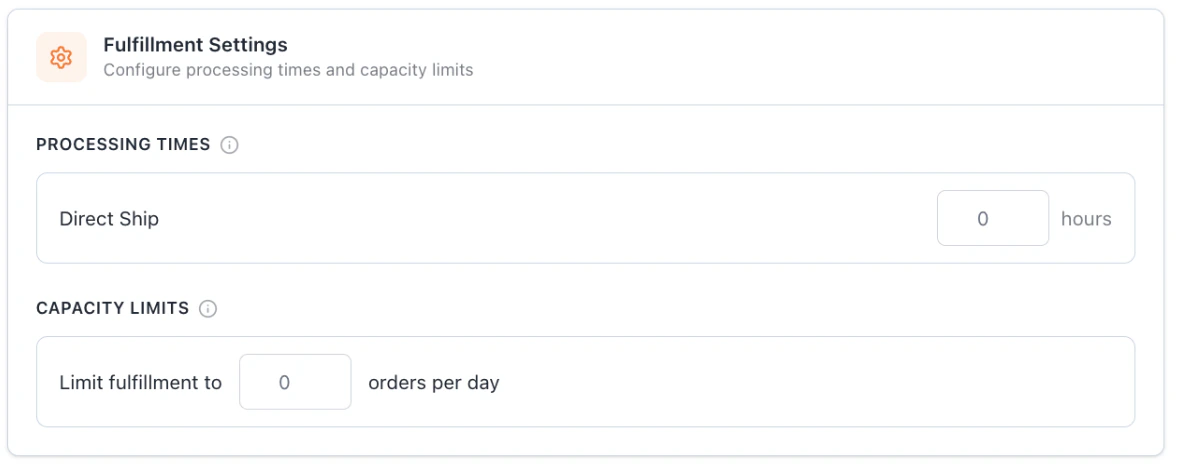
 ### **Fulfillment Settings:**
* **Processing Times** — the number of hours required to process and prepare an order before shipping. This feeds the calculation of estimated delivery date (EDD) and the SLA timer.
* **Capacity Limits** — the maximum number of orders per day this location can fulfill. Once the day's capacity is reached, the location is no longer considered when routing new orders.
### **Fulfillment Settings:**
* **Processing Times** — the number of hours required to process and prepare an order before shipping. This feeds the calculation of estimated delivery date (EDD) and the SLA timer.
* **Capacity Limits** — the maximum number of orders per day this location can fulfill. Once the day's capacity is reached, the location is no longer considered when routing new orders.
 ### **Configure Operating Hours**
The Hours tab defines the active operating window of the location. Operating hours are an input to order routing rules and to EDD calculation.
### **Configure Operating Hours**
The Hours tab defines the active operating window of the location. Operating hours are an input to order routing rules and to EDD calculation.
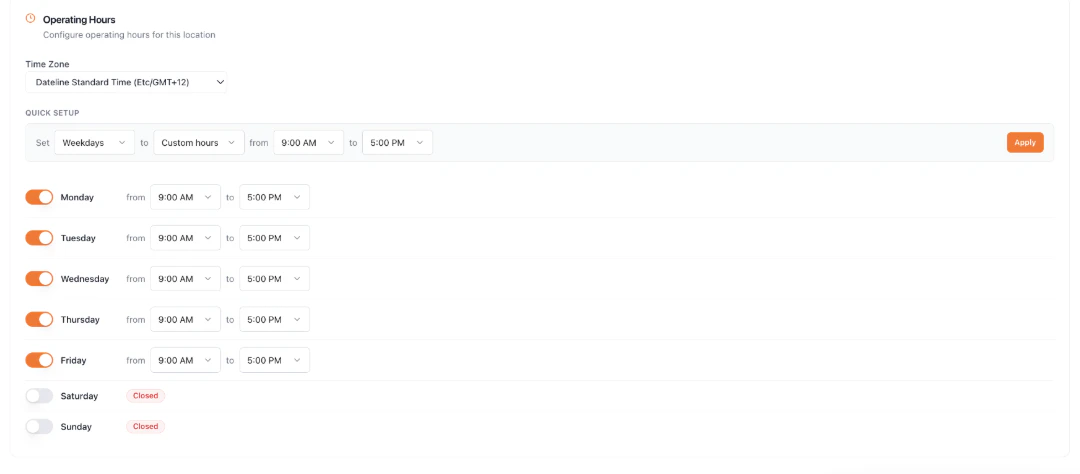 1. Choose the **Time Zone** for the location. All per-day hours and cut-off calculations are evaluated in this time zone.
2. Use **Quick Setup** at the top of the tab to bulk-apply a configuration to a day set:
* **Set** — choose **Weekdays**, **Weekends**, or **All Days**.
* **to** — choose **Custom hours**, **24x7**, or **Closed**. Custom hours expose **from** and **to** time pickers in 30-minute increments.
* Click **Apply** to apply the configuration to the selected day set.
3. Below Quick Setup, fine-tune individual days using the per-day toggles. Toggle a day on to enable it (with from/to time pickers) or off to mark it **Closed** (the day's row displays "Closed" in red and no pickers are shown).
### **Configure Cut Off Times**
The Cut Off Times tab mirrors the Hours tab's configuration model and is also used by order routing and EDD calculation. The cut-off is the latest time of day at which an order can be accepted for same-day processing.
1. Set the **Time Zone**.
2. Use **Quick Setup** to bulk-apply a cut-off configuration (Weekdays / Weekends / All Days × Custom hours / 24x7 / Closed) to a day set, then click Apply.
3. Use the per-day toggles below Quick Setup to override individual days as needed.
#### **Set Override Hours (Holidays and Maintenance)**
Override Hours capture one-off changes — holidays, maintenance windows, or peak-season exceptions — that replace the standard cut-off for a specific date.
1. Click **Set Override Hours** below the per-day schedule.
2. In the Set Override Hours modal, fill in the input row:
* **Label** — a name for the override (e.g., "Holiday hours", "Maintenance").
* **Select Date** — date picker. Future dates only.
* **From Cutoff Time** and **To Cutoff Time** — the cut-off window for the override date.
* Click **Add**. The override appears in the table below the input row.
1. Choose the **Time Zone** for the location. All per-day hours and cut-off calculations are evaluated in this time zone.
2. Use **Quick Setup** at the top of the tab to bulk-apply a configuration to a day set:
* **Set** — choose **Weekdays**, **Weekends**, or **All Days**.
* **to** — choose **Custom hours**, **24x7**, or **Closed**. Custom hours expose **from** and **to** time pickers in 30-minute increments.
* Click **Apply** to apply the configuration to the selected day set.
3. Below Quick Setup, fine-tune individual days using the per-day toggles. Toggle a day on to enable it (with from/to time pickers) or off to mark it **Closed** (the day's row displays "Closed" in red and no pickers are shown).
### **Configure Cut Off Times**
The Cut Off Times tab mirrors the Hours tab's configuration model and is also used by order routing and EDD calculation. The cut-off is the latest time of day at which an order can be accepted for same-day processing.
1. Set the **Time Zone**.
2. Use **Quick Setup** to bulk-apply a cut-off configuration (Weekdays / Weekends / All Days × Custom hours / 24x7 / Closed) to a day set, then click Apply.
3. Use the per-day toggles below Quick Setup to override individual days as needed.
#### **Set Override Hours (Holidays and Maintenance)**
Override Hours capture one-off changes — holidays, maintenance windows, or peak-season exceptions — that replace the standard cut-off for a specific date.
1. Click **Set Override Hours** below the per-day schedule.
2. In the Set Override Hours modal, fill in the input row:
* **Label** — a name for the override (e.g., "Holiday hours", "Maintenance").
* **Select Date** — date picker. Future dates only.
* **From Cutoff Time** and **To Cutoff Time** — the cut-off window for the override date.
* Click **Add**. The override appears in the table below the input row.
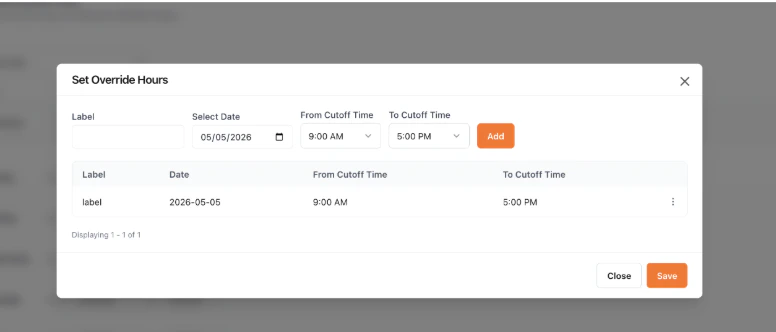 3. Add additional overrides as needed, then click **Save** to close the modal.
#### **View and Remove Override Hours**
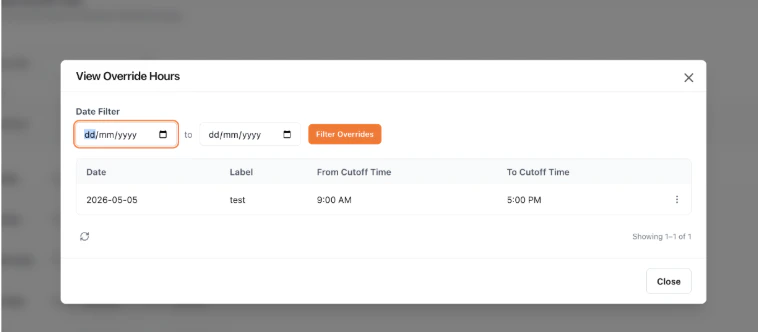
1. Click **View & Remove Override Hours** next to the Set Override Hours button. The View Override Hours modal opens.
2. Use the **from** and **to** date pickers at the top to filter the list, then click **Filter Overrides**.
3. Use the action menu (ellipsis) on each row to delete an override, or use the checkbox column to select multiple overrides for bulk deletion.
4. Click **Close** when done.
3. Add additional overrides as needed, then click **Save** to close the modal.
#### **View and Remove Override Hours**
1. Click **View & Remove Override Hours** next to the Set Override Hours button. The View Override Hours modal opens.
2. Use the **from** and **to** date pickers at the top to filter the list, then click **Filter Overrides**.
3. Use the action menu (ellipsis) on each row to delete an override, or use the checkbox column to select multiple overrides for bulk deletion.
4. Click **Close** when done.
 ## **Configure Location Attributes**
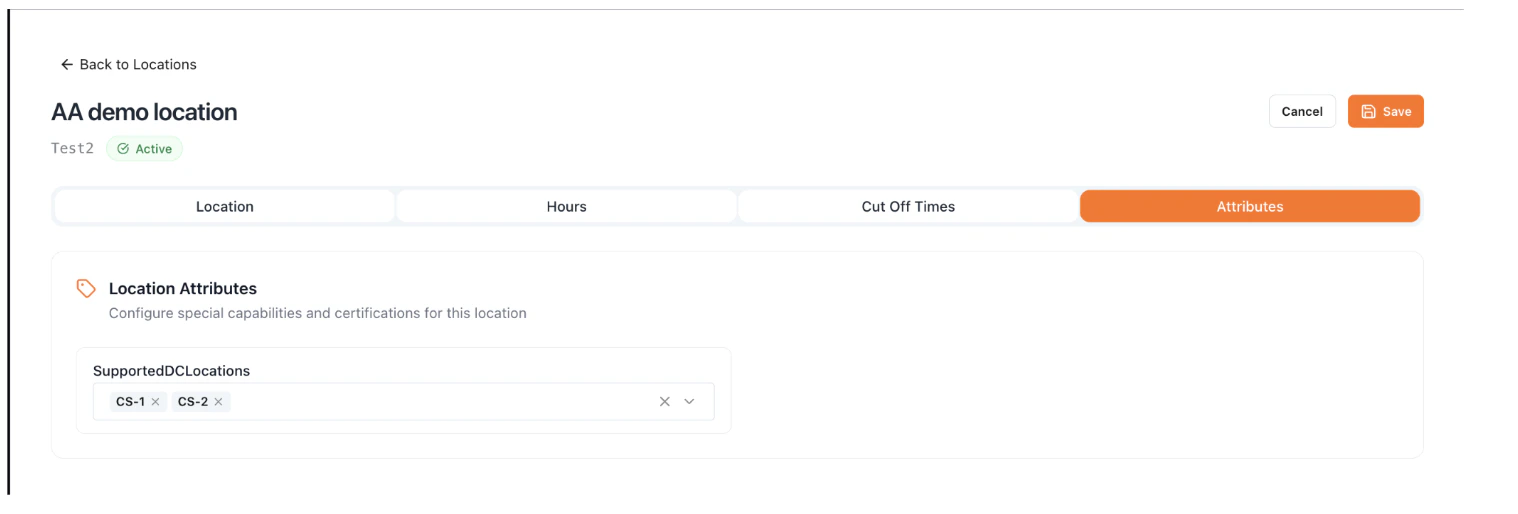
The Attributes tab lets you apply attribute values to the location. The list of available attributes is created and managed in the Operator Portal / Kibo Admin — only attributes that have been flagged for order routing are exposed here. The values you set feed directly into operator-side routing decisions, so the same attribute can drive routing for owned and dropship locations consistently.
*When no routing-flagged attributes have been configured by the operator, the tab displays an empty state.*
1. Set values for any attributes the operator has flagged for routing.
2. Click **Save** in the top-right of the form to create the location. The location now appears in the Locations listing and is automatically mirrored into Kibo Admin.
## **Configure Location Attributes**
The Attributes tab lets you apply attribute values to the location. The list of available attributes is created and managed in the Operator Portal / Kibo Admin — only attributes that have been flagged for order routing are exposed here. The values you set feed directly into operator-side routing decisions, so the same attribute can drive routing for owned and dropship locations consistently.
*When no routing-flagged attributes have been configured by the operator, the tab displays an empty state.*
1. Set values for any attributes the operator has flagged for routing.
2. Click **Save** in the top-right of the form to create the location. The location now appears in the Locations listing and is automatically mirrored into Kibo Admin.
 **Note:** Once a location is saved, the vendor or operator can later edit any field on it except the Code. The Code is fixed because it identifies the location uniquely
## **Manage Locations**
After you've added one or more locations, the Locations page surfaces them in a searchable, filterable table.
**Note:** Once a location is saved, the vendor or operator can later edit any field on it except the Code. The Code is fixed because it identifies the location uniquely
## **Manage Locations**
After you've added one or more locations, the Locations page surfaces them in a searchable, filterable table.
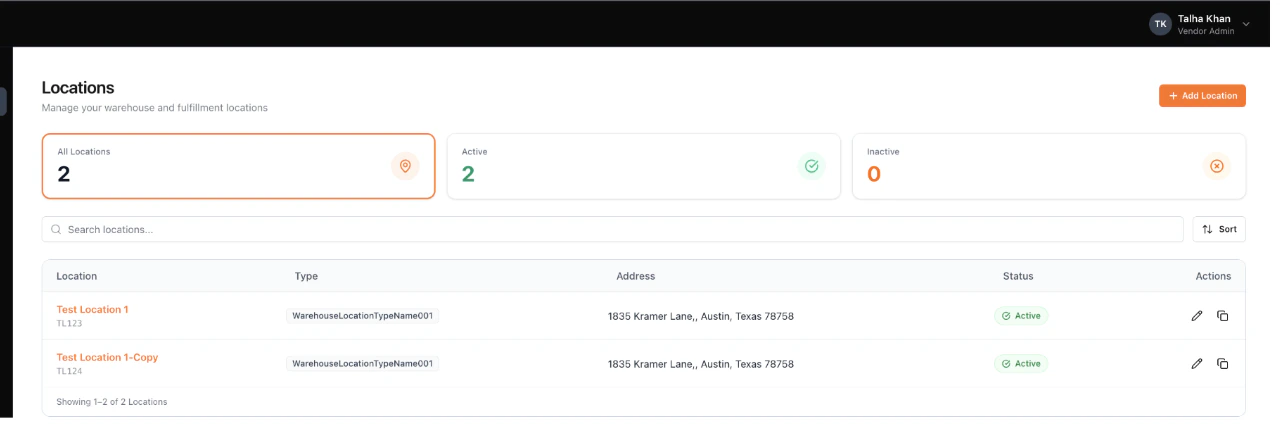 * **All Locations**, **Active**, and **Inactive** summary cards. Each card displays the count of locations and acts as a filter toggle — click a card to filter the table.
* **Search bar** — locates a specific location by name, scoped to the currently selected summary card.
* **Sort** icon — orders the list **A–Z** or **Z–A** by name.
Each row in the table shows the location name and code, type, address, manager (name + phone), status, and an Actions menu. The Actions menu offers:
* **Edit** — opens the location in edit mode. After making changes, click **Save Changes**.
* **Duplicate** — creates a copy of the location with all fields pre-populated, the Name appended with "Copy" (e.g., "Cambridge Store Copy"), and the Code field left blank for you to set fresh.
Click the location name to open the View Location page in read-only mode, with an Edit Location button if you need to make changes.
* **All Locations**, **Active**, and **Inactive** summary cards. Each card displays the count of locations and acts as a filter toggle — click a card to filter the table.
* **Search bar** — locates a specific location by name, scoped to the currently selected summary card.
* **Sort** icon — orders the list **A–Z** or **Z–A** by name.
Each row in the table shows the location name and code, type, address, manager (name + phone), status, and an Actions menu. The Actions menu offers:
* **Edit** — opens the location in edit mode. After making changes, click **Save Changes**.
* **Duplicate** — creates a copy of the location with all fields pre-populated, the Name appended with "Copy" (e.g., "Cambridge Store Copy"), and the Code field left blank for you to set fresh.
Click the location name to open the View Location page in read-only mode, with an Edit Location button if you need to make changes.