> ## Documentation Index
> Fetch the complete documentation index at: https://docs.kibocommerce.com/llms.txt
> Use this file to discover all available pages before exploring further.
# Pick Waves
Use pick waves to efficiently collect items for multiple shipments from your store. You can generate new pick waves based on different shipment filter configurations as well as manage existing pick waves in the Fulfiller UI.
Learn how to create and manage pick waves for fulfillment
Pick waves are only accessible if they are enabled for at least one location in its [location group configuration options](/pages/location-groups) and you have access to that location in the Fulfiller UI. Otherwise, the Pick & Pack page will not be listed in the navigation menu.
## Create a Pick Wave
An update in which pick waves are created based on [expression-based rules](/pages/pick-wave-rules "Pick Wave Rules") instead of the classic configuration options is being released to sandboxes with Version 1.2528. Please contact [Kibo Support](https://help.kibocommerce.com/) if you have any questions about migrating your implementation.
An overview of each version is detailed below.
### Classic Pick Waves
If your implementation does not utilize rules, then pick waves determine which shipments to include based on order type filters and other criteria you manually set when creating the pick wave.
1. Go to **Main** > **Fulfiller** > **Pick & Pack** > **Create Wave**.
2. Select the order type you want to create the pick wave for.
* Pick waves for **STH** will include Transfer and FedEx Cross Border shipments in addition to standard STH shipments.
* Pick waves for **BOPIS** will include both standard BOPIS and Curbside shipments.
* Pick waves for **Delivery** will only include shipments that are using the [updated Delivery BPM](/pages/delivery "Delivery").
3. Select a pick wave type.
* **Single Item Shipments:** Select only shipments that have one item.
* **Multiple Item Shipments:** Select only shipments with more than one item.
* **All Item Shipments:** Includes both single and multiple item shipments.
4. Set the **Number of Orders** you want to include in the pick wave.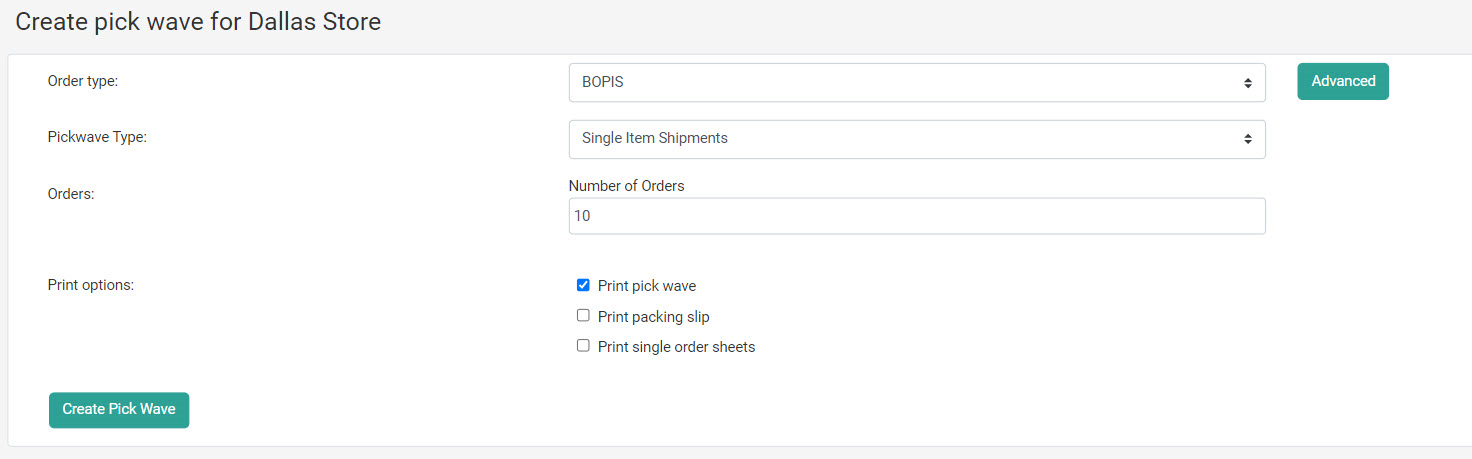 5. Check **Print pick wave**, **Print packing slip**, and/or **Print single order sheets** if you want to print these documents as part of the pick wave process. You can set whether these options are checked by default or not this via the `defaultPrintPickSheetCheckBox`, `defaultPrintPackingSlipCheckbox`, and `defaultPrintSingleOrderSheets` options in your [theme settings](/pages/fulfiller-theme-customization "Fulfiller Theme Customization"). If any of these are set to 1, then the corresponding option will be automatically checked.
6. If desired, click **Advanced** to reveal additional configurations. The button text will change to **Simple**, allowing you to switch back to the default creation form shown above.
7. Configure the optional advanced options as desired.
* The shipping preferences (All, Standard Only, or Express Only)
* Product matching by product identifier (product matching will still add all of a shipment's items to the pick wave as long as at least one item matches the criteria)
* The date or date range in which the order was placed.
5. Check **Print pick wave**, **Print packing slip**, and/or **Print single order sheets** if you want to print these documents as part of the pick wave process. You can set whether these options are checked by default or not this via the `defaultPrintPickSheetCheckBox`, `defaultPrintPackingSlipCheckbox`, and `defaultPrintSingleOrderSheets` options in your [theme settings](/pages/fulfiller-theme-customization "Fulfiller Theme Customization"). If any of these are set to 1, then the corresponding option will be automatically checked.
6. If desired, click **Advanced** to reveal additional configurations. The button text will change to **Simple**, allowing you to switch back to the default creation form shown above.
7. Configure the optional advanced options as desired.
* The shipping preferences (All, Standard Only, or Express Only)
* Product matching by product identifier (product matching will still add all of a shipment's items to the pick wave as long as at least one item matches the criteria)
* The date or date range in which the order was placed.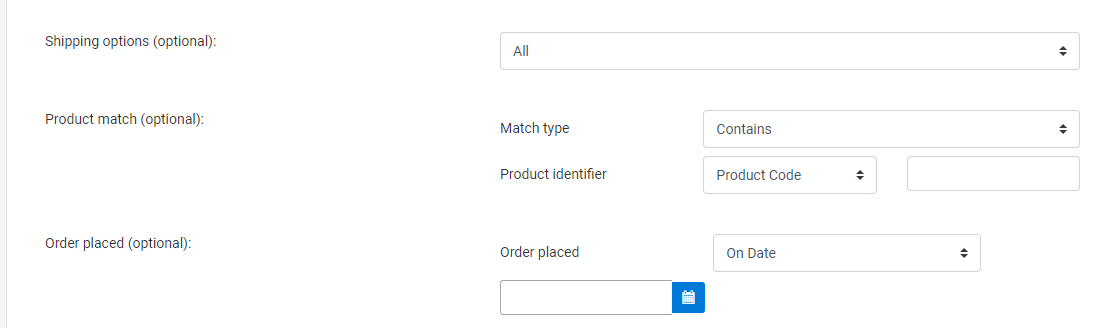 8. Click **Create Pick Wave** to generate the wave. All associated shipments will be placed into the In Pick Wave state.
### Pick Waves with Rules
If your implementation has pick wave rules enabled and configured, then shipment filtering criteria is determined by the rule you select when creating the pick wave.
1. Go to **Main** > **Fulfiller** > **Pick & Pack** > **Create Wave**.
2. Select a **Pick Wave Rule** from the dropdown menu.
* You can click **Advance Filters** to open selectable attribute options and more quickly locate the rule you want to use.
* You can click either **Edit Selected Rule** or **Create New Rule** to open a tab with rule configurations. See the [Pick Wave Rules guide](/pages/pick-wave-rules "Pick Wave Rules") for more details about how rules are defined and managed.
3. Set the **Number of Shipments** you want to include in the pick wave.
8. Click **Create Pick Wave** to generate the wave. All associated shipments will be placed into the In Pick Wave state.
### Pick Waves with Rules
If your implementation has pick wave rules enabled and configured, then shipment filtering criteria is determined by the rule you select when creating the pick wave.
1. Go to **Main** > **Fulfiller** > **Pick & Pack** > **Create Wave**.
2. Select a **Pick Wave Rule** from the dropdown menu.
* You can click **Advance Filters** to open selectable attribute options and more quickly locate the rule you want to use.
* You can click either **Edit Selected Rule** or **Create New Rule** to open a tab with rule configurations. See the [Pick Wave Rules guide](/pages/pick-wave-rules "Pick Wave Rules") for more details about how rules are defined and managed.
3. Set the **Number of Shipments** you want to include in the pick wave.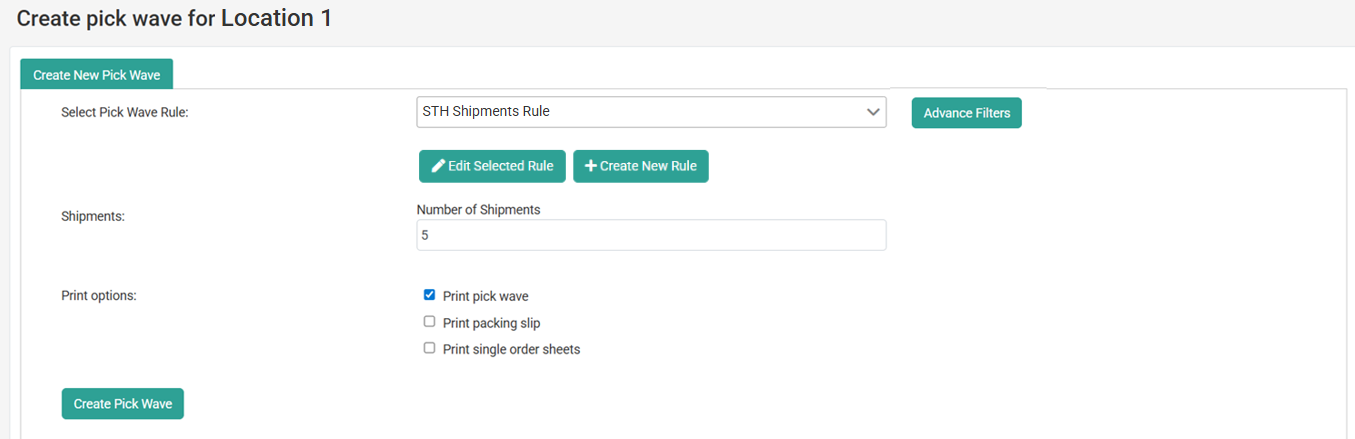 4. Check **Print pick wave**, **Print packing slip**, and/or **Print single order sheets** if you want to print these documents as part of the pick wave process. You can set whether these options are checked by default or not this via the `defaultPrintPickSheetCheckBox`, `defaultPrintPackingSlipCheckbox`, and `defaultPrintSingleOrderSheets` options in your [theme settings](/pages/fulfiller-theme-customization "Fulfiller Theme Customization"). If any of these are set to 1, then the corresponding option will be automatically checked.
5. Click **Create Pick Wave** to generate the wave. All associated shipments will be placed into the In Pick Wave state.
## Manage Pick Waves
Upon creation, the associated shipments will be given an “In Pick Wave” attribute in their shipment details view. To view all existing pick waves and perform the wave:
1. Go to **Main >** **Fulfiller** > **Pick & Pack** > **Open Waves**. All pick waves will be displayed in a table.
4. Check **Print pick wave**, **Print packing slip**, and/or **Print single order sheets** if you want to print these documents as part of the pick wave process. You can set whether these options are checked by default or not this via the `defaultPrintPickSheetCheckBox`, `defaultPrintPackingSlipCheckbox`, and `defaultPrintSingleOrderSheets` options in your [theme settings](/pages/fulfiller-theme-customization "Fulfiller Theme Customization"). If any of these are set to 1, then the corresponding option will be automatically checked.
5. Click **Create Pick Wave** to generate the wave. All associated shipments will be placed into the In Pick Wave state.
## Manage Pick Waves
Upon creation, the associated shipments will be given an “In Pick Wave” attribute in their shipment details view. To view all existing pick waves and perform the wave:
1. Go to **Main >** **Fulfiller** > **Pick & Pack** > **Open Waves**. All pick waves will be displayed in a table.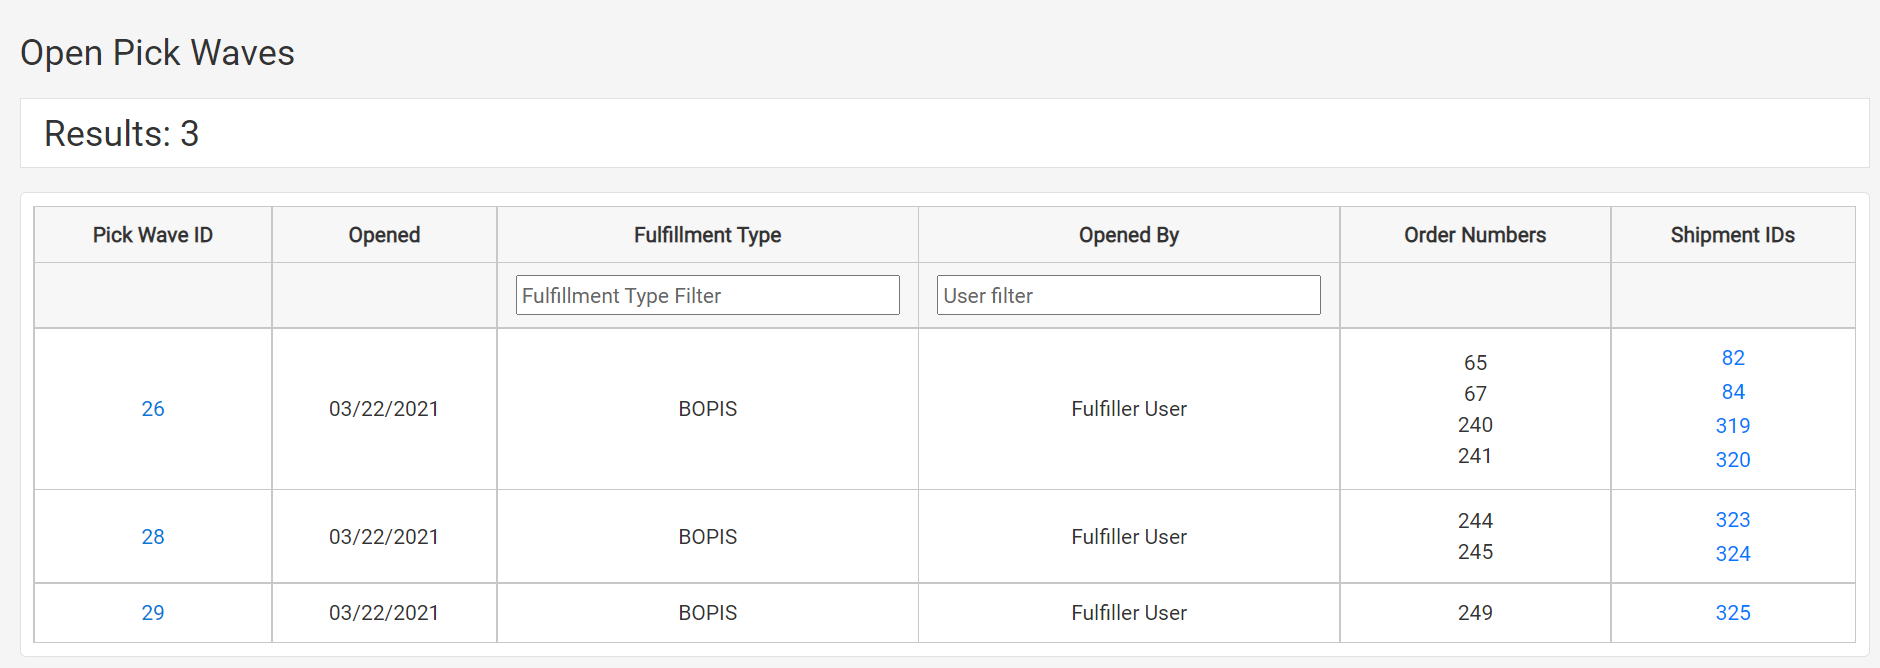 2. Click a wave to view its details. Individual items will be listed by shipment and can be picked one by one. If product identifiers have been set for any shipment items, then an additional Product Identifiers column will be displayed in the pick wave details.
3. Indicate the actual quantity of the item you picked in the **Actual QTY** column. If scanning is enabled (by setting the `isItemUPCScanAllowed`[tenant setting](/pages/fulfiller-theme-customization "Fulfiller Theme Customization") to 1), then a scan field will be displayed on each UPC and scanning a valid item will update that quantity.
2. Click a wave to view its details. Individual items will be listed by shipment and can be picked one by one. If product identifiers have been set for any shipment items, then an additional Product Identifiers column will be displayed in the pick wave details.
3. Indicate the actual quantity of the item you picked in the **Actual QTY** column. If scanning is enabled (by setting the `isItemUPCScanAllowed`[tenant setting](/pages/fulfiller-theme-customization "Fulfiller Theme Customization") to 1), then a scan field will be displayed on each UPC and scanning a valid item will update that quantity.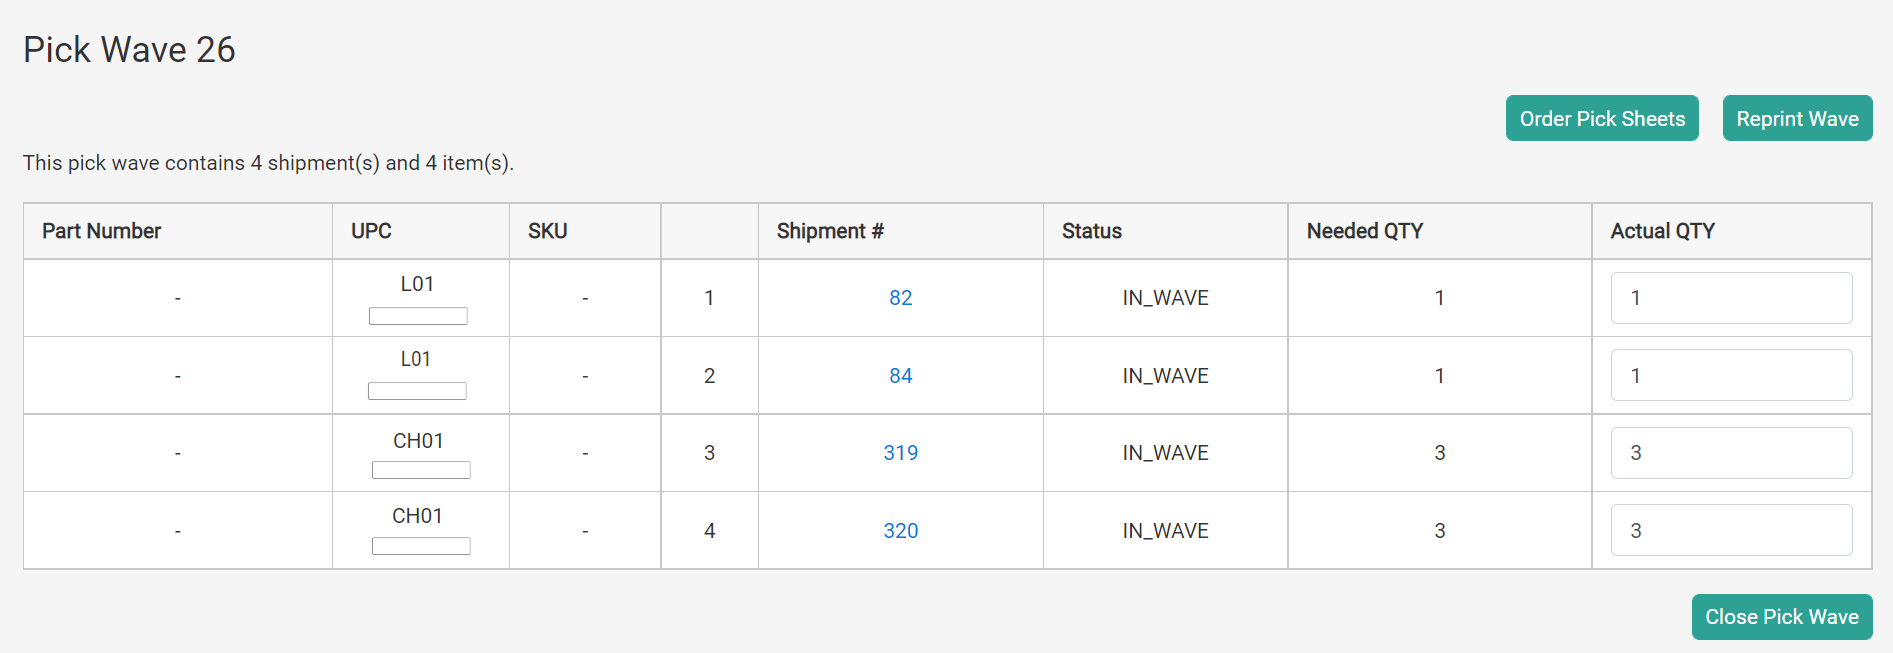 4. If the Actual QTY is less than the Needed QTY, then a **Shortage Reason** drop-down menu will appear. You must select a reason (such as "Customer Changed Their Mind" or "Can Not Find Item") before closing the pick wave.
5. When all items have been picked, click **Close Pick Wave.**
All picked shipments will then be moved to the next fulfillment step in their flow.
### Grouped Items
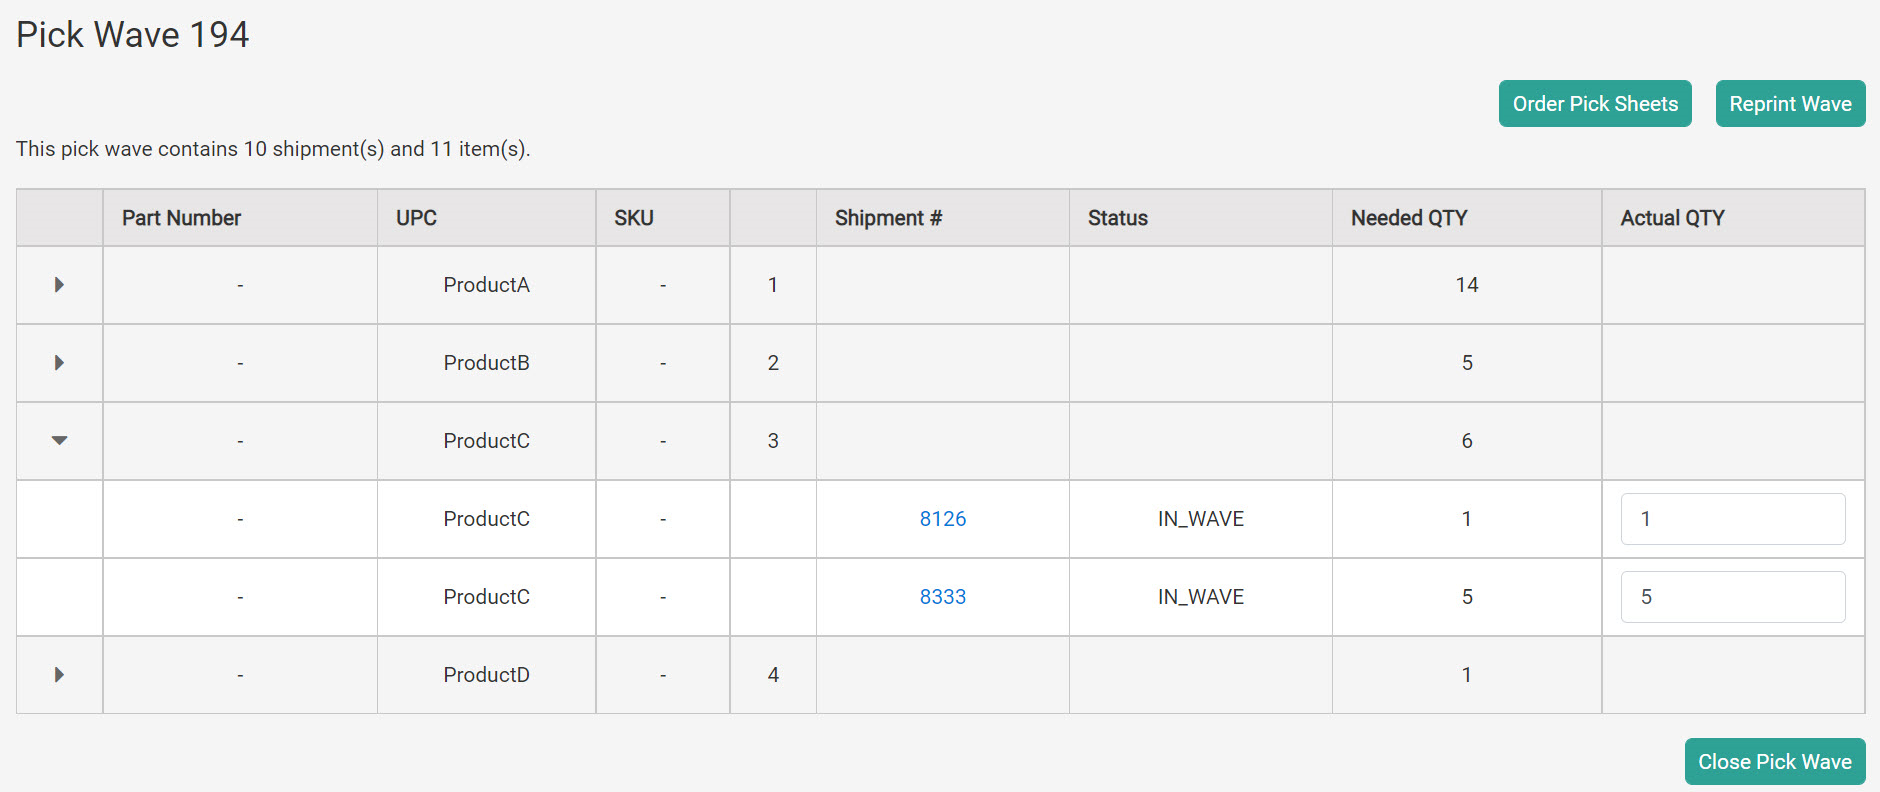
When viewing a pick wave, similar items will be grouped together across shipments. Items that are the same product will be listed under a collapsible parent row with a child row for each shipment. This means that if 5 shipments have 1 quantity of Product 123, the pick sheet will show one parent row for Product 123 with a quantity of 5 and display child rows beneath it for each individual shipment that has a quantity of 1.
The example below shows a case where the parent row for Product C has been expanded to show child rows for two shipments, whose quantities of 1 and 5 add up to the total of 6 displayed in the parent row.
4. If the Actual QTY is less than the Needed QTY, then a **Shortage Reason** drop-down menu will appear. You must select a reason (such as "Customer Changed Their Mind" or "Can Not Find Item") before closing the pick wave.
5. When all items have been picked, click **Close Pick Wave.**
All picked shipments will then be moved to the next fulfillment step in their flow.
### Grouped Items
When viewing a pick wave, similar items will be grouped together across shipments. Items that are the same product will be listed under a collapsible parent row with a child row for each shipment. This means that if 5 shipments have 1 quantity of Product 123, the pick sheet will show one parent row for Product 123 with a quantity of 5 and display child rows beneath it for each individual shipment that has a quantity of 1.
The example below shows a case where the parent row for Product C has been expanded to show child rows for two shipments, whose quantities of 1 and 5 add up to the total of 6 displayed in the parent row.
 ### Sort by Locator Names
If inventory locator names have been set for the items through the [Refresh Inventory API](/api-reference/modifyinventory/refresh), then that information will be displayed alongside the bin to help the user locate the items in their store. If you want to sort the pick waves by ascending or descending order based on this locator name, you must [customize your FFUI theme](/pages/fulfiller-theme-customization) and enable the tenant setting `pickWaveDisplayFields.locatorName.enableSorting`.
### Sort by Locator Names
If inventory locator names have been set for the items through the [Refresh Inventory API](/api-reference/modifyinventory/refresh), then that information will be displayed alongside the bin to help the user locate the items in their store. If you want to sort the pick waves by ascending or descending order based on this locator name, you must [customize your FFUI theme](/pages/fulfiller-theme-customization) and enable the tenant setting `pickWaveDisplayFields.locatorName.enableSorting`.