> ## Documentation Index
> Fetch the complete documentation index at: https://docs.kibocommerce.com/llms.txt
> Use this file to discover all available pages before exploring further.

# PayPal Multiparty Application

<table class="appcard"><tbody><tr><td><img src="https://mintcdn.com/kibocommerce-59e68a4a/wnwrN32AISYXOyk6/img/1671438163325.png?fit=max&auto=format&n=wnwrN32AISYXOyk6&q=85&s=0d46f2b2ca06260ea88e26e7a5498e12" alt="PayPal logo" class="fr-fic fr-dii img-responsive" width="544" height="256" data-path="img/1671438163325.png" /></td></tr><tr><td><strong>Platforms:</strong> KCCP eCommerce and eCommerce+OMS</td></tr></tbody></table>

The PayPal Multiparty application enables you to add PayPal's functionality to your eCommerce payment options with the ability to accept multiple payment methods. To do so, you will onboard your PayPal merchant account with Kibo's partner account to authorize with our credentials. For more information, see [PayPal's multiparty documentation](https://developer.paypal.com/docs/multiparty/).

## Application Features

* Enables PayPal Checkout on both shopping cart and checkout pages. Customers with a PayPal account can check out directly from the cart.
* Securely connects Kibo to your existing PayPal merchant account through your PayPal Merchant ID and API Signature.
* Communicates necessary order and shipping information between both systems.
* Allows for separate authorization and capture. Authorize payments on customer order and capture later through eCommerce.
* Imports all necessary order information back into eCommerce for payment capture, fulfillment, and order history.
* Can be enabled alongside any other payment providers or gateways, including Pay with Amazon and Visa Checkout.

## Setup Overview

The following steps are required before you can use PayPal Multiparty on your site(s). The exact process varies depending on whether you are already using PayPal Express or not.

### If Not Using PayPal Express

If you are not already using the PayPal Express application:

1. Contact your SI partner or Kibo's professional services and enablement team to install the PayPal Complete Payments application to your tenant.

   If you create a new site in a tenant after installing the PayPal Multiparty Application, you must reinstall the app to apply the payment configuration settings to the new site.

2. [Validate](#configure-admin-settings) your Custom Route and API Extension configurations.

3. [Enable](#enable-and-onboard-account) PayPal Multiparty in your payment type settings.

4. [Onboard](#enable-and-onboard-account) a merchant account.

### If Using PayPal Express

If you are already using the PayPal Express application, follow these steps for cleanly swapping to PayPal Multiparty:

1. Contact your SI partner or Kibo's professional services and enablement team to install the PayPal Complete Payments application to your tenant.
2. Perform the [Merchant Account Onboarding](#enable-and-onboard-account) steps in the Admin UI.
3. [Onboard a merchant account and enable the payment type](#enable-and-onboard-account), though it won't be used yet since your API Extensions will still direct to the old application.
4. When ready to cutover, [enable the new PayPal API Extensions](#api-extensions) and disable your old extensions. Do this by setting your old Express extensions to `"enabled": false` and your new Multiparty extensions to `"enabled": true`
5. Your PayPal requests will now direct to the new Multiparty application.

## Configure Admin Settings

After the application is installed, you should verify that your custom route and API Extensions settings are set up properly before adding PayPal Multiparty as a payment type.

### Custom Routes

Custom route setup should be done by application installation. To validate:

1. Go to **System** > **Settings** > **Customization** > **Custom Routes**.
2. The `paypal/checkout` and `paypal/token` templates should point to corresponding functionIds (see Api Extensions `http.storefront.routes` for functionId values). For example:
   ```
   "routes": [
   		{
   			"template": "paypal/checkout",
   			"defaults": {},
   			"internalRoute": "Arcjs",
   			"functionId": "paypalProcessor",
   			"mappings": {},
   			"validators": {}
   		},
   		{
   			"template": "paypal/token",
   			"defaults": {},
   			"internalRoute": "Arcjs",
   			"functionId": "paypalToken",
   			"mappings": {},
   			"validators": {}
   		}
   	]
   ```

### API Extensions

API Extension setup should be done by application installation. If you are migrating from PayPal Express, you should do this step after [onboarding the merchant account](#enable-and-onboard-account) instead of before.

To validate and enable them:

1. The appropriate application key can be found in **System** > **Settings** > **Customization** > **Applications** or received from Customer Support. This should be similar to `foo.paypal_complete_payments_application.1.0.0.Release`
2. Refer to the below example of what an updated API Extension should look like.  Set `"enabled": true` for every function referencing your application key.
   * If you already had PayPal Express API Extensions, you may see duplicate `functionId` fields referencing both the old application and the new one. Initially, old functions will be enabled and new functions disabled.

```
{
	"actionId": "embedded.commerce.payments.action.before",
	"contexts": [
		{
			"customFunctions": [
				{
					"applicationKey": "mozuadmin.PayPalMultiparty.1.0.0.Release",
					"functionId": "paypalPaymentActionBefore",
					"enabled": true,
					"timeoutMilliseconds": 25000
				}
			]
		}
	]
},
{
	"actionId": "embedded.commerce.payments.action.performPaymentInteraction",
	"contexts": [
		{
			"customFunctions": [
				{
					"applicationKey": "mozuadmin.PayPalMultiparty.1.0.0.Release",
					"functionId": "embedded.commerce.payments.action.performPaymentInteraction",
					"enabled": true,
					"timeoutMilliseconds": 25000
				}
			]
		}
	]
},
{
	"actionId": "http.commerce.settings.checkout.paymentsettings.updatePaymentSettings.before",
	"contexts": [
		{
			"customFunctions": [
				{
					"applicationKey": "mozuadmin.PayPalMultiparty.1.0.0.Release",
					"functionId": "paypalValidator",
					"enabled": true
				}
			]
		}
	]
},
{
  "actionId": "http.storefront.pages.cart.request.after",
  "contexts": [
		{
			"customFunctions": [
				{
					"applicationKey": "mozuadmin.PayPalMultiparty.1.0.0.Release",
					"functionId": "paypalCartAfter",
					"enabled": true
				}
			]
		}
  ]
},
{
	"actionId": "http.storefront.pages.checkout.request.after",
	"contexts": [
		{
			"customFunctions": [
				{
					"applicationKey": "mozuadmin.PayPalMultiparty.1.0.0.Release",
					"functionId": "paypalCheckoutAfter",
					"enabled": true
				}
			]
		}
	]
},
{
	"actionId": "http.storefront.routes",
	"contexts": [
		{
			"customFunctions": [
				{
					"applicationKey": "mozuadmin.PayPalMultiparty.1.0.0.Release",
					"functionId": "paypalProcessor",
					"enabled": true,
					"configuration": {
						"addBillingInfo": false,
						"missingLastNameValue": "N/A",
						"allowWarmCheckout": true
					},
					"timeoutMilliseconds": 25000
				},
				{
					"applicationKey": "mozuadmin.PayPalMultiparty.1.0.0.Release",
					"functionId": "paypalToken",
					"enabled": true,
					"timeoutMilliseconds": 25000
				}
			]
		}
	]
},
```

## Enable and Onboard Account

After PayPal Multiparty has been installed, enable the payment type and onboard a merchant account:

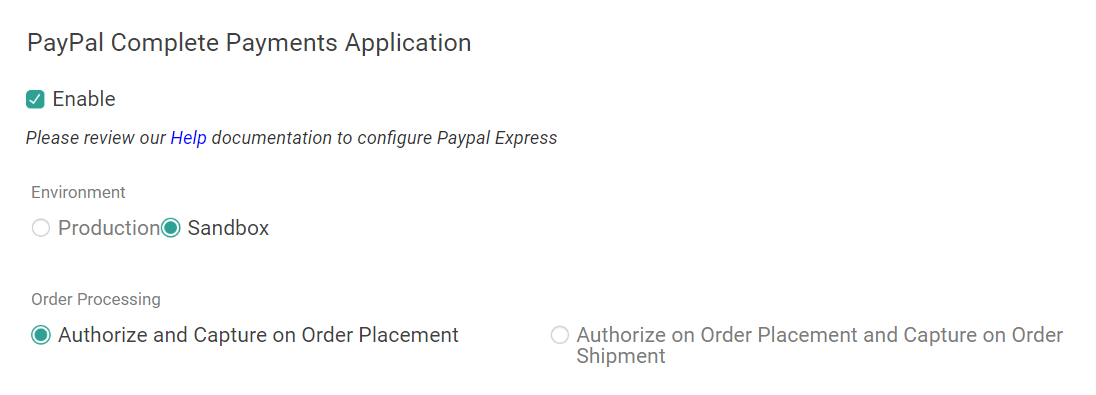
1. Go to **System** > **Settings** > **Payment Types** > **PayPal Complete Payments Application**.
2. Click the **Enable** checkbox for any site(s) you want to make PayPal Multiparty payments for.
3. Check **Production** or **Sandbox** to select whether this site will use the PayPal sandbox or production environments.
4. Select either **Authorize and Capture on Order Placement** or **Authorize on Order Placement and Capture on Order Shipment** to determine when you want to capture payments.<img src="https://mintcdn.com/kibocommerce-59e68a4a/mirjU24xTFSyw6n2/img/paypal-complete-settings.png?fit=max&auto=format&n=mirjU24xTFSyw6n2&q=85&s=339904cb4651c5f24759aa91bc4f079e" alt="The PayPal Complete Payments settings" width="1096" height="395" data-path="img/paypal-complete-settings.png" />
5. Click **Onboard**.
6. This opens a new window. Sign in with your PayPal merchant account and authorize Kibo’s Partner Account to act on your behalf. You may close the window when done.
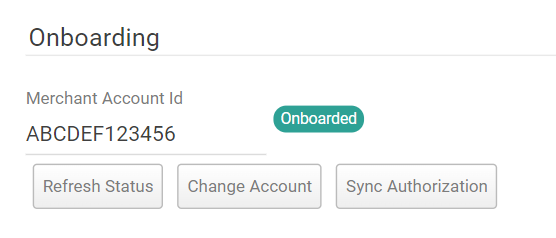
7. Click **Refresh Status**. The UI should automatically update to display the latest Merchant Account Id and Onboarding Status of the account you authorized. The "Onboard" button will now say Change Account instead, allowing you to switch merchant accounts if needed.<img src="https://mintcdn.com/kibocommerce-59e68a4a/HsxsmZiwYCuO9lws/img/onboarding-paypal.png?fit=max&auto=format&n=HsxsmZiwYCuO9lws&q=85&s=a153398f82aa356ca5ef3263428d081e" alt="A successfully onboarded merchant account" width="556" height="238" data-path="img/onboarding-paypal.png" />
8. Click **Save**.
9. If you have enabled PayPal Multiparty on multiple sites and want to use the same merchant account for all of them, click **Sync Authorization**. This site's credentials will be copied to all other sites that are missing PayPal Multiparty credentials.

Once onboarded, the PayPal Merchant Account Identifier that Kibo has on record for that site will be the account that payments are attributed to.

## Update Storefront

You can now configure your storefront theme to display a PayPal button on the cart and checkout pages. Kibo will use partner account permissions to create orders in your onboarded Merchant Account and authorize/capture payments against them.

This will leverage the same `http.storefront.routes` custom route entry points as the previous PayPal implementation, `paypal/checkout` and `paypal/token`.

### Headless Storefront Settings

If using a headless storefront, you must also configure the below keys in your environment variables:

```
NEXT_PUBLIC_URL=[Your_Next_Public_Url]
NEXT_PUBLIC_PAYPAL_URL=https://api-m.sandbox.paypal.com
NEXT_PUBLIC_PAYPAL_CURRENCY=USD
NEXT_PUBLIC_PAYPAL_CLIENT_ID=[Your_Client_Id]

PAYPAL_CLIENT_ID=[Your_Client_Id]
PAYPAL_CLIENT_SECRET=[Your_Client_Secret]
```

## Disable and Offboard

To disable PayPal as an available payment type for a site, simply toggle off the **Enable** checkbox in the payment type settings and click **Save**.

Fully revoking Kibo’s access to your account must be done through the PayPal UI:

1. Log in to your PayPal account.
2. Hover over your name in the top right and select **Account Settings**.
3. Click **Update** next to API Access.
4. Click **Manage API Permission** under Pre-Built Payment Solution.
5. If needed, click **View/Edit Additional Partners with Third Party Access**.
6. Expand the dropdown to view all permissions given.
7. To revoke permissions…
   1. Click the checkbox next to the partner you wish to revoke access from.
   2. Click **Yes, Revoke** to confirm.
8. In the Kibo Admin, click **Refresh Status**.

If permissions to your Merchant Account are revoked and the status is refreshed in Kibo, this will disable PayPal for any site that no longer has an onboarded Merchant Account.