Platforms: Legacy eCommerce, KCCP eCommerce and eCommerce+OMS
|
| More Info:[Technical Specs & Tests](/pages/paypal-express-technical-specs) Platforms: Legacy eCommerce, KCCP eCommerce and eCommerce+OMS |
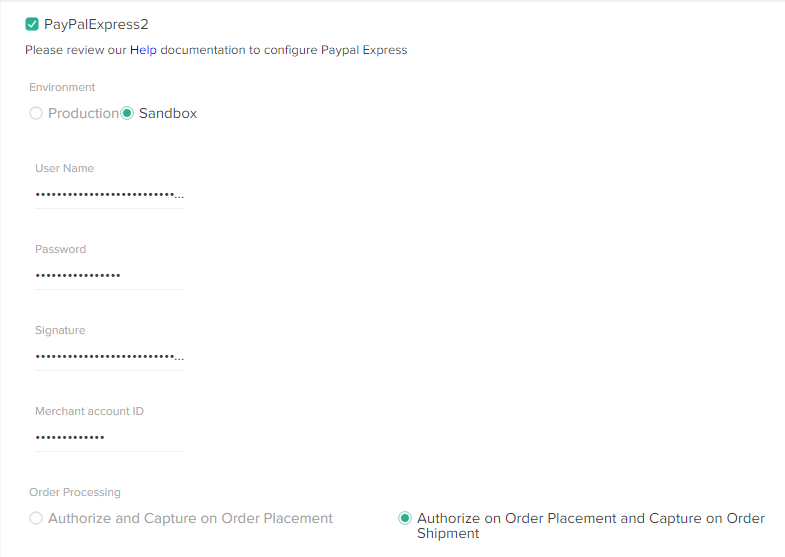 3. Select the PayPal **Environment** you want to use:
* Select **Sandbox** to use PayPal's sandbox environment for testing your PayPal Express integration.
* Select **Production** to use a working PayPal environment that processes payments.
4. Enter the **User Name** and **Password** for your PayPal merchant account.
5. Enter your PayPal API **Signature**. To find your API signature in PayPal:
1. Log in to [paypal.com](https://www.paypal.com/home) with your merchant account.
2. Click **Profile**.
3. Select the PayPal **Environment** you want to use:
* Select **Sandbox** to use PayPal's sandbox environment for testing your PayPal Express integration.
* Select **Production** to use a working PayPal environment that processes payments.
4. Enter the **User Name** and **Password** for your PayPal merchant account.
5. Enter your PayPal API **Signature**. To find your API signature in PayPal:
1. Log in to [paypal.com](https://www.paypal.com/home) with your merchant account.
2. Click **Profile**.
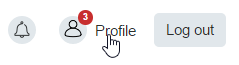 3. On the **My Profile** page, select **My Selling Tools**.
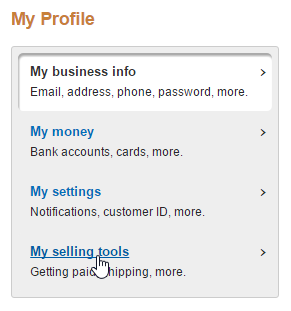 4. In the **Selling online** section, locate **API access** and click **Update**.
5. Click **View API Signature** under **NVP/SOAP API integration**.
6. Enter your PayPal **Merchant account ID**. To find your ID:
1. Log in to [paypal.com](https://www.paypal.com/home) with your merchant account.
2. Click **Profile**.
3. On the **My Profile** page, select **My Business Info**.
4. Your **Merchant account ID** appears near the bottom of the list.
7. Select an **Order Processing** method:
* **Authorize and Capture on Order Placement** both authorizes AND captures payment when an order is placed.
* **Authorize on Order Placement and Capture on Order Shipment** authorizes a payment when an order is placed, but does not capture that payment until you manually click **Capture** from the **Orders** module in Admin. (Typically, you capture payment when you ship an order.)
8. Click **Save** to save your PayPal Express settings.
### Display Billing Address
You can configure the PayPal Express application to display shoppers' billing address within Admin, on the checkout page, and in confirmation emails.
You can configure this functionality using the API Extensions JSON editor available in Admin. Refer to [Getting Started with API Extensions](/pages/what-you-can-do-with-api-extensions) for more information about API Extensions.
To configure the application to display shoppers' billing address:
1. Make sure you have the latest version of the application installed.
2. In Admin, go to **System** > **API Extensions**.
3. Within the `paypalProcessor` function configuration, set `addBillingInfo` to `true`. You can also use the `missingLastNameValue` to provide a value for the last name in case it is missing from the billing info.\
For example, if you chose to enable adding the billing info from Paypal, the configuration for the `paypalProcessor`function would look like:
```
{
"actionId": "http.storefront.routes",
"contexts": [
{
"customFunctions": [
{
"applicationKey": "a0842dd.mppea.1.2.2.Release",
"functionId": "paypalProcessor",
"enabled": true,
"configuration": {
"addBillingInfo": true,
"missingLastNameValue": "N/A"
},
"timeoutMilliseconds": 30000
}
]
}
]
}
```
## Enable the App
After configuration, enable the PayPal Express application to apply its functionality to your tenant:
1. In Admin, go to **System** > **Customization** > **Applications**.
2. Select the PayPal Express Application.
3. Click **Enable App** on the app page.
## Use the App
After you have installed the app and merged the theme changes, **Check out with PayPal** appears on the cart and checkout pages of your eCommerce site.
### Pay with PayPal from the Cart Page
With PayPal Express enabled, your customers see a PayPal button from the Cart page of your site. Complete the following steps to test the user experience:
4. In the **Selling online** section, locate **API access** and click **Update**.
5. Click **View API Signature** under **NVP/SOAP API integration**.
6. Enter your PayPal **Merchant account ID**. To find your ID:
1. Log in to [paypal.com](https://www.paypal.com/home) with your merchant account.
2. Click **Profile**.
3. On the **My Profile** page, select **My Business Info**.
4. Your **Merchant account ID** appears near the bottom of the list.
7. Select an **Order Processing** method:
* **Authorize and Capture on Order Placement** both authorizes AND captures payment when an order is placed.
* **Authorize on Order Placement and Capture on Order Shipment** authorizes a payment when an order is placed, but does not capture that payment until you manually click **Capture** from the **Orders** module in Admin. (Typically, you capture payment when you ship an order.)
8. Click **Save** to save your PayPal Express settings.
### Display Billing Address
You can configure the PayPal Express application to display shoppers' billing address within Admin, on the checkout page, and in confirmation emails.
You can configure this functionality using the API Extensions JSON editor available in Admin. Refer to [Getting Started with API Extensions](/pages/what-you-can-do-with-api-extensions) for more information about API Extensions.
To configure the application to display shoppers' billing address:
1. Make sure you have the latest version of the application installed.
2. In Admin, go to **System** > **API Extensions**.
3. Within the `paypalProcessor` function configuration, set `addBillingInfo` to `true`. You can also use the `missingLastNameValue` to provide a value for the last name in case it is missing from the billing info.\
For example, if you chose to enable adding the billing info from Paypal, the configuration for the `paypalProcessor`function would look like:
```
{
"actionId": "http.storefront.routes",
"contexts": [
{
"customFunctions": [
{
"applicationKey": "a0842dd.mppea.1.2.2.Release",
"functionId": "paypalProcessor",
"enabled": true,
"configuration": {
"addBillingInfo": true,
"missingLastNameValue": "N/A"
},
"timeoutMilliseconds": 30000
}
]
}
]
}
```
## Enable the App
After configuration, enable the PayPal Express application to apply its functionality to your tenant:
1. In Admin, go to **System** > **Customization** > **Applications**.
2. Select the PayPal Express Application.
3. Click **Enable App** on the app page.
## Use the App
After you have installed the app and merged the theme changes, **Check out with PayPal** appears on the cart and checkout pages of your eCommerce site.
### Pay with PayPal from the Cart Page
With PayPal Express enabled, your customers see a PayPal button from the Cart page of your site. Complete the following steps to test the user experience:
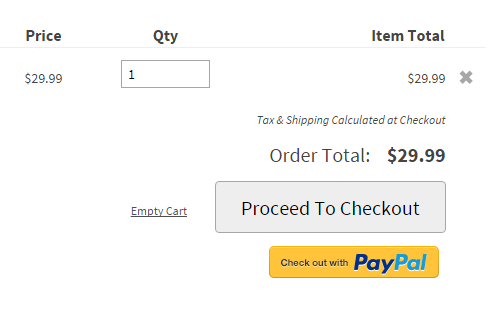 1. Click **Checkout with PayPal** to launch a modal browser window for PayPal.
2. Create or log in to your PayPal account. Because you are testing the buyer's experience, this should be a different account than your merchant account. You can also choose to remember your account info so you can skip the log-in process for future purchases.
3. Select your preferred payment method and shipping address from the options saved in your PayPal account.
If you have a balance or credit in your PayPal account, PayPal requires you to use all of the balance before it allows you to select a different payment method.
4. Click **Continue** to return to the eCommerce Checkout page. The shipping information from PayPal appears in eCommerce, and a PayPal logo appears in the **Payment Information** section.
5. (Optional) Apply coupons or make changes. You can change any of the information on the Checkout page up until the time you click **Place Order**. Kibo automatically updates PayPal with any changes made through the Checkout page before the order is placed.
6. Click **Place Order**. Kibo adds any shipping, fees, and taxes to the total charged to your PayPal account, and removes any amount covered by discounts or gift cards.
### Pay with PayPal from the Checkout Page
A customer who chooses **Proceed To Checkout** from the Cart page can still check out with PayPal. Complete the following steps to test the user experience:
1. On the Checkout page, enter your **Shipping Information** and select your **Shipping Method**.
2. (Optional) Apply any coupons, gift cards, or store credits.
3. Under **Payment Information** click **Check out with PayPal**:
1. Click **Checkout with PayPal** to launch a modal browser window for PayPal.
2. Create or log in to your PayPal account. Because you are testing the buyer's experience, this should be a different account than your merchant account. You can also choose to remember your account info so you can skip the log-in process for future purchases.
3. Select your preferred payment method and shipping address from the options saved in your PayPal account.
If you have a balance or credit in your PayPal account, PayPal requires you to use all of the balance before it allows you to select a different payment method.
4. Click **Continue** to return to the eCommerce Checkout page. The shipping information from PayPal appears in eCommerce, and a PayPal logo appears in the **Payment Information** section.
5. (Optional) Apply coupons or make changes. You can change any of the information on the Checkout page up until the time you click **Place Order**. Kibo automatically updates PayPal with any changes made through the Checkout page before the order is placed.
6. Click **Place Order**. Kibo adds any shipping, fees, and taxes to the total charged to your PayPal account, and removes any amount covered by discounts or gift cards.
### Pay with PayPal from the Checkout Page
A customer who chooses **Proceed To Checkout** from the Cart page can still check out with PayPal. Complete the following steps to test the user experience:
1. On the Checkout page, enter your **Shipping Information** and select your **Shipping Method**.
2. (Optional) Apply any coupons, gift cards, or store credits.
3. Under **Payment Information** click **Check out with PayPal**:
 Sample Checkout page as it appears to a customer.
4. In the browser window that appears, log in to your PayPal account. Because you are testing the buyer's experience, this should be a different account than your merchant account. Kibo automatically sends the shipping address you entered to PayPal, and the full order amount (including shipping, taxes, and discounts) is reflected in the order total.
5. Select your preferred payment method.
6. Click **Continue** to return to the eCommerce Checkout page.
7. Click **Place Order** to complete the order.
### Payment Authorization and Capture
Depending on the **Order Processing** method you chose when you configured the app, when a customer clicks **Place Order** on a eCommerce Checkout page, eCommerce either just authorizes the order or authorizes the order AND captures payment.
Regardless of when you capture payment, Kibo strongly recommends you always capture payment from eCommerce. If you capture payment from your PayPal merchant account, you must then handle any refunds or returns from PayPal, which can throw off your eCommerce order history.
The order appears in the **Orders** module in Admin. Note the following details from the **Payments** tab:
Sample Checkout page as it appears to a customer.
4. In the browser window that appears, log in to your PayPal account. Because you are testing the buyer's experience, this should be a different account than your merchant account. Kibo automatically sends the shipping address you entered to PayPal, and the full order amount (including shipping, taxes, and discounts) is reflected in the order total.
5. Select your preferred payment method.
6. Click **Continue** to return to the eCommerce Checkout page.
7. Click **Place Order** to complete the order.
### Payment Authorization and Capture
Depending on the **Order Processing** method you chose when you configured the app, when a customer clicks **Place Order** on a eCommerce Checkout page, eCommerce either just authorizes the order or authorizes the order AND captures payment.
Regardless of when you capture payment, Kibo strongly recommends you always capture payment from eCommerce. If you capture payment from your PayPal merchant account, you must then handle any refunds or returns from PayPal, which can throw off your eCommerce order history.
The order appears in the **Orders** module in Admin. Note the following details from the **Payments** tab:
 A sample PayPal Express order in Kibo eCommerce.
 The Transaction Details page for the payment authorization from the same order in PayPal.
| Caption | Description |
| ------- | --------------------------------------------------------------- |
| **1** | The Order Number in eCommerce matches the Invoice ID in PayPal. |
| **2** | The payment Method indicates a payment type of PayPal Express. |
| **3** | The Transaction History entry for the payment authorization: |
* **3a**—The Transaction ID for the authorization. Transaction IDs always match between Kibo and PayPal.
* **3b**—The Response Message for the authorization. This includes the PayPal CorrelationID for the transaction. If you need to contact PayPal Merchant Technical Support about a specific transaction, you can provide this ID to find the transaction.
|
\| **4** | The Transaction History entry for the payment authorization.
* **4a**—The Transaction ID for the payment capture.
* **4b**—The Response Message and PayPal CorrelationID for the payment capture transaction.
|
### Returns
If you return or credit a payment in eCommerce, the credit appears as a PayPal credit in the customer's PayPal account.
### Declines
The PayPal Express Application does not process declines. If you decline a payment in eCommerce, you must also manually decline the payment in PayPal.
The Transaction Details page for the payment authorization from the same order in PayPal.
| Caption | Description |
| ------- | --------------------------------------------------------------- |
| **1** | The Order Number in eCommerce matches the Invoice ID in PayPal. |
| **2** | The payment Method indicates a payment type of PayPal Express. |
| **3** | The Transaction History entry for the payment authorization: |
* **3a**—The Transaction ID for the authorization. Transaction IDs always match between Kibo and PayPal.
* **3b**—The Response Message for the authorization. This includes the PayPal CorrelationID for the transaction. If you need to contact PayPal Merchant Technical Support about a specific transaction, you can provide this ID to find the transaction.
|
\| **4** | The Transaction History entry for the payment authorization.
* **4a**—The Transaction ID for the payment capture.
* **4b**—The Response Message and PayPal CorrelationID for the payment capture transaction.
|
### Returns
If you return or credit a payment in eCommerce, the credit appears as a PayPal credit in the customer's PayPal account.
### Declines
The PayPal Express Application does not process declines. If you decline a payment in eCommerce, you must also manually decline the payment in PayPal.