> ## Documentation Index
> Fetch the complete documentation index at: https://docs.kibocommerce.com/llms.txt
> Use this file to discover all available pages before exploring further.
# Integrating Personalization With Search
This article guides you through setting up the Monetate Personalization and KCCP integration to use Search on your site. You must have your Monetate attributes and a developer sandbox set up to begin.
This guide is intended for clients new to Kibo. If you are an existing Kibo client, the process will be simplified so please consult with your Kibo representative about adding the Personalized Search service.
## Set Up Accounts
### Monetate
Monetate is the platform you will utilize for AI-driven personalization. This is where Personalized Experiences and Product Recommendation strategies are created and managed, which will then be layered on top of your Kibo Search API response. You will work with an assigned Monetate resource to develop experiences and strategies and assist with anything involving the Monetate platform.
When your Monetate account is being created, you will need to decide on what type of implementation you will go with: the [JavaScript tag implementation](https://docs.monetate.com/docs/introduction-to-the-monetate-javascript-api) or the [Engine API implementation](https://docs.monetate.com/docs/the-engine-api).
### Kibo
The Kibo Composable Commerce Platform (KCCP) combines omnichannel commerce, enterprise-grade order management and AI-driven personalization by Monetate into a single platform. This is where you will manage search configurations and relevancy settings. You will work with an assigned Kibo resource to assist with anything involving the Kibo KCCP Admin.
### Add Kibo Resources
Once your accounts have been created and you receive credentials to access your Kibo accounts, you will add the Kibo Search team members to your development and production sandboxes. Instructions on adding users will be emailed by the Kibo resource, but you can also refer to the [Dev Center](/pages/administration) and [Admin UI](/pages/users-and-user-groups) documentation. Kibo team members should be added as lead developers in the Dev Center, and as administrators or super administrators in the Admin UI.
The Kibo team will assist with the following:
* Creation of Development and Production Sandboxes
* Search Configuration settings
* Creating and installing the search application
* Account Mapping
* Search Relevancy Optimization
* API Testing
* Platform Training Support
## Monetate Setup
There are 2 tasks that are required to properly set up Monetate Personalization on your site. You will first need to whitelist your domain within the Monetate platform. For a Monetate Tag Implementation, you will also need to add the Monetate tags to your front-end. These allow Monetate to access your site, gather user data, and add/remove/change elements in the DOM. Consult with your Monetate resource for setup assistance.
### Create Recommendation Strategies
You will work with your Monetate resource to discover what [Recommendation Strategies](https://docs.monetate.com/docs/create-a-recommendation-strategy) are best for your business. Recommendation Strategies vary widely, from Most Viewed Products to Items Frequently Bought Together, and everything in between.
### Create Personalized Search Experiences
You can work with your Monetate resource to create a Personalized Search Experience that is right for your customers. An Experience can dictate how a customer experiences your site, if certain site elements are rendered or not and the order of products returned in the customer’s search query.
For the full set of instructions of how to create an experience, see the documentation [here](https://docs.monetate.com/docs/create-a-web-experience).
## Product Data Sets
You will need to create and upload a product dataset, as well a dataset schema that can be synced with the product attributes used in Kibo KCCP. Synchronizing attributes attaches your custom attributes to products in the KCCP search environment. This allows the attributes to be used for search weightings, boost/bury, filtering, and sorting.
### 1. Create Product Dataset with Monetate
You will work with your Monetate resource to create your product dataset. Accepted file types include CSV or TSV format. Datasets should be structured according to Monetate’s recommendations and should be detailed down to the variant level, meaning each line in the file contains either a product or product variation.
Datasets should also contain product attributes that you want to be searchable. For example, if you would like customers to be able to search for a shirt by color (red shirt, blue shirt) then it is recommended to include a color attribute column in the dataset. Product attributes are fully customizable during and after implementation.
Product attributes should be anything you want customers to be able to search by, but a few common ones are:
* Color
* Brand
* Size
* Gender
* Material
* Price/Price Range
* Category/Sub-Category
### 2. Create Product Catalog Dataset Schema
Before uploading your product dataset, you must create a Product Catalog Dataset Schema in Monetate which will define the structure of your data.
Accepted file types include CSV or TSV format. Datasets should be structured according to Monetate’s recommendations. Only a few lines of sample data are needed, a full product dataset is not required to complete this step. Full documentation can be found [here](https://docs.monetate.com/docs/create-a-product-catalog-dataset-schema).
Once the processing has completed, you are ready to upload your full product dataset utilizing the same schema. If you need to add product attributes/new columns after your initial upload, you can either send a full file update via the [Monetate Data API](https://docs.monetate.com/docs/update-a-product-catalog-via-the-data-api) or utilize the [Add Attribute](https://docs.monetate.com/docs/update-a-product-catalog-dataset#adding-attributes) modal accessible from the product catalog’s details page.
### 3. Upload Product Dataset to Monetate
You can work with your Monetate resource to upload your product dataset to the Monetate platform. There are 3 options for uploading your product dataset: [manually](https://docs.monetate.com/docs/update-a-product-catalog-dataset), [SFTP](https://docs.monetate.com/docs/update-a-product-catalog-dataset-via-sftp), or the [Monetate Data API](https://docs.monetate.com/docs/update-a-product-catalog-via-the-data-api).
Full documentation can be found [here](https://docs.monetate.com/docs/product-catalog-datasets).
### 4. Add Product Attributes in Kibo
You will need to add your product attributes into the Kibo KCCP Admin to make your attributes from your Monetate product dataset accessible for search. These should be the exact same product attributes you created in the Monetate product dataset, and must be the "Property" attribute type.
Follow the steps outlined in the [property attribute documentation](/pages/property-attributes) to create a new property. Ensure that “Available to Storefront Search”, “Search Label”, and “Available as Filter & Sort” are checked in the attribute configurations.
Kibo recommends using "Text Box" instead of "List" for the input type of your new attribute, because any new values inserted into the Monetate dataset will not sync to Kibo KCCP unless those values are added to the List attribute in KCCP first. This means that lists would require additional maintenance.
#### Note: Availability Product Attribute
The Availability product attribute is an out-of-the-box default product attribute. This attribute is used to determine product availability and whether it is returned in the API response. If it is set to “out of stock” in the Monetate product dataset, then the product will not be searchable. If it is set to “in stock” (or any other string value), then the product will be searchable.
### 5. Attach Product Attributes to Base Product Type
Once you have added your product attributes into the Kibo KCCP Admin, you will need to add those product attributes to the Base Product Type.
1. Go to **System** > **Schema** > **Product Types**.
2. Click the "Base" product type to edit its configurations.
3. Scroll down to the **Properties** section.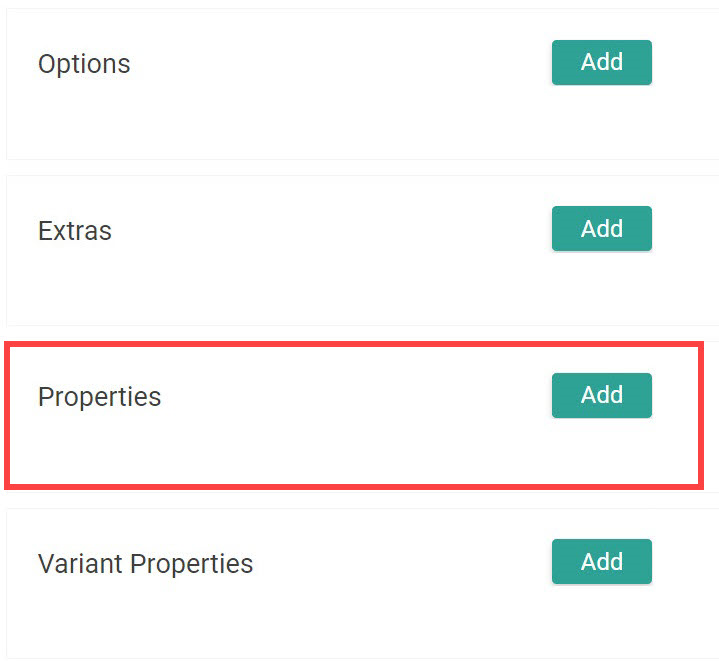 4. Click **Add** on the right.
5. Select the product attribute in the previous section.
6. Select **Storefront Details and Listings** for the Display Group.
7. Click **Done**.
8. Click **Save** in the top right.
### 6. Add Attributes to Search Schema
After your product attributes are all set up, you can add them to the KCCP search schema at **Main** > **Search** > **Schema** as shown in the [Add Custom Attributes](/pages/add-custom-attributes) guide. Not all attributes have to be added to the schema, only the ones you want use in search relevancy.
Be sure to select the attribute and the match type you want to use. For more information about match types, refer to [Field Type Analyzer Implementation Guide](/pages/field-type-analyzer-implementation-guide).
**Troubleshooting Tips:**
If you are ever looking for an attribute in the search configuration menu and it isn't displayed, then it may be missing in the schema. Adding the attribute to the Search schema should make it appear.
Whenever the schema is published, it will start to reindex all products. This can take between 10 minutes and a few hours depending on the size of your tenant.
### 7. Sync Product Dataset from Monetate to Kibo
Once you have created and uploaded your (ideally full) product dataset in Monetate, and updated the search configurations and product attributes in your Kibo sandboxes, inform your Kibo resource. Your Kibo resource will map the 2 accounts together and the Kibo KCCP Admin will continuously check the Monetate product dataset for any updates and automatically import the product data into the Kibo KCCP Admin. The default setting for checking for changes in the Monetate product dataset is 6 hours. Consult your Kibo resource if you would like to change this interval.
### 8. Edit Field Weights
While Kibo provides default field weights out-of-the-box, these are intended as a starting point and you should customize them to further configure your search.
Field weights should be based on how your product dataset is constructed in Monetate. For example, if the majority of your descriptive text is in the description field then you should add the exact match, lenient, lenient phrases and corresponding type ahead analyzers for the `productShortDescription` attribute. Add weight values between 0 and 20 for each analyzer.
Kibo recommends setting the phrase analyzers’ weight slightly higher than their non-phrase counterparts. Be sure to add all attributes, analyzers, and weight rankings you want considered in a search relevancy. The most common include color, brand, category, description, pricing, and so forth.
These are managed through your [Search Configurations](#search-configurations). Refer to the [Field Weights guide](/pages/field-weights) for more information.
## API Development
### Credentials and Authentication
Any user that calls into the Kibo Composable Commerce Platform API must authenticate with the API by including an OAuth 2.0 access token in the request header. To get an access token, you will need two values specific to your Kibo Developer Account, called the Application Key and the Shared Secret:
1. Go to **Develop** > **Applications**.
2. Click on the application you want to use.
3. Find the **APPLICATION KEY** in the header.
4. Find the **SHARED SECRET** in the header.
5. Click **Show** to make the secret visible.
You also need your tenant ID and site ID. These can be found in the sandbox:
* **Tenant ID**: The Base URL to your sandbox is `t#####.sandbox.mozu.com`. The number after the "t" is your tenant ID.
* **Site ID**: The site ID can be found at **System** > **Structure** > **Sites**.
With this information, you can obtain your authorization token using the [OAuth Authenticate App](/api-reference/appauthtickets/oauth-authenticate-app) API call. You can also refer to [Making API Calls](/pages/making-api-calls) and [Getting Started with Postman](/pages/getting-started-with-postman) for more information on API calls.
### Finding the Monetate ID for Personalization
The Monetate ID (`mid`) is the cookie-based identifier used for personalization, and can be found in the `mt.v` cookie file. This `mid` value must be sent in all Search API calls to apply personalization to search results.
An example Monetate ID:
```
&mid=2.480627356.1659540203878
```
### Search API Calls
Two primary API calls for the Search feature are the Suggest and Site Search APIs. These calls must be made from server to server. They return an error if called directly from your browser. For best performance, keep your request page sizes small.
#### Suggest2 API
Use the [Suggest2 API call](/api-reference/productsearch/gets-suggested-search-terms-2) for typeahead searches. This high-performance API was designed to return results based on each character a user types. Note that the Monetate ID must be entered in the `mid` query parameter defined in the documentation.
You can customize the call to return products, categories, or custom terms as the user types by entering comma-separated values as a string in the `groups` query parameter:
* When "products" is entered, the products matching the search query and suggested products similar to or stemming from the search query are returned.
* When “categories” is entered, suggested categories are returned based on the products and possible products associated with the search query.
* When "terms" is entered, custom terms allow you to pre-define search terms to return as suggestion results as users are actively typing and provide immediate feedback to help users find what they are looking for quicker. Refer to the documentation for the term-based suggester with instructions on how to upload a file [here](/pages/term-based-suggester).
The below example shows how these values are entered into the query:
```
.../commerce/catalog/storefront/productsearch/suggest2?query=jackets&groups=products,categories,terms
```
#### Site Search API
You can use the [Site Search](/api-reference/productsearch/site-search) API call to get products to display on the search results page. This API was designed to return products based on the user’s full search query when they click Submit (or Enter). This API can also return scores, or the relevancy score combined with the personalization score, for product search results. Use the `query` parameter to specify the search term and a comma-separated list of product attributes you want returned in the response in the `fieldList` parameter.
There is a similar API called the [Product Search API.](/api-reference/productsearch/search-products) Do not use the Product Search API in production environments—use Site Search instead. The Product Search should only be used for testing of relevancy scores and personalization scores in product search results.
An example Site Search call:
```
{{baseUrl}}/commerce/catalog/storefront/productsearch/siteSearch?query=searchTerm&fieldList=attribute1,attribute2,priceL,priceH,productName,productImageUrls,categoryCode&pageSize=30
```
You can also use this API to filter categories for personalized category pages. This allows you to display dynamic pages for each user by enabling personalized product listings on category or subcategory pages. You can use `categoryCode`, `categoryId`, or `productCategoryNames` as your filter criteria.
An example of this filtering method:
```
{{baseUrl}}/commerce/catalog/storefront/productsearch/siteSearch?query=?filter=categoryCode eq shoes
```
Some common values for the `fieldList` parameter include:
* `productName`: Product name.
* `priceL,priceH`: Price low and high.
* `attribute1,attribute2`: Product attributes by name.
* `productImageUrls`: Product image URLs.
* `categoryId`: IDs of categories the product is in.
* `productCategoryNames`: Names of categories the product is in.
* `categoryCode`: Codes of categories the product is in.
* `productShortDescription`: Short description.
* `productFullDescription`: Full description.
## Facets
Facets allow you to filter products based on categories and product attributes. You will create your desired facets in the Kibo KCCP Admin and then utilize different facet parameters in your API calls to return facets and filter products with those facets. Refer to the [Facets](/pages/facets) user guide for more information.
To set up facets for search results:
1. Go to **Main** > **Search** > **Facets**.
2. Click **Templates** and select **Search Results**.
3. In the top left, click the **Settings** tab.
4. Click **Add Facet**.
5. Select the category and/or from the list of product attributes.
6. Click **Save** and **Publish Now**.
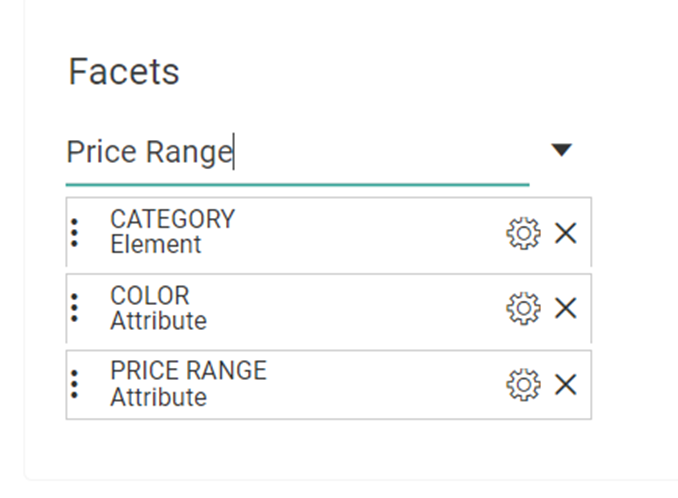
Note that you can sort the order of the facets by dragging them via the three dots on the left. You can also click the gear icon to further customize settings for each facet.
4. Click **Add** on the right.
5. Select the product attribute in the previous section.
6. Select **Storefront Details and Listings** for the Display Group.
7. Click **Done**.
8. Click **Save** in the top right.
### 6. Add Attributes to Search Schema
After your product attributes are all set up, you can add them to the KCCP search schema at **Main** > **Search** > **Schema** as shown in the [Add Custom Attributes](/pages/add-custom-attributes) guide. Not all attributes have to be added to the schema, only the ones you want use in search relevancy.
Be sure to select the attribute and the match type you want to use. For more information about match types, refer to [Field Type Analyzer Implementation Guide](/pages/field-type-analyzer-implementation-guide).
**Troubleshooting Tips:**
If you are ever looking for an attribute in the search configuration menu and it isn't displayed, then it may be missing in the schema. Adding the attribute to the Search schema should make it appear.
Whenever the schema is published, it will start to reindex all products. This can take between 10 minutes and a few hours depending on the size of your tenant.
### 7. Sync Product Dataset from Monetate to Kibo
Once you have created and uploaded your (ideally full) product dataset in Monetate, and updated the search configurations and product attributes in your Kibo sandboxes, inform your Kibo resource. Your Kibo resource will map the 2 accounts together and the Kibo KCCP Admin will continuously check the Monetate product dataset for any updates and automatically import the product data into the Kibo KCCP Admin. The default setting for checking for changes in the Monetate product dataset is 6 hours. Consult your Kibo resource if you would like to change this interval.
### 8. Edit Field Weights
While Kibo provides default field weights out-of-the-box, these are intended as a starting point and you should customize them to further configure your search.
Field weights should be based on how your product dataset is constructed in Monetate. For example, if the majority of your descriptive text is in the description field then you should add the exact match, lenient, lenient phrases and corresponding type ahead analyzers for the `productShortDescription` attribute. Add weight values between 0 and 20 for each analyzer.
Kibo recommends setting the phrase analyzers’ weight slightly higher than their non-phrase counterparts. Be sure to add all attributes, analyzers, and weight rankings you want considered in a search relevancy. The most common include color, brand, category, description, pricing, and so forth.
These are managed through your [Search Configurations](#search-configurations). Refer to the [Field Weights guide](/pages/field-weights) for more information.
## API Development
### Credentials and Authentication
Any user that calls into the Kibo Composable Commerce Platform API must authenticate with the API by including an OAuth 2.0 access token in the request header. To get an access token, you will need two values specific to your Kibo Developer Account, called the Application Key and the Shared Secret:
1. Go to **Develop** > **Applications**.
2. Click on the application you want to use.
3. Find the **APPLICATION KEY** in the header.
4. Find the **SHARED SECRET** in the header.
5. Click **Show** to make the secret visible.
You also need your tenant ID and site ID. These can be found in the sandbox:
* **Tenant ID**: The Base URL to your sandbox is `t#####.sandbox.mozu.com`. The number after the "t" is your tenant ID.
* **Site ID**: The site ID can be found at **System** > **Structure** > **Sites**.
With this information, you can obtain your authorization token using the [OAuth Authenticate App](/api-reference/appauthtickets/oauth-authenticate-app) API call. You can also refer to [Making API Calls](/pages/making-api-calls) and [Getting Started with Postman](/pages/getting-started-with-postman) for more information on API calls.
### Finding the Monetate ID for Personalization
The Monetate ID (`mid`) is the cookie-based identifier used for personalization, and can be found in the `mt.v` cookie file. This `mid` value must be sent in all Search API calls to apply personalization to search results.
An example Monetate ID:
```
&mid=2.480627356.1659540203878
```
### Search API Calls
Two primary API calls for the Search feature are the Suggest and Site Search APIs. These calls must be made from server to server. They return an error if called directly from your browser. For best performance, keep your request page sizes small.
#### Suggest2 API
Use the [Suggest2 API call](/api-reference/productsearch/gets-suggested-search-terms-2) for typeahead searches. This high-performance API was designed to return results based on each character a user types. Note that the Monetate ID must be entered in the `mid` query parameter defined in the documentation.
You can customize the call to return products, categories, or custom terms as the user types by entering comma-separated values as a string in the `groups` query parameter:
* When "products" is entered, the products matching the search query and suggested products similar to or stemming from the search query are returned.
* When “categories” is entered, suggested categories are returned based on the products and possible products associated with the search query.
* When "terms" is entered, custom terms allow you to pre-define search terms to return as suggestion results as users are actively typing and provide immediate feedback to help users find what they are looking for quicker. Refer to the documentation for the term-based suggester with instructions on how to upload a file [here](/pages/term-based-suggester).
The below example shows how these values are entered into the query:
```
.../commerce/catalog/storefront/productsearch/suggest2?query=jackets&groups=products,categories,terms
```
#### Site Search API
You can use the [Site Search](/api-reference/productsearch/site-search) API call to get products to display on the search results page. This API was designed to return products based on the user’s full search query when they click Submit (or Enter). This API can also return scores, or the relevancy score combined with the personalization score, for product search results. Use the `query` parameter to specify the search term and a comma-separated list of product attributes you want returned in the response in the `fieldList` parameter.
There is a similar API called the [Product Search API.](/api-reference/productsearch/search-products) Do not use the Product Search API in production environments—use Site Search instead. The Product Search should only be used for testing of relevancy scores and personalization scores in product search results.
An example Site Search call:
```
{{baseUrl}}/commerce/catalog/storefront/productsearch/siteSearch?query=searchTerm&fieldList=attribute1,attribute2,priceL,priceH,productName,productImageUrls,categoryCode&pageSize=30
```
You can also use this API to filter categories for personalized category pages. This allows you to display dynamic pages for each user by enabling personalized product listings on category or subcategory pages. You can use `categoryCode`, `categoryId`, or `productCategoryNames` as your filter criteria.
An example of this filtering method:
```
{{baseUrl}}/commerce/catalog/storefront/productsearch/siteSearch?query=?filter=categoryCode eq shoes
```
Some common values for the `fieldList` parameter include:
* `productName`: Product name.
* `priceL,priceH`: Price low and high.
* `attribute1,attribute2`: Product attributes by name.
* `productImageUrls`: Product image URLs.
* `categoryId`: IDs of categories the product is in.
* `productCategoryNames`: Names of categories the product is in.
* `categoryCode`: Codes of categories the product is in.
* `productShortDescription`: Short description.
* `productFullDescription`: Full description.
## Facets
Facets allow you to filter products based on categories and product attributes. You will create your desired facets in the Kibo KCCP Admin and then utilize different facet parameters in your API calls to return facets and filter products with those facets. Refer to the [Facets](/pages/facets) user guide for more information.
To set up facets for search results:
1. Go to **Main** > **Search** > **Facets**.
2. Click **Templates** and select **Search Results**.
3. In the top left, click the **Settings** tab.
4. Click **Add Facet**.
5. Select the category and/or from the list of product attributes.
6. Click **Save** and **Publish Now**.
Note that you can sort the order of the facets by dragging them via the three dots on the left. You can also click the gear icon to further customize settings for each facet.
 ### Facet API Examples
The following examples are ways you can use facets within API calls.
To see all facets in the search response, add the `facetTemplate` parameter with `categoryCode:_root` as shown below:
```
{{baseUrl}}/commerce/catalog/storefront/productsearch/siteSearch?query=searchTerm&facetTemplate=categoryCode:_root
```
To see only certain facets, use the `facet` parameter. You can pass multiple values separated by a comma. Pass custom product attributes prefixed with `tenant~` as shown here:
```
{{baseUrl}}/commerce/catalog/storefront/productsearch/siteSearch?query=searchTerm&facet=CategoryId,tenant~attribute1,tenant~attribute2
```
Alternatively, you can use the `omitNamespace` flag to pass only the attribute name without the `tenant~` prefix:
```
{{baseUrl}}/commerce/catalog/storefront/productsearch/siteSearch?query=searchTerm&omitNamespace=true&facet=CategoryId,attribute1,attribute2
```
The `facetValueFilter` parameter filters product results based on the facet value(s) you specify:
```
{{baseUrl}}/commerce/catalog/storefront/productsearch/siteSearch?query=earbuds&omitNamespace=true&facet=brand&facetValueFilter=brand:sony
```
## Sorting and Filtering
Filters can be used in search queries to create a collection of results, and these collections can then be sorted before being returned in a response:
* Use the `filter` parameter to filter the API response based on specified product attributes.
* Use the `sortBy` parameter to sort the API response in ascending or descending order based on specified product attributes.
Refer to [Sorting and Filtering APIs](/pages/sorting-and-filtering-apis) for more information.
## KCCP Admin Search Configurations
The Kibo KCCP Admin manages “what” is returned for a user’s search query, and is where you will manage your search configurations. These settings will determine search relevancy and which products are returned in the API responses.
### Search Schema
The [Search Schema](/pages/search-schema-overview) determines which product attributes are enabled to be made searchable and which field analyzers apply to those product attributes. Configure these analyzer and attribute pairings to control how search results are ranked and displayed.
For more information about the below analyzers and how to apply them with product attributes, see the [Field Type Analyzers guide](/pages/field-type-analyzers).
| Analyzer | Description |
| ----------------------------- | -------------------------------------------- |
| exact\_match | The search term must be an exact match |
| exact\_match\_type\_ahead | Exact matches only for typeahead |
| lenient | Allows synonyms and stemming |
| lenient\_type\_ahead | Lenient for typeahead |
| lenient\_phrases | Lenient with phrase boosting |
| lenient\_phrases\_type\_ahead | Lenient with phrase boosting for typeahead |
| return\_only | Used for having non-standard fields returned |
| code\_exact | Used for product codes |
| code\_lenient | Split on dashes and dots |
| code\_lenient\_type\_ahead | Code lenient for typeahead |
### Search Configurations
The Search Configurations page is where you will manage your search configurations involving relevancy. These settings determine what products are returned in the API response and sorted according to relevancy score and custom settings. Search Configuration settings should only be set up after the Schema settings have been completed.
Refer to the [Search Configurations documentation](/pages/create-or-edit-a-search-configuration) for more details on how to create a new configuration. The sections below provide an overview of some important concepts and features for your implementation.
#### Multiple Search Configurations
You can use multiple search configurations with different settings for aspects like weighting and boost/bury. You can also use separate configurations to utilize different personalization IDs to create multiple personalization experiences. Repeat the setup steps to create a new configuration.
When using multiple configurations, specify the name of the configuration to use with the `searchSettings` parameter in your Site Search API calls. In the Suggest2 API, this parameter is called `searchSettingsName` instead.
```
{{baseUrl}}/commerce/catalog/storefront/productsearch/siteSearch?query=hats&searchSettings=nameOfSearchConfig
```
To get the names of your configurations, you can use [Get Search Settings](/api-reference/searchsettings/get-search-settings).
### Merchandizing Rules
Merchandizing Rules provide the ability to create and manage boost and bury conditions, sort definitions and control how products are displayed in specific search scenarios. Products may also be “pinned” or locked into place in the API response for that search term. “Pinning” products in Merchandizing Rules has a higher priority than personalization score. Rules can be applied to Site Search or entire Categories.
Follow the steps in the [Merchandizing Rules documentation](/pages/merchandizing-rules) to create a new rule.
### Search Synonyms
Search synonyms are synonyms to user search queries which expand the search results. A **One Way** synonym will replace the search results for a single specific term, while a **Two Way** synonym contains no term but will expand the search results for all listed synonyms. In general, Kibo recommends using Two Way synonyms except for cases where the term is not meant to be searched for, such as a common misspelling.
See the [Search Synonyms documentation](/pages/search-synonyms) for examples of these synonym types as well as instructions for how to create a synonym.
### Term Redirects
This function allows you to redirect a user to a specific URL based on a specific search term. The redirect URL will appear as a string in the Site Search API response, as shown in the example below. You may use this string to immediately redirect the user to the page or you can use the string as a page option for users to click on if desired.
```
{
"facets": [],
"searchRedirect": "www.example.com/new-sale",
"startIndex": 0,
"pageSize": 200,
"pageCount": 1,
"totalCount": 32,
"items": [
...
]
}
```
Note that Search Redirects apply to Site Search only.
### Relevancy Fine Tuning and Testing
You can fine tune the Search Configurations to produce the search results you want, as the default settings may not be ideal for your implementation. There are two approaches when it comes to search relevancy:
* You may prefer to have multiple similar/closely-matched products returned in the Search API responses.
* You may prefer to have fewer search results, but with a higher level of relevancy.
Ideally, you should create a set of default settings that utilize the proper field analyzers and attribute weights for your catalog that also include your business search strategies and preferences. Then, you can address unsatisfactory edge cases with synonyms, redirects, and merchandizing rules.
Consult with your Kibo resources if you need assistance with search relevancy fine tuning.
#### Testing Results with Postman
Kibo utilizes Postman to quickly test the Search API responses. You can find the Postman collection list of Kibo APIs here, scroll down for the latest Postman collection link.
### Facet API Examples
The following examples are ways you can use facets within API calls.
To see all facets in the search response, add the `facetTemplate` parameter with `categoryCode:_root` as shown below:
```
{{baseUrl}}/commerce/catalog/storefront/productsearch/siteSearch?query=searchTerm&facetTemplate=categoryCode:_root
```
To see only certain facets, use the `facet` parameter. You can pass multiple values separated by a comma. Pass custom product attributes prefixed with `tenant~` as shown here:
```
{{baseUrl}}/commerce/catalog/storefront/productsearch/siteSearch?query=searchTerm&facet=CategoryId,tenant~attribute1,tenant~attribute2
```
Alternatively, you can use the `omitNamespace` flag to pass only the attribute name without the `tenant~` prefix:
```
{{baseUrl}}/commerce/catalog/storefront/productsearch/siteSearch?query=searchTerm&omitNamespace=true&facet=CategoryId,attribute1,attribute2
```
The `facetValueFilter` parameter filters product results based on the facet value(s) you specify:
```
{{baseUrl}}/commerce/catalog/storefront/productsearch/siteSearch?query=earbuds&omitNamespace=true&facet=brand&facetValueFilter=brand:sony
```
## Sorting and Filtering
Filters can be used in search queries to create a collection of results, and these collections can then be sorted before being returned in a response:
* Use the `filter` parameter to filter the API response based on specified product attributes.
* Use the `sortBy` parameter to sort the API response in ascending or descending order based on specified product attributes.
Refer to [Sorting and Filtering APIs](/pages/sorting-and-filtering-apis) for more information.
## KCCP Admin Search Configurations
The Kibo KCCP Admin manages “what” is returned for a user’s search query, and is where you will manage your search configurations. These settings will determine search relevancy and which products are returned in the API responses.
### Search Schema
The [Search Schema](/pages/search-schema-overview) determines which product attributes are enabled to be made searchable and which field analyzers apply to those product attributes. Configure these analyzer and attribute pairings to control how search results are ranked and displayed.
For more information about the below analyzers and how to apply them with product attributes, see the [Field Type Analyzers guide](/pages/field-type-analyzers).
| Analyzer | Description |
| ----------------------------- | -------------------------------------------- |
| exact\_match | The search term must be an exact match |
| exact\_match\_type\_ahead | Exact matches only for typeahead |
| lenient | Allows synonyms and stemming |
| lenient\_type\_ahead | Lenient for typeahead |
| lenient\_phrases | Lenient with phrase boosting |
| lenient\_phrases\_type\_ahead | Lenient with phrase boosting for typeahead |
| return\_only | Used for having non-standard fields returned |
| code\_exact | Used for product codes |
| code\_lenient | Split on dashes and dots |
| code\_lenient\_type\_ahead | Code lenient for typeahead |
### Search Configurations
The Search Configurations page is where you will manage your search configurations involving relevancy. These settings determine what products are returned in the API response and sorted according to relevancy score and custom settings. Search Configuration settings should only be set up after the Schema settings have been completed.
Refer to the [Search Configurations documentation](/pages/create-or-edit-a-search-configuration) for more details on how to create a new configuration. The sections below provide an overview of some important concepts and features for your implementation.
#### Multiple Search Configurations
You can use multiple search configurations with different settings for aspects like weighting and boost/bury. You can also use separate configurations to utilize different personalization IDs to create multiple personalization experiences. Repeat the setup steps to create a new configuration.
When using multiple configurations, specify the name of the configuration to use with the `searchSettings` parameter in your Site Search API calls. In the Suggest2 API, this parameter is called `searchSettingsName` instead.
```
{{baseUrl}}/commerce/catalog/storefront/productsearch/siteSearch?query=hats&searchSettings=nameOfSearchConfig
```
To get the names of your configurations, you can use [Get Search Settings](/api-reference/searchsettings/get-search-settings).
### Merchandizing Rules
Merchandizing Rules provide the ability to create and manage boost and bury conditions, sort definitions and control how products are displayed in specific search scenarios. Products may also be “pinned” or locked into place in the API response for that search term. “Pinning” products in Merchandizing Rules has a higher priority than personalization score. Rules can be applied to Site Search or entire Categories.
Follow the steps in the [Merchandizing Rules documentation](/pages/merchandizing-rules) to create a new rule.
### Search Synonyms
Search synonyms are synonyms to user search queries which expand the search results. A **One Way** synonym will replace the search results for a single specific term, while a **Two Way** synonym contains no term but will expand the search results for all listed synonyms. In general, Kibo recommends using Two Way synonyms except for cases where the term is not meant to be searched for, such as a common misspelling.
See the [Search Synonyms documentation](/pages/search-synonyms) for examples of these synonym types as well as instructions for how to create a synonym.
### Term Redirects
This function allows you to redirect a user to a specific URL based on a specific search term. The redirect URL will appear as a string in the Site Search API response, as shown in the example below. You may use this string to immediately redirect the user to the page or you can use the string as a page option for users to click on if desired.
```
{
"facets": [],
"searchRedirect": "www.example.com/new-sale",
"startIndex": 0,
"pageSize": 200,
"pageCount": 1,
"totalCount": 32,
"items": [
...
]
}
```
Note that Search Redirects apply to Site Search only.
### Relevancy Fine Tuning and Testing
You can fine tune the Search Configurations to produce the search results you want, as the default settings may not be ideal for your implementation. There are two approaches when it comes to search relevancy:
* You may prefer to have multiple similar/closely-matched products returned in the Search API responses.
* You may prefer to have fewer search results, but with a higher level of relevancy.
Ideally, you should create a set of default settings that utilize the proper field analyzers and attribute weights for your catalog that also include your business search strategies and preferences. Then, you can address unsatisfactory edge cases with synonyms, redirects, and merchandizing rules.
Consult with your Kibo resources if you need assistance with search relevancy fine tuning.
#### Testing Results with Postman
Kibo utilizes Postman to quickly test the Search API responses. You can find the Postman collection list of Kibo APIs here, scroll down for the latest Postman collection link.
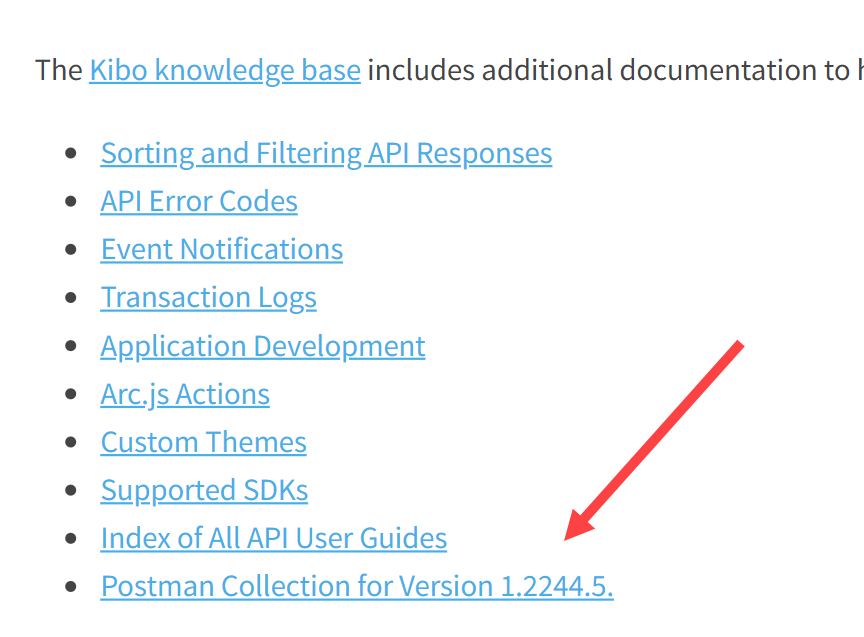 Save the .json to your computer, then open Postman and **Import** the file. For more information about using Postman, see the guide [here](/pages/getting-started-with-postman).
#### Tuning Results with Splainer
Splainer is a tool integrated into the Kibo search configuration settings to help you understand how your search results are being scored. You can access this from the **Main** > **Search** > **Configuration** page. Refer to [Third-Party Search Tools](/pages/search-configurations-overview) for information on using Splainer.
When using Splainer to test changes, the best practice is to clone your default configuration so that you are not testing on production. To clone your configuration, use [Get Search Settings by Name](/api-reference/searchsettings/get-search-settings) to get the name of your configuration, then use [Add Search Settings](/api-reference/searchsettings/add-search-settings) to create it with a new name. Set `isDefault` to false with this call.
## Personalized Search
Personalized Search refers to when you submit your Monetate ID with each Kibo search API call and receiving a personalization score for the returned products, which adds an additional sorting layer on top of the Kibo API response, based on the selected Monetate Recommendation Strategies.
It is recommended to only add Monetate Personalization after relevancy tuning with Kibo Search Configurations has been completed.
### Using Personalized Search
Once search relevancy tuning in Kibo is finished, there are two tasks that need to be completed: inserting the Monetate Personalization Experience ID into Kibo (as shown [here](/pages/personalized-search)) and passing the Monetate ID `mid` query parameter with each Kibo search API call.
In a JavaScript tab implementation with Monetate, typically the `mt.v` cookie will contain the `mid` number that you can use. In an Engine API implementation, the `mid` number can be set wherever you'd like. In order to trigger Monetate Personalization, pass this value in the `mid` parameter with every Suggest2 and Site Search API call such as in:
```
{{baseUrl}}/commerce/catalog/storefront/productsearch/suggest2?query=jeans&pageSize=200&groups=products,categories,terms&mid=2.1954287910.1669831088740
```
### Viewing Personalization Scores
You can utilize the [Product Search API](/api-reference/productsearch/search-products) to view individual Kibo relevancy scores and the Monetate personalization scores for products returned in search queries. As with Suggest2 and Site Search, be sure to provide a search term in the `query` parameter and your Monetate ID number in the `mid` parameter.
Do not use the Product Search API in production environments. This API should only be used for testing of relevancy scores and personalization scores in product search results.
This example shows part of a response with a Kibo relevancy score and Monetate Personalization score:
```
"productImageGroups": [],
"productCollections": [],
"score": 330.34677,
"personalizationScore": 1.6408163265306124
```
## Provide Estimated Volume
As you begin to complete your implementation, you will need to provide Kibo with an estimation of your expected volume and activity. Inform Kibo of your average searches per day, as well as any overall traffic numbers like users/sessions per day.
This information should be provided to Kibo 3 weeks before your go-live date and will ensure there is sufficient Kibo back-end capacity to achieve your goals.
## Post Implementation
Once you have successfully launched the Search services, you will be able to utilize your assigned Kibo resources for an additional 30 days to assist with training, troubleshooting, enhancements, personalization, fine tuning, and so forth. During that time, you will also be assigned a Monetate CSM who will work with you to address any customer service issues moving forward.
For any assistance past the 30-day window after implementation, please open either a [Monetate](https://monetateknowledge.zendesk.com/) or [Kibo Support](https://help.kibocommerce.com/) ticket.
Save the .json to your computer, then open Postman and **Import** the file. For more information about using Postman, see the guide [here](/pages/getting-started-with-postman).
#### Tuning Results with Splainer
Splainer is a tool integrated into the Kibo search configuration settings to help you understand how your search results are being scored. You can access this from the **Main** > **Search** > **Configuration** page. Refer to [Third-Party Search Tools](/pages/search-configurations-overview) for information on using Splainer.
When using Splainer to test changes, the best practice is to clone your default configuration so that you are not testing on production. To clone your configuration, use [Get Search Settings by Name](/api-reference/searchsettings/get-search-settings) to get the name of your configuration, then use [Add Search Settings](/api-reference/searchsettings/add-search-settings) to create it with a new name. Set `isDefault` to false with this call.
## Personalized Search
Personalized Search refers to when you submit your Monetate ID with each Kibo search API call and receiving a personalization score for the returned products, which adds an additional sorting layer on top of the Kibo API response, based on the selected Monetate Recommendation Strategies.
It is recommended to only add Monetate Personalization after relevancy tuning with Kibo Search Configurations has been completed.
### Using Personalized Search
Once search relevancy tuning in Kibo is finished, there are two tasks that need to be completed: inserting the Monetate Personalization Experience ID into Kibo (as shown [here](/pages/personalized-search)) and passing the Monetate ID `mid` query parameter with each Kibo search API call.
In a JavaScript tab implementation with Monetate, typically the `mt.v` cookie will contain the `mid` number that you can use. In an Engine API implementation, the `mid` number can be set wherever you'd like. In order to trigger Monetate Personalization, pass this value in the `mid` parameter with every Suggest2 and Site Search API call such as in:
```
{{baseUrl}}/commerce/catalog/storefront/productsearch/suggest2?query=jeans&pageSize=200&groups=products,categories,terms&mid=2.1954287910.1669831088740
```
### Viewing Personalization Scores
You can utilize the [Product Search API](/api-reference/productsearch/search-products) to view individual Kibo relevancy scores and the Monetate personalization scores for products returned in search queries. As with Suggest2 and Site Search, be sure to provide a search term in the `query` parameter and your Monetate ID number in the `mid` parameter.
Do not use the Product Search API in production environments. This API should only be used for testing of relevancy scores and personalization scores in product search results.
This example shows part of a response with a Kibo relevancy score and Monetate Personalization score:
```
"productImageGroups": [],
"productCollections": [],
"score": 330.34677,
"personalizationScore": 1.6408163265306124
```
## Provide Estimated Volume
As you begin to complete your implementation, you will need to provide Kibo with an estimation of your expected volume and activity. Inform Kibo of your average searches per day, as well as any overall traffic numbers like users/sessions per day.
This information should be provided to Kibo 3 weeks before your go-live date and will ensure there is sufficient Kibo back-end capacity to achieve your goals.
## Post Implementation
Once you have successfully launched the Search services, you will be able to utilize your assigned Kibo resources for an additional 30 days to assist with training, troubleshooting, enhancements, personalization, fine tuning, and so forth. During that time, you will also be assigned a Monetate CSM who will work with you to address any customer service issues moving forward.
For any assistance past the 30-day window after implementation, please open either a [Monetate](https://monetateknowledge.zendesk.com/) or [Kibo Support](https://help.kibocommerce.com/) ticket.