> ## Documentation Index
> Fetch the complete documentation index at: https://docs.kibocommerce.com/llms.txt
> Use this file to discover all available pages before exploring further.
# Download Reports
You can download full reports directly from the dashboard, download individual tiles, schedule a recurring report for automatic send, and export custom reports to S3 on a one-time or recurring basis.
## Download a Report
To download a report from the dashboard:
1. Expand the options menu in the top right and click **Download**. 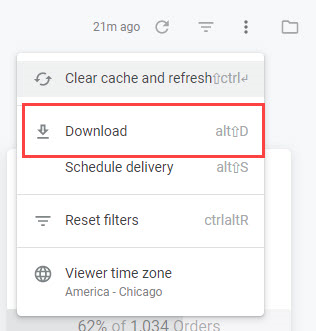 2. You will be prompted to select PDF or CSV.
* Downloading as a PDF offers more options such as single column format, expanding tables, and paper size.
* Downloading as a CSV includes no additional options.
2. You will be prompted to select PDF or CSV.
* Downloading as a PDF offers more options such as single column format, expanding tables, and paper size.
* Downloading as a CSV includes no additional options.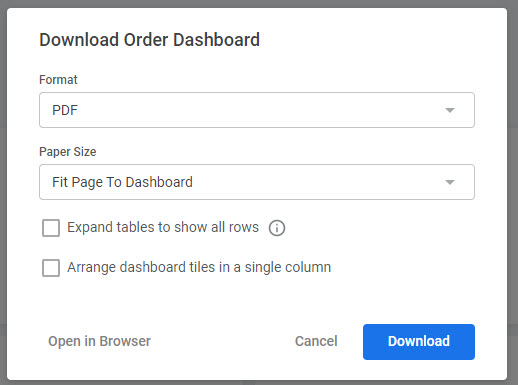 3. When you have finished selecting your options, click **Open in Browser** to view in the browser or **Download** to download the file.
## Download a Tile
Alternatively, individual tiles from a dashboard can be downloaded:
1. Expand the three dots in the top right corner of a tile that appear on hover, and click **Download data**.
3. When you have finished selecting your options, click **Open in Browser** to view in the browser or **Download** to download the file.
## Download a Tile
Alternatively, individual tiles from a dashboard can be downloaded:
1. Expand the three dots in the top right corner of a tile that appear on hover, and click **Download data**.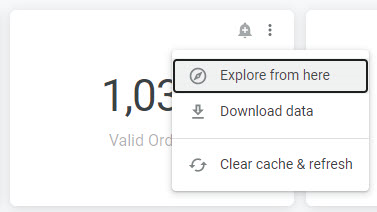 2. Select your desired format (TXT, Excel, CSV, JSON, HTML, Markdown, or PNG).
3. You can expand the **Advanced data options** to further specify how you want visualization included, how to format the data, and the rows to include.
2. Select your desired format (TXT, Excel, CSV, JSON, HTML, Markdown, or PNG).
3. You can expand the **Advanced data options** to further specify how you want visualization included, how to format the data, and the rows to include.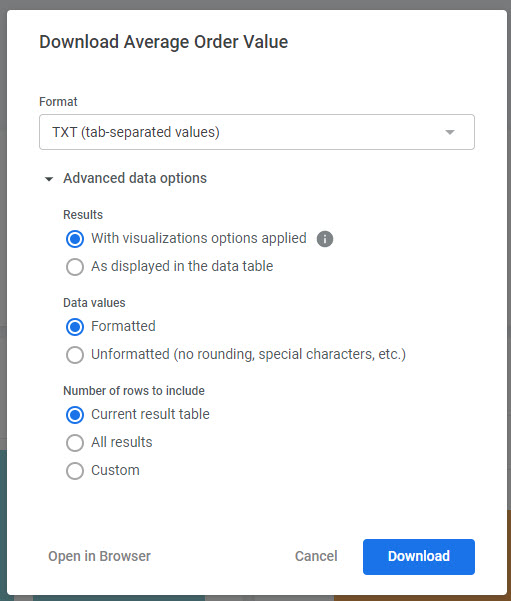 ## Scheduling a Report
Instead of immediately receiving the email send, a report can instead be scheduled for delivery at a future date and time. This report will be sent as an attachment to the email.
1. Expand the options menu in the top right and click **Schedule delivery**.
## Scheduling a Report
Instead of immediately receiving the email send, a report can instead be scheduled for delivery at a future date and time. This report will be sent as an attachment to the email.
1. Expand the options menu in the top right and click **Schedule delivery**.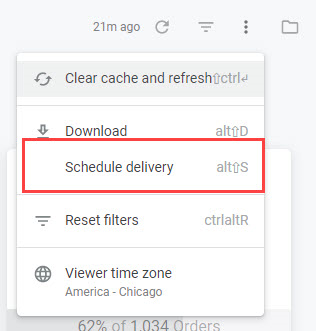 2. A modal appears with scheduling options.
3. In the **Settings** tab, set the recurrence, time, file format (PNG, CSV zip file, or PNG visualization), destination (email, webhook, Amazon S3, SFTP, or Google Drive) and the details of the selected destination.
2. A modal appears with scheduling options.
3. In the **Settings** tab, set the recurrence, time, file format (PNG, CSV zip file, or PNG visualization), destination (email, webhook, Amazon S3, SFTP, or Google Drive) and the details of the selected destination.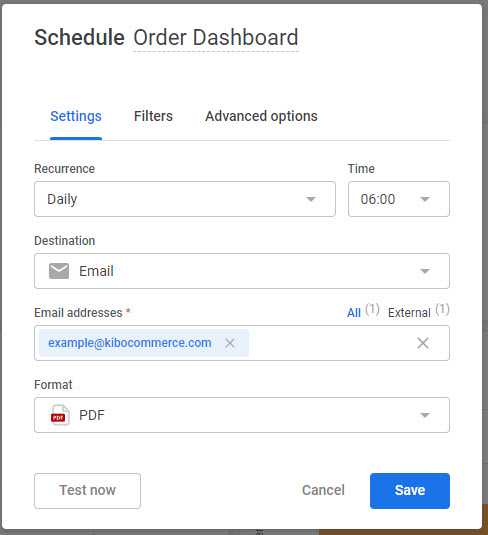 4. In the **Filters** tab, you can change the configuration of filter logic that will be used to generate the scheduled report.
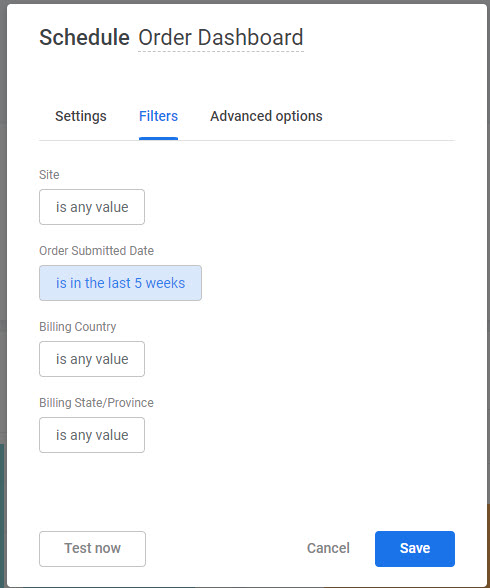 5. In the **Advanced options** tab, you can set additional options depending on the file and delivery format you selected. For example, if emailing the report then you can add a custom message to be included in the body of the email. You can also select the delivery time zone, paper size, and how to format the data.
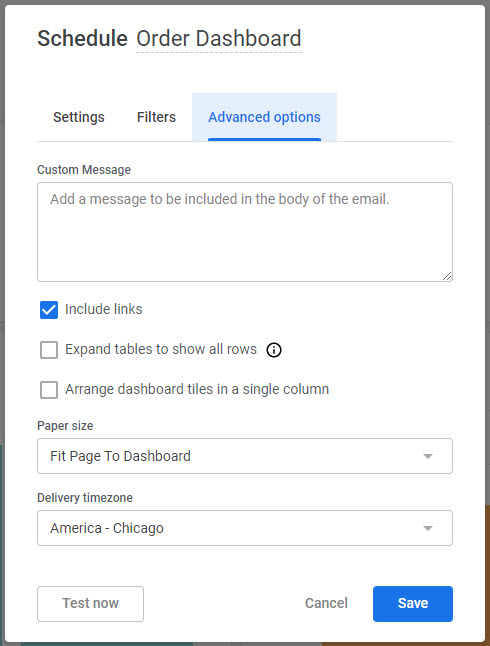 6. Click **Test now** to immediately send a test delivery to review the format and other configurations before confirming the scheduling.
7. Click **Save** to confirm the schedule.
Click **Schedule** to view the options for this future report delivery. The same options for file format and filters are supported as in the immediate email send. A test email can be sent to review the format and other configurations before confirming the scheduling.
## Exporting to S3
If you export report data to an S3 drop point, rather than downloading the reports directly or scheduling an email, then the end result will be a set of JSON files copied to an Amazon S3 bucket. This can be performed on custom reports as either a one-time export or a recurring export that is generated on a given schedule.
### Prerequisites
In order to perform either type of export, the following items must already be set up:
* You have created an AWS S3 bucket
* You have configured an AWS IAM user with write permissions to the S3 bucket.
The following data will have to be provided during the export process:
* S3 bucket name
* AWS region where S3 bucket lives
* Access key and secret key for the IAM user
### Creating a One-Time Export
From the Reporting UI, navigate to **Shared** > **Custom Reports** in the folder directory and click a custom report. When viewing a custom report, it is possible that the format of the report header and menu buttons may change to an older version. In this case, you can still navigate the folder directory from the top right.
6. Click **Test now** to immediately send a test delivery to review the format and other configurations before confirming the scheduling.
7. Click **Save** to confirm the schedule.
Click **Schedule** to view the options for this future report delivery. The same options for file format and filters are supported as in the immediate email send. A test email can be sent to review the format and other configurations before confirming the scheduling.
## Exporting to S3
If you export report data to an S3 drop point, rather than downloading the reports directly or scheduling an email, then the end result will be a set of JSON files copied to an Amazon S3 bucket. This can be performed on custom reports as either a one-time export or a recurring export that is generated on a given schedule.
### Prerequisites
In order to perform either type of export, the following items must already be set up:
* You have created an AWS S3 bucket
* You have configured an AWS IAM user with write permissions to the S3 bucket.
The following data will have to be provided during the export process:
* S3 bucket name
* AWS region where S3 bucket lives
* Access key and secret key for the IAM user
### Creating a One-Time Export
From the Reporting UI, navigate to **Shared** > **Custom Reports** in the folder directory and click a custom report. When viewing a custom report, it is possible that the format of the report header and menu buttons may change to an older version. In this case, you can still navigate the folder directory from the top right.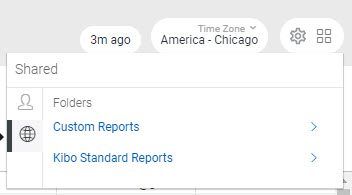 To begin the export process:
1. Click the gear icon in the top right (where you also have options for direct download and schedule) and click **Send**.
To begin the export process:
1. Click the gear icon in the top right (where you also have options for direct download and schedule) and click **Send**. 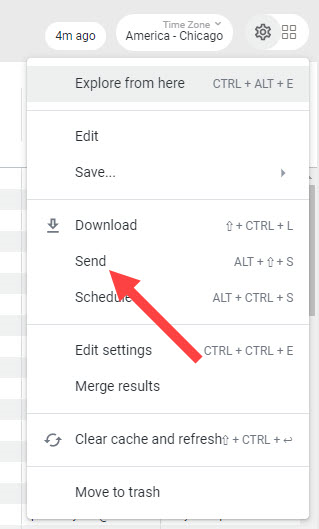 2. A modal will appear with options to fill out with the various fields, including advanced options. The standard options are listed below.
* **Title:** This will be combined with a timestamp to form the file name sent to S3.
* **Destination:** S3.
* **Bucket Name:** The bucket name in AWS.
* **Optional Path:** If you would like the files to be placed in a folder within the bucket, enter it here.
* **Access Key**: The AWS access key for the IAM user
* **Secret Key**: The AWS secret key for the IAM user
* **Region**: The AWS region where the bucket exists
* **Data Format**: JSON – Simple
* **Filters**: Select the date range that you wish to export.
2. A modal will appear with options to fill out with the various fields, including advanced options. The standard options are listed below.
* **Title:** This will be combined with a timestamp to form the file name sent to S3.
* **Destination:** S3.
* **Bucket Name:** The bucket name in AWS.
* **Optional Path:** If you would like the files to be placed in a folder within the bucket, enter it here.
* **Access Key**: The AWS access key for the IAM user
* **Secret Key**: The AWS secret key for the IAM user
* **Region**: The AWS region where the bucket exists
* **Data Format**: JSON – Simple
* **Filters**: Select the date range that you wish to export.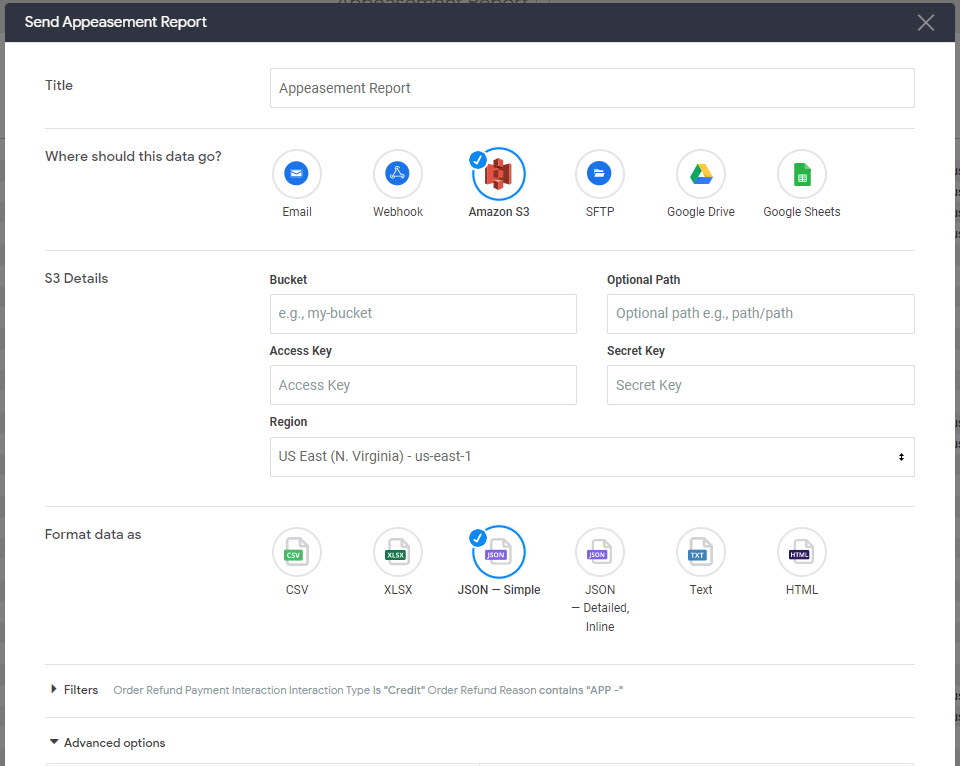 3. In the **Filters** section, configure the filter logic that you want the report to be generated with.
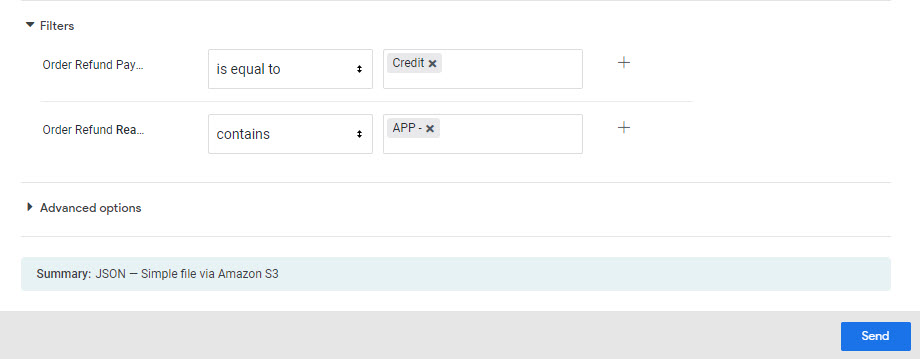 4. In **Advanced options**, you can set the following additional configurations.
* **Limit:** All Results
* **Format Options:** Check all if you want data to be formatted, such as currency symbols; uncheck all if you want raw data.
4. In **Advanced options**, you can set the following additional configurations.
* **Limit:** All Results
* **Format Options:** Check all if you want data to be formatted, such as currency symbols; uncheck all if you want raw data.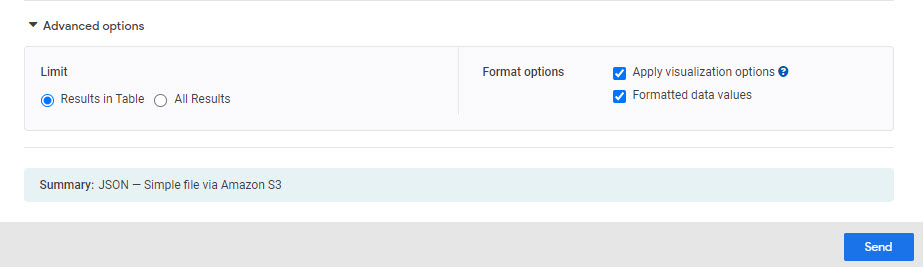 5. When the form is complete, click **Send** to trigger the export. The report will be viewable in the S3 drop point when the export is finished.
### Scheduling a Recurring Export
From the Reporting UI, navigate to **Shared** > **Custom Reports** in the folder directory and click a custom report. When viewing a custom report, it is possible that the format of the report header and menu buttons may change to an older version. In this case, you can still navigate the folder directory from the top right.
To begin the export process:
1. Click the gear icon in the top right and click **Schedule.
5. When the form is complete, click **Send** to trigger the export. The report will be viewable in the S3 drop point when the export is finished.
### Scheduling a Recurring Export
From the Reporting UI, navigate to **Shared** > **Custom Reports** in the folder directory and click a custom report. When viewing a custom report, it is possible that the format of the report header and menu buttons may change to an older version. In this case, you can still navigate the folder directory from the top right.
To begin the export process:
1. Click the gear icon in the top right and click **Schedule.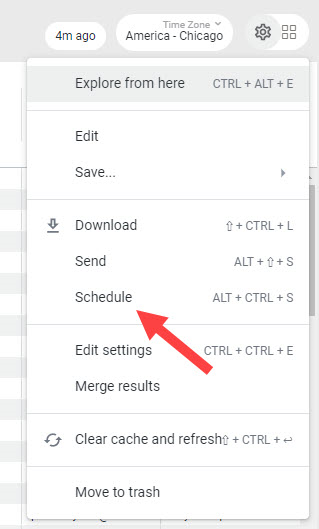 **
2. The configuration form is similar to the one used for a one-time S3 export, but includes additional options for the report recurrence. The standard options are listed below.
* **Name**: This will be combined with a timestamp to form the file name sent to S3.
* **Destination**: S3.
* **Bucket Name**: The bucket name in AWS.
* **Optional Path**: If you would like the files to be placed in a folder within the bucket, enter it here.
* **Access Key**: The AWS access key for the IAM user.
* **Secret Key**: The AWS secret key for the IAM user.
* **Region**: The AWS region where the bucket exists.
* **Data Format**: JSON – Simple.
3. Select whether you want to **Trigger** the report on a repeating interval or when a particular datagroup updates.
* If you select **Repeating** **interval**, set the interval and time.
* If you select **Datagroup update**, select the particular datagroup.
**
2. The configuration form is similar to the one used for a one-time S3 export, but includes additional options for the report recurrence. The standard options are listed below.
* **Name**: This will be combined with a timestamp to form the file name sent to S3.
* **Destination**: S3.
* **Bucket Name**: The bucket name in AWS.
* **Optional Path**: If you would like the files to be placed in a folder within the bucket, enter it here.
* **Access Key**: The AWS access key for the IAM user.
* **Secret Key**: The AWS secret key for the IAM user.
* **Region**: The AWS region where the bucket exists.
* **Data Format**: JSON – Simple.
3. Select whether you want to **Trigger** the report on a repeating interval or when a particular datagroup updates.
* If you select **Repeating** **interval**, set the interval and time.
* If you select **Datagroup update**, select the particular datagroup.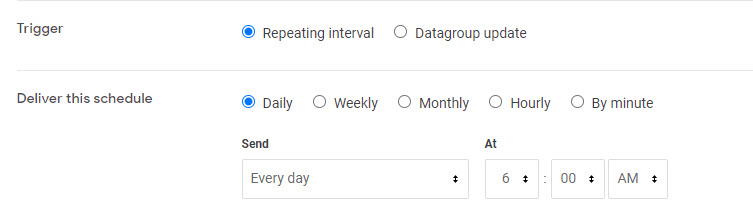 4. It is recommend to leave the **Filters** section as the default.
5. In the **Advanced options** section, select any criteria for sending the scheduled report, the email and format options, time zone, and result limits.
4. It is recommend to leave the **Filters** section as the default.
5. In the **Advanced options** section, select any criteria for sending the scheduled report, the email and format options, time zone, and result limits.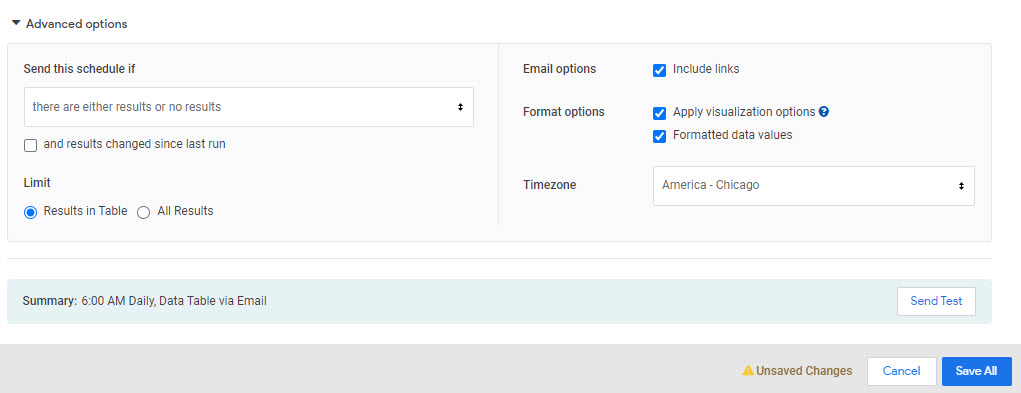 Reporting data is updated on an hourly basis, so a more frequent interval will not result in more recent data. Note that this also means that some records will be repeated in subsequent export files.