> ## Documentation Index
> Fetch the complete documentation index at: https://docs.kibocommerce.com/llms.txt
> Use this file to discover all available pages before exploring further.
# Customizing the BPM
You can create a custom BPM by forking the Kibo-Fulfillment-Workflows repository of your codebase and creating a new BPM process. This BPM is then uploaded with assistance from Kibo Professional Services, enabled through API, and executed via the Kibo Fulfiller UI. This allows you to fine-tune your fulfillment methods, such as by:
* Adding custom steps with buttons like proceed, back, and skip.
* Displaying a static message on a custom step.
* Changing the name or look and feel of custom steps.
This documentation uses the jBPM Business Central application for authoring and testing BPM workflows locally. Alternatively, you can use an Integrated Development Environment (IDE) such as Eclipse which is documented at [jbpm.org](https://www.jbpm.org/). Click **Read Documentation** on the jBPM home page and search the referenced document for **Eclipse Developer Tools** to get more details.
Additionally, since custom BPMs are implemented on a separate fork of Kibo’s fulfillment workflows, that means that any future enhancements Kibo may add to the default BPM will not be reflected on the fork. In this case, you will have to code the changes into your version of the forked BPMs in order to add them to the new fulfillment workflows.
## Step 1: Set Up jBPM with Business Central
The jBPM Server distribution is the easiest way to start with jBPM, as the included Business Central application is useful for authoring processes. To get up and running quickly, use the jBPM single distribution which can be downloaded at [jbpm.org](https://www.jbpm.org/). Look at the [Getting Started guide](https://www.jbpm.org/learn/gettingStartedUsingSingleZipDistribution) to get yourself familiar with Business Central.
By default, Business Central is available [here](https://docs.jbpm.org/7.17.0.Final/jbpm-docs/html_single/#_wb.workbench).
## Step 2: Fork the Fulfillment Workflows Repository
Forking the repository is a simple two-step process:
1. On GitHub, navigate to the [Kibo Fulfillment Workflows](https://github.com/KiboSoftware/kibo-fulfillment-workflows) repository.
2. In the top-right corner of the page, click **Fork**.
### Keep Your Fork Synchronized
It's a good practice to regularly synchronize your fork with the upstream repository. To achieve this, you'll need to use Git via the command line by following the below steps:
1. Set Up Git
2. Create a Local Clone of Your Fork
3. Configure Git to Synchronize with the Original Repository
4. Make Changes to the Fork
#### Set Up Git
If you haven't yet, first set up Git. Don't forget to set up authentication to GitHub from Git as well.
#### Create a Local Clone of Your Fork
Right now, you have a fork of the [Kibo Fulfillment Workflows](https://github.com/KiboSoftware/kibo-fulfillment-workflows) repository on GitHub but you don't have the files in that repository on your computer. Let's create a clone of your fork locally on your computer.
1. On GitHub, navigate to your fork of the repository.
2. Under the repository name, click **Code** and then the desired **Clone** or **Download** option.
3. To clone the repository using HTTPS, click the clipboard icon under **Clone with HTTPS**. To clone the repository using an SSH key, including a certificate issued by your organization's SSH certificate authority, click **Use SSH** and then click **Clone URL**.
4. Open Terminal.
5. Type `git clone`, and then paste the URL you copied earlier. It will look like this, with your GitHub username instead of `YOUR_USERNAME`:
```
$ git clone https://github.com/YOUR_USERNAME/YOUR_FORK
```
6. Press **Enter**. Your local clone will be created.
```
$ git clone https://github.com/YOUR_USERNAME/YOUR_FORK
> Cloning into \`YOUR_FORK\`...
> remote: Counting objects: 1033, done.
> remote: Total 1033 (delta 0), reused 0 (delta 0), pack-reused 1033
> Receiving objects: 100% (1033/1033), 1.22 MiB | 173.00 KiB/s, done.
> Resolving deltas: 100% (405/405), done.
```
#### Configure Git to Synchronize with the Original Repository
When you fork a project, you can configure Git to pull changes from the original (or upstream) repository into the local clone of your fork.
1. On GitHub, navigate to the [Kibo Fulfillment Workflows](https://github.com/KiboSoftware/kibo-fulfillment-workflows) repository.
2. Under the repository name, click **Code** and then the desired **Clone** or **Download** option. To clone the repository using HTTPS, click the clipboard icon under **Clone with HTTPS**. To clone the repository using an SSH key, including a certificate issued by your organization's SSH certificate authority, click **Use SSH** and then click **Clone URL**.
3. Open Terminal.
4. Change directories to the location of the fork you cloned in Create a Local Clone of Your Fork.
* To go to your home directory, type just `cd` with no other text.
* To list the files and folders in your current directory, type `ls`.
* To go into one of your listed directories, type `cd your_listed_directory.`
* To go up one directory, type `cd ..`
5. Type `git remote -v`and press **Enter**. You'll see the current configured remote repository for your fork.
```
$ git remote -v
> origin https://github.com/YOUR_USERNAME/YOUR_FORK.git (fetch)
> origin https://github.com/YOUR_USERNAME/YOUR_FORK.git (push)
```
6. Type `git remote add upstream` , paste the URL you copied, and press **Enter**. It will look like this:
```
$ git remote add upstream https://github.kibocommerce.com/KiboSoftware/kibo-fulfillment-workflows.git
```
7. To verify the new upstream repository you've specified for your fork, type `git remote -v` again. You should see the URL for your fork as origin, and the URL for the original [Kibo Fulfillment Workflows](https://github.com/KiboSoftware/kibo-fulfillment-workflows) repository as upstream.
```
$ git remote -v
> origin https://github.com/YOUR_USERNAME/YOUR_FORK.git (fetch)
> origin https://github.com/YOUR_USERNAME/YOUR_FORK.git (push)
> upstream https://github.kibocommerce.com/KiboSoftware/kibo-fulfillment-workflows
(fetch)
> upstream https://github.kibocommerce.com/KiboSoftware/kibo-fulfillment-workflows
(push)
```
#### Make Changes to the Fork
You have the flexibility to make various changes to your fork, which includes creating and opening branches. You will have to synchronize your custom fork with the upstream repository as well as with your jBPM Business Central repository.
* **Creating Branches:** Branches allow you to build new features or test out ideas without putting your main project at risk.
* **Opening Pull Requests:** If you are hoping to propose a change to the original repository, you can send a request to Kibo to pull your fork into their repository by submitting a pull request.
## Step 3: Modify Forked Repository Files
To update your pom.xml file:
1. Modify **pom.xml** by changing the following elements to match your project requirements:
```
YOUR_DEVCENTER_ACCOUNT_KEY
YOUR_DEVCENTER_ACCOUNT_KEY.YOUR_DEVCENTER_APP_NAME
1.0.0-SNAPSHOT
kjar
YOUR_DEVCENTER_ACCOUNT_KEY.YOUR_DEVCENTER_APP_NAME
```
2. Commit changes to your local copy of the forked repository.
```
$ git add pom.xml
$ git commit -m "Provide a meaningful commit message here"
$ git push origin develop
```
## Step 4: Import Assets into Business Central
You can easily import the forked business assets project into Business Central, as it's a valid Git repository:
1. Create a git branch named **master** from the default **develop** branch.
```
$ git checkout -b master
Switched to a new branch 'master'
---
$ git branch
develop
* master
```
The assumption here is that there's no existing `master` branch in your forked repository. The name `master` is used to align with the default branch name used by the development jBPM instance.
2. Log in to Business Central and go to **Menu** > **Design** > **Projects**.
3. Select `Import Project` from the Add Project menu and enter the filesystem location of the project git repository within the `Repository URL` field. For example:
```
file://{filesystem location of forked repository}
```
4. Click **Import**, confirm the project to be imported, and click **Ok.**
Note that if attempting upload within a Docker container, a volume must be mapped.
5. Once the business assets project is successfully imported into Business Central, you can begin working on it. Navigate to the project and make additions or modifications to assets such as business processes, forms, rules, decision tables, and more.
## Optional: Pick Wave Requirement
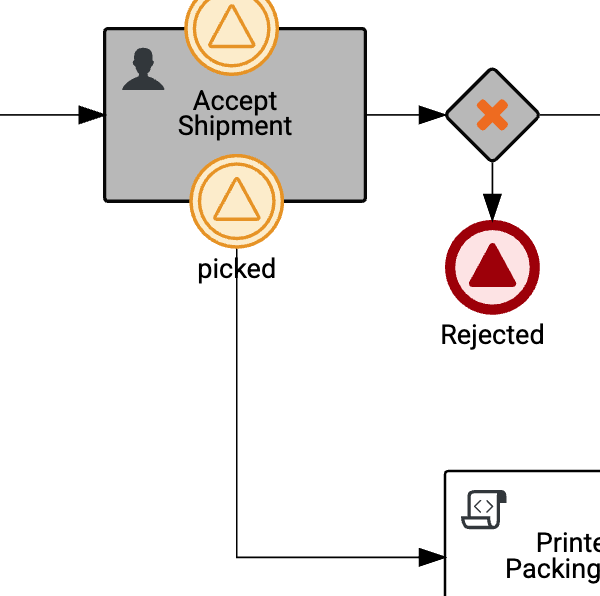
If you intend to use this custom fulfillment workflow for pick waves, then it must have a "picked" signal component in order for shipment progression to follow your routing logic upon closing a pick wave. This is required for compatibility with the [Close Pick Wave API](/api-reference/pickwave/close-pick-wave).
1. Include the Picked Signal
* Ensure your BPMN workflow includes a signal event named "picked."
2. Enable Triggering via API
* Position the signal so it can be triggered when the fulfillment service calls the Pick Wave Close API.
3. Route to the Next Task
* Once triggered, the workflow must route to the appropriate user task or fulfillment step—either an existing or a custom task—based on the custom signal route.
4. Ensure Proper Workflow Progression
* This signal-driven routing allows shipments associated with the pick wave to continue progressing through the workflow as intended.
 ## Step 5: Pull Custom Assets to the Fork
Updated business assets need to be pulled back to the forked project source code repository:
1. Go to Settings of the project within Business Central.
2. Copy the **URL** value from the **General Settings** view.
3. Go to the filesystem location of the forked and imported repository.
4. Type `git remote -v` and press **Enter**. You'll see the current configured remote repositories.
5. ```
$ git remote -v
> origin https://github.com/YOUR_USERNAME/YOUR_FORK.git (fetch)
> origin https://github.com/YOUR_USERNAME/YOUR_FORK.git (push)
> upstream https://github.com/KiboSoftware/kibo-fulfillment-workflows.git (fetch)
> upstream https://github.com/KiboSoftware/kibo-fulfillment-workflows.git (push)
```
6. Type `git remote add jbpm`, and then paste the URL you copied in Step 2. Modify the value to include `wbadmin@` and press **Enter**. It will look like this:
```
$ git remote add jbpm ssh://wbadmin@localhost:8001/MySpace/YOUR_DEVCENTER_ACCOUNT_KEY.YOUR_DEVCENTER_APP_NAME
```
7. To verify the new **jbpm** repository you've specified for your fork, type `git remote -v` again. You should see the URL for the jBPM Business Central project as **jbpm**, the URL for your fork as **origin**, and the URL for the original repository as **upstream**.
```
$ git remote -v
> jbpm ssh://wbadmin@localhost:8001/MySpace/YOUR_DEVCENTER_ACCOUNT_KEY.YOUR_DEVCENTER_APP_NAME (fetch)
> jbpm ssh://wbadmin@localhost:8001/MySpace/YOUR_DEVCENTER_ACCOUNT_KEY.YOUR_DEVCENTER_APP_NAME (push)
> origin https://github.com/YOUR_USERNAME/YOUR_FORK.git (fetch)
> origin https://github.com/YOUR_USERNAME/YOUR_FORK.git (push)
> upstream https://github.com/KiboSoftware/kibo-fulfillment-workflows.git (fetch)
> upstream https://github.com/KiboSoftware/kibo-fulfillment-workflows.git (push)
```
8. Pull or fetch your custom business assets from jBPM Business Central to your forked git repository.
```
$ git checkout master
$ git pull jbpm master - when prompted enter wbadmin as password
```
or
```
$ git checkout master
$ git fetch jbpm
$ git rebase jbpm/master
```
If you encounter issues connecting to the jBPM generated Git repository over SSH, you can change the protocol to **http** within the same Business Central **Settings** view for your project.
9. Synchronize the **develop** branch of your fork with the **origin** repository on GitHub.
```
$ git checkout develop
$ git pull origin develop
```
10. Rebase your updated local **master** branch commits on the synchronized **develop** branch.
```
$ git checkout master
$ git rebase develop
```
11. Squash all dedicated jBPM Business Central changes in the **develop** branch of your fork.
```
$ git checkout develop
$ git merge --squash master
```
12. Add & commit the merged changes to the **develop** branch and then push to your fork on GitHub.
```
$ git add -A
$ git commit -m "some useful comment"
$ git push origin develop
```
13. Reset the jBPM Business Central **master** branch using the updated **develop** branch.
```
$ git checkout master
$ git reset --hard develop
$ git push -f jbpm master
```
14. With your custom business assets now part of the forked project source tree, Maven commands can be used to build and publish the KJAR artifact to a Maven repository without using the standalone jBPM server.
```
$ mvn clean install
```
## Step 6: Deploy Custom Assets to KIE Server
After adding assets to your project in Business Central, you can easily deploy it to a running KIE server instance:
1. Navigate to your project and click **Deploy**.
2. After a few seconds, you should see the project successfully deployed.
## Step 7: Interact with Deployed Assets
You can use **Process Definitions** and **Process Instances** perspectives of Business Central to interact with your newly deployed business assets, such as processes or user tasks.
## Step 8: Install Custom Workflows
Provide Kibo Professional Services with your repository. They will verify and upload your workflows, as well as provide any further instructions needed to modify or install your BPMs.
## Step 9: Enable Workflows for Location Groups
Update your location group configuration settings to use customized processes, referencing the new containerId(s) and processId(s) by shipmentType. Some example cURL requests are listed below.
Get all location groups for a tenant and site:
```
curl --request GET 'http://t123.mozu.com/api/commerce/admin/locationGroups' \\
--header 'x-vol-tenant: 123' \\
--header 'x-vol-site: 456' \\
--header 'Authorization: Bearer *******'
```
Get configuration for a specific location group:
```
curl --request GET 'http://t123.mozu.com/api/commerce/admin/locationGroupConfiguration/2' \\
--header 'x-vol-tenant: 123' \\
--header 'x-vol-site: 456' \\
--header 'Authorization: Bearer *******'
```
Set a custom BPM configuration for a location group:
```
curl --request PUT 'http://t123.mozu.com/api/commerce/admin/locationGroupConfiguration/2' \\
--header 'x-vol-tenant: 123' \\
--header 'x-vol-site: 456' \\
--header 'Authorization: Bearer *******' \\
--header 'Content-Type: application/json' \\
--data-raw '{
"tenantId": 123,
"siteId": 456,
"locationGroupId": 2,
"locationGroupCode": "2",
...
"bpmConfigurations": [
{
"shipmentType": "BOPIS",
"workflowContainerId": "YOUR_DEVCENTER_ACCOUNT_KEY.YOUR_DEVCENTER_APP_NAME",
"workflowProcessId": "fulfillment.FulfillmentProcess-BOPIS"
},
{
"shipmentType": "STH",
"workflowContainerId": "YOUR_DEVCENTER_ACCOUNT_KEY.YOUR_DEVCENTER_APP_NAME",
"workflowProcessId": "fulfillment.FulfillmentProcess-STH"
},
{
"shipmentType": "Transfer",
"workflowContainerId": "YOUR_DEVCENTER_ACCOUNT_KEY.YOUR_DEVCENTER_APP_NAME",
"workflowProcessId": "fulfillment.FulfillmentProcess-Transfer"
}
],
...
}'
```
## Step 10: Execute Custom Workflows in Fulfiller UI
To execute custom workflows as a fulfiller user, such as for testing the new workflow:
1. Log in to the Admin UI and select the appropriate tenant.
2. Create a new order and shipment type matching the custom workflow configuration.
3. Go to **Main** > **Fulfiller** and locate the corresponding shipment.
4. Proceed through the workflow tasks for the shipment and confirm functionality.
## Step 11: Sync Custom Fork with Upstream Repository
To sync your custom forked repository with the upstream repository:
1. Open Terminal.
2. Change the current working directory to your local project.
3. Fetch the branches and their respective commits from the upstream repository. Commits to develop will be stored in a local branch, `upstream/develop`.
```
$ git fetch upstream
> remote: Counting objects: 8, done.
> remote: Compressing objects: 100% (8/8), done.
> remote: Total 8 (delta 3), reused 0 (delta 0), pack-reused 0
> Unpacking objects: 100% (8/8), done.
> From https://github.com/KiboSoftware/kibo-fulfillment-workflows
> * [new branch] develop -> upstream/develop
```
4. Check out your fork's local `develop` branch.
```
$ git checkout develop
> Switched to branch 'develop'
```
5. Merge the changes from `upstream/develop` into your local `develop` branch. This brings your fork's `develop` branch into sync with the upstream repository, without losing your local changes.
```
$ git merge upstream/develop
> Merge made by the 'recursive' strategy.
```
6. If your local branch didn't have any unique commits, Git will instead perform a "fast-forward":
```
$ git merge upstream/develop
> Updating 34e91da..16c56ad
> Fast-forward
> README.md | 5 +++--
> 1 file changed, 3 insertions(+), 2 deletions(-)
```
Syncing your fork updates only your local copy of the repository. To update your fork on GitHub, you must push your changes. For more information about syncing a fork, see [the GitHub documentation](https://help.github.com/en/github/collaborating-with-issues-and-pull-requests/syncing-a-fork).
## Step 5: Pull Custom Assets to the Fork
Updated business assets need to be pulled back to the forked project source code repository:
1. Go to Settings of the project within Business Central.
2. Copy the **URL** value from the **General Settings** view.
3. Go to the filesystem location of the forked and imported repository.
4. Type `git remote -v` and press **Enter**. You'll see the current configured remote repositories.
5. ```
$ git remote -v
> origin https://github.com/YOUR_USERNAME/YOUR_FORK.git (fetch)
> origin https://github.com/YOUR_USERNAME/YOUR_FORK.git (push)
> upstream https://github.com/KiboSoftware/kibo-fulfillment-workflows.git (fetch)
> upstream https://github.com/KiboSoftware/kibo-fulfillment-workflows.git (push)
```
6. Type `git remote add jbpm`, and then paste the URL you copied in Step 2. Modify the value to include `wbadmin@` and press **Enter**. It will look like this:
```
$ git remote add jbpm ssh://wbadmin@localhost:8001/MySpace/YOUR_DEVCENTER_ACCOUNT_KEY.YOUR_DEVCENTER_APP_NAME
```
7. To verify the new **jbpm** repository you've specified for your fork, type `git remote -v` again. You should see the URL for the jBPM Business Central project as **jbpm**, the URL for your fork as **origin**, and the URL for the original repository as **upstream**.
```
$ git remote -v
> jbpm ssh://wbadmin@localhost:8001/MySpace/YOUR_DEVCENTER_ACCOUNT_KEY.YOUR_DEVCENTER_APP_NAME (fetch)
> jbpm ssh://wbadmin@localhost:8001/MySpace/YOUR_DEVCENTER_ACCOUNT_KEY.YOUR_DEVCENTER_APP_NAME (push)
> origin https://github.com/YOUR_USERNAME/YOUR_FORK.git (fetch)
> origin https://github.com/YOUR_USERNAME/YOUR_FORK.git (push)
> upstream https://github.com/KiboSoftware/kibo-fulfillment-workflows.git (fetch)
> upstream https://github.com/KiboSoftware/kibo-fulfillment-workflows.git (push)
```
8. Pull or fetch your custom business assets from jBPM Business Central to your forked git repository.
```
$ git checkout master
$ git pull jbpm master - when prompted enter wbadmin as password
```
or
```
$ git checkout master
$ git fetch jbpm
$ git rebase jbpm/master
```
If you encounter issues connecting to the jBPM generated Git repository over SSH, you can change the protocol to **http** within the same Business Central **Settings** view for your project.
9. Synchronize the **develop** branch of your fork with the **origin** repository on GitHub.
```
$ git checkout develop
$ git pull origin develop
```
10. Rebase your updated local **master** branch commits on the synchronized **develop** branch.
```
$ git checkout master
$ git rebase develop
```
11. Squash all dedicated jBPM Business Central changes in the **develop** branch of your fork.
```
$ git checkout develop
$ git merge --squash master
```
12. Add & commit the merged changes to the **develop** branch and then push to your fork on GitHub.
```
$ git add -A
$ git commit -m "some useful comment"
$ git push origin develop
```
13. Reset the jBPM Business Central **master** branch using the updated **develop** branch.
```
$ git checkout master
$ git reset --hard develop
$ git push -f jbpm master
```
14. With your custom business assets now part of the forked project source tree, Maven commands can be used to build and publish the KJAR artifact to a Maven repository without using the standalone jBPM server.
```
$ mvn clean install
```
## Step 6: Deploy Custom Assets to KIE Server
After adding assets to your project in Business Central, you can easily deploy it to a running KIE server instance:
1. Navigate to your project and click **Deploy**.
2. After a few seconds, you should see the project successfully deployed.
## Step 7: Interact with Deployed Assets
You can use **Process Definitions** and **Process Instances** perspectives of Business Central to interact with your newly deployed business assets, such as processes or user tasks.
## Step 8: Install Custom Workflows
Provide Kibo Professional Services with your repository. They will verify and upload your workflows, as well as provide any further instructions needed to modify or install your BPMs.
## Step 9: Enable Workflows for Location Groups
Update your location group configuration settings to use customized processes, referencing the new containerId(s) and processId(s) by shipmentType. Some example cURL requests are listed below.
Get all location groups for a tenant and site:
```
curl --request GET 'http://t123.mozu.com/api/commerce/admin/locationGroups' \\
--header 'x-vol-tenant: 123' \\
--header 'x-vol-site: 456' \\
--header 'Authorization: Bearer *******'
```
Get configuration for a specific location group:
```
curl --request GET 'http://t123.mozu.com/api/commerce/admin/locationGroupConfiguration/2' \\
--header 'x-vol-tenant: 123' \\
--header 'x-vol-site: 456' \\
--header 'Authorization: Bearer *******'
```
Set a custom BPM configuration for a location group:
```
curl --request PUT 'http://t123.mozu.com/api/commerce/admin/locationGroupConfiguration/2' \\
--header 'x-vol-tenant: 123' \\
--header 'x-vol-site: 456' \\
--header 'Authorization: Bearer *******' \\
--header 'Content-Type: application/json' \\
--data-raw '{
"tenantId": 123,
"siteId": 456,
"locationGroupId": 2,
"locationGroupCode": "2",
...
"bpmConfigurations": [
{
"shipmentType": "BOPIS",
"workflowContainerId": "YOUR_DEVCENTER_ACCOUNT_KEY.YOUR_DEVCENTER_APP_NAME",
"workflowProcessId": "fulfillment.FulfillmentProcess-BOPIS"
},
{
"shipmentType": "STH",
"workflowContainerId": "YOUR_DEVCENTER_ACCOUNT_KEY.YOUR_DEVCENTER_APP_NAME",
"workflowProcessId": "fulfillment.FulfillmentProcess-STH"
},
{
"shipmentType": "Transfer",
"workflowContainerId": "YOUR_DEVCENTER_ACCOUNT_KEY.YOUR_DEVCENTER_APP_NAME",
"workflowProcessId": "fulfillment.FulfillmentProcess-Transfer"
}
],
...
}'
```
## Step 10: Execute Custom Workflows in Fulfiller UI
To execute custom workflows as a fulfiller user, such as for testing the new workflow:
1. Log in to the Admin UI and select the appropriate tenant.
2. Create a new order and shipment type matching the custom workflow configuration.
3. Go to **Main** > **Fulfiller** and locate the corresponding shipment.
4. Proceed through the workflow tasks for the shipment and confirm functionality.
## Step 11: Sync Custom Fork with Upstream Repository
To sync your custom forked repository with the upstream repository:
1. Open Terminal.
2. Change the current working directory to your local project.
3. Fetch the branches and their respective commits from the upstream repository. Commits to develop will be stored in a local branch, `upstream/develop`.
```
$ git fetch upstream
> remote: Counting objects: 8, done.
> remote: Compressing objects: 100% (8/8), done.
> remote: Total 8 (delta 3), reused 0 (delta 0), pack-reused 0
> Unpacking objects: 100% (8/8), done.
> From https://github.com/KiboSoftware/kibo-fulfillment-workflows
> * [new branch] develop -> upstream/develop
```
4. Check out your fork's local `develop` branch.
```
$ git checkout develop
> Switched to branch 'develop'
```
5. Merge the changes from `upstream/develop` into your local `develop` branch. This brings your fork's `develop` branch into sync with the upstream repository, without losing your local changes.
```
$ git merge upstream/develop
> Merge made by the 'recursive' strategy.
```
6. If your local branch didn't have any unique commits, Git will instead perform a "fast-forward":
```
$ git merge upstream/develop
> Updating 34e91da..16c56ad
> Fast-forward
> README.md | 5 +++--
> 1 file changed, 3 insertions(+), 2 deletions(-)
```
Syncing your fork updates only your local copy of the repository. To update your fork on GitHub, you must push your changes. For more information about syncing a fork, see [the GitHub documentation](https://help.github.com/en/github/collaborating-with-issues-and-pull-requests/syncing-a-fork).