> ## Documentation Index
> Fetch the complete documentation index at: https://docs.kibocommerce.com/llms.txt
> Use this file to discover all available pages before exploring further.
# Configure Products
After creating [product attributes](/pages/product-attributes-overview) and [product types](/pages/product-types-overview), you can then create products to sell on your Kibo eCommerce storefront.
See how to create a new standard product
Learn how to create products with configurable options
The way that these products display can be further configured with [slicing](/pages/product-slicing) to show variants of a product separately in search results and category pages.
You can also use a Postman Runner to update products with the [Kibo Catalog APIs.](/api-overviews/openapi_catalog_admin_overview)
## Create Products
Once you create product attributes and product types you can then create your products to sell on your storefront. When you create products you can also choose to create product variations if your product includes configurable options.
To create a new product:
1. Go to **Main** > **Catalog** > **Products**.
2. Click **Create New Product** in the top right.
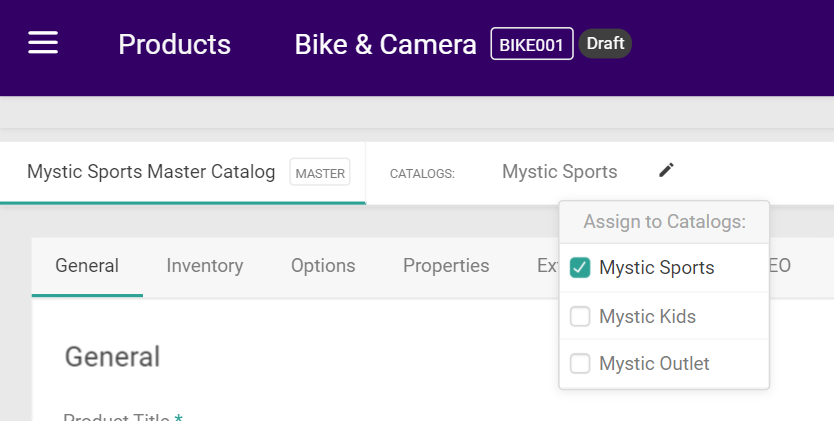
3. Select the catalog you wish to add the product to by clicking the pencil icon in the **Catalogs** bar and selecting which catalogs to add to the list.
Ensure that you have the correct master catalog selected, because once you add a product to a catalog you cannot move that product to another catalog that belongs to a different master catalog. However, you can always move products between catalogs that belong to the same master catalog.
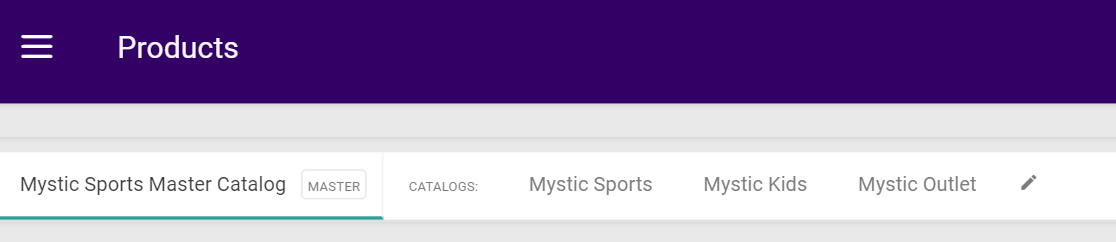 4. Once added, you can click any of the catalogs in the list to configure the product specifically within that catalog. Some settings are only available at the master catalog level, while others are only available at the child catalog level.
5. At the master catalog level, enter the following **General** settings:
* Product Title
* Product Code (at least 3 and up to 30 characters)
* Product Type
* Product Usage (this will determine what other configuration sections are displayed on the page, such as Inventory, Properties, Shipping, Bundle Items, and SEO)
* Short Description (260 character limit)
* Long Description
* Product Image
* Pricing Information
* And any other configuration sections that appeared when you selected a Product Usage (see Step #8 and beyond for more detailed descriptions of these possible settings)
6. At each child catalog level, select the following **General** settings:
* Status (Active, Disabled, or Scheduled, which allows you to schedule the product to be active during a specific time-frame on your storefront)
* If Scheduled was selected as the Status, then select the Active Start Date and Active End Date. See the [Schedule Products](/pages/schedule-products) guide for more information about this behavior.
* [First Available Date](/pages/schedule-products#first-available-date) (allows you to specify the date the product either becomes or became first available in the specific catalog)
4. Once added, you can click any of the catalogs in the list to configure the product specifically within that catalog. Some settings are only available at the master catalog level, while others are only available at the child catalog level.
5. At the master catalog level, enter the following **General** settings:
* Product Title
* Product Code (at least 3 and up to 30 characters)
* Product Type
* Product Usage (this will determine what other configuration sections are displayed on the page, such as Inventory, Properties, Shipping, Bundle Items, and SEO)
* Short Description (260 character limit)
* Long Description
* Product Image
* Pricing Information
* And any other configuration sections that appeared when you selected a Product Usage (see Step #8 and beyond for more detailed descriptions of these possible settings)
6. At each child catalog level, select the following **General** settings:
* Status (Active, Disabled, or Scheduled, which allows you to schedule the product to be active during a specific time-frame on your storefront)
* If Scheduled was selected as the Status, then select the Active Start Date and Active End Date. See the [Schedule Products](/pages/schedule-products) guide for more information about this behavior.
* [First Available Date](/pages/schedule-products#first-available-date) (allows you to specify the date the product either becomes or became first available in the specific catalog) 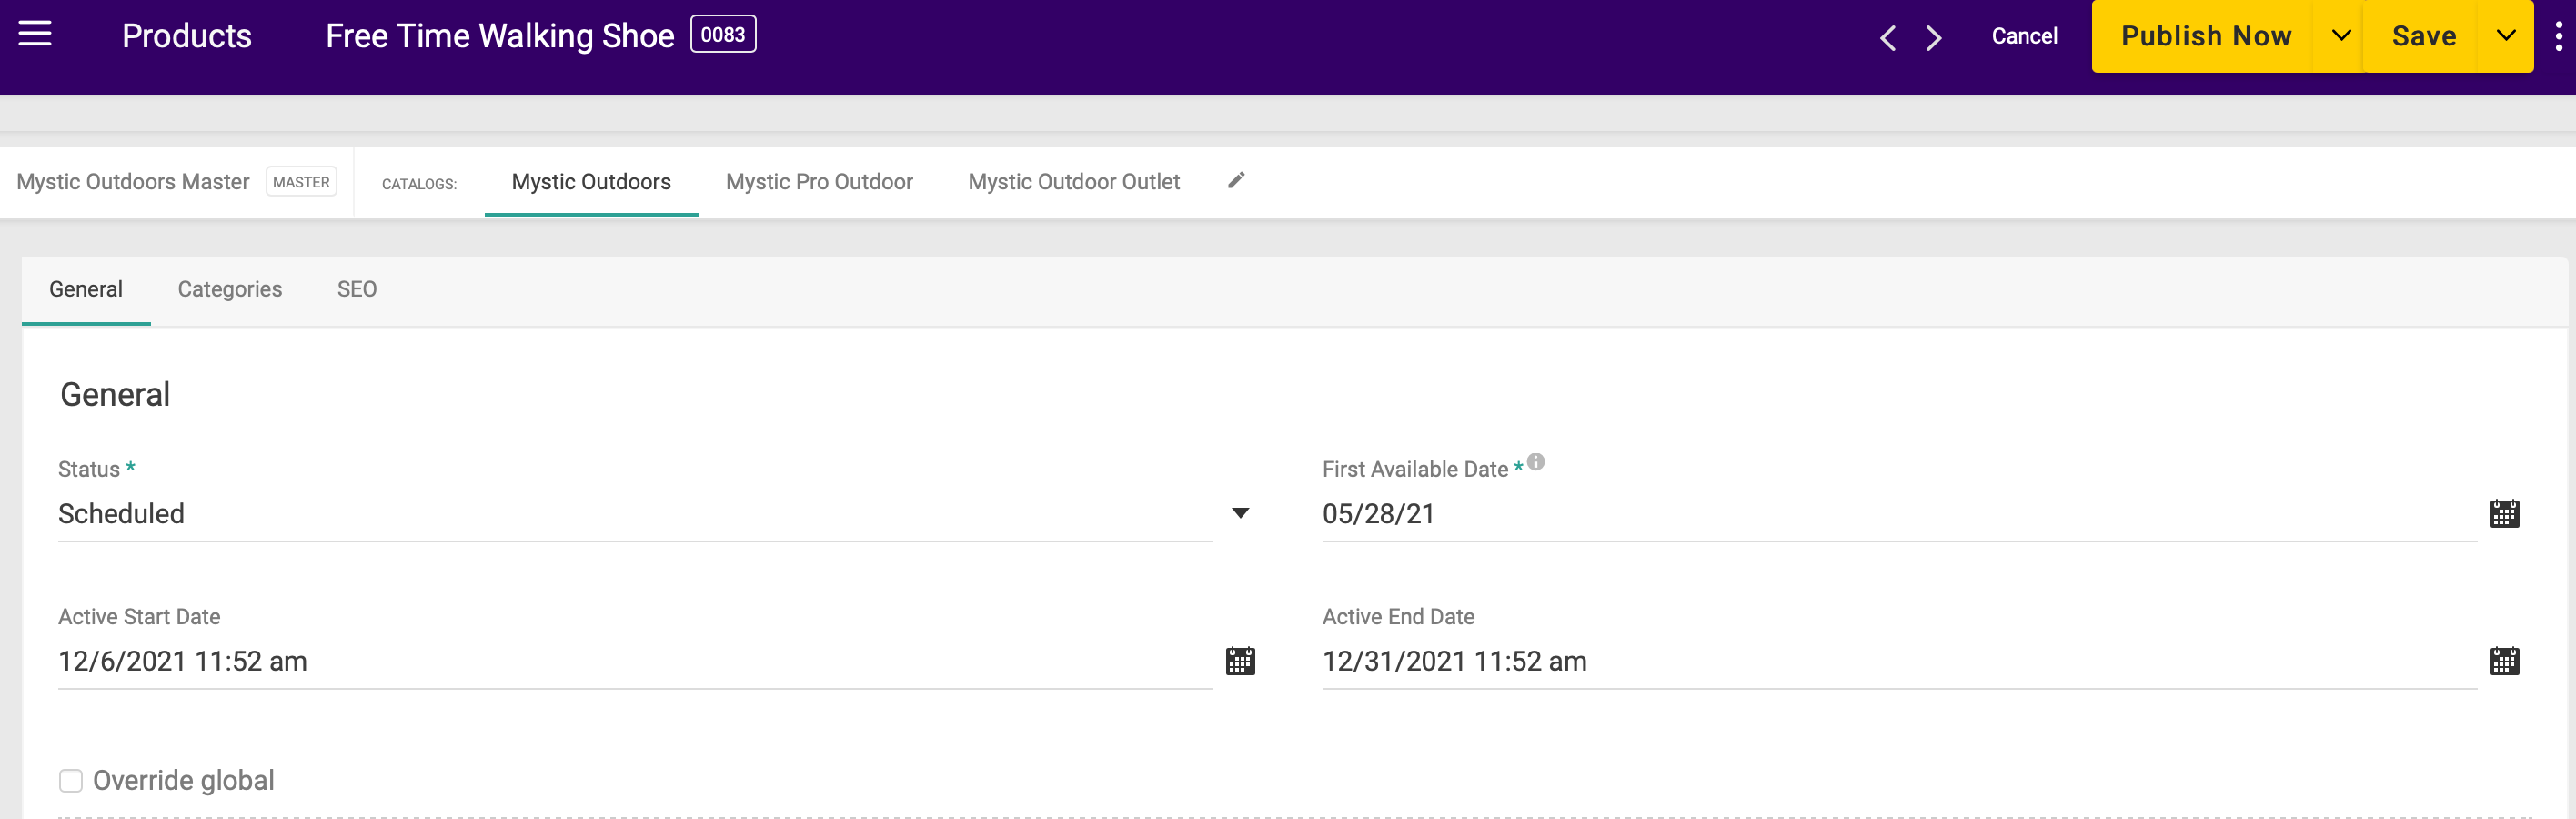 7. Continue down the page to the other configuration sections that appeared below General when you selected a Product Usage.
8. If the **Inventory** section is available, you can track stock level and determine the behavior when the product goes out of stock. When you product goes out of stock, you can opt to show an out of stock message, allow backordering, or hide product in store. If you decide to track inventory for a product, refer to [Inventory Management](/concept-guides/inventory) for information.
You must configure one or more locations for the Inventory section to appear. Refer to [Location Settings](/pages/location-types) for more information about configuring locations.
9. Depending on what you selected for Product Usage, you may have **Options**, **Properties**, and/or **Extras** to enter. Refer to [Product Attributes](/pages/product-attributes-overview) for more information about assigning attribute values to a product, and refer to [Dynamic Imaging](/pages/dynamic-imaging) for more information about assigning images to specific variants.
If your product includes options, in the **Options** section select a **Pricing Mode** and click **Select Values** to edit the product’s variants. In the **Edit Variants** window, click **Update Options** to create a [product variation](/pages/product-variations) and click the **Enabled** checkbox next to each variant you want to enable. Refer to [Product Variant Pricing](/pages/product-variations#product-variant-pricing-and-weight) for more information about product variant pricing.
10. If the **Shipping** section is displayed, select whether the product is available for direct ship, in-store pick up, or both. You can also specify whether the item must ship in a package by itself (such as for fragile items), the weight, and appropriate package dimensions in this section.
7. Continue down the page to the other configuration sections that appeared below General when you selected a Product Usage.
8. If the **Inventory** section is available, you can track stock level and determine the behavior when the product goes out of stock. When you product goes out of stock, you can opt to show an out of stock message, allow backordering, or hide product in store. If you decide to track inventory for a product, refer to [Inventory Management](/concept-guides/inventory) for information.
You must configure one or more locations for the Inventory section to appear. Refer to [Location Settings](/pages/location-types) for more information about configuring locations.
9. Depending on what you selected for Product Usage, you may have **Options**, **Properties**, and/or **Extras** to enter. Refer to [Product Attributes](/pages/product-attributes-overview) for more information about assigning attribute values to a product, and refer to [Dynamic Imaging](/pages/dynamic-imaging) for more information about assigning images to specific variants.
If your product includes options, in the **Options** section select a **Pricing Mode** and click **Select Values** to edit the product’s variants. In the **Edit Variants** window, click **Update Options** to create a [product variation](/pages/product-variations) and click the **Enabled** checkbox next to each variant you want to enable. Refer to [Product Variant Pricing](/pages/product-variations#product-variant-pricing-and-weight) for more information about product variant pricing.
10. If the **Shipping** section is displayed, select whether the product is available for direct ship, in-store pick up, or both. You can also specify whether the item must ship in a package by itself (such as for fragile items), the weight, and appropriate package dimensions in this section.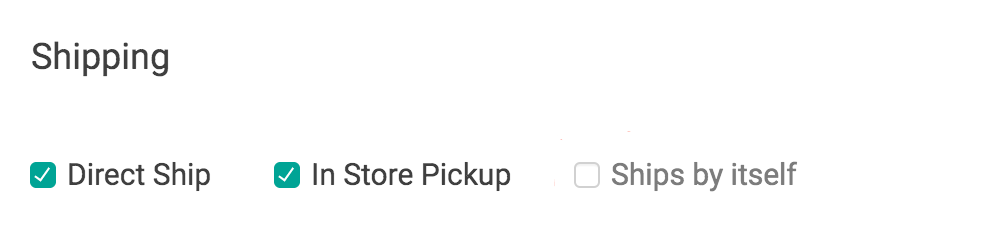 11. The **Categories** section is only displayed if you clicked on a child catalog to configure the product on that site (as products cannot be assigned to categories at the master catalog level). Here, select the static categories of which the product is a member. Alternatively, you can create dynamic categories to automatically add products to depending on specific configuration options. Refer to [Dynamic Categories](/pages/dynamic-categories) for more information.
You must first create static categories before you can assign products to a static category. Refer to [Static Categories](/pages/static-categories) for more information.
12. If you assign a product to more than one static category, then you can use the **Primary Category** field to specify which static category to use in the navigation breadcrumb, regardless of how shoppers navigate to the product. If not set, or if the product belongs only to dynamic categories, the default is to use the category with the smallest ID.
13. If the **SEO** section is available, use the available fields to enter SEO information:
| Field Name | SEO Effect |
| ---------------------------------------------------------------------------------------------------------------------------------------------------------------------------------------------------------------------------- | -------------------------------------------------------------------------------------------------------------------------------------------------------------------------------------------------------------------------------------------------------------------------------------------------------- |
| Meta Title | Maps to the HTML meta title tag. While most search engines place little value on this tag, most Kibo eCommerce themes inject the value of the meta title tag into the HTML title tag. |
| The HTML title tag is used by search engines and browsers to display the title of the page, and is critical to SEO. Search engines place very high importance on the correlation between a page's title tag and its content. | |
| Slug | The default URL structure for products is `yourSite.com/{slug}/p/{productCode}` and for categories is `yourSite.com/{slug}/c/{categoryId}`. The slug (or SEO-friendly URL) gives you the ability to add a meaningful component to the URL structure in order to boost search results. |
| Meta Description | Maps to the HTML meta description tag, which is used by search engines to summarize the content of the page. |
| Meta Keywords | Maps to the HTML meta keywords tag, which is used to tell search engines what the page is about. From an SEO-perspective, search engines place little value on this tag, but the Kibo eCommerce search implementation uses these keywords to help construct search results for pages on your storefront. |
14. If you have enabled [multiple locales for this catalog](/pages/multi-locale-catalogs "Multi-Locale Catalogs"), you can switch locales using the dropdown menu in the top right. This allows you to localize the product title, images, descriptions, customizable string properties, and SEO fields for that language. The pricing, inventory, shipping, extras, and other settings will not be displayed or editable, as those are only configurable on the default locale for the catalog.
11. The **Categories** section is only displayed if you clicked on a child catalog to configure the product on that site (as products cannot be assigned to categories at the master catalog level). Here, select the static categories of which the product is a member. Alternatively, you can create dynamic categories to automatically add products to depending on specific configuration options. Refer to [Dynamic Categories](/pages/dynamic-categories) for more information.
You must first create static categories before you can assign products to a static category. Refer to [Static Categories](/pages/static-categories) for more information.
12. If you assign a product to more than one static category, then you can use the **Primary Category** field to specify which static category to use in the navigation breadcrumb, regardless of how shoppers navigate to the product. If not set, or if the product belongs only to dynamic categories, the default is to use the category with the smallest ID.
13. If the **SEO** section is available, use the available fields to enter SEO information:
| Field Name | SEO Effect |
| ---------------------------------------------------------------------------------------------------------------------------------------------------------------------------------------------------------------------------- | -------------------------------------------------------------------------------------------------------------------------------------------------------------------------------------------------------------------------------------------------------------------------------------------------------- |
| Meta Title | Maps to the HTML meta title tag. While most search engines place little value on this tag, most Kibo eCommerce themes inject the value of the meta title tag into the HTML title tag. |
| The HTML title tag is used by search engines and browsers to display the title of the page, and is critical to SEO. Search engines place very high importance on the correlation between a page's title tag and its content. | |
| Slug | The default URL structure for products is `yourSite.com/{slug}/p/{productCode}` and for categories is `yourSite.com/{slug}/c/{categoryId}`. The slug (or SEO-friendly URL) gives you the ability to add a meaningful component to the URL structure in order to boost search results. |
| Meta Description | Maps to the HTML meta description tag, which is used by search engines to summarize the content of the page. |
| Meta Keywords | Maps to the HTML meta keywords tag, which is used to tell search engines what the page is about. From an SEO-perspective, search engines place little value on this tag, but the Kibo eCommerce search implementation uses these keywords to help construct search results for pages on your storefront. |
14. If you have enabled [multiple locales for this catalog](/pages/multi-locale-catalogs "Multi-Locale Catalogs"), you can switch locales using the dropdown menu in the top right. This allows you to localize the product title, images, descriptions, customizable string properties, and SEO fields for that language. The pricing, inventory, shipping, extras, and other settings will not be displayed or editable, as those are only configurable on the default locale for the catalog.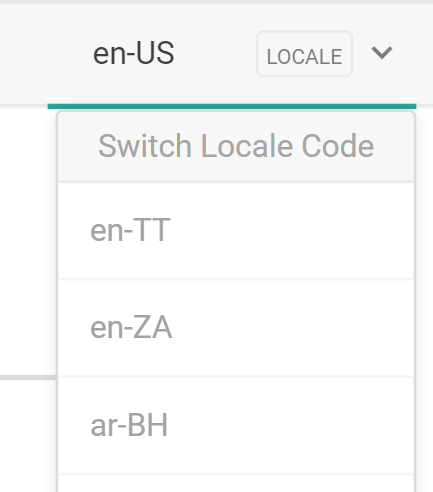 15. Depending on your [Product Publishing settings](/pages/publishing-settings), you can either have the product publish immediately or be saved as a product draft:
* If your Product Publishing settings are set to Live, click **Save** to make the product live on your storefront.
* If your Product Publishing settings are set to Staged, click **Save** to save your changes as a [draft](/pages/drafts), and then decide to either publish the draft immediately or move it to a Publish Set.
## Add Products to Catalogs
You add existing products to catalogs using the product details:
1. Go to **Main** > **Catalog** > **Products**.
2. Select your product.
3. In the Catalogs list, click **Edit** to add your product to a specific catalog.
15. Depending on your [Product Publishing settings](/pages/publishing-settings), you can either have the product publish immediately or be saved as a product draft:
* If your Product Publishing settings are set to Live, click **Save** to make the product live on your storefront.
* If your Product Publishing settings are set to Staged, click **Save** to save your changes as a [draft](/pages/drafts), and then decide to either publish the draft immediately or move it to a Publish Set.
## Add Products to Catalogs
You add existing products to catalogs using the product details:
1. Go to **Main** > **Catalog** > **Products**.
2. Select your product.
3. In the Catalogs list, click **Edit** to add your product to a specific catalog.
 4. If you want to change the product's details for a specific catalog such as price or descriptions, select that catalog’s tab and check **Override global**.
5. Click **Save** in the top right.
4. If you want to change the product's details for a specific catalog such as price or descriptions, select that catalog’s tab and check **Override global**.
5. Click **Save** in the top right.