> ## Documentation Index
> Fetch the complete documentation index at: https://docs.kibocommerce.com/llms.txt
> Use this file to discover all available pages before exploring further.
# Configure Inventory Tags
To use inventory segmentation, you need to enable them on your tenant and then configure your tags.
**Note:** The Inventory UI has been updated with a new look and feel and new functional changes, and has been renamed to **Supply/Demand UI**. Contact [Kibo Support](https://help.kibocommerce.com/) to opt in and begin using it. All sandbox tenants will receive the new UI on July 21. Select the tab below based on which UI your tenant is currently using.
## Enable Inventory Tags
Tags must be enabled and configured before inventory can be used in segments.
1. Click **Inventory Settings** in the Inventory UI to access the inventory configurations. 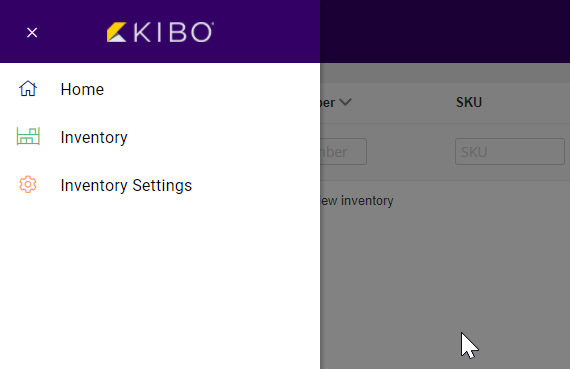 2. Under the Inventory Tags section, click **Enable Inventory Tags** to toggle this functionality on.
 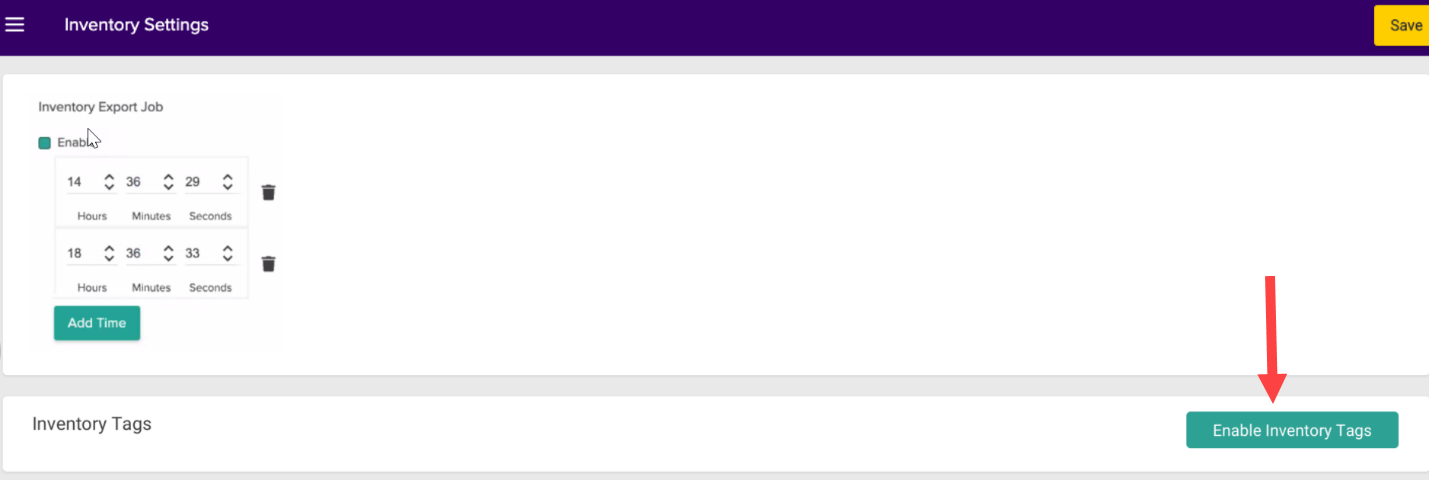 This will create an empty table where tags will be displayed once created.
 Tags must be enabled and configured before inventory can be used in segments.
1. Click **Inventory Settings** in the Supply Demand Menu to access the inventory configurations.
Tags must be enabled and configured before inventory can be used in segments.
1. Click **Inventory Settings** in the Supply Demand Menu to access the inventory configurations.
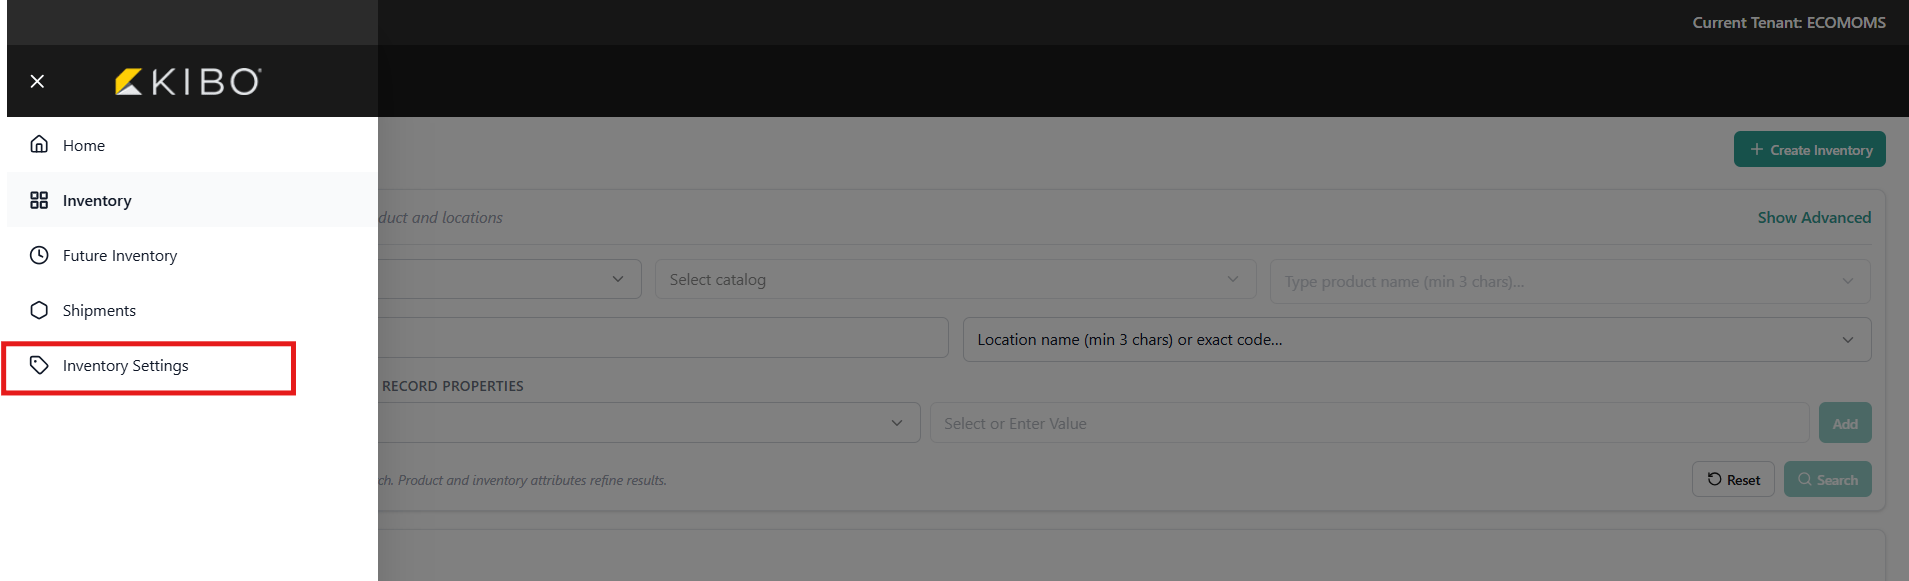 2. Under the Inventory Tags section, click **Enable Inventory Tags** to toggle this functionality on.
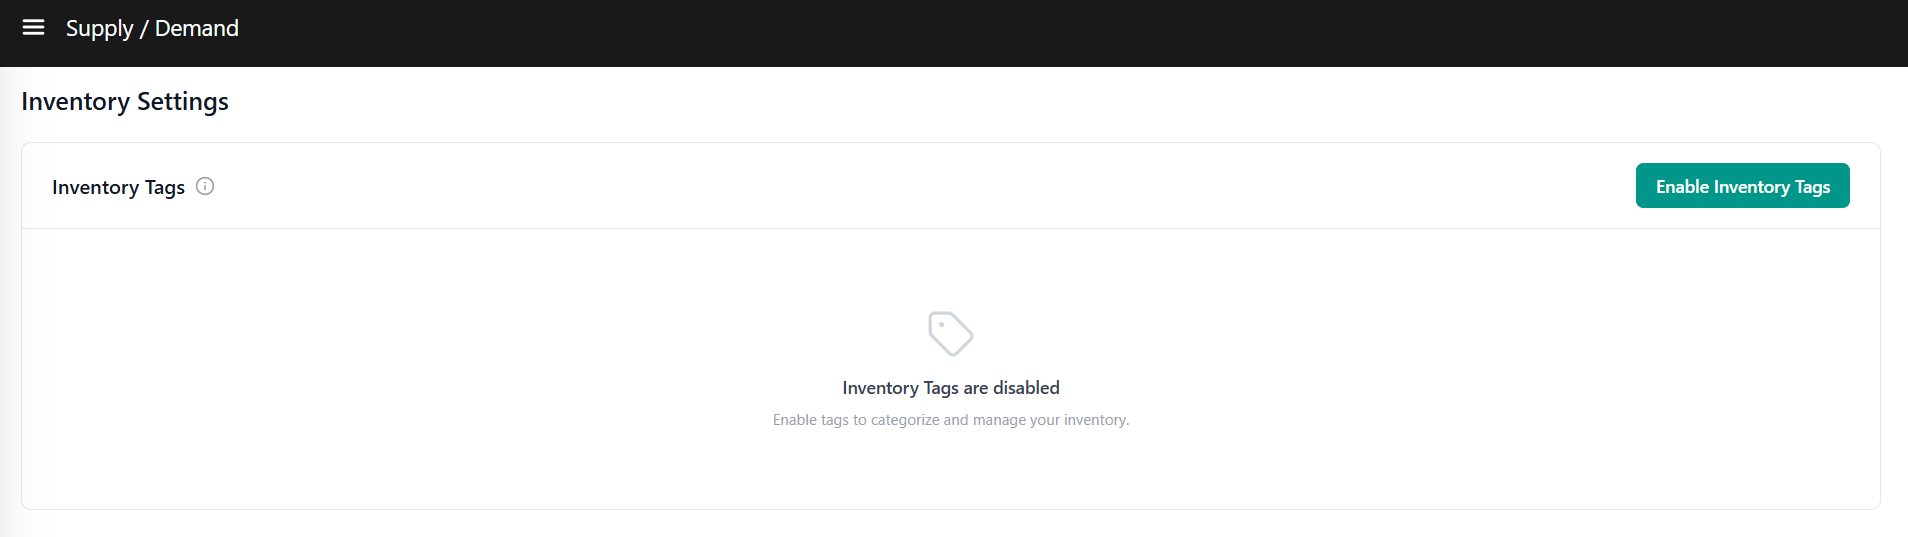 This will create an empty table where tags will be displayed once created.
## Create Inventory Tags
You can create new tags by clicking **Create Inventory Tag**. A pop-up will appear with configuration settings. There is a default maximum limit of 3 tags per tenant and 6 tag values per tenant (across all tags).
1. Enter a **Tag Name** (such as Channel). This name is sometimes referred to as a "tag category" in APIs or other resources.
2. Enter a default **Tag Value** (such as Amazon). At least one value is required to be set, as if no tag is specified for an inventory item then it will use this first value instead.
This will create an empty table where tags will be displayed once created.
## Create Inventory Tags
You can create new tags by clicking **Create Inventory Tag**. A pop-up will appear with configuration settings. There is a default maximum limit of 3 tags per tenant and 6 tag values per tenant (across all tags).
1. Enter a **Tag Name** (such as Channel). This name is sometimes referred to as a "tag category" in APIs or other resources.
2. Enter a default **Tag Value** (such as Amazon). At least one value is required to be set, as if no tag is specified for an inventory item then it will use this first value instead.
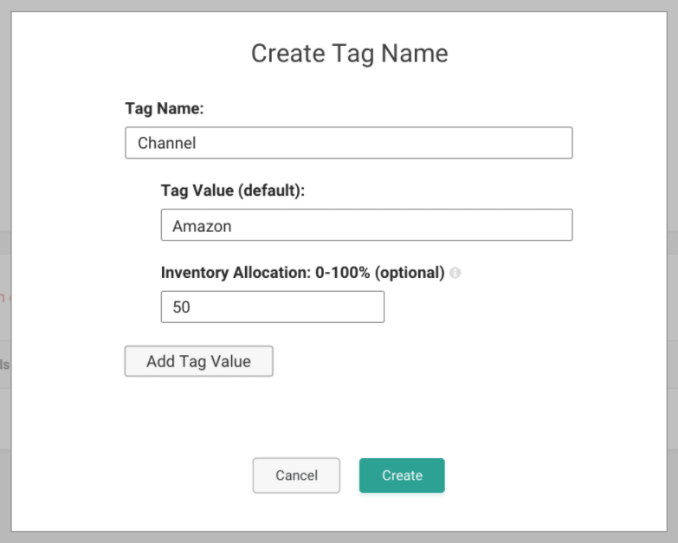 3. If desired, set the **Inventory Allocation** percentage. This will determine how much of the total inventory is made available for this segment. In this example, 50% of the discrete total inventory will always be allocated for the Amazon sales channel. If you want to use discrete values for your inventory segmentation instead of a percentage, you must leave the Inventory Allocation % field blank. If you do set percentage values but want to switch to discrete values later, you must delete all tags and re-add them without percentages to view discrete inventory.
4. Click **Add Tag Value** to create another option for this tag. All values that you add should be unique within their tag name.
5. If an allocation percentage is specified for each value, then all of the percentages must add up to 100%.
* In the below example, the first value is allocated at 50% so additional tags could be created with allocations of 20% and 30%. However, it is not required to set these percentages – if any are left blank, then validation will not be done for that tag value when inventory levels are refreshed. It will effectively accept any amount of inventory, as long as other values' percentage requirements are satisfied first.
3. If desired, set the **Inventory Allocation** percentage. This will determine how much of the total inventory is made available for this segment. In this example, 50% of the discrete total inventory will always be allocated for the Amazon sales channel. If you want to use discrete values for your inventory segmentation instead of a percentage, you must leave the Inventory Allocation % field blank. If you do set percentage values but want to switch to discrete values later, you must delete all tags and re-add them without percentages to view discrete inventory.
4. Click **Add Tag Value** to create another option for this tag. All values that you add should be unique within their tag name.
5. If an allocation percentage is specified for each value, then all of the percentages must add up to 100%.
* In the below example, the first value is allocated at 50% so additional tags could be created with allocations of 20% and 30%. However, it is not required to set these percentages – if any are left blank, then validation will not be done for that tag value when inventory levels are refreshed. It will effectively accept any amount of inventory, as long as other values' percentage requirements are satisfied first.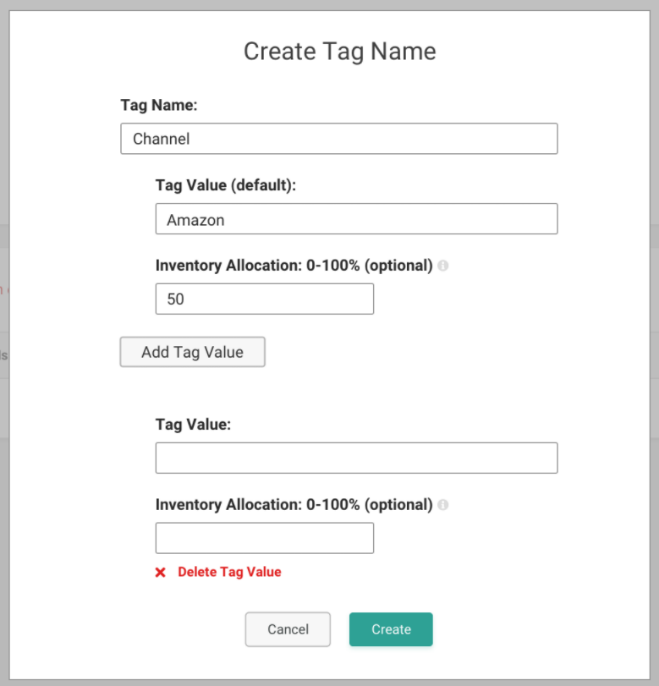 6. Click **Create** to save the tag.
You can create new tags by clicking **Create Inventory Tag**. A Drawer will appear with configuration settings. There is a default maximum limit of 3 tags per tenant and 6 tag values per tenant (across all tags).
1. Enter a **Tag Name** (such as Channel). This name is sometimes referred to as a "tag category" in APIs or other resources.
6. Click **Create** to save the tag.
You can create new tags by clicking **Create Inventory Tag**. A Drawer will appear with configuration settings. There is a default maximum limit of 3 tags per tenant and 6 tag values per tenant (across all tags).
1. Enter a **Tag Name** (such as Channel). This name is sometimes referred to as a "tag category" in APIs or other resources.
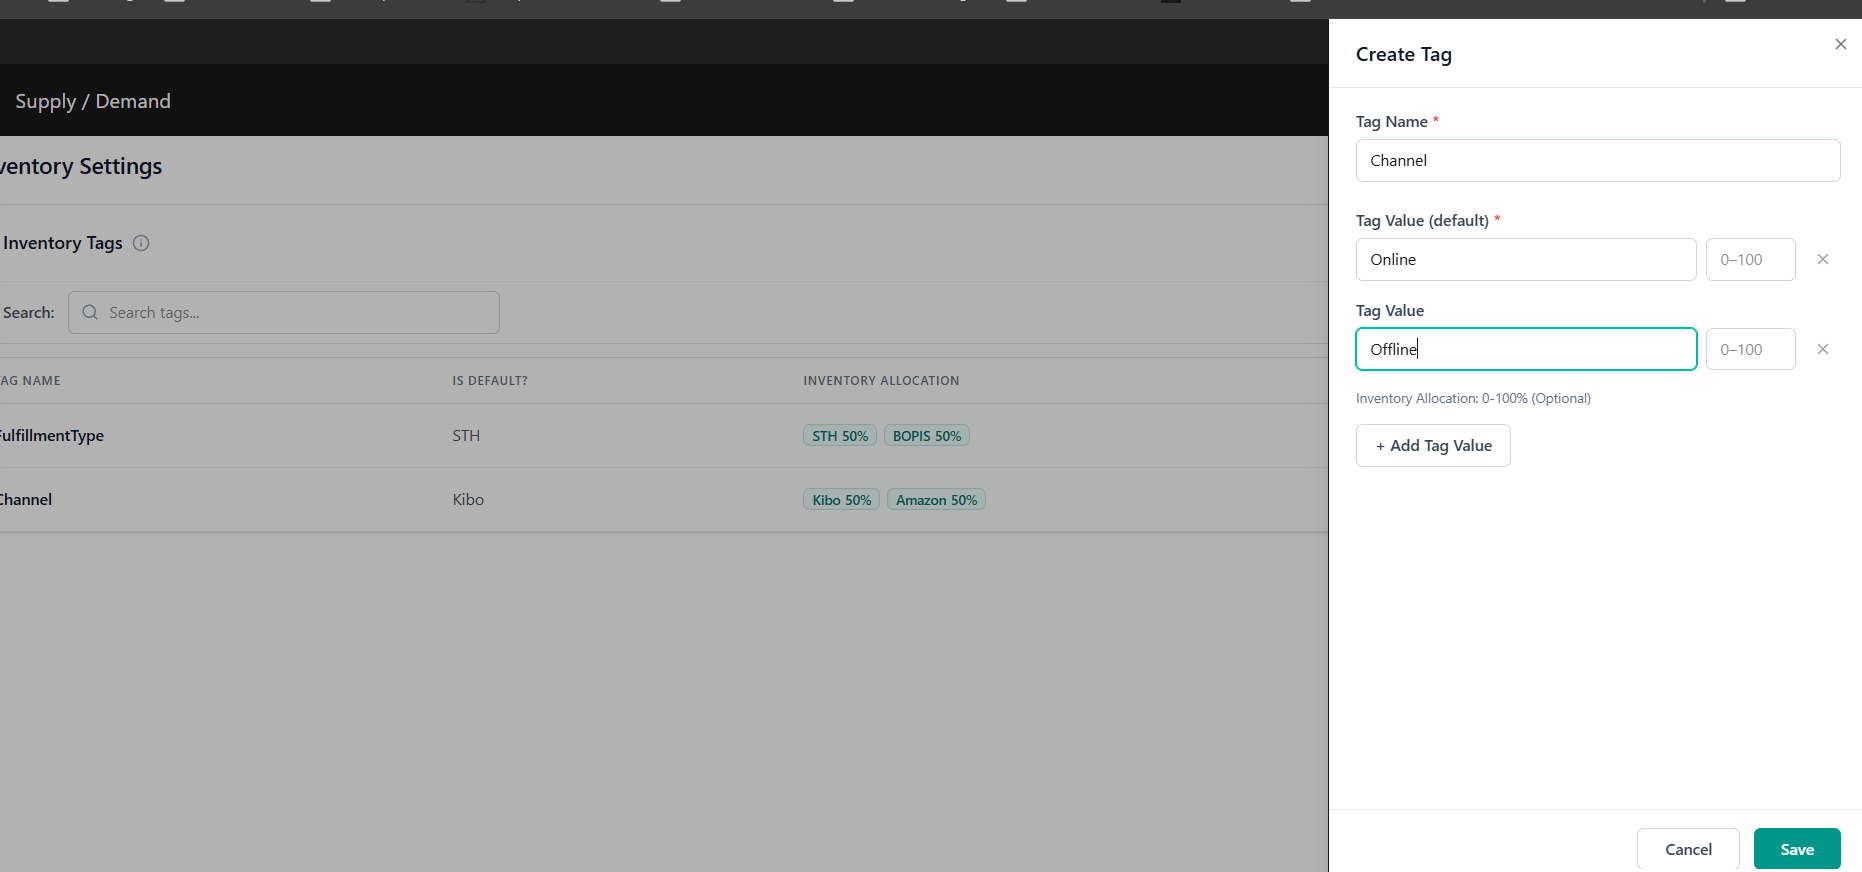 2. Enter a default **Tag Value** (such as Amazon). At least one value is required to be set, as if no tag is specified for an inventory item then it will use this first value instead
3. If desired, set the **Inventory Allocation** percentage. This will determine how much of the total inventory is made available for this segment. In this example, 50% of the discrete total inventory will always be allocated for the Amazon sales channel. If you want to use discrete values for your inventory segmentation instead of a percentage, you must leave the Inventory Allocation % field blank. If you do set percentage values but want to switch to discrete values later, you must delete all tags and re-add them without percentages to view discrete inventory.
4. Click **Add Tag Value** to create another option for this tag. All values that you add should be unique within their tag name.
5. If an allocation percentage is specified for each value, then all of the percentages must add up to 100%.
* In the below example, the first value is allocated at 50% so additional tags could be created with allocations of 20% and 30%. However, it is not required to set these percentages – if any are left blank, then validation will not be done for that tag value when inventory levels are refreshed. It will effectively accept any amount of inventory, as long as other values' percentage requirements are satisfied first.
2. Enter a default **Tag Value** (such as Amazon). At least one value is required to be set, as if no tag is specified for an inventory item then it will use this first value instead
3. If desired, set the **Inventory Allocation** percentage. This will determine how much of the total inventory is made available for this segment. In this example, 50% of the discrete total inventory will always be allocated for the Amazon sales channel. If you want to use discrete values for your inventory segmentation instead of a percentage, you must leave the Inventory Allocation % field blank. If you do set percentage values but want to switch to discrete values later, you must delete all tags and re-add them without percentages to view discrete inventory.
4. Click **Add Tag Value** to create another option for this tag. All values that you add should be unique within their tag name.
5. If an allocation percentage is specified for each value, then all of the percentages must add up to 100%.
* In the below example, the first value is allocated at 50% so additional tags could be created with allocations of 20% and 30%. However, it is not required to set these percentages – if any are left blank, then validation will not be done for that tag value when inventory levels are refreshed. It will effectively accept any amount of inventory, as long as other values' percentage requirements are satisfied first.
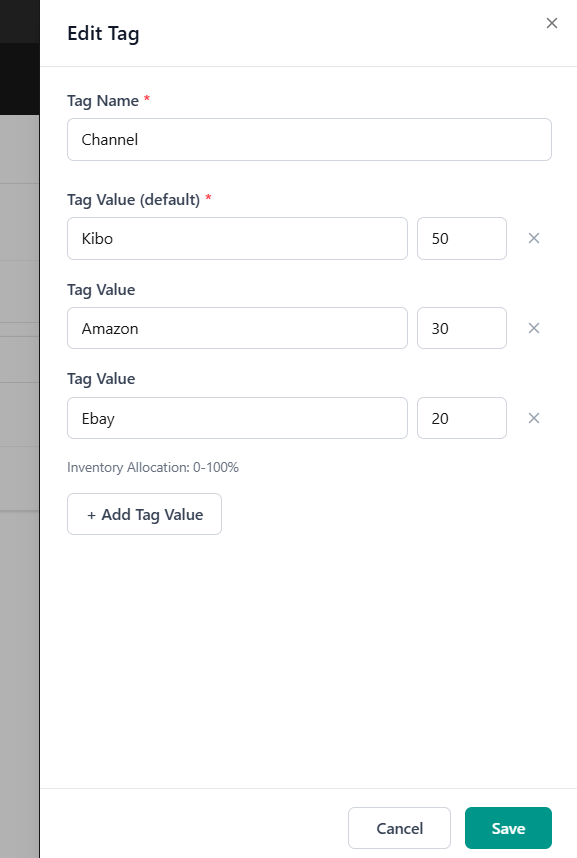 6. Click **Save** to Create the tag.
## View and Update Tags
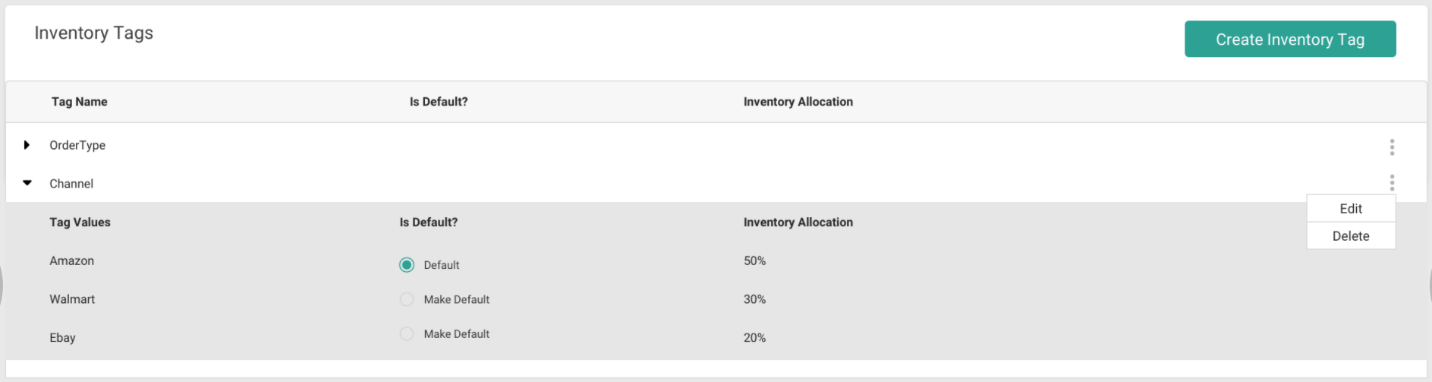
Once set, the new tag is added to the Inventory Tags table. Click a tag in the table to expand its details and view the possible values and allocation percentages.
You can use the dropdown menu shown below to **Edit** or **Delete** a tag instead. Editing will open the same pop-up as used for tag creation, allowing you to update all values, change the default value, and delete any non-default values.
6. Click **Save** to Create the tag.
## View and Update Tags
Once set, the new tag is added to the Inventory Tags table. Click a tag in the table to expand its details and view the possible values and allocation percentages.
You can use the dropdown menu shown below to **Edit** or **Delete** a tag instead. Editing will open the same pop-up as used for tag creation, allowing you to update all values, change the default value, and delete any non-default values.
 Inventory should be periodically redistributed between your channels based on the allocation percentages. You can do this on-demand by calling the [Inventory Redistribution API](/pages/inventory-api-overview#inventory-redistribution "Inventory API Overview") with the UPCs and/or location codes you want to redistribute across. Asynchronous redistribution will then occur at the next Refresh or Adjust update to restore the appropriate amount of inventory to the designated channels.
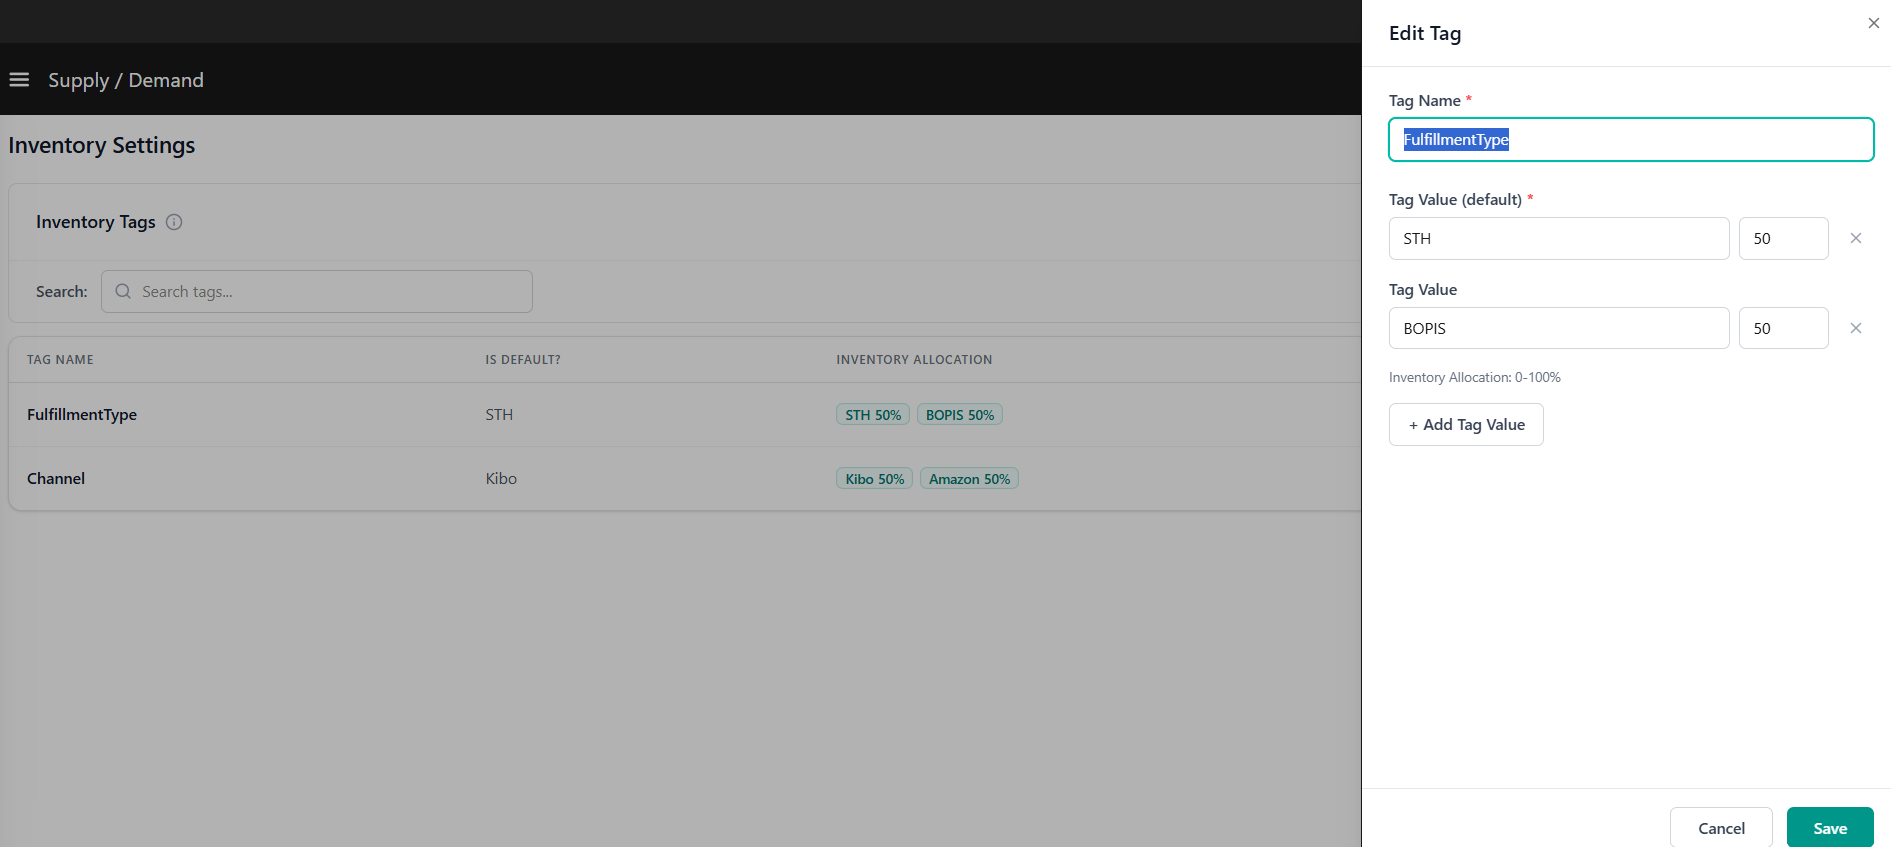
Once set, the new tag is added to the Inventory Tags table. Click the edit icon in the table to view and edit its details and view the possible values and allocation percentages.
Editing will open the same Drawer as used for tag creation, allowing you to update all values, change the default value, and delete icon will allow to delete Tag.
Inventory should be periodically redistributed between your channels based on the allocation percentages. You can do this on-demand by calling the [Inventory Redistribution API](/pages/inventory-api-overview#inventory-redistribution "Inventory API Overview") with the UPCs and/or location codes you want to redistribute across. Asynchronous redistribution will then occur at the next Refresh or Adjust update to restore the appropriate amount of inventory to the designated channels.
Once set, the new tag is added to the Inventory Tags table. Click the edit icon in the table to view and edit its details and view the possible values and allocation percentages.
Editing will open the same Drawer as used for tag creation, allowing you to update all values, change the default value, and delete icon will allow to delete Tag.
 Inventory should be periodically redistributed between your channels based on the allocation percentages. You can do this on-demand by calling the [Inventory Redistribution API](/pages/inventory-api-overview#inventory-redistribution "Inventory API Overview") with the UPCs and/or location codes you want to redistribute across. Asynchronous redistribution will then occur at the next Refresh or Adjust update to restore the appropriate amount of inventory to the designated channels.