> ## Documentation Index
> Fetch the complete documentation index at: https://docs.kibocommerce.com/llms.txt
> Use this file to discover all available pages before exploring further.
# Buy Online Pickup In Store
Buy Online Pickup In Store (BOPIS) shipments follow a slightly different process than Ship to Home (STH).
Learn how transfer shipments work to fulfill orders from alternative locations
See how to fulfill buy online pickup in store orders
Where STH shipments usually print a pack sheet *after* stock validation, pickup shipments instead print a pick sheet *before* validating stock. Then, the shipment is provided for the customer to pick up instead of preparing for carrier shipment.
## Begin Fulfillment
To get started:
1. Go to **Main** > **Fulfiller**.
2. Locate the shipment you want to fulfill, whether through the search bar or the widgets on the Fulfiller homepage.
3. Click **Finish** **Fulfilling Shipment** at the bottom of the shipment details.
* If you accessed this shipment's details page directly, such as by clicking a link from the Order Admin, then this button will not be displayed. Instead, the page will already show you the current shipment step. 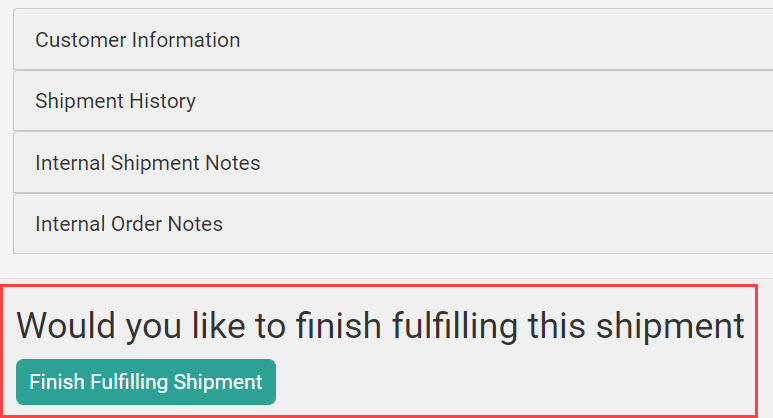 ### Cancel Fulfillment
At any point in this process, the shipment can be cancelled by clicking **Cancel Shipment** from the dropdown actions menu in the top right. If an order has multiple shipments, then canceling one of its shipments does NOT cancel the other shipments nor the order itself. The order will only be canceled in one of two ways: automatically by the system when all of its shipments are canceled first, or manually by an admin or customer service representative through the Admin UI. See the [Order Admin UI documentation](/pages/cancel-orders-and-shipments) for more information about cancellation at the order level.
### Cancel Fulfillment
At any point in this process, the shipment can be cancelled by clicking **Cancel Shipment** from the dropdown actions menu in the top right. If an order has multiple shipments, then canceling one of its shipments does NOT cancel the other shipments nor the order itself. The order will only be canceled in one of two ways: automatically by the system when all of its shipments are canceled first, or manually by an admin or customer service representative through the Admin UI. See the [Order Admin UI documentation](/pages/cancel-orders-and-shipments) for more information about cancellation at the order level.
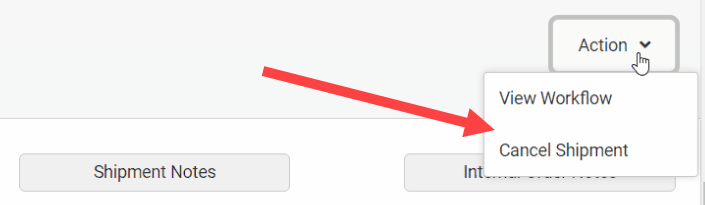 Before you begin, note that you can also click **View Workflow** from the above action menu at any point to view the BPM for that fulfillment method.
## Accept Shipment
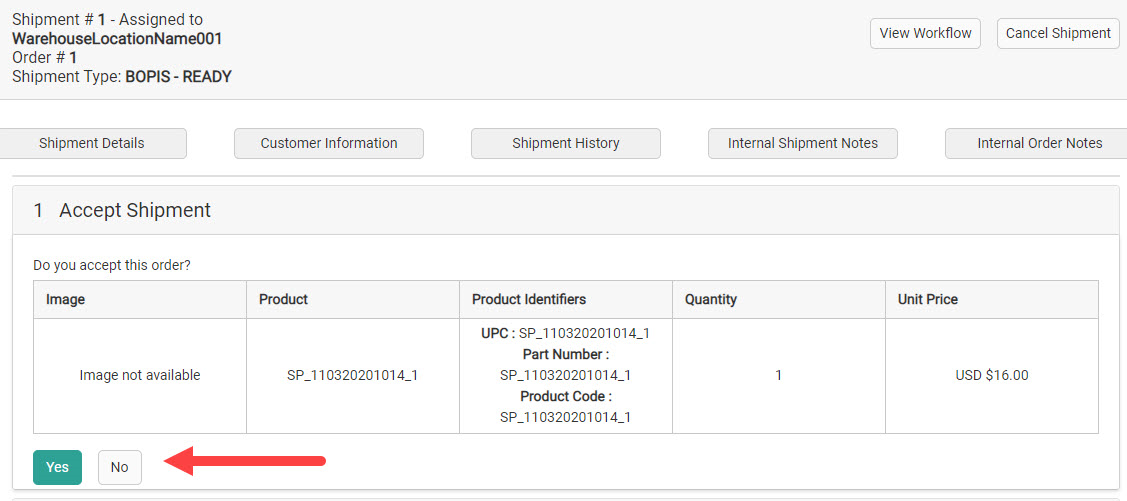
The first step in the BOPIS fulfillment process is Accept Shipment, where you acknowledge the shipment and indicate that it is ready to start fulfillment.
1. Review the shipment details.
2. Click **Yes**.
Before you begin, note that you can also click **View Workflow** from the above action menu at any point to view the BPM for that fulfillment method.
## Accept Shipment
The first step in the BOPIS fulfillment process is Accept Shipment, where you acknowledge the shipment and indicate that it is ready to start fulfillment.
1. Review the shipment details.
2. Click **Yes**.
 ## Print Pick Sheet
You must print a pick sheet before you can validate the item availability at your fulfillment location.
1. Click **Print Pick Sheet** to print the sheet.
2. Click **Proceed to Validate Stock**.
3. Alternatively, click **Reject Shipment** if you cannot fulfill this shipment.
## Print Pick Sheet
You must print a pick sheet before you can validate the item availability at your fulfillment location.
1. Click **Print Pick Sheet** to print the sheet.
2. Click **Proceed to Validate Stock**.
3. Alternatively, click **Reject Shipment** if you cannot fulfill this shipment.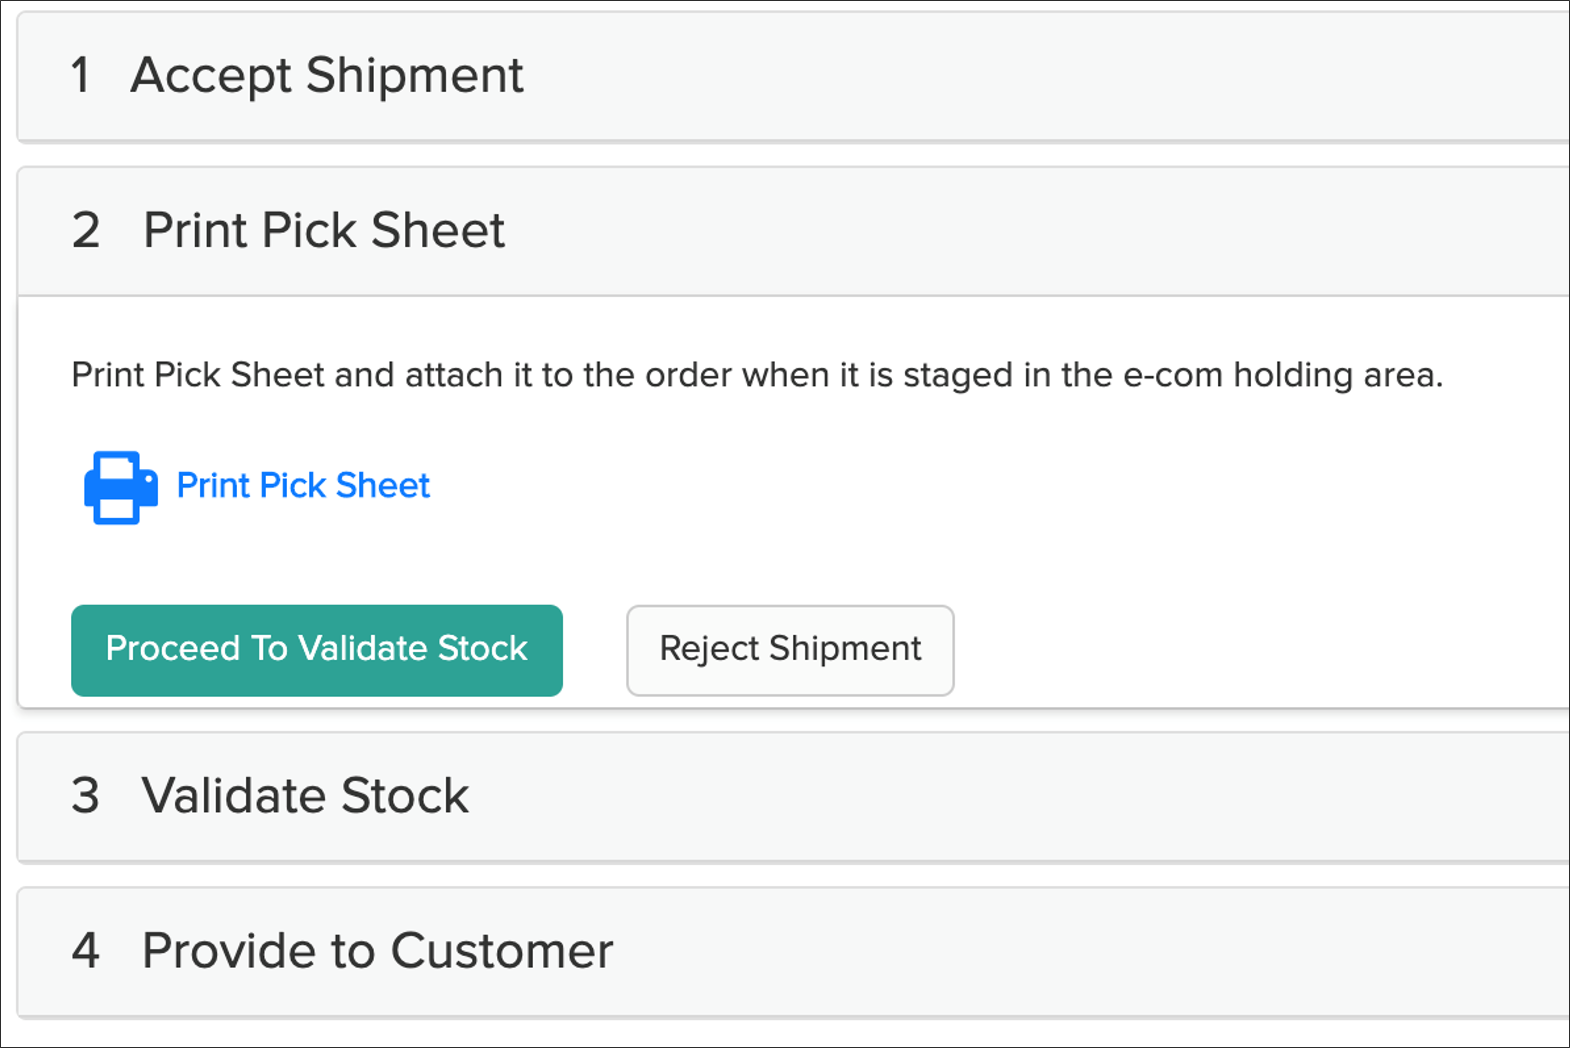 ## Validate Stock
Stock validation indicates how many of each product you can fulfill.
1. In the **In Stock** column for each shipment, type in the quantity you have in stock.
* Or, if you click inside the field then arrows will appear. Click these to increase or decrease the quantity by one.
* The barcode(s) can also be scanned to be automatically populate this field instead. For more details and configurable scanning options, see [the UI overview](/pages/fulfiller-ui-overview#barcode-scanners).
## Validate Stock
Stock validation indicates how many of each product you can fulfill.
1. In the **In Stock** column for each shipment, type in the quantity you have in stock.
* Or, if you click inside the field then arrows will appear. Click these to increase or decrease the quantity by one.
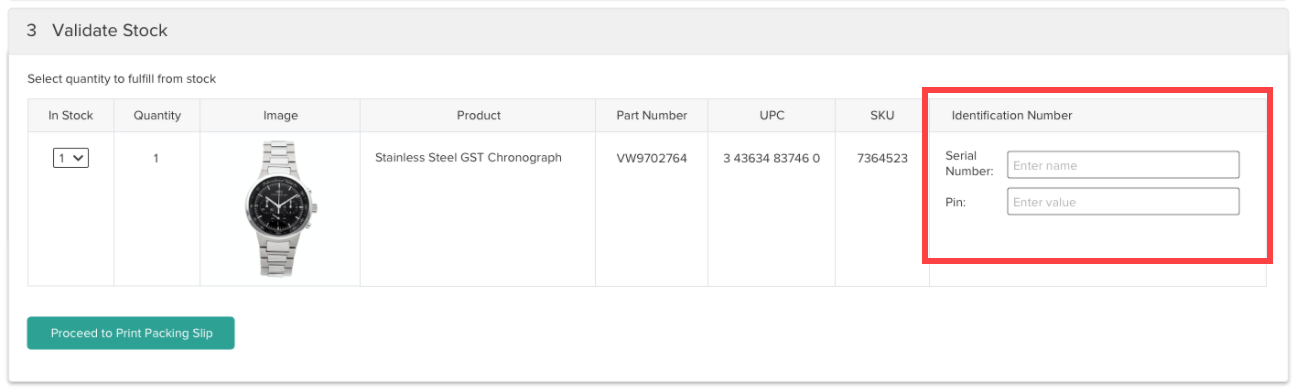
* The barcode(s) can also be scanned to be automatically populate this field instead. For more details and configurable scanning options, see [the UI overview](/pages/fulfiller-ui-overview#barcode-scanners).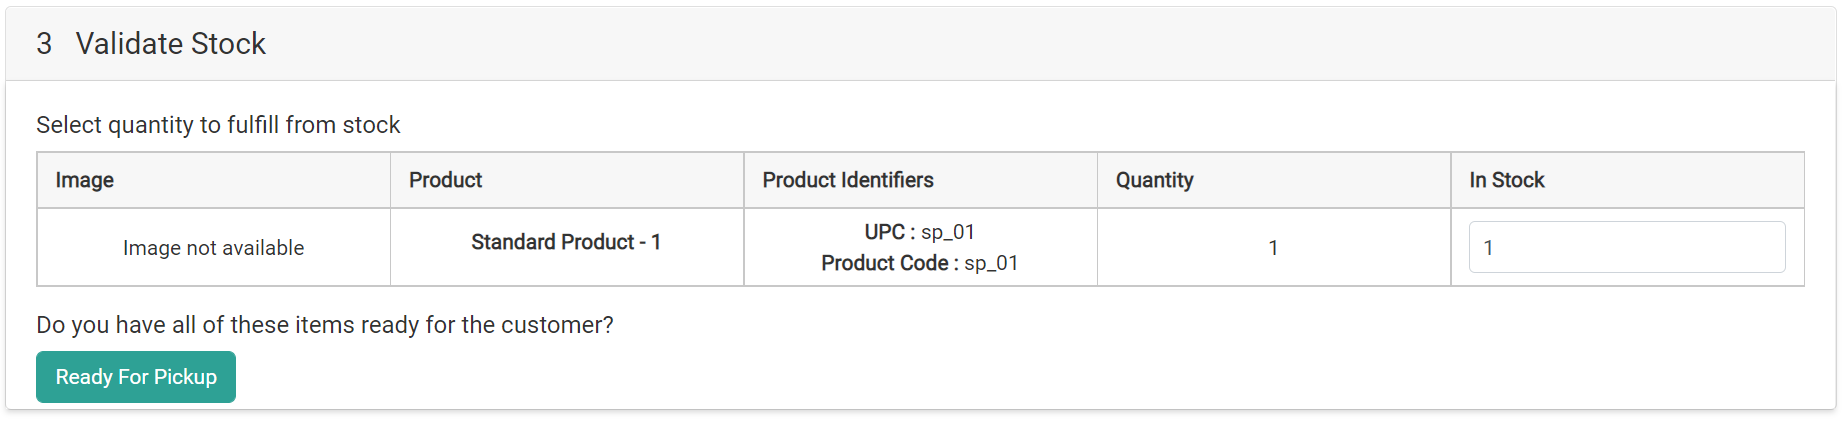 2. If any additional item identifiers are displayed, such as in the Identification Number column shown below, then enter the appropriate values. These are item-level attributes that denote important unique information such as a serial number, manufacturer number, number for a gift card item to load a value to, or other identifying data point.
* Item identifiers are defined as the `fulfillmentFields` object in the [Create Order API](/api-reference/order/create-order). If any are flagged as required, then you will not be able to proceed until you have provided them.
2. If any additional item identifiers are displayed, such as in the Identification Number column shown below, then enter the appropriate values. These are item-level attributes that denote important unique information such as a serial number, manufacturer number, number for a gift card item to load a value to, or other identifying data point.
* Item identifiers are defined as the `fulfillmentFields` object in the [Create Order API](/api-reference/order/create-order). If any are flagged as required, then you will not be able to proceed until you have provided them.
 3. If you have all of the required quantity in stock, click **Ready for Pickup**. If some quantity is not in stock, then your next action will depend on whether the [site setting](/pages/general-settings#site) for BOPIS Transfer at **System** > **Settings** > **General** in the Admin UI is enabled.
* If transfers are enabled, click **Transfer Shipment** to create a transfer for another location to supply the the missing quantity.
3. If you have all of the required quantity in stock, click **Ready for Pickup**. If some quantity is not in stock, then your next action will depend on whether the [site setting](/pages/general-settings#site) for BOPIS Transfer at **System** > **Settings** > **General** in the Admin UI is enabled.
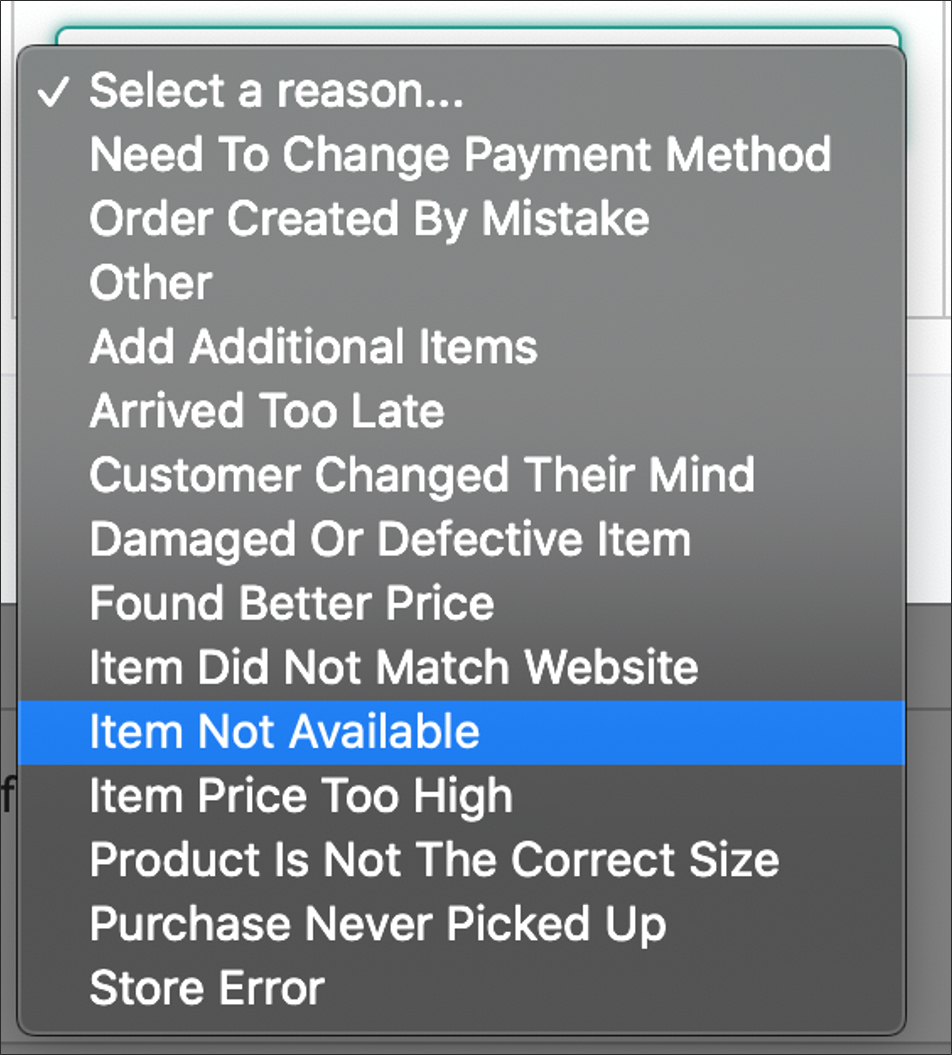
* If transfers are enabled, click **Transfer Shipment** to create a transfer for another location to supply the the missing quantity.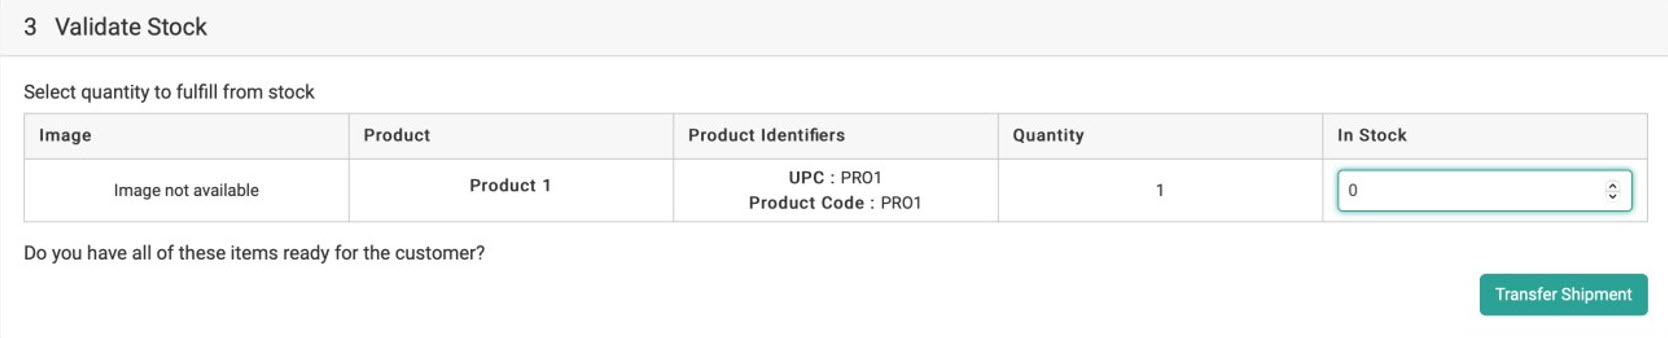 * If the site setting is disabled, then you will not be able to request a transfer for the missing quantity. Instead, clicking **Some Items Not Available** will reject the shipment. A pop-up will require the user to select a reason before confirming the rejection and sending the shipment to Customer Care.
 If your implementation is set up to allocate inventory from granular fields, then you will be able to adjust the quantities being fulfilled from each granular record during Validate Stock. See the [Granular Inventory Fields guide](/pages/granular-inventory-fields#fulfiller-ui "Granular Inventory Fields") for more details.
### Barcode Scanners
Scanning capability is available for the Validate Stock step, making it easier to input the quantity you have in stock for that shipment. Both USB plug-in laser and camera scanners are supported, though camera scanners are only available through the [mobile fulfiller application](/pages/fulfiller-ui-overview) and will use the camera of that mobile device.
By default, you can input your laser scan into the text field of the In Stock column in the Validate Stock table. However, you can also implement a "Scan UPC/SKU" text box (shown below) that displays above the table to input your scan results. This is a more straightforward method compared to the default interface, but requires a [custom theme change](/pages/fulfiller-theme-customization) to display the field. In your theme, simply activate the `isItemUPCScanAllowed` setting within the language file.
If your implementation is set up to allocate inventory from granular fields, then you will be able to adjust the quantities being fulfilled from each granular record during Validate Stock. See the [Granular Inventory Fields guide](/pages/granular-inventory-fields#fulfiller-ui "Granular Inventory Fields") for more details.
### Barcode Scanners
Scanning capability is available for the Validate Stock step, making it easier to input the quantity you have in stock for that shipment. Both USB plug-in laser and camera scanners are supported, though camera scanners are only available through the [mobile fulfiller application](/pages/fulfiller-ui-overview) and will use the camera of that mobile device.
By default, you can input your laser scan into the text field of the In Stock column in the Validate Stock table. However, you can also implement a "Scan UPC/SKU" text box (shown below) that displays above the table to input your scan results. This is a more straightforward method compared to the default interface, but requires a [custom theme change](/pages/fulfiller-theme-customization) to display the field. In your theme, simply activate the `isItemUPCScanAllowed` setting within the language file.
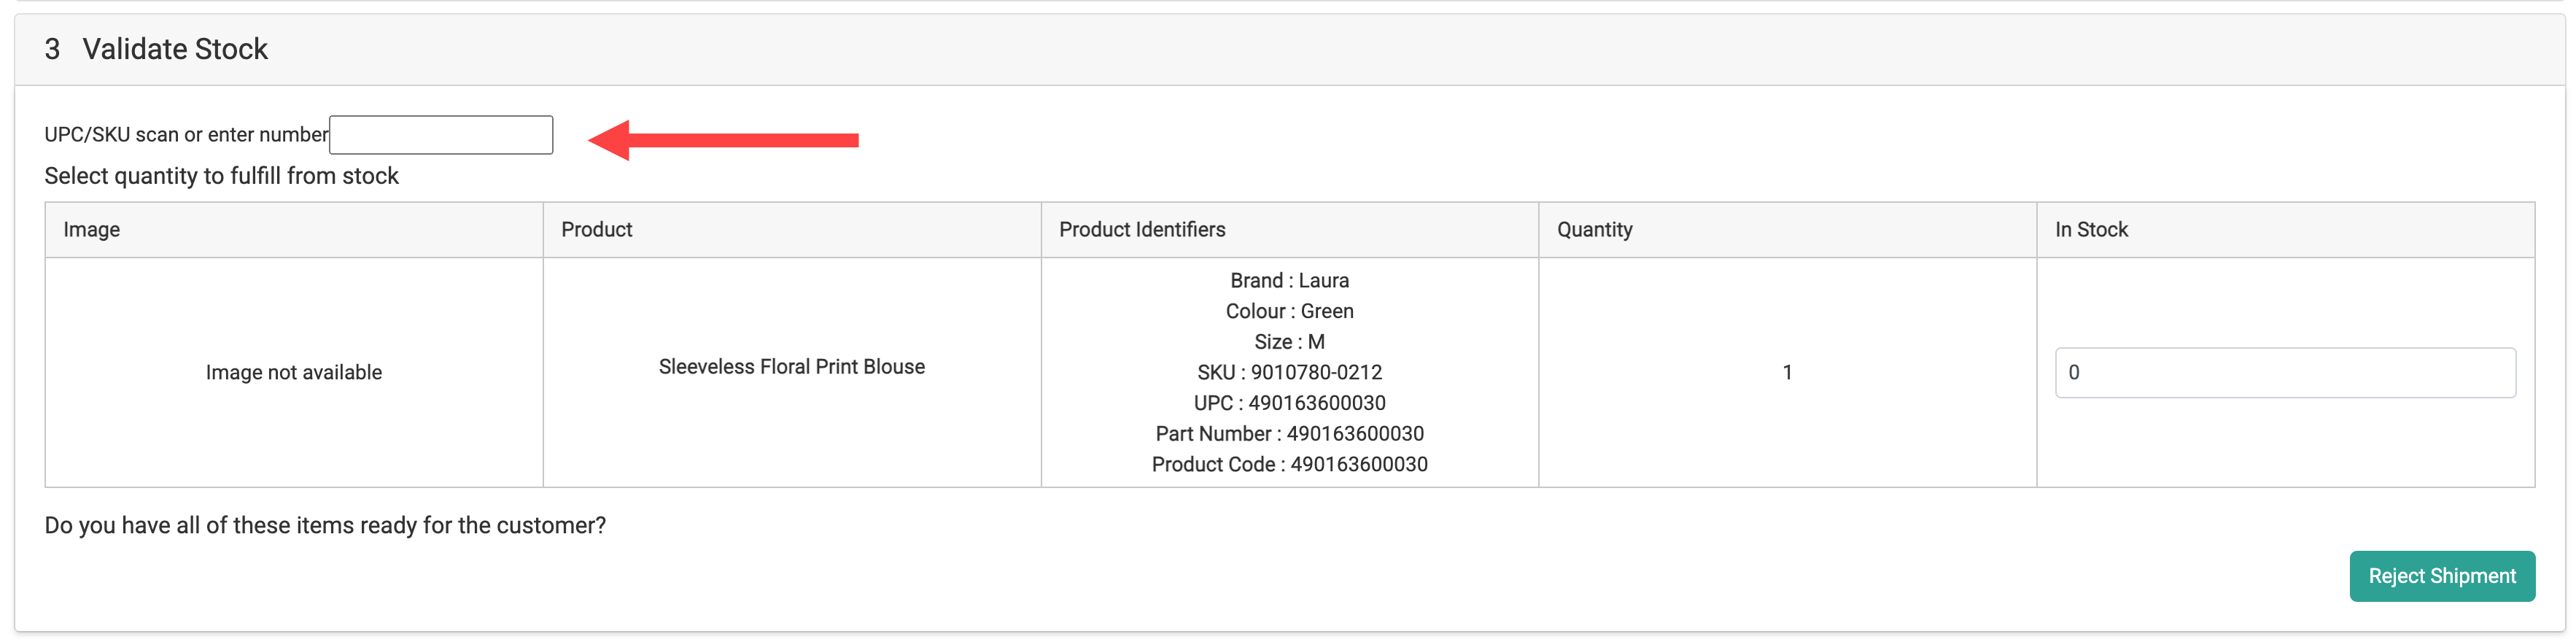 You may also want to reverse the way that the Validate Stock table displays counts when using laser scanning. By default, the In Stock field is populated with the expected count of the order and the fulfiller is expected to decrease this value for any quantity they are rejecting. However, you can instead start the In Stock count at 0 and scan items to increase the value. To enable this behavior, find your `ValidateStockQuantity` [theme settings](/pages/fulfiller-theme-customization) and set `defaultZeroQuantity` to "1" and set both `defaultShipmentQuantity` and `locationInventoryQuantity` to "0" as shown below.
```
"ValidateStockQuantity": {
"defaultZeroQuantity": 1,
"defaultShipmentQuantity": 0,
"locationInventoryQuantity": 0
},
```
## Optional: Waiting for Transfer and Partial Pickup
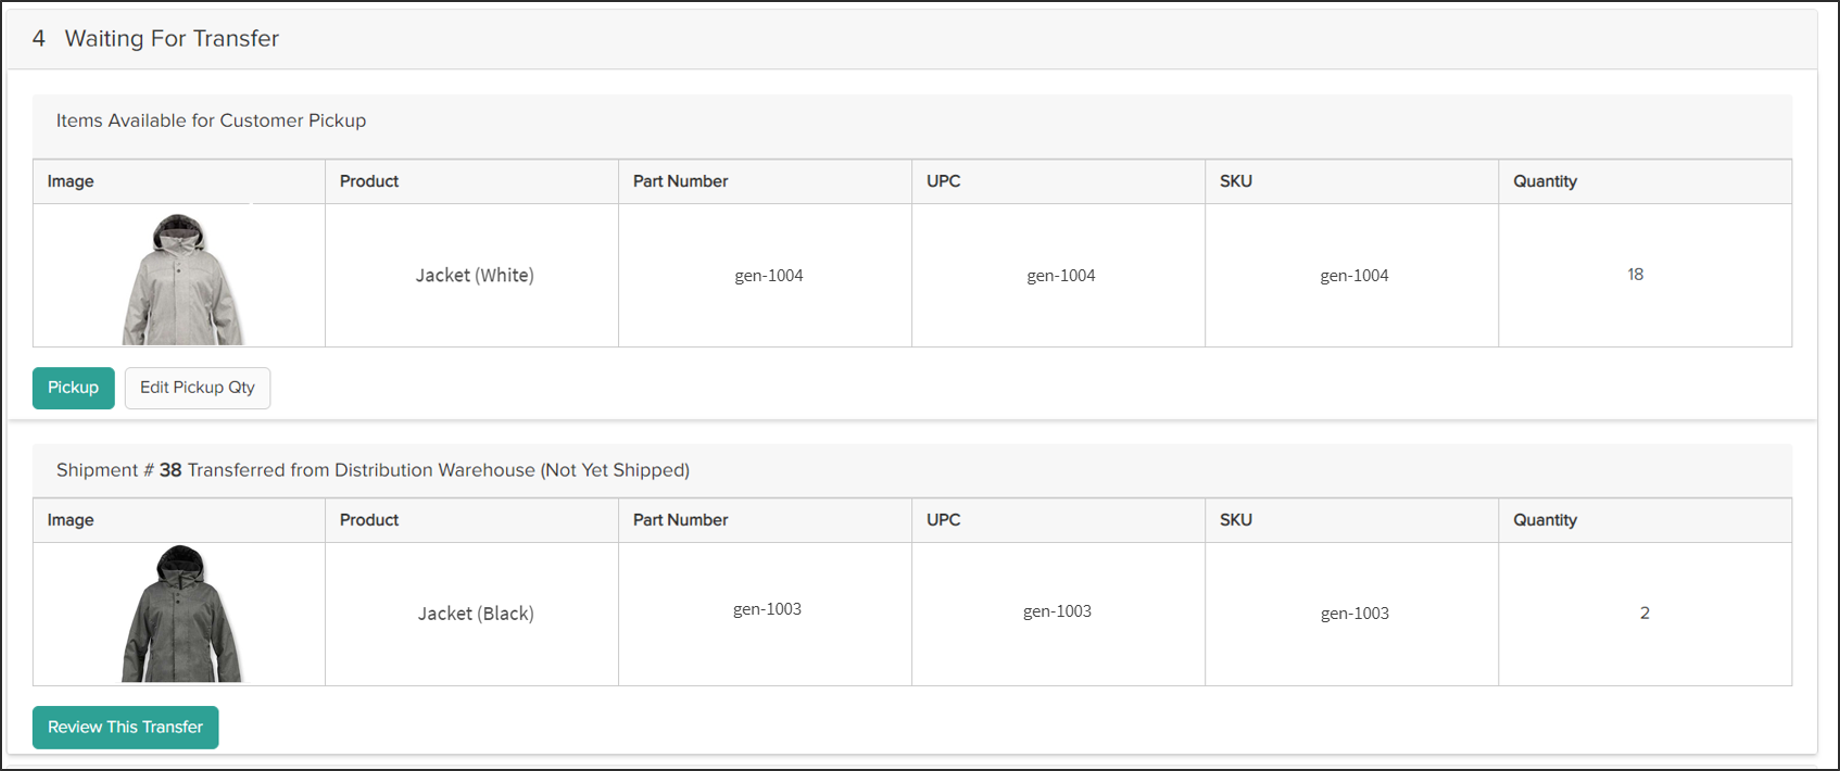
If a transfer was initiated during Validate Stock, the BOPIS shipment will be placed into Waiting for Transfer. However, it may be possible for the customer to pick up any items that are on-hand before the transfer has arrived.
In this case, the on-hand items are displayed in their own section as shown below. Click **Pickup** to split those items into a new shipment that can be fulfilled while the transfer remains pending for this original shipment. The customer will receive a Partial Pickup Ready email and can come collect these items, then return to pick up the transferred items when they arrive.
You may also want to reverse the way that the Validate Stock table displays counts when using laser scanning. By default, the In Stock field is populated with the expected count of the order and the fulfiller is expected to decrease this value for any quantity they are rejecting. However, you can instead start the In Stock count at 0 and scan items to increase the value. To enable this behavior, find your `ValidateStockQuantity` [theme settings](/pages/fulfiller-theme-customization) and set `defaultZeroQuantity` to "1" and set both `defaultShipmentQuantity` and `locationInventoryQuantity` to "0" as shown below.
```
"ValidateStockQuantity": {
"defaultZeroQuantity": 1,
"defaultShipmentQuantity": 0,
"locationInventoryQuantity": 0
},
```
## Optional: Waiting for Transfer and Partial Pickup
If a transfer was initiated during Validate Stock, the BOPIS shipment will be placed into Waiting for Transfer. However, it may be possible for the customer to pick up any items that are on-hand before the transfer has arrived.
In this case, the on-hand items are displayed in their own section as shown below. Click **Pickup** to split those items into a new shipment that can be fulfilled while the transfer remains pending for this original shipment. The customer will receive a Partial Pickup Ready email and can come collect these items, then return to pick up the transferred items when they arrive.
 ## Provide to Customer
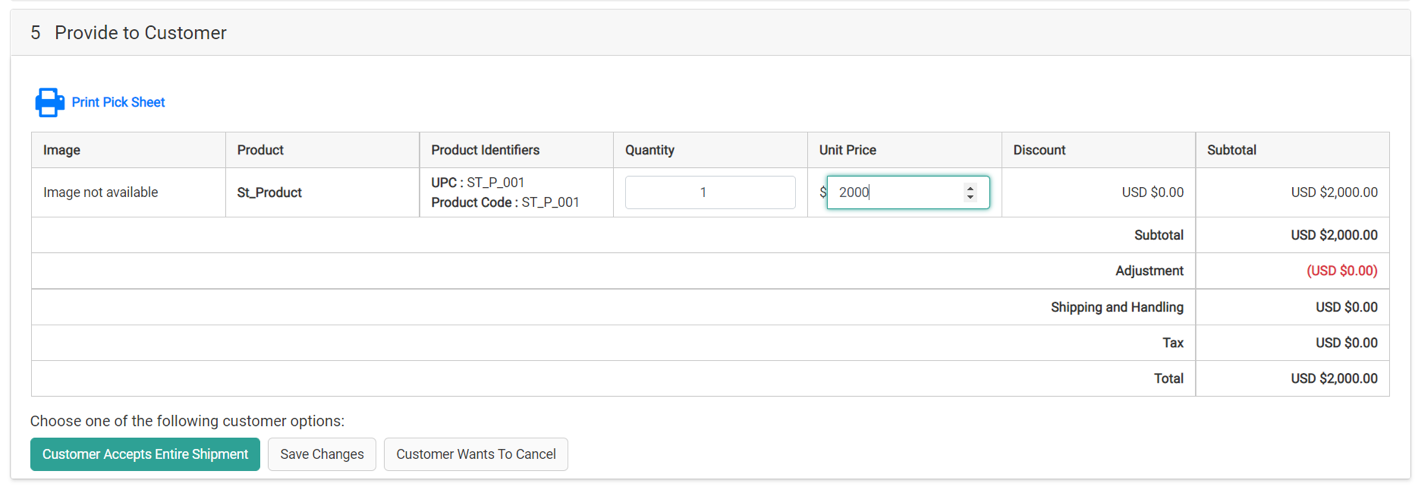
In the final step, you have the option to print the pick sheet if needed. Additionally, you may be able to [offer a partial pickup](/pages/transfer-shipments#partial-pickup) if the BOPIS shipment is waiting on a transfer but some items are available.
1. Once the customer arrives to pick up their order, you click either **Customer Accepts Entire Shipment** or **Customer Wants To Cancel** depending on the appropriate case.
2. If the shipment is accepted, then it will be completed and set to the Fulfilled status.
## Provide to Customer
In the final step, you have the option to print the pick sheet if needed. Additionally, you may be able to [offer a partial pickup](/pages/transfer-shipments#partial-pickup) if the BOPIS shipment is waiting on a transfer but some items are available.
1. Once the customer arrives to pick up their order, you click either **Customer Accepts Entire Shipment** or **Customer Wants To Cancel** depending on the appropriate case.
2. If the shipment is accepted, then it will be completed and set to the Fulfilled status.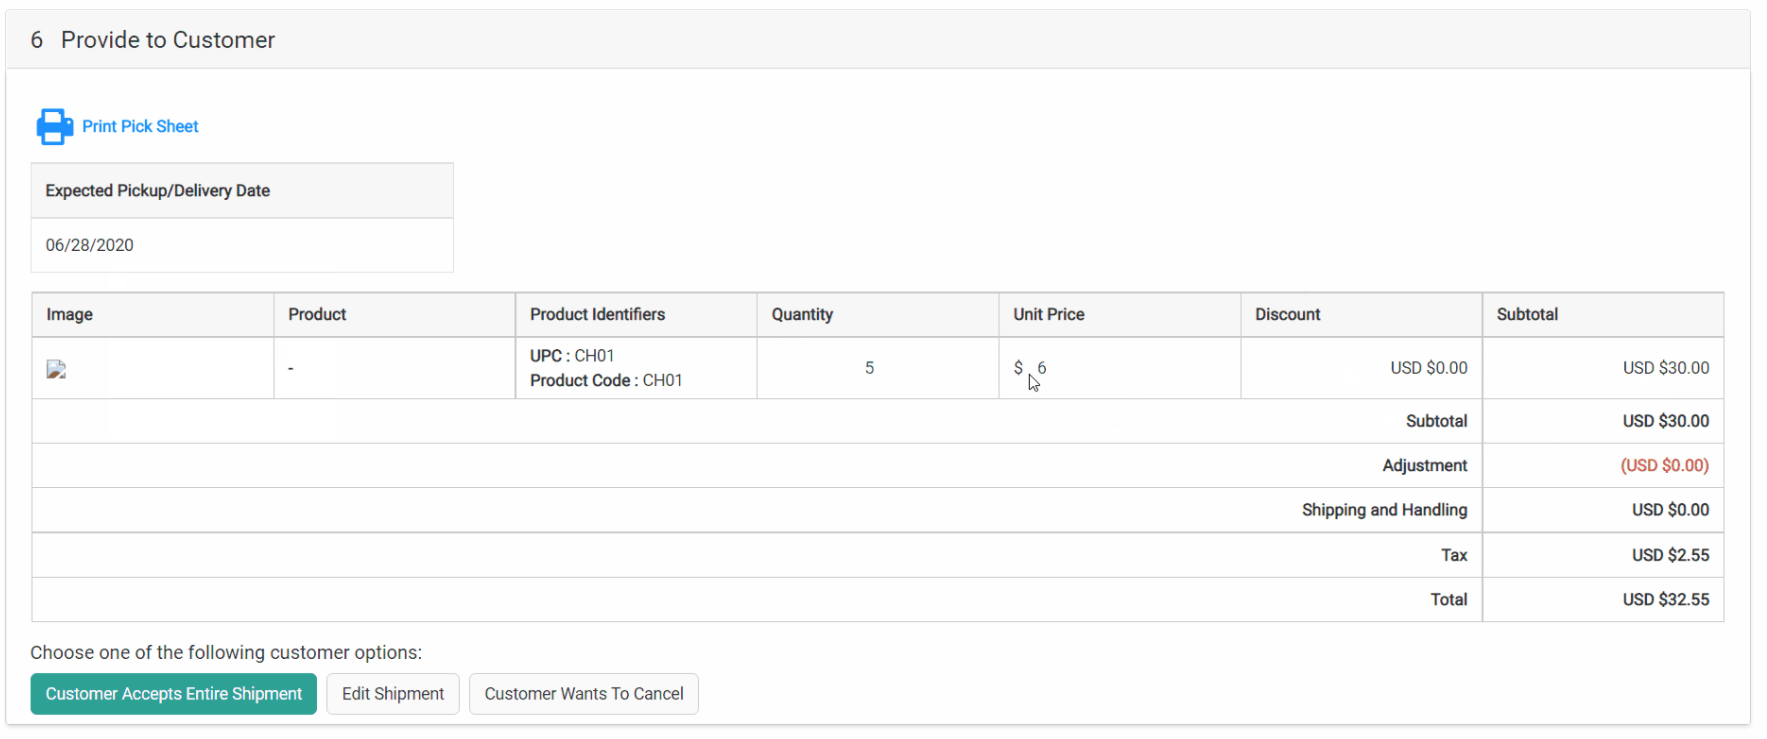 ### Change Pickup Contact and Shipment Details
In cases where the customer designated an alternate pickup contact at checkout, the Fulfiller UI will display both the primary and alternate contact details above **Print Pick Sheet** in this step (as well as in the Customer Information tab in the shipment header). This information is not be editable in the Fulfiller UI and can only be changed from the order details page in [the Order Admin UI](/pages/edit-orders#edit-pickup-contacts) or the [Order API](/api-reference/order/addupdate-alternate-contact).
If the customer wants to change the quantity of an item or requires a price adjustment appeasement, you can edit those values within this step.
1. In this case, click the **Edit Shipment** option before accepting or canceling the entire shipment.
2. Click the quantity and/or unit price field and enter the new value.
3. Click **Save Changes**.
4. If changing the unit price, a pop-up will prompt you to select an appeasement reason. The possible reasons include the default options of Damaged or Defective Item, Price Match, Arrived Too Late, Customer Satisfaction, Lost In Transit, and Other (which will require the user to enter the reason information in a text box, with a limit of 255 characters). However, this list can be customized via the Refund Reasons .[before](/pages/refund-reasons-before) and .[after](/pages/refund-reasons-after) API Extension actions.
### Change Pickup Contact and Shipment Details
In cases where the customer designated an alternate pickup contact at checkout, the Fulfiller UI will display both the primary and alternate contact details above **Print Pick Sheet** in this step (as well as in the Customer Information tab in the shipment header). This information is not be editable in the Fulfiller UI and can only be changed from the order details page in [the Order Admin UI](/pages/edit-orders#edit-pickup-contacts) or the [Order API](/api-reference/order/addupdate-alternate-contact).
If the customer wants to change the quantity of an item or requires a price adjustment appeasement, you can edit those values within this step.
1. In this case, click the **Edit Shipment** option before accepting or canceling the entire shipment.
2. Click the quantity and/or unit price field and enter the new value.
3. Click **Save Changes**.
4. If changing the unit price, a pop-up will prompt you to select an appeasement reason. The possible reasons include the default options of Damaged or Defective Item, Price Match, Arrived Too Late, Customer Satisfaction, Lost In Transit, and Other (which will require the user to enter the reason information in a text box, with a limit of 255 characters). However, this list can be customized via the Refund Reasons .[before](/pages/refund-reasons-before) and .[after](/pages/refund-reasons-after) API Extension actions.