> ## Documentation Index
> Fetch the complete documentation index at: https://docs.kibocommerce.com/llms.txt
> Use this file to discover all available pages before exploring further.
# Manage Vendors
All operator-side vendor management — invitations, document review, item mapping, and status changes — happens inside the Vendor module in Kibo Admin.
See the four-step vendor onboarding process and the operator review and approval workflow
## **Access the Vendor Module**
1. Sign in to **Kibo Admin**.
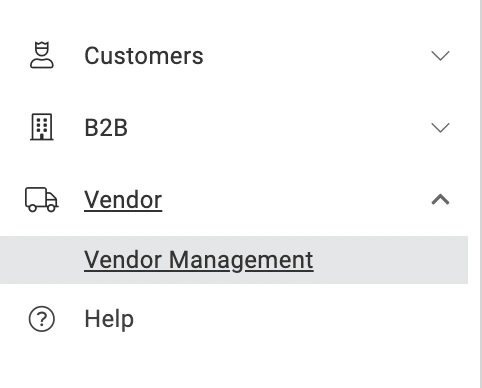
2. In the left navigation, expand **Vendor** and click **Vendor Management**.
 ## **Vendor Listing**
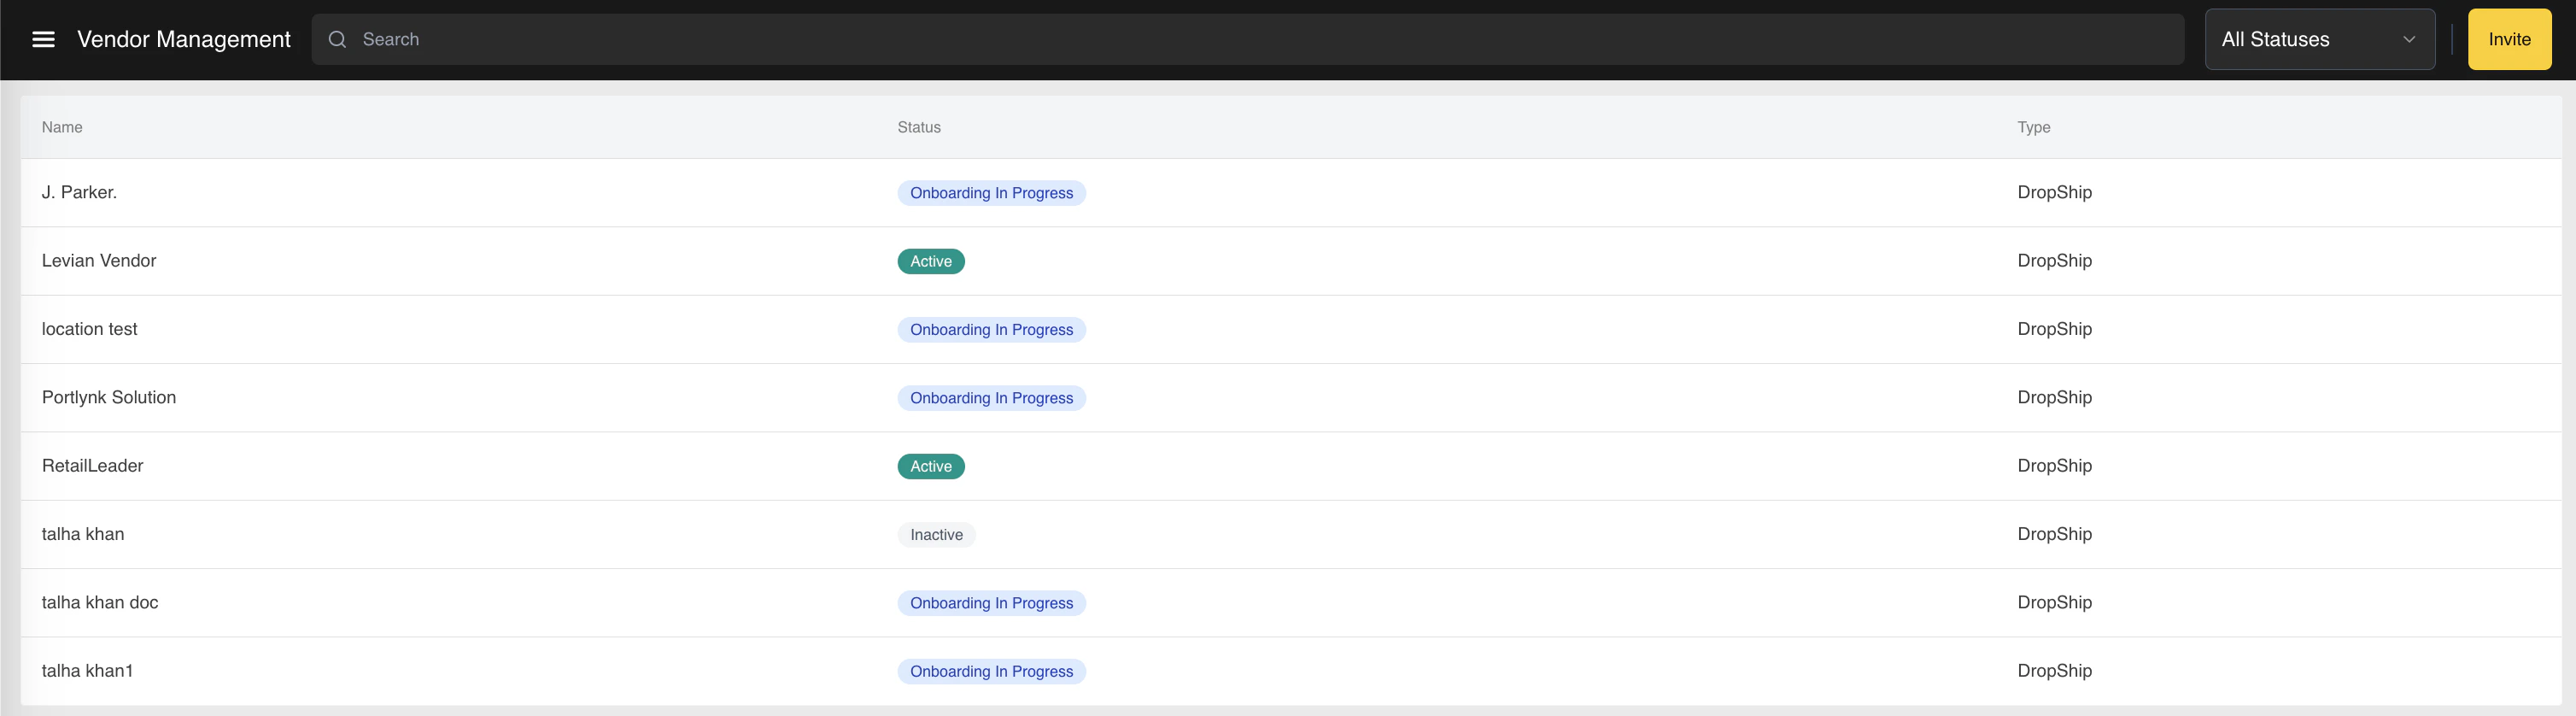
The Vendor Management page displays all vendors registered to the tenant. For a first-time user the listing is blank.
Each row in the table shows:
* **Name —** the vendor's display name.
* **Status —** one of:
1. **Onboarding In Progress** — the vendor has been invited (or has registered) but is not yet active.
2. **Active** — the vendor has met activation requirements and orders can be routed to them.
3. **Inactive** — the operator has turned the vendor off; they will not receive new orders.
* **Type —** the vendor's classification. Currently restricted to **Dropship**.
Use the search bar at the top to find a vendor by name, or use the All Statuses filter on the right to filter the list to a specific status.
## **Vendor Listing**
The Vendor Management page displays all vendors registered to the tenant. For a first-time user the listing is blank.
Each row in the table shows:
* **Name —** the vendor's display name.
* **Status —** one of:
1. **Onboarding In Progress** — the vendor has been invited (or has registered) but is not yet active.
2. **Active** — the vendor has met activation requirements and orders can be routed to them.
3. **Inactive** — the operator has turned the vendor off; they will not receive new orders.
* **Type —** the vendor's classification. Currently restricted to **Dropship**.
Use the search bar at the top to find a vendor by name, or use the All Statuses filter on the right to filter the list to a specific status.
 ### **Invite a New Vendor**
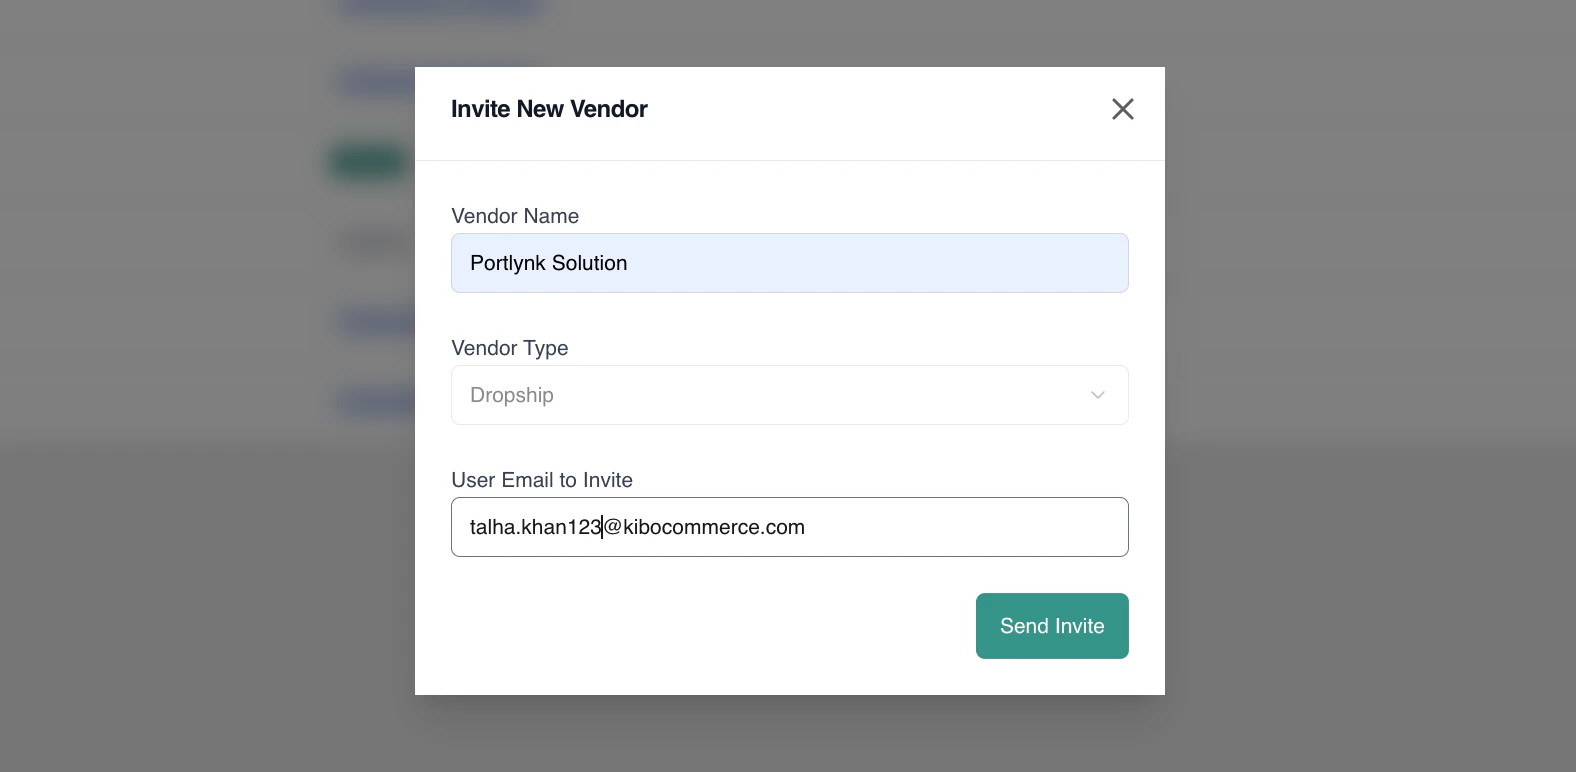
1. Click **Invite** in the top-right corner of the Vendor Management page.
2. Fill in the **Invite New Vendor** popup:
* **Vendor Name** — the display name for the vendor. Must be unique; a duplicate throws an error.
* **Vendor Type** — restricted to **Dropship**.
* **User Email to Invite** — the email address that will receive the invitation. Must be unique; a duplicate throws an error. This becomes the vendor's primary admin login on registration.
3. Click **Send Invite**.
### **Invite a New Vendor**
1. Click **Invite** in the top-right corner of the Vendor Management page.
2. Fill in the **Invite New Vendor** popup:
* **Vendor Name** — the display name for the vendor. Must be unique; a duplicate throws an error.
* **Vendor Type** — restricted to **Dropship**.
* **User Email to Invite** — the email address that will receive the invitation. Must be unique; a duplicate throws an error. This becomes the vendor's primary admin login on registration.
3. Click **Send Invite**.
 The recipient receives an email with a Join Now link that takes them to the Confirm Invitation page. The vendor appears in the listing immediately with the status Onboarding In Progress.
Activation requirements: Before the operator can mark a vendor as Active, two conditions must be met: at least one item mapping must exist for the vendor, and the vendor's Primary Contact must be on record (captured by the vendor in onboarding Step 1).
### **Review Vendor Documents**
The vendor uploads compliance documents during onboarding Step 3 (Business Verification). On the operator side, those documents arrive on the Documents tab of the vendor record for review.
1. From the Vendor Management listing, click a vendor's name to open their record.
2. Click the **Documents** tab. You will see every document the vendor has uploaded, with its required/optional flag and a status (Pending Approval, Approved, Rejected, or Not Uploaded).
The recipient receives an email with a Join Now link that takes them to the Confirm Invitation page. The vendor appears in the listing immediately with the status Onboarding In Progress.
Activation requirements: Before the operator can mark a vendor as Active, two conditions must be met: at least one item mapping must exist for the vendor, and the vendor's Primary Contact must be on record (captured by the vendor in onboarding Step 1).
### **Review Vendor Documents**
The vendor uploads compliance documents during onboarding Step 3 (Business Verification). On the operator side, those documents arrive on the Documents tab of the vendor record for review.
1. From the Vendor Management listing, click a vendor's name to open their record.
2. Click the **Documents** tab. You will see every document the vendor has uploaded, with its required/optional flag and a status (Pending Approval, Approved, Rejected, or Not Uploaded).
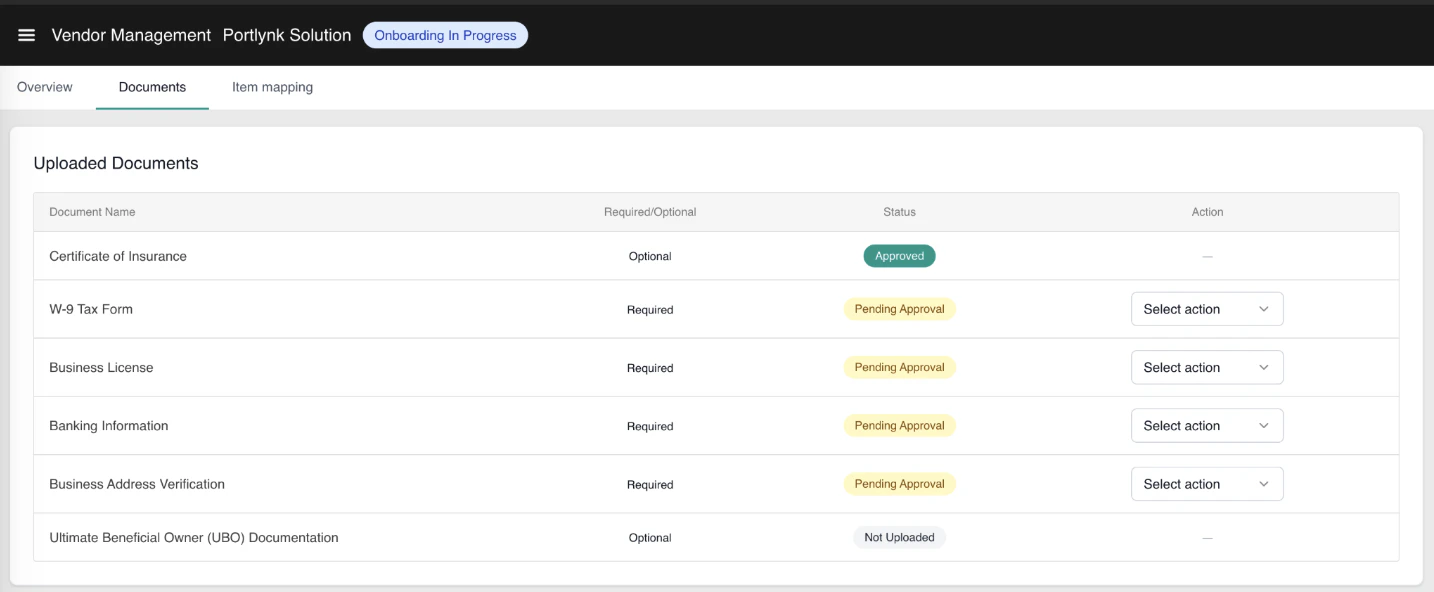 3. Open the document by clicking the eye/view icon, then choose an action:
* **Approve** — marks the document as Approved. No further input required.
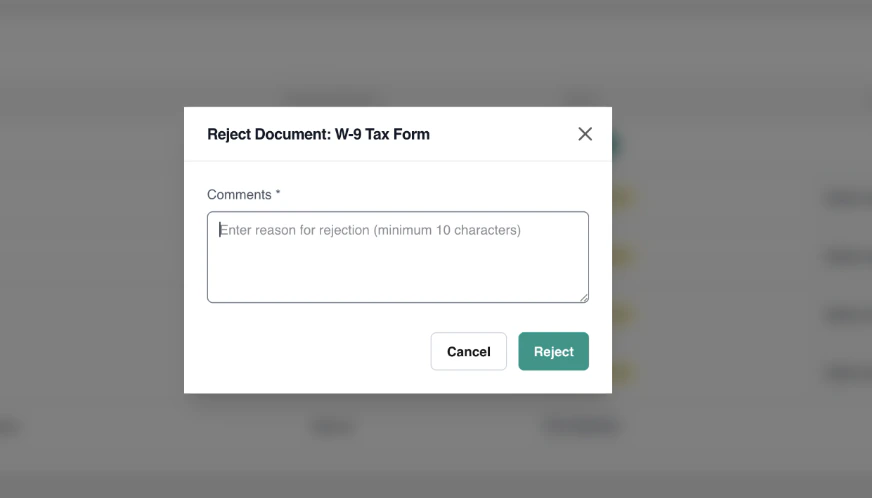
* **Reject** — opens a Reject Document popup. Enter a comment of at least 10 characters explaining the rejection. The reason will be surfaced to the vendor in red on their onboarding screen so they can re-upload.
3. Open the document by clicking the eye/view icon, then choose an action:
* **Approve** — marks the document as Approved. No further input required.
* **Reject** — opens a Reject Document popup. Enter a comment of at least 10 characters explaining the rejection. The reason will be surfaced to the vendor in red on their onboarding screen so they can re-upload.
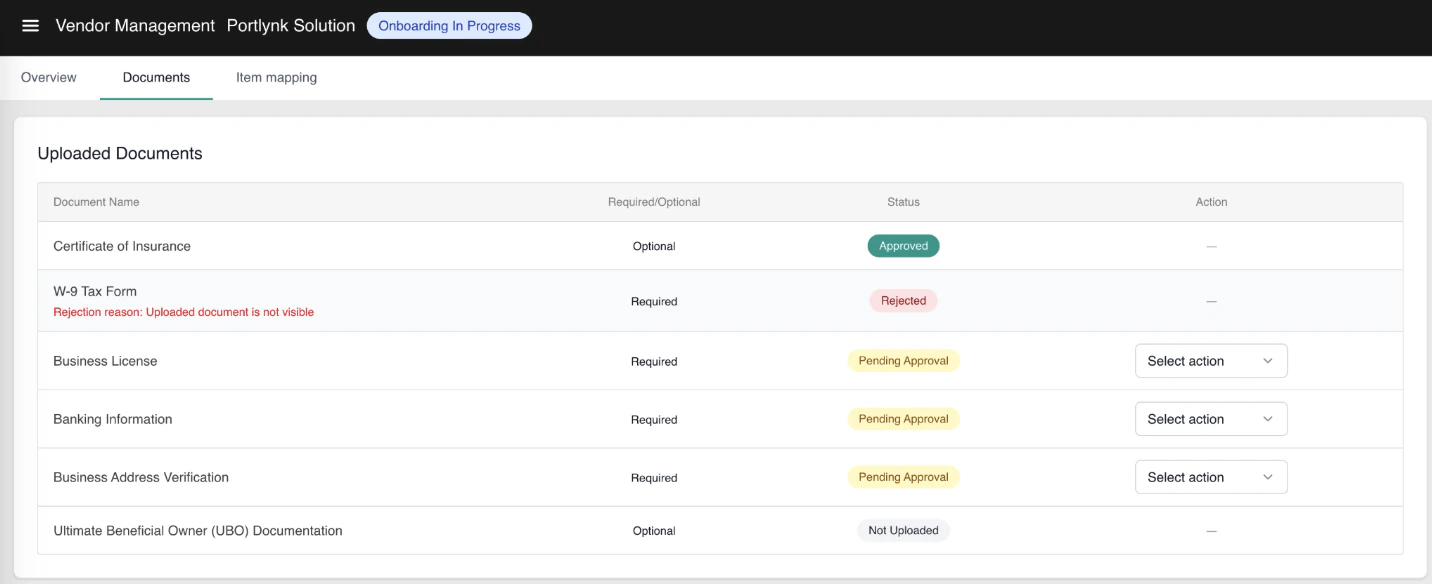
 4. After rejection the document's row displays the rejection reason below the document title and the vendor is prompted to re-upload.
 **Note:** The set of documents the vendor sees is configurable on the Operator Portal — operators define which documents are required vs. optional and can customize document titles.
### **Map Items and Set Contracted Prices**
Item mapping links the operator's catalog products (by UPC) to the vendor's internal SKUs and captures the contract-level cost the operator will pay the vendor per unit. At least one mapping must exist before a vendor can be marked Active.
**Note:** The vendor catalog needs to already exist within the Kibo system.
1. On the vendor record, click the **Item Mapping** tab. The first time you open this tab the table is empty.
**Note:** The set of documents the vendor sees is configurable on the Operator Portal — operators define which documents are required vs. optional and can customize document titles.
### **Map Items and Set Contracted Prices**
Item mapping links the operator's catalog products (by UPC) to the vendor's internal SKUs and captures the contract-level cost the operator will pay the vendor per unit. At least one mapping must exist before a vendor can be marked Active.
**Note:** The vendor catalog needs to already exist within the Kibo system.
1. On the vendor record, click the **Item Mapping** tab. The first time you open this tab the table is empty.
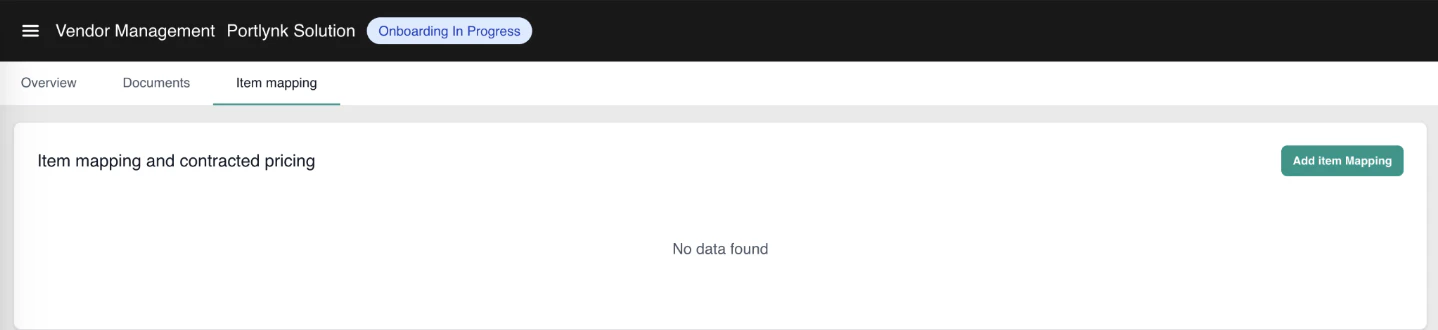 2. Click **Add Item Mapping** in the top-right.
3. In the popup, fill in:
* **UPC** — the operator's Universal Product Code that identifies the catalog product.
* **Vendor SKU** — the vendor's internal stock-keeping unit for the same physical product.
* **Contracted Price** — the negotiated unit cost the operator will pay the vendor. This is the price displayed on the vendor's order items and on the resulting invoice — distinct from the storefront selling price the customer sees.
2. Click **Add Item Mapping** in the top-right.
3. In the popup, fill in:
* **UPC** — the operator's Universal Product Code that identifies the catalog product.
* **Vendor SKU** — the vendor's internal stock-keeping unit for the same physical product.
* **Contracted Price** — the negotiated unit cost the operator will pay the vendor. This is the price displayed on the vendor's order items and on the resulting invoice — distinct from the storefront selling price the customer sees.
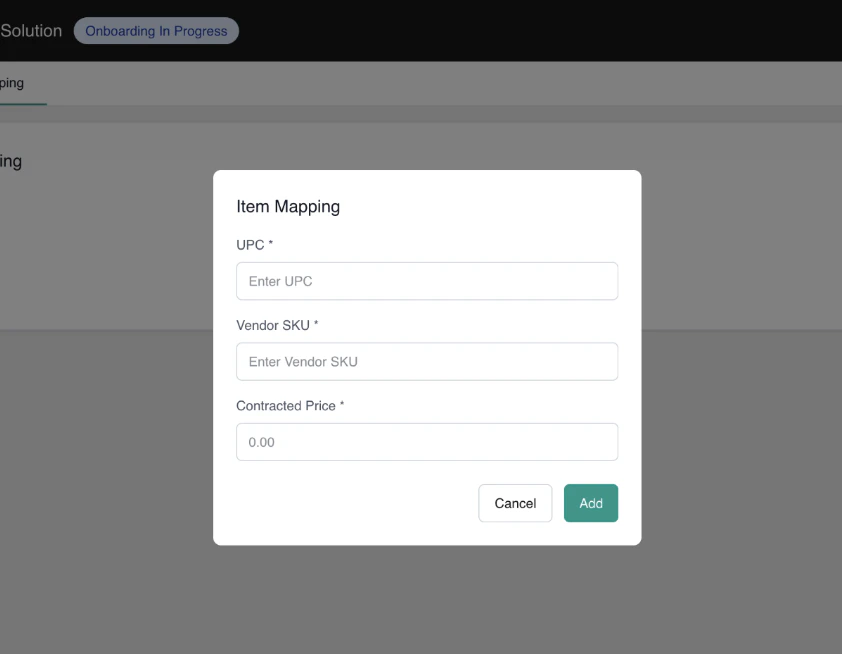 4. Click **Add** to save.
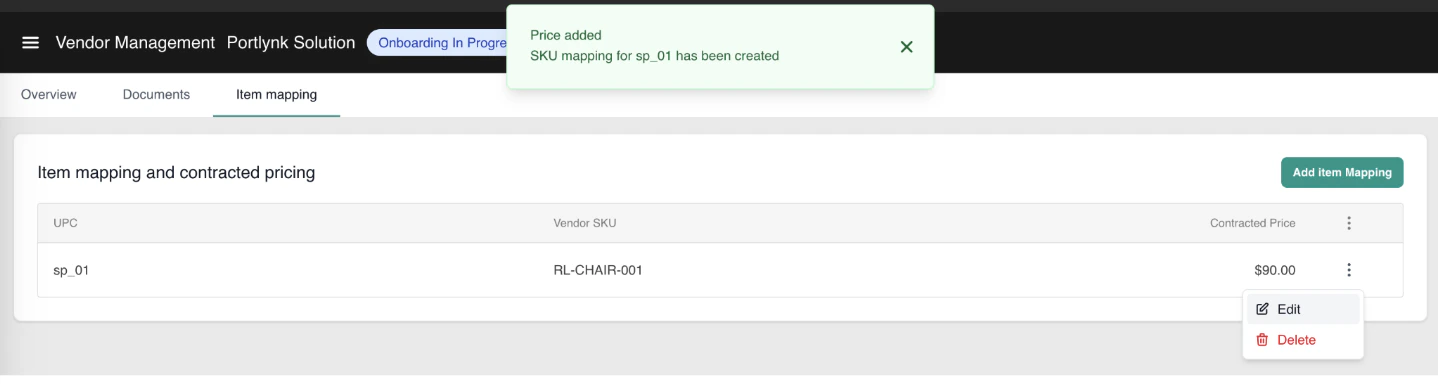
5. The mapping appears in the table, showing UPC, Vendor SKU, and Contracted Price. Use the action menu on each row to **Edit** or **Delete** an existing mapping.
4. Click **Add** to save.
5. The mapping appears in the table, showing UPC, Vendor SKU, and Contracted Price. Use the action menu on each row to **Edit** or **Delete** an existing mapping.
 ### **Map Fulfillment Locations to a Vendor**
The **Mapped Locations** section on the vendor's **Overview** tab (below Vendor Settings) is the single place to control where a vendor fulfills from. It lists every location the vendor can fulfill from, with a running count ("Locations this vendor can fulfill from. X mapped."), showing each location's Name, Code, Address, and Type. The relationship is **bidirectional**: locations you map here appear in the vendor's portal automatically, and locations the vendor creates in their portal appear here automatically — no approval step in either direction.
#### **Add a Location**
1. On the vendor's **Overview** tab, find the **Mapped Locations** section and click **+ Add Location**. *\[screenshot needed]*
2. In the Add Location modal, search by name, code, city, or type, or use **Select all**. Locations already mapped are greyed out and cannot be added twice.
3. Select one or more locations and click **Add**. The mapping takes effect immediately — the locations appear in the table and in the vendor's portal at once.
#### **Remove a Location**
1. Click the delete icon on a location row and choose **Remove**.
2. Confirm in the popup.
If no locations are mapped, the section shows an empty state with **+ Add Location** still available — useful for pre-assigning a vendor's footprint during onboarding, before any order flows.
### **Activate or Deactivate a Vendor**
Once at least one item mapping exists and the vendor's Primary Contact phone number is on file, you can activate the vendor.
1. On the vendor record, click the **Overview** tab.
2. Scroll to **Vendor Settings**.
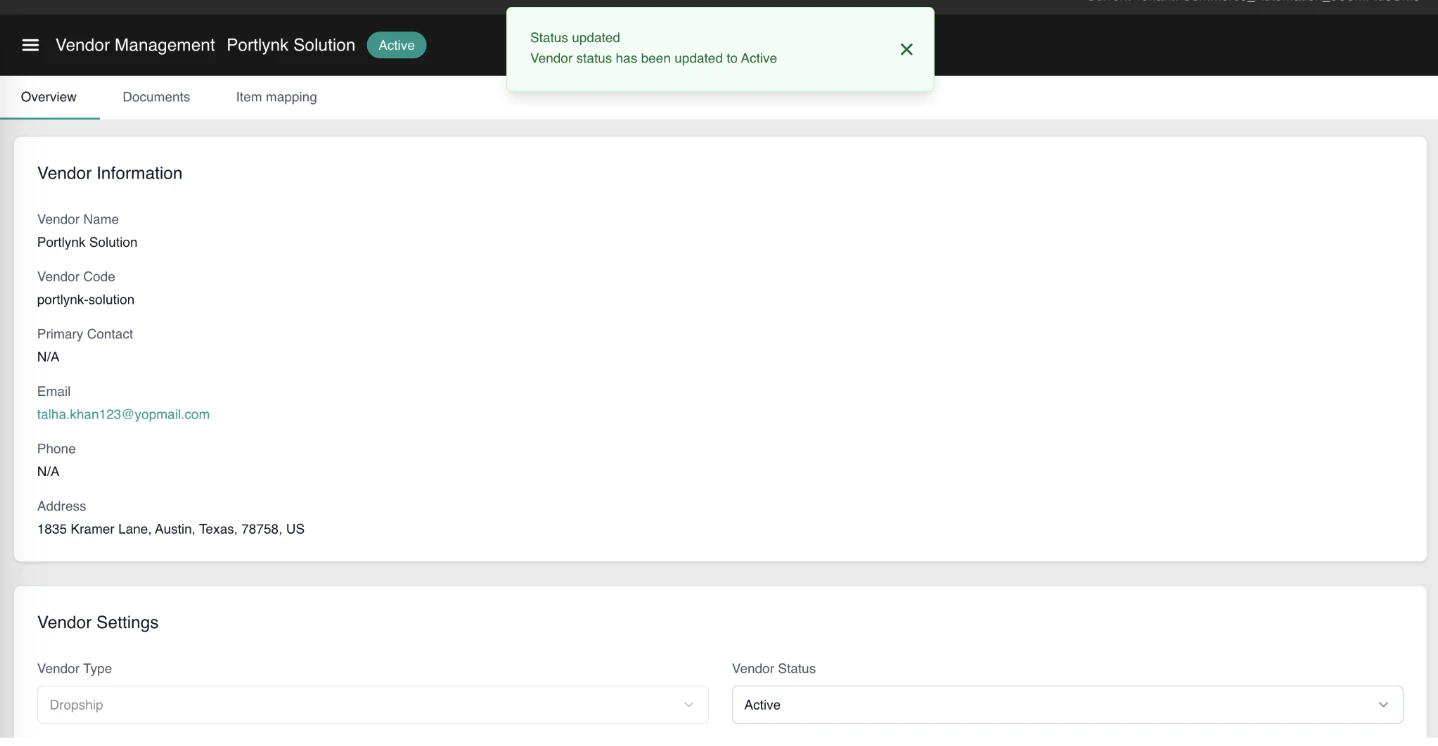
3. Change **Vendor Status** from Onboarding In Progress to **Active** and confirm. A toast appears confirming the status change, and the status badge in the page header updates to Active.
### **Map Fulfillment Locations to a Vendor**
The **Mapped Locations** section on the vendor's **Overview** tab (below Vendor Settings) is the single place to control where a vendor fulfills from. It lists every location the vendor can fulfill from, with a running count ("Locations this vendor can fulfill from. X mapped."), showing each location's Name, Code, Address, and Type. The relationship is **bidirectional**: locations you map here appear in the vendor's portal automatically, and locations the vendor creates in their portal appear here automatically — no approval step in either direction.
#### **Add a Location**
1. On the vendor's **Overview** tab, find the **Mapped Locations** section and click **+ Add Location**. *\[screenshot needed]*
2. In the Add Location modal, search by name, code, city, or type, or use **Select all**. Locations already mapped are greyed out and cannot be added twice.
3. Select one or more locations and click **Add**. The mapping takes effect immediately — the locations appear in the table and in the vendor's portal at once.
#### **Remove a Location**
1. Click the delete icon on a location row and choose **Remove**.
2. Confirm in the popup.
If no locations are mapped, the section shows an empty state with **+ Add Location** still available — useful for pre-assigning a vendor's footprint during onboarding, before any order flows.
### **Activate or Deactivate a Vendor**
Once at least one item mapping exists and the vendor's Primary Contact phone number is on file, you can activate the vendor.
1. On the vendor record, click the **Overview** tab.
2. Scroll to **Vendor Settings**.
3. Change **Vendor Status** from Onboarding In Progress to **Active** and confirm. A toast appears confirming the status change, and the status badge in the page header updates to Active.
 \
From this point onward, orders routed to the vendor's locations will flow through the Dropship fulfillment workflow. To deactivate a vendor, repeat the steps above and set the status to Inactive
**Note:** The dropship location group with its workflow assignment must also exist before activation, or vendor fulfillment will not route correctly. See Configure Dropship for the platform setup.
\
From this point onward, orders routed to the vendor's locations will flow through the Dropship fulfillment workflow. To deactivate a vendor, repeat the steps above and set the status to Inactive
**Note:** The dropship location group with its workflow assignment must also exist before activation, or vendor fulfillment will not route correctly. See Configure Dropship for the platform setup.